The linux command 之存储媒介
一、常用的命令
- mount:挂载文件系统
- unmount:卸载文件系统
- fdisk:硬盘分区命令
- fdformat:格式化软盘
- fsck:检查和修复文件系统
- mkfs:创建文件系统
- dd:转换和拷贝一个文件
- genisoimage(mkisofs):创建一个ISO 9660映象文件
- wodim(cdrecord):向光存储介质中写入数据
- md5sum:计算MD5校验码
二、挂载、卸载存储设备
挂载:将该设备添加到文件树中,从而允许操作系统可以操作该设备,这个过程称为挂载。
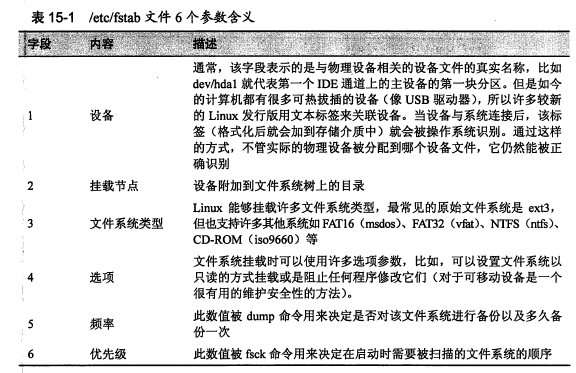
/etc/fstab 文件列出了系统启动时挂载的设备。
使用mount命令,查看已经挂载的文件系统列表。

列表的格式是:device on mount_point type filesystem_type(options)
/dev/sda2 on / type ext4 (rw)
以上表示dev/sda2设备挂载在根目录下,可读写.
首先切换到超级用户,再使用(umount)命令卸载设备。
[me@linuxbox ~]$ su -

Password:

[root@linuxbox ~]# umount /dev/sdc
然后为设备创建一个新的挂载节点,挂载节点仅仅是文件系统上的某个目录。
[root@linuxbox ~]# mkdir /mnt/cdrom
使用 -t 选项指定文件系统类型:
[root@linuxbox ~]# mount -t iso9660 /dev/sdc /mnt/cdrom
通过新建的挂载节点访问CD光盘的内容:
 [root@linuxbox ~]# cd /mnt/cdrom

 [root@linuxbox cdrom]# ls
然后将目录切换到挂载节点以外的地方,卸载光盘:
 [root@linuxbox cdrom]# cd

 [root@linuxbox ~]# umount /dev/sdc
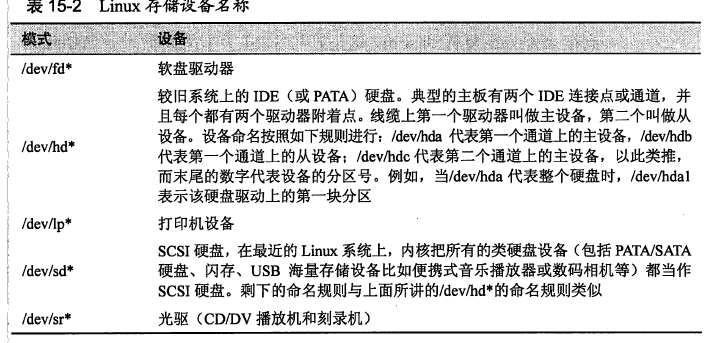
经过上述操作,我们还需要确定设备的名称:
二、创建新的文件系统
使用fdisk命令进行磁盘分区,fdisk命令实现用户与磁盘设备进行较低层次的直接交互,该工具可以用来编辑、删除、创建设备分区。
 [me@linuxbox ~]$ sudo umount /dev/sdb1

 [me@linuxbox ~]$ sudo fdisk /dev/sdb
然后输入m:
 Command action

 a toggle a bootable flag

 b edit bsd disklabel

 c toggle the dos compatibility flag

 d delete a partition

 l list known partition types

 m print this menu

 n add a new partition

 o create a new empty DOS partition table

 p print the partition table

 q quit without saving changes

 s create a new empty Sun disklabel

 t change a partition's system id

 u change display/entry units

 v verify the partition table

 w write table to disk and exit

 x extra functionality (experts only)

 Command (m for help):
使用p可以显示设备的分区表:
 Command (m for help): p

 Disk /dev/sdb:  MB,  bytes

  heads,  sectors/track,  cylinders

 Units = cylinders of  *  =  bytes

 Device Boot Start End Blocks Id System

 /dev/sdb1   + b W95 FAT32
未完待续....
The linux command 之存储媒介的更多相关文章
- 《The Linux Command Line》 读书笔记01 基本命令介绍
<The Linux Command Line> 读书笔记01 基本命令介绍 1. What is the Shell? The Shell is a program that takes ...
- Linux Command Line 解析
Linux Command Line 解析 0 处理模型 Linux kernel的启动包括很多组件的初始化和相关配置,这些配置参数一般是通过command line进行配置的.在进行后续分析之前,先 ...
- 《The Linux Command Line》 读书笔记04 Linux用户以及权限相关命令
Linux用户以及权限相关命令 查看身份 id:Display user identity. 这个命令的输出会显示uid,gid和用户所属的组. uid即user ID,这是账户创建时被赋予的. gi ...
- 《The Linux Command Line》 读书笔记02 关于命令的命令
<The Linux Command Line> 读书笔记02 关于命令的命令 命令的四种类型 type type—Indicate how a command name is inter ...
- Linux Command Line Basics
Most of this note comes from the Beginning the Linux Command Line, Second Edition by Sander van Vugt ...
- 15 Examples To Master Linux Command Line History
When you are using Linux command line frequently, using the history effectively can be a major produ ...
- 10 Interesting Linux Command Line Tricks and Tips Worth Knowing
I passionately enjoy working with commands as they offer more control over a Linux system than GUIs( ...
- linux高级数据存储
linux内此存储模式由5部分组成,自低向上的顺序: 物理卷,内核块设备驱动,内核文件系统驱动,虚拟文件系统,应用程序数据结构; 系统中所有的文件仅按此模式存储,无论是数据还是元数据,均在此模式下统一 ...
- Reso | The Linux Command Line 的中文版
http://book.haoduoshipin.com/tlcl/book/zh/ 本书是 The Linux Command Line 的中文版, 为大家提供了多种不同的阅读方式. 中英文双语版- ...
随机推荐
- 十、 shell基础
shell的表现形式: history -c 清空历史命令(清空缓存;默认:1000条) -w 将缓存中的历史命令保存到配置文件中 ~/.bash_history 永久保存历史命令(默认:1000条) ...
- 通过字体代替图片优化,如何使用Font Awesome字体图标?
博客搬迁,给你带来的不便敬请谅解! http://www.suanliutudousi.com/2017/10/17/%E9%80%9A%E8%BF%87%E5%AD%97%E4%BD%93%E4%B ...
- Linux 安装 python3.6
Linux下安装Python3.6和第三方库 如果本机安装了python2,尽量不要管他,使用python3运行python脚本就好,因为可能有程序依赖目前的python2环境, 比如yum!!! ...
- 初识 flex 布局
开启弹性盒模式: display:flex / inline-flex: inline-flex 行内弹性盒 1.设置 flex 缩放的 限定值 min-width 最小值 min-wi ...
- HttpURLConnection模拟登录学校的正方教务系统
教务系统登录界面 如图1-1 1-1 F12-->network查看登录教务系统需要参数: __VIEWSTAT txtUserName TextBox2 txtSecretCode Radio ...
- WXSS学习
<view class='container'> <button type='default'>测试</button> <button type='defau ...
- XOR linked list--- 异或链表
异或链表的结构 这是一个数据结构.利用计算机的的位异或操作(⊕),来降低双向链表的存储需求. ... A B C D E ... –> next –> next –> next –& ...
- C—变量—register
Tips 1.寄存器变量可以用来优化加速c语言程序 2.声名只需在类型前多加register 即可,eg register int quick; (quick 就是一个整形的寄存器变量) 3.regi ...
- spark-sql中的分析函数的使用
分析函数的应用场景: (1)用于分组后组内排序 (2)指定计算范围 (3)Top N (4)累加计算 (5)层次计算 分析函数的一般语法: 分析函数的语法结构一般是: 分析函数名(参数) over ...
- 51. TreeSet
集合分类:-------------------| Collection 单列集合的根接口 ---------------| List 如果实现了List接口的集合类,具备的特点是:有序,可重复- ...