
SpringMVC详解(三)------基于注解的入门实例
前两篇博客我们讲解了基于XML 的入门实例,以及SpringMVC运行的详细流程。但是我们发现基于 XML 的配置还是比较麻烦的,而且,每个 Handler 类只能有一个方法,在实际开发中肯定是不可能这样来进行开发的。那么这篇博客我们就讲解实际开发中用的最多的基于注解配置的SpringMVC配置。
本篇博客源码下载链接:http://pan.baidu.com/s/1dESLgv3 密码:vkuy
项目结构为:
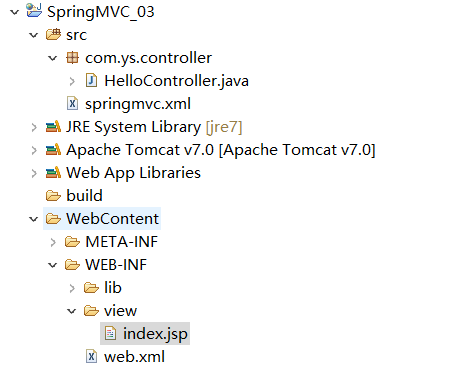
1、在 web.xml 文件中配置前端处理器
<?xml version="1.0" encoding="UTF-8"?>

<web-app xmlns:xsi="http://www.w3.org/2001/XMLSchema-instance"

	 xmlns="http://java.sun.com/xml/ns/javaee"

	 xsi:schemaLocation="http://java.sun.com/xml/ns/javaee

	 http://java.sun.com/xml/ns/javaee/web-app_3_0.xsd" id="WebApp_ID" version="3.0">

  <display-name>SpringMVC_01</display-name>

  <!-- 配置前端控制器DispatcherServlet -->

  <servlet>

    <servlet-name>springmvc</servlet-name>

    <servlet-class>org.springframework.web.servlet.DispatcherServlet</servlet-class>

    <!--springmvc.xml 是自己创建的SpringMVC全局配置文件,用contextConfigLocation作为参数名来加载

    	如果不配置 contextConfigLocation,那么默认加载的是/WEB-INF/servlet名称-servlet.xml,在这里也就是 springmvc-servlet.xml

      -->

    <init-param>

        <param-name>contextConfigLocation</param-name>

        <param-value>classpath:springmvc.xml</param-value>

    </init-param>

  </servlet>

  <servlet-mapping>

    <servlet-name>springmvc</servlet-name>

    <!--第一种配置:*.do,还可以写*.action等等,表示以.do结尾的或者以.action结尾的URL都由前端控制器DispatcherServlet来解析

    	第二种配置:/,所有访问的 URL 都由DispatcherServlet来解析,但是这里最好配置静态文件不由DispatcherServlet来解析

    	错误配置:/*,注意这里是不能这样配置的,应为如果这样写,最后转发到 jsp 页面的时候,仍然会由DispatcherServlet进行解析,

    				而这时候会找不到对应的Handler,从而报错!!!

      -->

    <url-pattern>/</url-pattern>

  </servlet-mapping>

</web-app>
2、在 springmvc.xml 文件中配置处理器映射器,处理器适配器,视图解析器
<?xml version="1.0" encoding="UTF-8"?>

<beans xmlns="http://www.springframework.org/schema/beans"

       xmlns:xsi="http://www.w3.org/2001/XMLSchema-instance"

       xmlns:mvc="http://www.springframework.org/schema/mvc"

       xmlns:context="http://www.springframework.org/schema/context"

       xmlns:aop="http://www.springframework.org/schema/aop"

       xmlns:tx="http://www.springframework.org/schema/tx"

       xsi:schemaLocation="http://www.springframework.org/schema/beans

        http://www.springframework.org/schema/beans/spring-beans-4.2.xsd

        http://www.springframework.org/schema/mvc

        http://www.springframework.org/schema/mvc/spring-mvc-4.2.xsd

        http://www.springframework.org/schema/context

        http://www.springframework.org/schema/context/spring-context.xsd

        http://www.springframework.org/schema/aop

        http://www.springframework.org/schema/aop/spring-aop-4.2.xsd

        http://www.springframework.org/schema/tx

        http://www.springframework.org/schema/tx/spring-tx.xsd">

	<!--注解处理器映射器  -->

	<bean class="org.springframework.web.servlet.mvc.method.annotation.RequestMappingHandlerMapping"></bean>

	<!--注解处理器适配器  -->

	<bean class="org.springframework.web.servlet.mvc.method.annotation.RequestMappingHandlerAdapter"></bean>

	<!--使用mvc:annotation-driven可以代替上面的映射器和适配器

		这里面会默认加载很多参数绑定方法,比如json转换解析器就默认加载,所以优先使用下面的配置

	  -->

	<!-- <mvc:annotation-driven></mvc:annotation-driven> -->

	<!--单个配置Handler  -->

	<!-- <bean class="com.ys.controller.HelloController"></bean> -->

	<!--批量配置Handler,指定扫描的包全称  -->

	<context:component-scan base-package="com.ys.controller"></context:component-scan>

	<!--配置视图解析器  -->

	<bean class="org.springframework.web.servlet.view.InternalResourceViewResolver">

		<!-- 返回视图页面的前缀 -->

		<property name="prefix" value="/WEB-INF/view/"></property>

		<!-- 返回页面的后缀 -->

		<property name="suffix" value=".jsp"></property>

	</bean>

</beans>
3、编写 Handler
package com.ys.controller;

import org.springframework.stereotype.Controller;

import org.springframework.web.bind.annotation.RequestMapping;

import org.springframework.web.servlet.ModelAndView;

//使用@Controller注解表示这个类是一个Handler

@Controller

public class HelloController {

	//@RequestMapping注解括号里面的表示访问的URL

	@RequestMapping("hello")

	public ModelAndView hello(){

		ModelAndView modelView = new ModelAndView();

		//类似于 request.setAttribute()

		modelView.addObject("name","张三");

		//配置返回的视图名,由于我们在springmvc.xml中配置了前缀和后缀,这里直接写视图名就好

		modelView.setViewName("index");

		//modelView.setViewName("/WEB-INF/view/index.jsp");

		return modelView;

	}

}
注意@Controller注解和@RequestMapping注解的用法
4、编写 视图 index.jsp
<%@ page language="java" contentType="text/html; charset=UTF-8"

    pageEncoding="UTF-8"%>

<!DOCTYPE html PUBLIC "-//W3C//DTD HTML 4.01 Transitional//EN" "http://www.w3.org/TR/html4/loose.dtd">

<html>

<head>

<meta http-equiv="Content-Type" content="text/html; charset=UTF-8">

<title>Insert title here</title>

</head>

<body>

hello:${name}

</body>

</html>
5、在浏览器中输入:http://localhost:8080/SpringMVC_03/hello
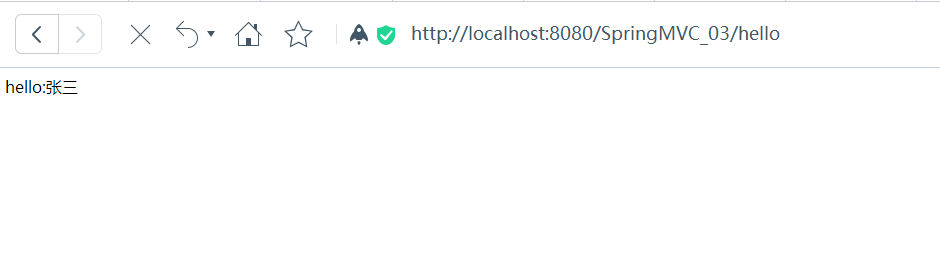
SpringMVC详解(三)------基于注解的入门实例的更多相关文章
- 转载 SpringMVC详解(三)------基于注解的入门实例
目录 1.在 web.xml 文件中配置前端处理器 2.在 springmvc.xml 文件中配置处理器映射器,处理器适配器,视图解析器 3.编写 Handler 4.编写 视图 index.jsp ...
- Mybatis(二)基于注解的入门实例
前言 上一篇简单的介绍了Mybatis的概念和基于XML来实现数据库的CRUD,这篇给大家实现基于注解的CRUD. 一.初始搭建 在基于注解当中前四步和上一篇基于XML是一样的,分别是: 1)创建数据 ...
- SpringMVC详解一、@RequestMapping注解与Controller接收参数
SpringMVC详解一.@RequestMapping注解与Controller接收参数 https://blog.csdn.net/mxcsdn/article/details/80719258 ...
- 第5章—构建Spring Web应用程序—SpringMVC详解
SpringMVC详解 5.1.跟踪Springmvc的请求 SpringMVC的核心流程如下: 具体步骤: 第一步:发起请求到前端控制器(DispatcherServlet) 第二步:前端控制器请求 ...
- Comet技术详解:基于HTTP长连接的Web端实时通信技术
前言 一般来说,Web端即时通讯技术因受限于浏览器的设计限制,一直以来实现起来并不容易,主流的Web端即时通讯方案大致有4种:传统Ajax短轮询.Comet技术.WebSocket技术.SSE(Ser ...
- SpringMVC详解------参数绑定
SpringMVC详解------参数绑定 转载于:https://blog.csdn.net/swebin/article/details/92795422 目录 1.SpringMVC 参数绑定 ...
- ViewPager 详解(一)---基本入门
前言:这两天研究研究ViewPager滚动功能,现在很多的app都有用到这个功能,我们的大虾米也有这个模块.要研究就彻底的研究研究,我从不满足于一个功能只是简单的应用,要学就学的彻底,所以我打算将Vi ...
- Android 之窗口小部件详解(三) 部分转载
原文地址:http://blog.csdn.net/iefreer/article/details/4626274. (一) 应用程序窗口小部件App Widgets 应用程序窗口小部件(Widget ...
- WebSocket安卓客户端实现详解(三)–服务端主动通知
WebSocket安卓客户端实现详解(三)–服务端主动通知 本篇依旧是接着上一篇继续扩展,还没看过之前博客的小伙伴,这里附上前几篇地址 WebSocket安卓客户端实现详解(一)–连接建立与重连 We ...
随机推荐
- # nodejs模块学习: express 解析
# nodejs模块学习: express 解析 nodejs 发展很快,从 npm 上面的包托管数量就可以看出来.不过从另一方面来看,也是反映了 nodejs 的基础不稳固,需要开发者创造大量的轮子 ...
- 【干货】Chrome插件(扩展)开发全攻略(不点进来看看你肯定后悔)
写在前面 我花了将近一个多月的时间断断续续写下这篇博文,并精心写下完整demo,写博客的辛苦大家懂的,所以转载务必保留出处.本文所有涉及到的大部分代码均在这个demo里面:https://github ...
- Andorid源码系列:View的onTouchEvent()与performClick(),performLongClick()调用时机解析
这是大土豆的第一篇博客,想着工作3年多了,在工作上从一名菜鸟逐渐成长为在项目中能干点事的人,自己对Android的见解也一步步加深,有必要写一些对Android代码和开发过程中的感悟,和广大朋友们分享 ...
- MongoDB 系列(一) C# 简易入门封装
之前写过一篇关于MongoDB的封装 发现太过繁琐 于是打算从新写一篇简易版 1:关于MongoDB的安装请自行百度,进行权限认证的时候有一个小坑,3.0之后授权认证方式默认的SCRAM-SHA-1模 ...
- UDP和多线程服务器
UDP: UDP是数据报文传输协议,这个传输协议比较野蛮,发送端不需要理会接收端是否存在,直接就发送数据,不会像TCP协议一样建立连接.如果接收端不存在的话,发送的数据就会丢失,UDP协议不会去理会数 ...
- Django源码学习 了解render与render_to_response
render与render_to_response def render_to_response(template_name, context=None, content_type=None, sta ...
- 将txt文档按行分割
昨天遇到了一个需求,需要将txt文档按行分割,并指定了行数, 最近在用python,就在网上搜了一下,在参考了http://blog.csdn.net/zhang_red/article/detail ...
- angularjs初窥门径
貌似angularjs出来之后网上各种夸angularjs的好黑jquery. angularjs大致可以分为几个板块:作用域,控制器,指令(主要),路由,依赖注入. 1 作用域 作用域在angula ...
- VMware虚拟机下Ubuntu连不上网解决
虚拟机:VMware® Workstation 12 Pro Ubuntu: 14.04 问题描述:电脑从公司拿到家打开Ubuntu之后,打开自带Firefox浏览器,显示连接不上网,终端下ping ...
- tensorflow l2_loss函数
1.l2_loss函数 tf.nn.l2_loss(t, name=None) 解释:这个函数的作用是利用 L2 范数来计算张量的误差值,但是没有开方并且只取 L2 范数的值的一半,具体如下: out ...