Flare-On4 解题复现
01
是一个 html 页面, 用开发者工具看看,发现是简单的 js 加密。
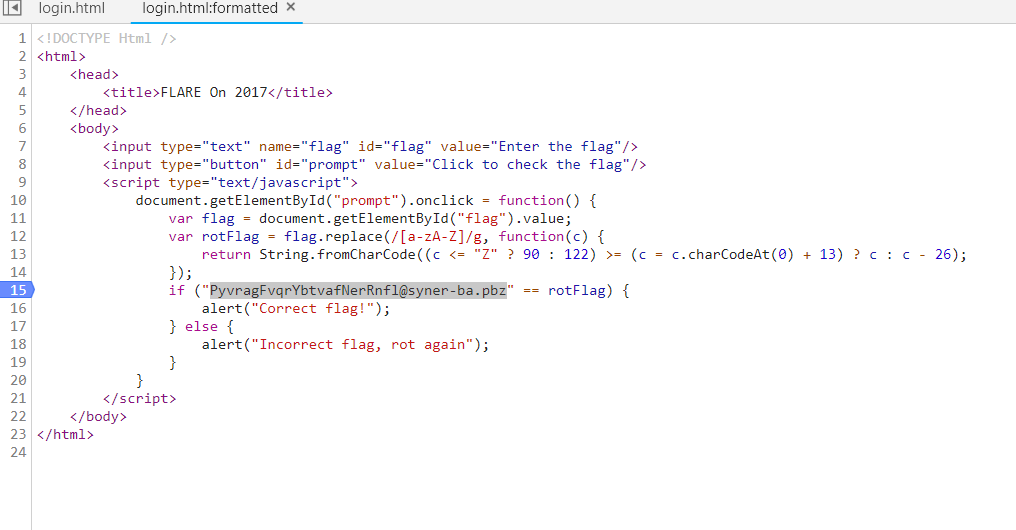
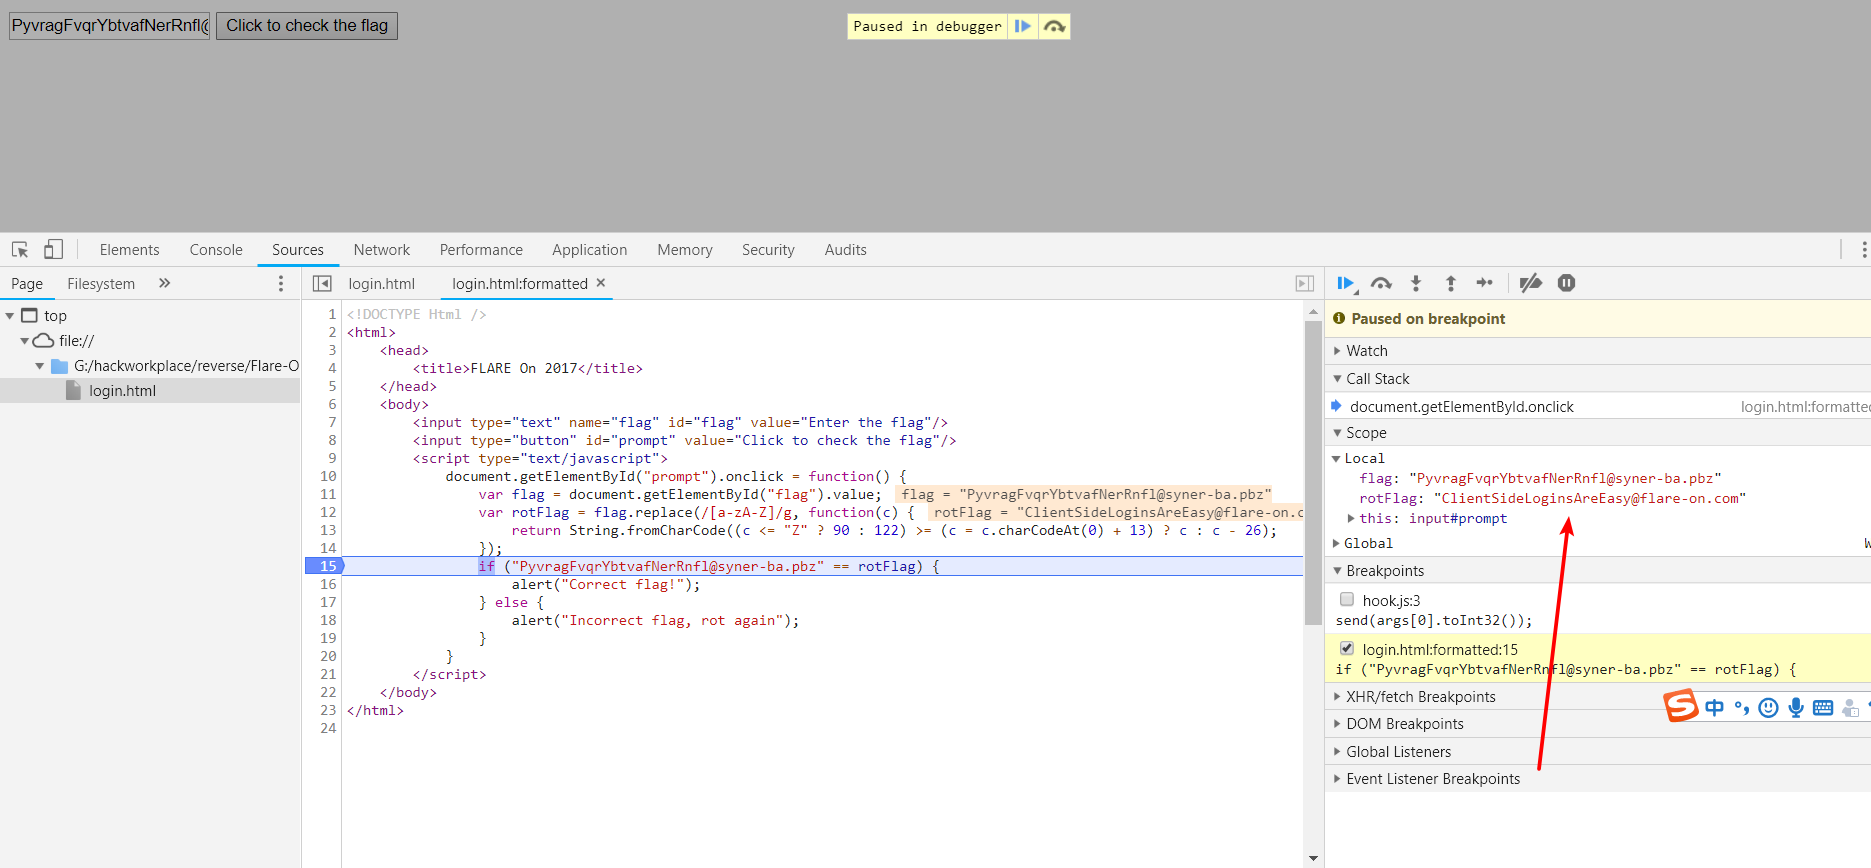
猜测加密算法可逆,试着用 PyvragFvqrYbtvafNerRnfl@syner-ba.pbz 作为输入,然后调试 ,得到 flag 为 ClientSideLoginsAreEasy@flare-on.com
02
程序逻辑如下
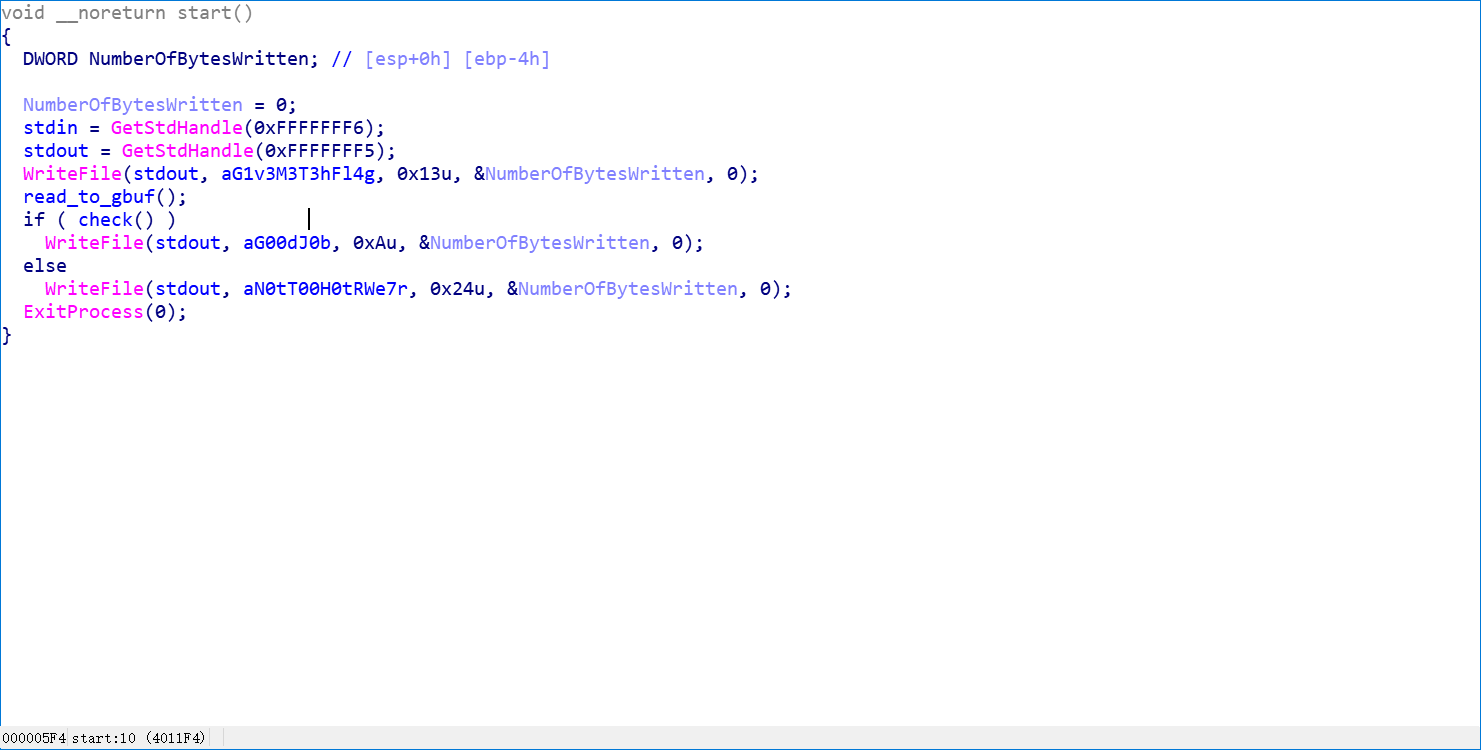
首先 获取输入, 然后 调用 check 进行判断, 下面分析 check 函数
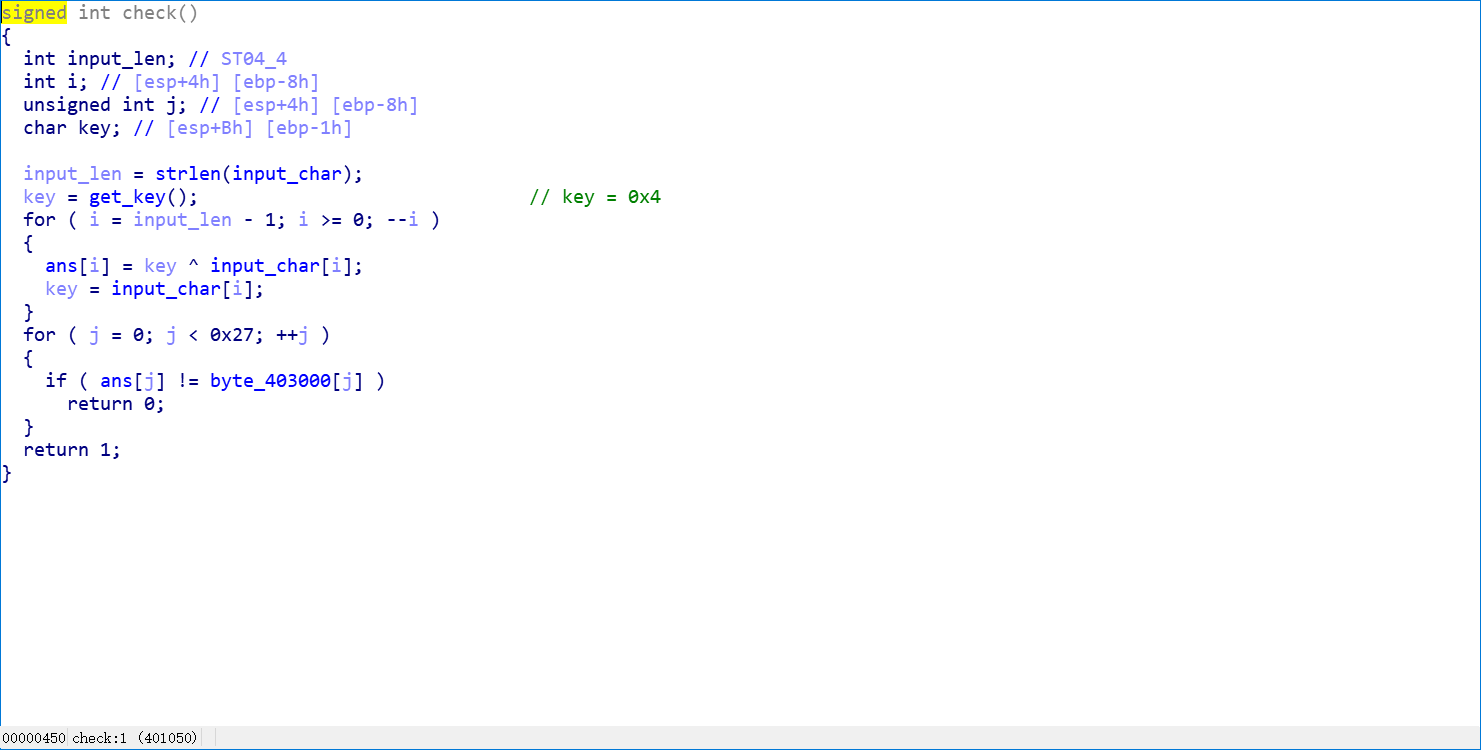
通过异或操作加密我们的输入, 首先获取一个固定的初始 key , 后面每一步 key 从输入中取,获取到密文后就和 程序中已有的密文做对比。
那么 flag 应该就是程序里面那段密文解密后的字符串, 对加密算法求反,写出解密的 idapython 脚本
import idc

encoded_data = get_bytes(0x403000, 0x27)

key = 0x4

flag = ""

i = 0x26

while i >= 0:

    key = ord(encoded_data[i])^key

    flag = chr(key) + flag

    i = i - 1

print flag
由于 key 是输入中来的,所以这里的 key 应该是解密后的数据。得出 flag 为
R_y0u_H0t_3n0ugH_t0_1gn1t3@flare-on.com
03
分析
程序首先监听 2222 端口,然后接收 4 个字节
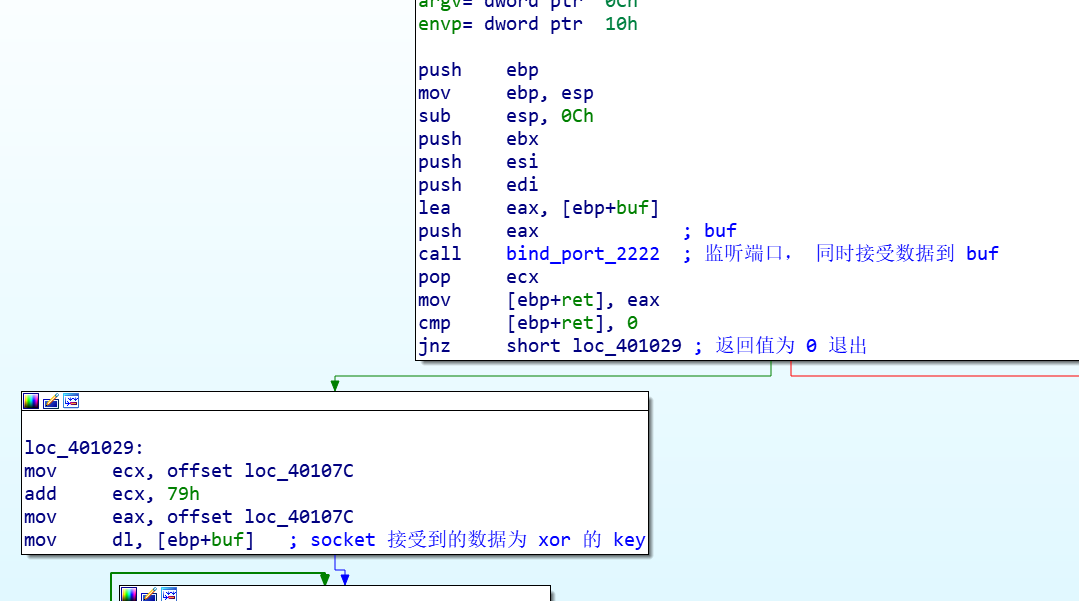
然后用刚接收的 4 个字节的其中一个字节作为 key , 对 0x40107C 开始的 0x79 字节的代码进行解密,然后校验解密后的数据,校验成功继续执行,如果不成功则退出。
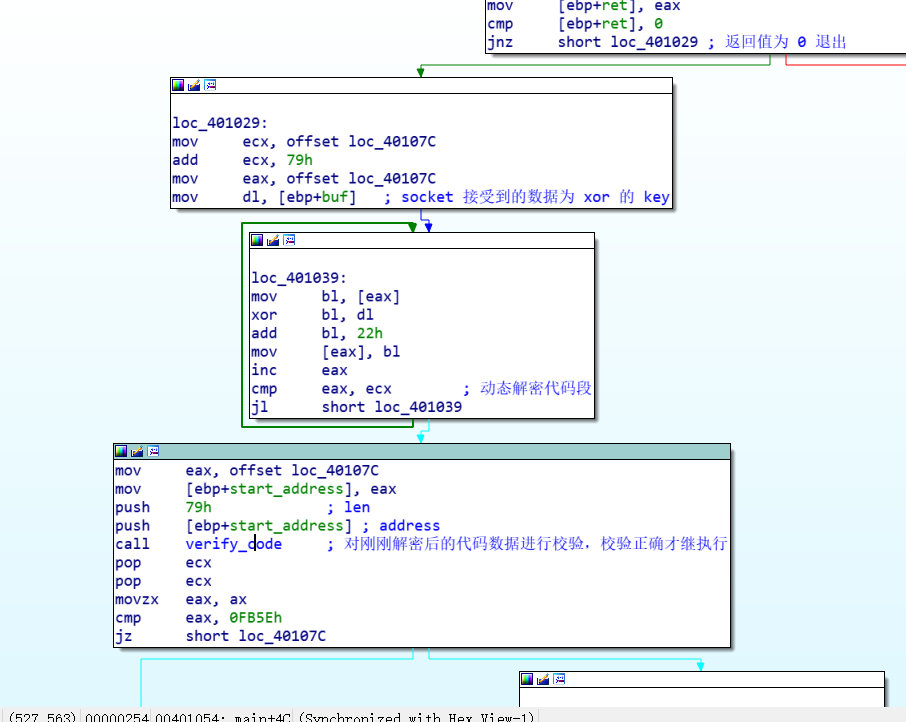
所以想要继续分析,首先得解出解密代码的 key , key 的大小为 1 个字节,255 中可能。爆破之即可。
解密
借助 unicorn
把解密逻辑用 python 实现, 然后把 校验解密结果的代码用 unicorn 模拟运行,然后整合一下爆破出正确的解密 key
import binascii

import struct

from unicorn import *

from unicorn.x86_const import *

def list_to_str(arr):

    res = ""

    for i in arr:

        res += chr(i)

    return res

verify_code = list_to_str([

    0x55, 0x8B, 0xEC, 0x51, 0x8B, 0x55, 0x0C, 0xB9, 0xFF, 0x00, 0x00, 0x00, 0x89, 0x4D, 0xFC, 0x85,

    0xD2, 0x74, 0x51, 0x53, 0x8B, 0x5D, 0x08, 0x56, 0x57, 0x6A, 0x14, 0x58, 0x66, 0x8B, 0x7D, 0xFC,

    0x3B, 0xD0, 0x8B, 0xF2, 0x0F, 0x47, 0xF0, 0x2B, 0xD6, 0x0F, 0xB6, 0x03, 0x66, 0x03, 0xF8, 0x66,

    0x89, 0x7D, 0xFC, 0x03, 0x4D, 0xFC, 0x43, 0x83, 0xEE, 0x01, 0x75, 0xED, 0x0F, 0xB6, 0x45, 0xFC,

    0x66, 0xC1, 0xEF, 0x08, 0x66, 0x03, 0xC7, 0x0F, 0xB7, 0xC0, 0x89, 0x45, 0xFC, 0x0F, 0xB6, 0xC1,

    0x66, 0xC1, 0xE9, 0x08, 0x66, 0x03, 0xC1, 0x0F, 0xB7, 0xC8, 0x6A, 0x14, 0x58, 0x85, 0xD2, 0x75,

    0xBB, 0x5F, 0x5E, 0x5B, 0x0F, 0xB6, 0x55, 0xFC, 0x8B, 0xC1, 0xC1, 0xE1, 0x08, 0x25, 0x00, 0xFF,

    0x00, 0x00, 0x03, 0xC1, 0x66, 0x8B, 0x4D, 0xFC, 0x66, 0xC1, 0xE9, 0x08, 0x66, 0x03, 0xD1, 0x66,

    0x0B, 0xC2, 0x8B, 0xE5, 0x5D

])

encoded_code = list_to_str(

    [0x33, 0xE1, 0xC4, 0x99, 0x11, 0x06, 0x81, 0x16, 0xF0, 0x32, 0x9F, 0xC4, 0x91, 0x17, 0x06, 0x81,

     0x14, 0xF0, 0x06, 0x81, 0x15, 0xF1, 0xC4, 0x91, 0x1A, 0x06, 0x81, 0x1B, 0xE2, 0x06, 0x81, 0x18,

     0xF2, 0x06, 0x81, 0x19, 0xF1, 0x06, 0x81, 0x1E, 0xF0, 0xC4, 0x99, 0x1F, 0xC4, 0x91, 0x1C, 0x06,

     0x81, 0x1D, 0xE6, 0x06, 0x81, 0x62, 0xEF, 0x06, 0x81, 0x63, 0xF2, 0x06, 0x81, 0x60, 0xE3, 0xC4,

     0x99, 0x61, 0x06, 0x81, 0x66, 0xBC, 0x06, 0x81, 0x67, 0xE6, 0x06, 0x81, 0x64, 0xE8, 0x06, 0x81,

     0x65, 0x9D, 0x06, 0x81, 0x6A, 0xF2, 0xC4, 0x99, 0x6B, 0x06, 0x81, 0x68, 0xA9, 0x06, 0x81, 0x69,

     0xEF, 0x06, 0x81, 0x6E, 0xEE, 0x06, 0x81, 0x6F, 0xAE, 0x06, 0x81, 0x6C, 0xE3, 0x06, 0x81, 0x6D,

     0xEF, 0x06, 0x81, 0x72, 0xE9, 0x06, 0x81, 0x73, 0x7C])

def decode_bytes(i):

    decoded_bytes = ""

    for byte in encoded_code:

        decoded_bytes += chr(((ord(byte) ^ i) + 0x22) & 0xFF)

    return decoded_bytes

def emulate_checksum(decoded_bytes):

    # establish memory addresses for checksum code, stack, and decoded bytes

    address = 0

    stack_addr = 0x10000

    dec_bytes_addr = 0x20000

    # write checksum code and decoded bytes into memory

    mu = Uc(UC_ARCH_X86, UC_MODE_32)

    mu.mem_map(address, 2 * 1024 * 1024)

    mu.mem_write(address, verify_code)

    mu.mem_write(dec_bytes_addr, decoded_bytes)

    # place the address of decoded bytes and size on the stack

    mu.reg_write(UC_X86_REG_ESP, stack_addr)

    mu.mem_write(stack_addr + 4, struct.pack('<I', dec_bytes_addr))   # arg1 , address

    mu.mem_write(stack_addr + 8, struct.pack('<I', 0x79))  # arg2 , len

    # emulate and read result in AX

    mu.emu_start(address, address + len(verify_code))

    checksum = mu.reg_read(UC_X86_REG_AX)

    return checksum

for i in range(256):

    checksum = emulate_checksum(decode_bytes(i))

    if checksum & 0xffff == 0xFB5E:

        print(hex(i))

        break`
其中 verify_code 不需要 ret 指令,因为我们只需要函数的返回值。
最后得到的 key 为 0xa2, 然后在调试的时候,设置正常的 key,解密代码后发现是一段复制语句,调试 得到 flag`
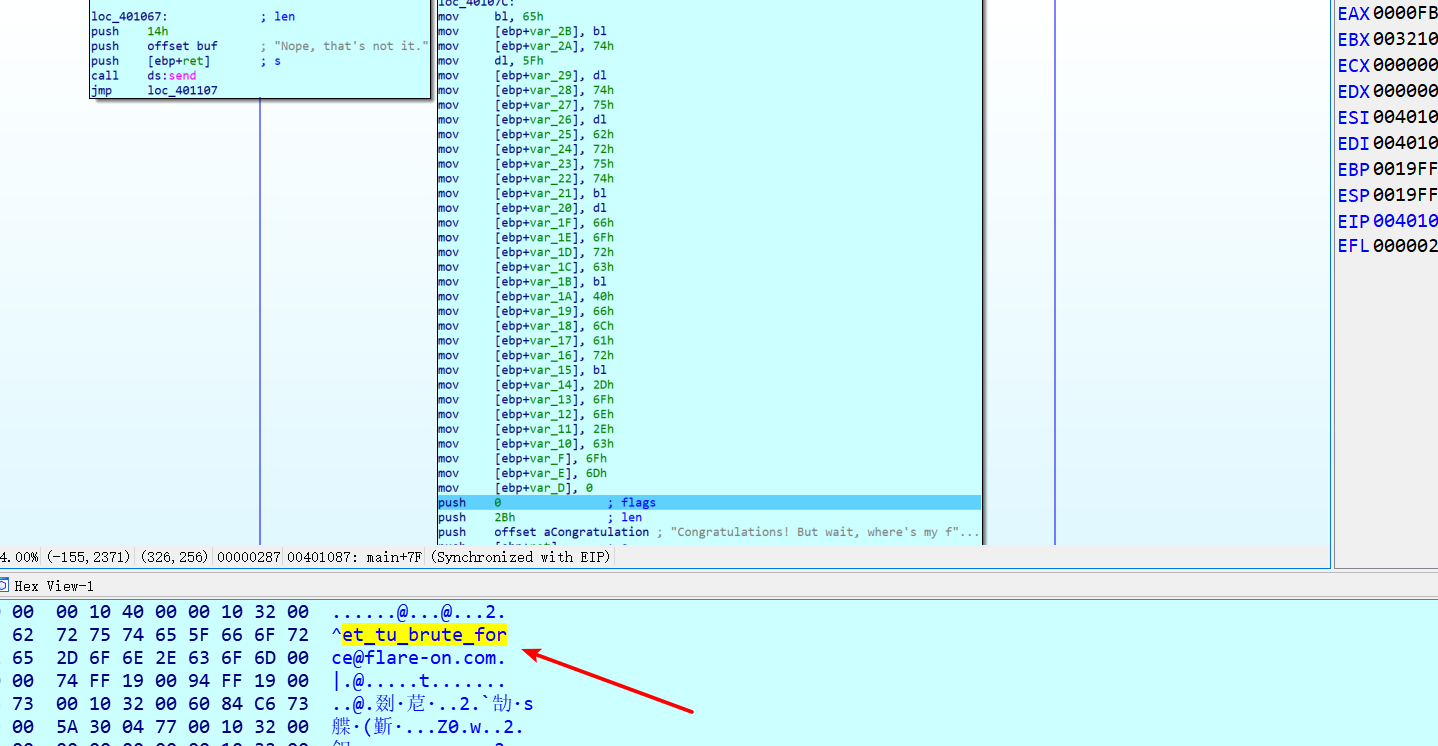
flag
et_tu_brute_force@flare-on.com
借助 frida
# -*- coding:utf-8 -*-

from __future__ import print_function

import frida

from time import sleep

retval = 0

is_ret = 0

def list_to_str(arr):

    res = ""

    for i in arr:

        res += chr(i)

    return res

def str_to_list(string):

    res = []

    for i in string:

        res.append(ord(i))

    return res

encoded_code_array = [0x33, 0xE1, 0xC4, 0x99, 0x11, 0x06, 0x81, 0x16, 0xF0, 0x32, 0x9F, 0xC4, 0x91, 0x17, 0x06, 0x81,

                      0x14, 0xF0, 0x06, 0x81, 0x15, 0xF1, 0xC4, 0x91, 0x1A, 0x06, 0x81, 0x1B, 0xE2, 0x06, 0x81, 0x18,

                      0xF2, 0x06, 0x81, 0x19, 0xF1, 0x06, 0x81, 0x1E, 0xF0, 0xC4, 0x99, 0x1F, 0xC4, 0x91, 0x1C, 0x06,

                      0x81, 0x1D, 0xE6, 0x06, 0x81, 0x62, 0xEF, 0x06, 0x81, 0x63, 0xF2, 0x06, 0x81, 0x60, 0xE3, 0xC4,

                      0x99, 0x61, 0x06, 0x81, 0x66, 0xBC, 0x06, 0x81, 0x67, 0xE6, 0x06, 0x81, 0x64, 0xE8, 0x06, 0x81,

                      0x65, 0x9D, 0x06, 0x81, 0x6A, 0xF2, 0xC4, 0x99, 0x6B, 0x06, 0x81, 0x68, 0xA9, 0x06, 0x81, 0x69,

                      0xEF, 0x06, 0x81, 0x6E, 0xEE, 0x06, 0x81, 0x6F, 0xAE, 0x06, 0x81, 0x6C, 0xE3, 0x06, 0x81, 0x6D,

                      0xEF, 0x06, 0x81, 0x72, 0xE9, 0x06, 0x81, 0x73, 0x7C]

encoded_code = list_to_str(encoded_code_array)

def on_message(message, data):

    global retval,is_ret

    retval = message['payload']

    is_ret = 1

def decode_bytes(i):

    decoded_bytes = ""

    for byte in encoded_code:

        decoded_bytes += chr(((ord(byte) ^ i) + 0x22) & 0xFF)

    return decoded_bytes

def main():

    global retval, is_ret

    session = frida.attach("greek_to_me.exe")

    for i in range(256):

        script = session.create_script("""

            var verify_code = ptr('0x4011E6');

            var f = new NativeFunction(verify_code, 'int', ['pointer', 'int']);

            var save_address = ptr('0x40107C');

            Memory.writeByteArray(save_address, {})

            send(f(save_address, 121));

        """.format(str_to_list(decode_bytes(i))))

        script.on('message', on_message)

        script.load()

        while is_ret != 1:  # 等待远程函数执行完

            sleep(0.2)

        is_ret = 0

        if retval & 0xffff == 0xFB5E:

            print(hex(i))

            break

    session.detach()

if __name__ == '__main__':

    main()
每次解密code后,直接用 frida 调用进程里面的校验函数,通过这样可以爆破出 key
最后附一个导出光标所在函数的二进制代码的 idapython 脚本
import idaapi

def list_to_str(arr):

    res = ""

    for i in arr:

        res += chr(i)

    return res

def str_to_list(string):

    res = []

    for i in string:

        res.append(ord(i))

    return res

compiled_functions = {}

def ida_run_python_function(func_name):

    if func_name not in compiled_functions:

        ida_func_name = "py_%s" % func_name

        idaapi.CompileLine('static %s() { RunPythonStatement("%s()"); }'

            % (ida_func_name, func_name))

        compiled_functions[func_name] = ida_func_name

    return ida_func_name

def GetFunctionCode():

    func_start = get_func_attr(here(), FUNCATTR_START)

    func_end = get_func_attr(here(), FUNCATTR_END)

    func_name = GetFunctionName(func_start)

    data = get_bytes(func_start, func_end - func_start)

    with open(func_name, "wb") as fp:

        fp.write(data)

    with open(func_name + ".list", "w") as fp:

        fp.write(str(str_to_list(data)))

    Message("Write code of %s done!!!\n" %(func_name))

AddHotkey("Ctrl+Shift+A", ida_run_python_function("GetFunctionCode"));
参考
http://blog.nsfocus.net/flare-onchallenge4th/
Flare-On4 解题复现的更多相关文章
- 【Vulfocus解题系列】手把手教你使用Vulfocus公开靶场对Apache Log4j2远程命令执行漏洞复现
前言 关于这个漏洞,啥都不用说了,直接发车. 工具下载 JNDIExploit:https://github.com/0x727/JNDIExploit 复现过程 启动靶场环境 直接用vulfocus ...
- 2019CISCN web题赛-JustSoSo;love_math(复现)
0x00前言 这几天从网上找个CMS源码开始练习审计,盯着众多的代码debug调呀调头晕脑胀的,还不错找到个文件读取和一个ssrf... 上月底结束的CISCN线上赛,web四道,仔细研究的2道,做出 ...
- BUUCTF复现记录1
平台地址:https://buuoj.cn/ 里面很多之前的题目,不错的平台.另外幕后大哥博客https://www.zhaoj.in/ 以下的解题,都是参考各位大佬的WP去复现,重在记录下 ...
- 上传靶机实战之upload-labs解题
前言 我们知道对靶机的渗透可以提高自己对知识的掌握能力,这篇文章就对上传靶机upload-labs做一个全面的思路分析,一共21个关卡.让我们开始吧,之前也写过关于上传的专题,分别为浅谈文件上传漏洞( ...
- 2021qwb [强网先锋]赌徒 Writeup + 环境复现
2021 qwb [强网先锋]赌徒 Writeup + 环境复现(win10) 1.本地环境复现(win10+phpStudy2018) 将比赛文件复制到phpStudy的\phpStudy\PHPT ...
- CVE-2021-3129:Laravel远程代码漏洞复现分析
摘要:本文主要为大家带来CVE-2021-3129漏洞复现分析,为大家在日常工作中提供帮助. 本文分享自华为云社区<CVE-2021-3129 分析>,作者:Xuuuu . CVE-202 ...
- 漏洞复现:MS12-020 远程桌面协议RDP远程代码执行漏洞
漏洞复现:MS12-020 远程桌面协议RDP远程代码执行漏洞 攻击机:Kali2019 靶机:Win7 64位 解题步骤: 1.打开Kali2019和Win7 64位 ,确定IP地址是多少 2.确定 ...
- SCNU ACM 2016新生赛决赛 解题报告
新生初赛题目.解题思路.参考代码一览 A. 拒绝虐狗 Problem Description CZJ 去排队打饭的时候看到前面有几对情侣秀恩爱,作为单身狗的 CZJ 表示很难受. 现在给出一个字符串代 ...
- SCNU ACM 2016新生赛初赛 解题报告
新生初赛题目.解题思路.参考代码一览 1001. 无聊的日常 Problem Description 两位小朋友小A和小B无聊时玩了个游戏,在限定时间内说出一排数字,那边说出的数大就赢,你的工作是帮他 ...
随机推荐
- 数据库MySQL(课下作业,必做)
数据库MySQL(课下作业,必做) 题目要求: 下载附件中的world.sql.zip, 参考http://www.cnblogs.com/rocedu/p/6371315.html#SECDB,导入 ...
- (转)Python——functools
原文:https://www.cnblogs.com/Security-Darren/p/4168310.html#t7 http://www.wklken.me/posts/2013/08/18/p ...
- Windows10下简单搭建zookeeper
转载请注明源出处:http://www.cnblogs.com/lighten/p/6798669.html 1 简介 zookeeper是Apache的一个开源项目,致力于开发和维护一个开源的服务器 ...
- 快速初步了解Neo4j与使用
快速初步了解Neo4j与使用 Neo4j是一个高性能的,NOSQL图形数据库,它将结构化数据存储在网络上而不是表中.它是一个嵌入式的.基于磁盘的.具备完全的事务特性的Java持久化引擎,但是它将结构化 ...
- 程序模拟HTTP请求
1. 使用HttpClient 前面拼接StringContent string strContent = "client_id=client&client_secret=secre ...
- Python 开发
1.GIL,CPython,Python跟编译器没关系,语言有多个编译器,如:JPython.IronPython等,其他语言如是.GIL对IO密集型友好,计算密集型惨淡 2.pass,定义空执行函数 ...
- elasticsearch插件安装之--linux下安装及head插件
/** * 系统环境: vm12 下的centos 7.2 * 当前安装版本: elasticsearch-2.4.0.tar.gz */ 安装和学习可参照官方文档: 1, 安装 # 下载, 获取不成 ...
- lucene源码分析(6)Query分析
查询的入口 /** Lower-level search API. * * <p>{@link LeafCollector#collect(int)} is called for ever ...
- 修改 /etc/pam.d/login, linux 本地账号密码无法登陆,一直返回 登陆的login界面
今天我在我虚拟机测试的时候遇到了一个问题.登陆centos一直是返回login,账号和密码没错,我也换了两个用户. 1.问题描述 我正常的输入用户名和密码 错误提示截图:返回登陆界面,我重新试了另外的 ...
- elasticsearch插件的开发--计算特征向量的相似度
目录 更改elasticsearch的score评分 插件源码解读 脚步一 脚本二(fast-vector-distance) 部署 测试 创建索引 查询 版本说明 项目详细见github 参考文献 ...