Android中UI设计的一些技巧!!!
出处:http://blog.csdn.net/android_tutor/article/details/5995759
大家好,今天给大家分享的是Android中UI设计的一些技巧,本节内容主要有两点:一是Android按钮(Button)的UI设计,二是:ListView以及GridView的UI设计。
按钮的状态:
我们一般搞UI设计,按钮通常有三个状态:normal(正常状态);focus(焦点状态),pressed(按下状态)。如下图所示:


我们会在res/drawable目录下定义一个资源文件,比如我们本例中要用到的handle.xml,在里面定义三种状态,每种状态对应一张图片:
代码如下:
- <?xml version="1.0" encoding="utf-8"?>
- <selector xmlns:android="http://schemas.android.com/apk/res/android">
- <item android:state_window_focused="false" android:drawable="@drawable/handle_normal" />
- <item android:state_focused="true" android:drawable="@drawable/handle_focused" />
- <item android:state_pressed="true" android:drawable="@drawable/handle_pressed" />
- </selector>
而我们使用这个资源文件的用法只需要引用drawable里的资源文件(android:background="@drawable/handle")代码如下:
- <Button
- android:id="@+id/handle"
- android:layout_width="wrap_content"
- android:layout_height="fill_parent"
- android:background="@drawable/handle"
- />
Android中的层:
看过《盗梦空间》的人都知道,梦境有多少层,而Android中也有层次之分,在Android中第一层"梦境",我们可以认为是壁纸。第二层就是应用的Activity,第三层就是放在Activity上的容器(ViewGroup以及它的子类FrameLayout,LinearLayout等布局对象),当然容器中还可以放容器,你也可以放到N层(最多放多少我还没验证过),总之最后一层就是那些继承于View的控件了(诸如,Button,TextView等.)
而ListView以及GridView中UI是怎么设计的呢,下面我们看一下效果图:
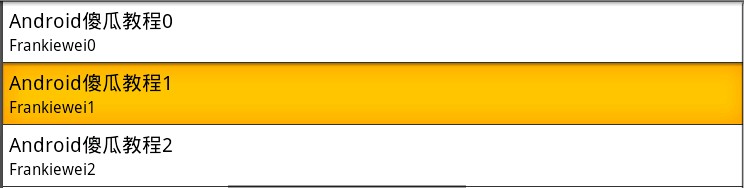
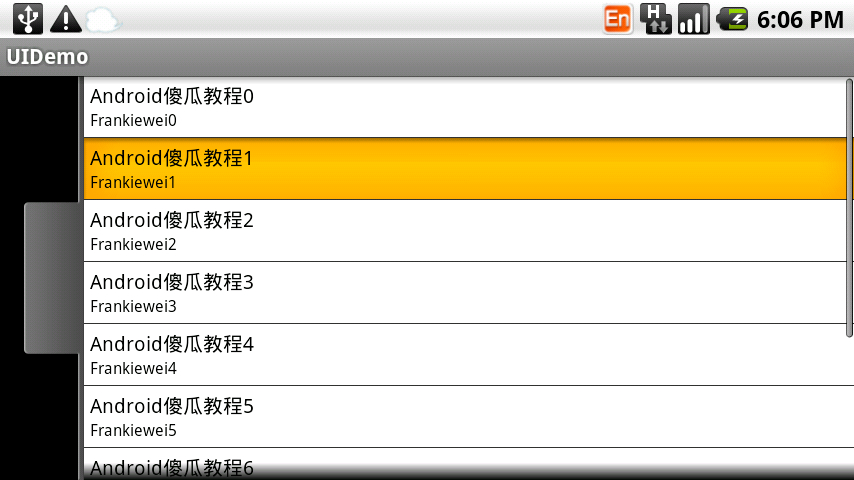
上图是一个ListView的效果图,正常状态下是白色背景黑色字体,当我们点击一列时会出现黄色背景。这一效果是如何做到的呢?
ListView单元格显示的内容其实是我们事先定义在Layout目录下的一个布局文件,从这个效果来看,我们可以看出它一共有三个“层”
第一层容器(LinearLayout) 背景色为白色:
第二层也是容器(LinearLayout)当按下时,背景色为黄色,把第一层挡住(具体做法可以参照按钮):
第三层是控件(TextView)。
实例 :
上面说了一些,有些人肯定会云里雾里,所以我们直接来个实例,实例做完后,再看一下,效果会更好,大家按照步骤跟我来:
第一步:首先准备素材,准备三个按钮,以及ListView的背景图(上面三个按钮已经有了,下面我只贴一个ListView背景图片):

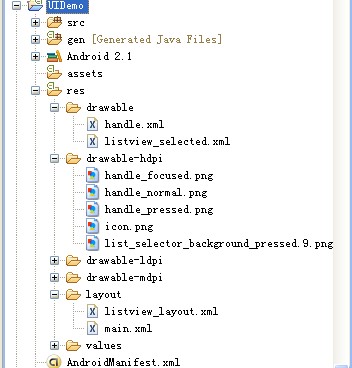
第二步:新建一个Android工程,命名为UIDemo.目录结构如下图所示:
第三步:在res目录下新建一个drawable文件夹,定义两个资源文件一个是handle.xml另一个为listview_selected.xml,其中handle.xml代码已经在上面贴出,listview_selected.xml代码如下:
- <?xml version="1.0" encoding="utf-8"?>
- <selector xmlns:android="http://schemas.android.com/apk/res/android">
- <item android:state_pressed="true" android:drawable="@drawable/list_selector_background_pressed" />
- </selector>
第四步:修改main.xml布局文件,这里我用到了SliddingDrawer控件,代码如下:
- <?xml version="1.0" encoding="utf-8"?>
- <LinearLayout xmlns:android="http://schemas.android.com/apk/res/android"
- android:orientation="vertical"
- android:layout_width="fill_parent"
- android:layout_height="fill_parent"
- >
- <SlidingDrawer
- android:id="@+id/slidingdrawer"
- android:layout_width="fill_parent"
- android:layout_height="fill_parent"
- android:orientation="horizontal"
- android:handle="@+id/handle"
- android:content="@+id/content">
- <Button
- android:id="@+id/handle"
- android:layout_width="wrap_content"
- android:layout_height="fill_parent"
- android:background="@drawable/handle"
- />
- <ListView
- android:id="@+id/content"
- android:layout_width="fill_parent"
- android:layout_height="wrap_content"
- />
- </SlidingDrawer>
- </LinearLayout>
我们这里用到了ListView控件,而我们ListView控件显示的内容我事先在layout目录下定义两个TextView,命名为listview_layout.xml,代码如下(这里有三层哦!):
- <?xml version="1.0" encoding="utf-8"?>
- <LinearLayout xmlns:android="http://schemas.android.com/apk/res/android"
- android:orientation="vertical"
- android:layout_width="fill_parent"
- android:layout_height="fill_parent"
- android:background="#ffffff"
- >
- <LinearLayout
- android:orientation="vertical"
- android:layout_width="fill_parent"
- android:layout_height="fill_parent"
- android:background="@drawable/listview_selected"
- android:padding="6px"
- >
- <TextView
- android:id="@+id/bookname"
- android:layout_width="fill_parent"
- android:layout_height="wrap_content"
- android:textSize="20px"
- android:textColor="#000000"
- />
- <TextView
- android:id="@+id/author"
- android:layout_width="fill_parent"
- android:layout_height="wrap_content"
- android:textSize="16px"
- android:textColor="#000000"
- />
- </LinearLayout>
- </LinearLayout>
第五步:修改主核心程序UIDemo.java,代码如下:
- package com.tutor.uidemo;
- import android.app.Activity;
- import android.os.Bundle;
- import android.view.LayoutInflater;
- import android.view.View;
- import android.view.ViewGroup;
- import android.widget.BaseAdapter;
- import android.widget.ListView;
- import android.widget.TextView;
- public class UIDemo extends Activity {
- private ListView mListView;
- @Override
- public void onCreate(Bundle savedInstanceState) {
- super.onCreate(savedInstanceState);
- setContentView(R.layout.main);
- setupViews();
- }
- private void setupViews(){
- mListView = (ListView)findViewById(R.id.content);
- mListView.setAdapter(new ListViewAdapter());
- }
- private class ListViewAdapter extends BaseAdapter{
- //这里返回10行,ListView有多少行取决于getCount()方法
- public int getCount() {
- return 10;
- }
- public Object getItem(int arg0) {
- return null;
- }
- public long getItemId(int arg0) {
- return 0;
- }
- public View getView(int position, View v, ViewGroup parent) {
- final LayoutInflater inflater = LayoutInflater.from(getApplicationContext());
- if(v == null){
- v = inflater.inflate(R.layout.listview_layout, null);
- }
- TextView mBookName = (TextView)v.findViewById(R.id.bookname);
- TextView mBookAuthor = (TextView)v.findViewById(R.id.author);
- mBookName.setText("Android傻瓜教程" + position);
- mBookAuthor.setText("Frankiewei" + position);
- return v;
- }
- }
- }
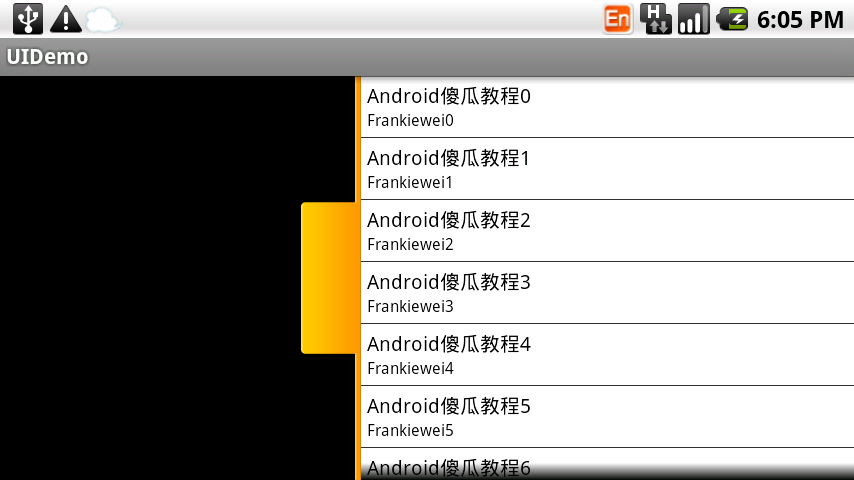
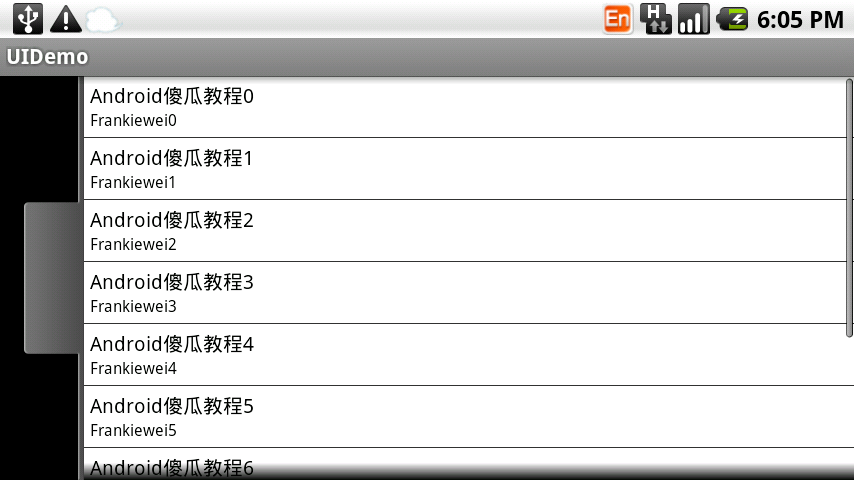
第六步:运行上述工程,查看效果:
运行效果1:

点击按钮效果2:
ListView正常效果3:
ListView点击效果4:
Android中UI设计的一些技巧!!!的更多相关文章
- Android 高级UI设计笔记07:RecyclerView 的详解
1. 使用RecyclerView 在 Android 应用程序中列表是一个非常重要的控件,适用场合非常多,如新闻列表.应用列表.消息列表等等,但是从Android 一出生到现在并没有非常 ...
- Android应用UI设计流程
Android应用UI设计流程 设计原理 1.在移动设计中,使用环境是最关键的因素.原型设计方法必须考虑尺寸因素 2.用户测试必须涵盖运动.声音和多点触控等方面: 进行移动设计和测试时,请将你知道的有 ...
- Android中的对话框AlertDialog使用技巧合集-转载
Android中的对话框AlertDialog使用技巧合集 文章来自:http://blog.csdn.net/blue6626/article/details/6641105 今天我用自 ...
- Android中UI线程与后台线程交互设计的5种方法
我想关于这个话题已经有很多前辈讨论过了.今天算是一次学习总结吧. 在android的设计思想中,为了确保用户顺滑的操作体验.一 些耗时的任务不能够在UI线程中运行,像访问网络就属于这类任务.因此我们必 ...
- Android中UI线程与后台线程交互设计的6种方法
在android的设计思想中,为了确保用户顺滑的操作体验.一些耗时的任务不能够在UI线程中运行,像访问网络就属于这类任务.因此我们必须要重新开启 一个后台线程运行这些任务.然而,往往这些任务最终又会直 ...
- 【Android开发经验】Android举UI设计经验
转载请注明出处:http://blog.csdn.net/zhaokaiqiang1992 1.Android眼下的主流设备分辨率为480×800.720×1280.1080×1920,单位是像素.在 ...
- Android 高级UI设计笔记09:Android如何实现无限滚动列表
ListView和GridView已经成为原生的Android应用实现中两个最流行的设计模式.目前,这些模式被大量的开发者使用,主要是因为他们是简单而直接的实现,同时他们提供了一个良好,整洁的用户体验 ...
- Android 高级UI设计笔记08:Android开发者常用的7款Android UI组件(转载)
Android开发是目前最热门的移动开发技术之一,随着开发者的不断努力和Android社区的进步,Android开发技术已经日趋成熟,当然,在Android开源社区中也涌现了很多不错的开源UI项目,它 ...
- Android 高级UI设计笔记09:Android实现无限滚动列表
1. 无限滚动列表应用场景: ListView和GridView已经成为原生的Android应用实现中两个最流行的设计模式.目前,这些模式被大量的开发者使用,主要是因为他们是简单而直接的实现,同时他们 ...
随机推荐
- 向SQL Server 现有表中添加新列并添加描述.
注: sql server 2005 及以上支持. 版本估计是不支持(工作环境2005,2008). 工作需要, 需要向SQL Server 现有表中添加新列并添加描述. 从而有个如下存储过程. (先 ...
- Linux下堆漏洞的利用机制
1.保护机制 )) malloc_printerr (check_action, "corrupted double-linked list", P); 这个就是所谓的堆指针的ch ...
- Java模拟按键
JDK自带了Robot类,此类用于为测试自动化.自运行演示程序和其他需要控制鼠标和键盘的应用程序生成本机系统输入事件.Robot 的主要目的是便于 Java 平台实现自动测试. 详情可查看jdk1.6 ...
- C++中bool类型变量初值对程序的影响
很困惑的一个问题 #include<iostream> using namespace std; int main() { //bool a=true; //非0(1,2,3,……)输出1 ...
- oracle数据库11g(11.2.0.1)安装报错:提示ins_ctx.mk编译错误。
https://blog.csdn.net/weixin_42967330/article/details/81668404
- bzoj 1879 容斥
暴力求容斥系数或者直接组合数求容斥系数都可以. #include<bits/stdc++.h> #define LL long long #define fi first #define ...
- 子查询中的NULL问题
子查询返回有单行,多行和null值:适用于单行子查询的比较运算符是=,>,>=,<,<=<>和!=.适用于多行子查询的比较运算符是in,not in,any和any ...
- HDU - 1027 Ignatius and the Princess II 全排列
Ignatius and the Princess II Time Limit: 2000/1000 MS (Java/Others) Memory Limit: 65536/32768 K ( ...
- c语言程序与设计第三版-苏小红--第一轮学习笔记、难点整理
---恢复内容开始--- 1> 编程:需求分析.设计.编写程序(编码.编辑.链接.运行).调试程序 2> 指数形式:e的左边是数值部分(有效数字),不能省略,但可以表示成 .e-4:等等: ...
- 见微知著(一):解析ctf中的pwn--Fast bin里的UAF
在网上关于ctf pwn的入门资料和writeup还是不少的,但是一些过渡的相关知识就比较少了,大部分赛棍都是在不断刷题中总结和进阶的.所以我觉得可以把学习过程中的遇到的一些问题和技巧总结成文,供大家 ...