
Cisco基础(一):Vlan的划分、配置trunk中继链路、以太通道配置、DHCP服务配置
一、Vlan的划分
目标:
VLAN(虚拟局域网)是对连接到的第二层交换机端口的网络用户的逻辑分段,不受网络用户的物理位置限制而根据用户需求进行网络分段。一个VLAN可以在 一个交换机或者跨交换机实现。VLAN可以根据网络用户的位置、作用、部门或者根据网络用户所使用的应用程序和协议来进行分组。基于交换机的虚拟局域网能 够为局域网解决冲突域、广播域、带宽问题。
- 按企业部门规划vlan
方案:
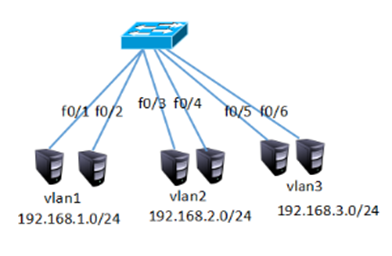
在交换机上创建vlan2、vlan3,参照如下网络拓扑如下图所示:
步骤:
步骤一:客户端与交换机相连
1)为了使同vlan在交换机上可以通信,需要给同vlan客户端配置同网段IP地址,如下图所示
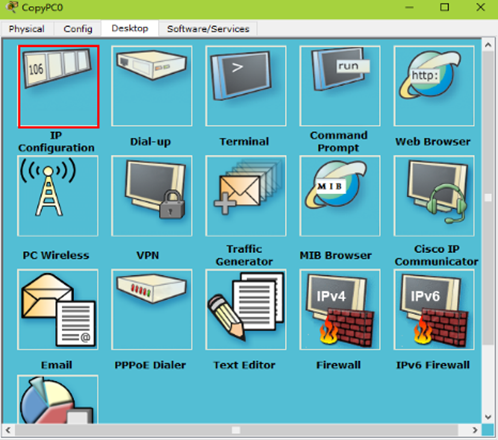
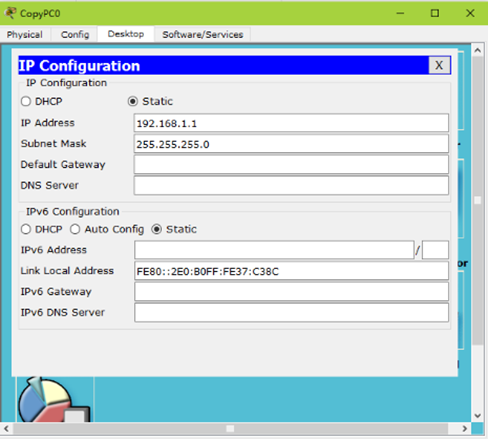
分别配置为192.168.1.1、192.169.1.2;192.168.2.1、192.168.2.2;192.168.3.1、192.168.3.2;
2)在交换机上创建vlan2 和vlan3并将指定的接口划分到相对应的vlan下
Switch >enable
Switch#configure terminal
Switch(config)#vlan 2
Switch(config-vlan)#exit
Switch(config)#vlan 3
Switch(config-vlan)#exit
Switch(config)#interface fastEthernet 0/3
Switch(config-if)#switchport access vlan 2
Switch(config-if)#exit
Switch(config)#interface fastEthernet 0/4
Switch(config-if)#switchport access vlan 2
Switch(config-if)#exit
Switch(config)#interface fastEthernet 0/5
Switch(config-if)#switchport access vlan 3
Switch(config-if)#exit
Switch(config)#interface fastEthernet 0/6
Switch(config-if)#switchport access vlan 3
3)在交换机上查看vlan信息,可以看到创建的vlan以及vlan下的接口
Switch>enable
Switch#show vlan
VLAN Name Status Ports
---- -------------------------------- --------- -------------------------------
1 default active Fa0/1, Fa0/2, Fa0/7, Fa0/8
Fa0/9, Fa0/10, Fa0/11, Fa0/12
Fa0/13, Fa0/14, Fa0/15, Fa0/16
Fa0/17, Fa0/18, Fa0/19, Fa0/20
Fa0/21, Fa0/22, Fa0/23, Fa0/24
2 VLAN0002 active Fa0/3, Fa0/4
3 VLAN0003 active Fa0/5, Fa0/6
1002 fddi-default act/unsup
1003 token-ring-default act/unsup
1004 fddinet-default act/unsup
1005 trnet-default act/unsup
VLAN Type SAID MTU Parent RingNo BridgeNo Stp BrdgMode Trans1 Trans2
---- ----- ---------- ----- ------ ------ -------- ---- -------- ------ ------
1 enet 100001 1500 - - - - - 0 0
2 enet 100002 1500 - - - - - 0 0
3 enet 100003 1500 - - - - - 0 0
1002 fddi 101002 1500 - - - - - 0 0
1003 tr 101003 1500 - - - - - 0 0
1004 fdnet 101004 1500 - - - ieee - 0 0
1005 trnet 101005 1500 - - - ibm - 0 0
Remote SPAN VLANs
------------------------------------------------------------------------------
Primary Secondary Type Ports
------- --------- ----------------- ------------------------------------------
4)在客户端测试网络的连通性
在192.168.1.0/24的客户机上测试1.0网段的连通性
PC1>ping 192.168.1.2
Pinging 192.168.1.2 with 32 bytes of data:
Reply from 192.168.1.2: bytes=32 time=11ms TTL=128
Reply from 192.168.1.2: bytes=32 time=1ms TTL=128
Reply from 192.168.1.2: bytes=32 time=1ms TTL=128
Reply from 192.168.1.2: bytes=32 time=4ms TTL=128
Ping statistics for 192.168.1.2:
Packets: Sent = 4, Received = 4, Lost = 0 (0% loss),
Approximate round trip times in milli-seconds:
Minimum = 1ms, Maximum = 11ms, Average = 4ms
5)在192.168.2.0/24的客户机上测试2.0网段的连通性
PC>ping 192.168.2.2
Pinging 192.168.2.2 with 32 bytes of data:
Reply from 192.168.2.2: bytes=32 time=1ms TTL=128
Reply from 192.168.2.2: bytes=32 time=0ms TTL=128
Reply from 192.168.2.2: bytes=32 time=0ms TTL=128
Reply from 192.168.2.2: bytes=32 time=0ms TTL=128
Ping statistics for 192.168.2.2:
Packets: Sent = 4, Received = 4, Lost = 0 (0% loss),
Approximate round trip times in milli-seconds:
Minimum = 0ms, Maximum = 1ms, Average = 0ms
6)在192.168.3.0/24的客户机上测试3.0网段的连通性
PC>ping 192.168.3.2
Pinging 192.168.3.2 with 32 bytes of data:
Reply from 192.168.3.2: bytes=32 time=1ms TTL=128
Reply from 192.168.3.2: bytes=32 time=0ms TTL=128
Reply from 192.168.3.2: bytes=32 time=0ms TTL=128
Reply from 192.168.3.2: bytes=32 time=1ms TTL=128
Ping statistics for 192.168.3.2:
Packets: Sent = 4, Received = 4, Lost = 0 (0% loss),
Approximate round trip times in milli-seconds:
Minimum = 0ms, Maximum = 1ms, Average = 0ms
二、配置trunk中继链路
目标:
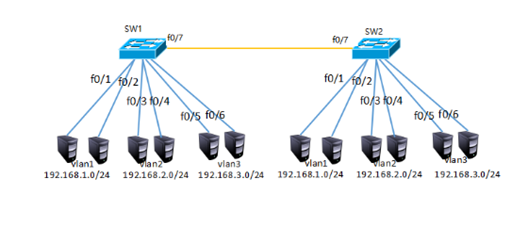
在两台交换机上分别创建vlan2、vlan3,参照如下网络拓扑图将端口加入到指定的vlan并配置IP址,实现跨交换机的同vlan主机的通信。
方案:
分别在sw1和sw2上创建vlan2和vlan3并把相应的接口划分到对应的vlan并为客户端配置IP地址,IP地址具有唯一性所以同一局域网络中不能存在相同的IP,另所有的接口默认为vlan1,所以不配置trunk中继链路vlan1也是可以跨交换机通信的。
步骤:
步骤一:为客户端配置IP,分别为交换机sw1和sw2创建vlan并把相应的接口划到相对应的vlan下
1)参照上图为客户端分别配置相对应网段的IP
2)为交换机创建vlan2、vlan3 并把相应的接口划到vlan下
Switch >enable
Switch#configure terminal
Switch(config)#hostname SW1
SW1 (config)#Switch(config-vlan)#exit
SW1 (config)#vlan 3
SW1 (config-vlan)#exit
SW1 (config)#interface fastEthernet 0/3
SW1 (config-if)#switchport access vlan 2
SW1 (config-if)#exit
SW1 (config)#interface fastEthernet 0/4
SW1 (config-if)#switchport access vlan 2
SW1 (config-if)#exit
SW1 (config)#interface fastEthernet 0/5
SW1 (config-if)#switchport access vlan 3
SW1 (config-if)#exit
SW1 (config)#interface fastEthernet 0/6
SW1 (config-if)#switchport access vlan 3
Switch >enable
Switch#configure terminal
Enter configuration commands, one per line. End with CNTL/Z.
Switch(config)#hostname SW2
SW2 (config)#Switch(config-vlan)#exit
SW2 (config)#vlan 3
SW2 (config-vlan)#exit
SW2 (config)#interface fastEthernet 0/3
SW2(config-if)#switchport access vlan 2
SW2 (config-if)#exit
SW2 (config)#interface fastEthernet 0/4
SW2 (config-if)#switchport access vlan 2
SW2 (config-if)#exit
SW2 (config)#interface fastEthernet 0/5
SW2 (config-if)#switchport access vlan 3
SW2 (config-if)#exit
SW2 (config)#interface fastEthernet 0/6
SW2 (config-if)#switchport access vlan 3
3)分别查看SW1和SW2交换机上的vlan信息
SW1#show vlan
VLAN Name Status Ports
---- -------------------------------- --------- -------------------------------
1 default active Fa0/1, Fa0/2, Fa0/8, Fa0/9
Fa0/10, Fa0/11, Fa0/12, Fa0/13
Fa0/14, Fa0/15, Fa0/16, Fa0/17
Fa0/18, Fa0/19, Fa0/20, Fa0/21
Fa0/22, Fa0/23, Fa0/24
2 VLAN0002 active Fa0/3, Fa0/4
3 VLAN0003 active Fa0/5, Fa0/6
1002 fddi-default act/unsup
1003 token-ring-default act/unsup
1004 fddinet-default act/unsup
1005 trnet-default act/unsup
VLAN Type SAID MTU Parent RingNo BridgeNo Stp BrdgMode Trans1 Trans2
---- ----- ---------- ----- ------ ------ -------- ---- -------- ------ ------
1 enet 100001 1500 - - - - - 0 0
2 enet 100002 1500 - - - - - 0 0
3 enet 100003 1500 - - - - - 0 0
1002 fddi 101002 1500 - - - - - 0 0
1003 tr 101003 1500 - - - - - 0 0
1004 fdnet 101004 1500 - - - ieee - 0 0
1005 trnet 101005 1500 - - - ibm - 0 0
Remote SPAN VLANs
------------------------------------------------------------------------------
Primary Secondary Type Ports
------- --------- ----------------- ------------------------------------------
SW1#
SW2#show vlan
VLAN Name Status Ports
---- -------------------------------- --------- -------------------------------
1 default active Fa0/1, Fa0/2, Fa0/8, Fa0/9
Fa0/10, Fa0/11, Fa0/12, Fa0/13
Fa0/14, Fa0/15, Fa0/16, Fa0/17
Fa0/18, Fa0/19, Fa0/20, Fa0/21
Fa0/22, Fa0/23, Fa0/24
2 VLAN0002 active Fa0/3, Fa0/4
3 VLAN0003 active Fa0/5, Fa0/6
1002 fddi-default act/unsup
1003 token-ring-default act/unsup
1004 fddinet-default act/unsup
1005 trnet-default act/unsup
VLAN Type SAID MTU Parent RingNo BridgeNo Stp BrdgMode Trans1 Trans2
---- ----- ---------- ----- ------ ------ -------- ---- -------- ------ ------
1 enet 100001 1500 - - - - - 0 0
2 enet 100002 1500 - - - - - 0 0
3 enet 100003 1500 - - - - - 0 0
1002 fddi 101002 1500 - - - - - 0 0
1003 tr 101003 1500 - - - - - 0 0
1004 fdnet 101004 1500 - - - ieee - 0 0
1005 trnet 101005 1500 - - - ibm - 0 0
Remote SPAN VLANs
------------------------------------------------------------------------------
Primary Secondary Type Ports
------- --------- ----------------- ------------------------------------------
SW2#
步骤二:为交换机配置trunk中继链接路
1)分别进入两台交换机相连接的f0/7接口配置trunk中继链路
SW1>enable
SW1#configure terminal
SW1(config)#interface fastEthernet 0/7
SW1(config-if)#switchport mode trunk
SW2#enable
SW2#configure terminal
SW2(config)#interface fastEthernet 0/7
SW2(config-if)#switchport mode trunk
SW2(config-if)#
2)测试2.0网段和3.0网段跨交换机通信
PC>ping 192.168.2.3
Pinging 192.168.2.3 with 32 bytes of data:
Reply from 192.168.2.3: bytes=32 time=1ms TTL=128
Reply from 192.168.2.3: bytes=32 time=0ms TTL=128
Reply from 192.168.2.3: bytes=32 time=0ms TTL=128
Reply from 192.168.2.3: bytes=32 time=0ms TTL=128
Ping statistics for 192.168.2.3:
Packets: Sent = 4, Received = 4, Lost = 0 (0% loss),
Approximate round trip times in milli-seconds:
Minimum = 0ms, Maximum = 1ms, Average = 0ms
PC>ping 192.168.3.3
Pinging 192.168.3.3 with 32 bytes of data:
Reply from 192.168.3.3: bytes=32 time=1ms TTL=128
Reply from 192.168.3.3: bytes=32 time=0ms TTL=128
Reply from 192.168.3.3: bytes=32 time=0ms TTL=128
Reply from 192.168.3.3: bytes=32 time=0ms TTL=128
Ping statistics for 192.168.3.3:
Packets: Sent = 4, Received = 4, Lost = 0 (0% loss),
Approximate round trip times in milli-seconds:
Minimum = 0ms, Maximum = 1ms, Average = 0ms
三、以太通道配置
目标:
企业需要增加带宽和网络可用性,以太通道可以同时满足这两个条件,而又无需购买新设备。
方案:
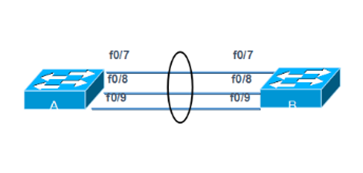
在某些环境下,为了在现有条件下增加带宽而不增加额外的设备,以太通道是可用技术之一。以太通道为交换机提供了端口捆绑的技术,允许两个交换机之间通过两个或多个端口并行连接,同时传输数据,以提供更高的带宽。
企业网络模拟拓扑环境如下图所示:
步骤:
步骤一:在交换机A上分别配置以太通道
太通道的配置模式与Trunk类似,也有开启、企望等。同样的,在生产环境下都是强制设置以太通道处于on的状态,而不是让它们自动协商。
sw1(config)# interface range fastEthernet 0/7 – 9
Switch(config-if-range)#switchport mode trunk
sw1(config-if-range)#channel-group 1 mode on
sw1(config-if-range)#
步骤二:在交换机B上分别配置以太通道
sw2(config)# interface range fastEthernet 0/7 – 9
Switch(config-if-range)#switchport mode trunk
sw2(config-if-range)#channel-group 1 mode on
sw2(config-if-range)#
步骤三:在交换机A上查看以太通通道配置
sw1# show etherchannel 1 summary
Flags: D - down P - in port-channel
I - stand-alone s - suspended
H - Hot-standby (LACP only)
R - Layer3 S - Layer2
U - in use f - failed to allocate aggregator
u - unsuitable for bundling
w - waiting to be aggregated
d - default port
Number of channel-groups in use: 1
Number of aggregators: 1
Group Port-channel Protocol Ports
------+-------------+-----------+---------------------------------
1 Po1(SU) - Fa0/7(P) Fa0/8(P) Fa0/9(P)
根据输出最后一行小括号中的提示,可以获知以太通道是二层的(S)、正在被使用的(U),端口Fa0/7、Fa0/8和Fa09在以太通道中(P)。
步骤四:创建以太通道后,系统会增加一个名称为Port-channel 1的端口,可以通过show running-config命令查看到其信息
sw2#show running-config
Building configuration...
Current configuration : 1308 bytes
!
version 12.2
no service timestamps log datetime msec
no service timestamps debug datetime msec
no service password-encryption
!
hostname tarena-sw2
!
!
.. ..
interface Port-channel 1 //以太通道信息
switchport mode trunk
!
.. ..
四、DHCP服务配置
目标:
大型企业网络客户机数量较多,客记机IP地址配置如果都为静态配置存在如下问题:
- 增加网络管理员工作量
- 静态手动配置容易输入错误
- 静态手动配置容易冲突
方案:
在路由器上配置DHCP服务为客户端自动分配IP地址如下图所示:
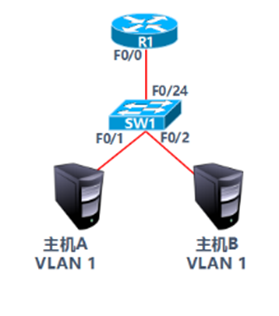
- VLAN 1:192.168.1.0/24
- 网关192.168.1.254
- 首选DNS为202.106.0.20
- 预留IP地址打印服务器:192.168.1.1
- 预留IP地址文件服务器:192.168.1.100
步骤:
步骤一:路由器R1配置DHCP服务
1)配置路由器接口IP
R1(config)#interface fastEthernet 0/0
R1(config-if)#ip address 192.168.1.254 255.255.255.0
R1(config-if)#no shutdown
2)DHCP服务配置
R1(config)#ip dhcp pool vlan11)
R1(dhcp-config)#network 192.168.1.0 255.255.255.0
R1(dhcp-config)#default-router 192.168.1.254
R1(dhcp-config)#dns-server 202.106.0.20
R1(config)#ip dhcp excluded-address 192.168.1.1
R1(config)#ip dhcp excluded-address 192.168.1.100
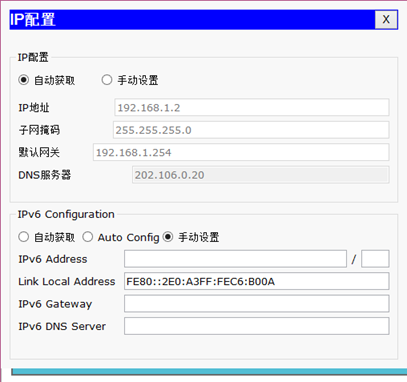
3)设置主机A的IP配置为自动获取如下图所示:
Cisco基础(一):Vlan的划分、配置trunk中继链路、以太通道配置、DHCP服务配置的更多相关文章
- VLAN、Trunk,以太通道及DHCP
VLAN.Trunk,以太通道及DHCP 案例1:Vlan的划分 案例2:配置trunk中继链路 案例3:以太通道配置 案例4:DHCP服务配置 1 案例1:Vlan的划分 1.1 问题 VLAN(虚 ...
- (四)跟我一起玩Linux网络服务:DHCP服务配置之中继代理
继第三部分的DHCP服务器的设置成功,我们来做一个中继代理服务器的配置吧. 我们的虚拟机结构如图: 具体参考: (一)跟我一起玩Linux网络服务:DNS服务——BIND(/etc/named.con ...
- 【树莓派】服务配置相关3:基于Ubuntu Server的服务配置
该文接续之前写过的两篇: [树莓派]服务配置相关 [树莓派]服务配置相关2:基于RPi Desktop的服务配置 这是我个人用来进行树莓派盒子安装配置的脚本,对于外部其他博友,可以部分参考,但不需要逐 ...
- DHCP服务配置
DHCP(Dynamic Host Configuration Protocol)动态主机配置协议 -->是由Internet工作任务小组设计开发的,专用于对TCP/IP网络中的计算机自定分配T ...
- (三)跟我一起玩Linux网络服务:DHCP服务配置之主服务器配置
我们今天来做DHCP服务器的配置,我们的前提示要实现用一台虚拟机做DHCP服务器 1.首先,我们要有DHCP软件,我们用到下面两个软件(可以使用其他方法从网上直接安装,具体方法网络搜索) dhcp-3 ...
- 项目(四)DHCP服务配置
DHCP是由Internet工作任务小组设计开发的,专门用于为TCP/IP网络中的计算机自动分配TCP/IP参数的协议. 使用DHCP可以减少管理员的工作量,避免IP地址冲突,当网络修改IP地址网段时 ...
- 【树莓派】服务配置相关2:基于RPi Desktop的服务配置
该文接续之前写过的一篇:[树莓派]服务配置相关. 这是我个人用来进行树莓派盒子安装配置的脚本,对于外部其他博友,可以部分参考,但不需要逐个引用. 现在有一定更新,部分按如下脚本来操作: step1: ...
- Linux:DHCP服务配置
DHCP服务程序能够使局域网内的主机自动且动态的获取IP地址.子网掩码.网关地址以及DNS服务器地址等信息. 说明:先安装DHCP服务 yum install dhcp -y ...
- Cisco基础(二):三层交换vlan间通信、多交换机vlan间通信、三层交换配置路由、RIP动态路由配置、三层交换配置RIP动态路由
一.三层交换vlan间通信 目标: VLAN实现了广播域的隔离,同时也将VLAN间的通信隔离了.三层交换技术使得VLAN间可以通信. 通过三层交换实现VLAN间通信 方案: 为了解决了传统路由器低速. ...
随机推荐
- 【HDOJ6583】Typewriter(SAM,DP)
题意:给定一个由小写字母组成的字符串,每次可以花费p在串后加上任意一个字母,花费q在串后复制一个当前串的子串,问生成字符串的最小花费 n<=2e5,1<=p,q<2^31 思路: S ...
- 专为渗透测试人员设计的 Python 工具大合集
如果你对漏洞挖掘.逆向工程分析或渗透测试感兴趣的话,我第一个要推荐给你的就是Python编程语言.Python不仅语法简单上手容易,而且它还有大量功能强大的库和程序可供我们使用.在这篇文章中,我们会给 ...
- js中Array方法重写(二):myForEach;myEvery;mySome;myFilter;myReduce
一.myForEach //myForeach 数组每个元素都执行一次回调函数 Array.prototype.myForEach = function(callback){ for(var i = ...
- oauth2学习
oauth2 生词: 授权码模式(authorization code) 简化模式(implicit) 密码模式(resource owner password credentials) 客户端模式( ...
- Eclipse对web项目设置请求路径(与项目名称不同)
可以在下图位置,进行修改 也可以修改项目的路径下的.settings文件夹下的org.eclipse.wst.common.component的value属性 <property name=&q ...
- MVC 入门
MVC是什么? MVC是一个框架模式,它用于把应用程序的输入.处理和输出进行强制性的分开.使用MVC应用程序被分成三个核心部件:模型.视图.控制器.它们各自处理自己的任务.最典型的MVC就是JSP+S ...
- CPU的架构:x86、arm、mips、龙芯等
在公司经常听其他工程师讲x86,arm平台啥的,作为一个算法工程师,我听过却不知道这是啥!!!(汗颜) 现在偷偷学起: x86,arm,mips等这些都是CPU的架构,不管是手机电脑还是一些嵌入式的设 ...
- pytorch与numpy中的通道交换问题
pytorch网络输入图像的格式为(C, H, W),而numpy中的图像的shape为(H,W,C) 所以一般需要变换通道,将numpy中的shape变换为torch中的shape. 方法如下: # ...
- 在学react时候找不到static/js/bundle.js
看如图上面bundle.js,我在项目中和配置文件中都没有找到这个JS文件,然后我就觉得很诧异,然后各种查找,终于找到一篇文章,在此记录一下 第一步:npm run start ...
- python中深copy,浅copy与赋值语句的区别
以下详细讲解:python深复制,浅复制与赋值语句的区别 1. '='赋值语句,常规复制只是将另一个变量名关联到了列表,并不进行副本复制,实例如下: var1=[12,35,67,91,101]var ...