
RPC学习----Thrift快速入门和Java简单示例
一.什么是RPC?
RPC(Remote Procedure Call Protocol)——远程过程调用协议,它是一种通过网络从远程计算机程序上请求服务,而不需要了解底层网络技术的协议。
RPC协议假定某些传输协议的存在,如TCP或UDP,为通信程序之间携带信息数据。在OSI网络通信模型中,RPC跨越了传输层和应用层。RPC使得开发包括网络分布式多程序在内的应用程序更加容易。
二.什么是Thrift?
thrift是一个软件框架,用来进行可扩展且跨语言的服务的开发。它结合了功能强大的软件堆栈和代码生成引擎,以构建在 C++, Java, Python, PHP, Ruby, Erlang, Perl, Haskell, C#, Cocoa, JavaScript, Node.js, Smalltalk, and OCaml 这些编程语言间无缝结合的、高效的服务。
thrift最初由facebook开发,07年四月开放源码,08年5月进入apache孵化器。
三.下载,安装,配置Thrift
本机环境:ubuntu 12.04 (64bit)
1.下载:
下载地址:http://www.apache.org/dyn/closer.cgi?path=/thrift/0.9.1/thrift-0.9.1.tar.gz (目前最新0.9.1,2014/08/11)
2.安装,配置Thrift
官网教程:http://thrift.apache.org/docs/BuildingFromSource
Building from source
First make sure your system meets all necessary Apache Thrift Requirements
If you are building from the first time out of the source repository, you will need to generate the configure scripts. (This is not necessary if you downloaded areleased tarball.) From the top directory, do:
./bootstrap.sh
Once the configure scripts are generated, thrift can be configured. From the top directory, do:
./configure
Disable a language:
./configure --without-java
You may need to specify the location of the boost files explicitly. If you installed boost in /usr/local, you would run configure as follows:
./configure --with-boost=/usr/local
If you want to override the logic of the detection of the Java SDK, use the JAVAC environment variable:
./configure JAVAC=/usb/bin/javac
Note that by default the thrift C++ library is typically built with debugging symbols included. If you want to customize these options you should use the CXXFLAGS option in configure, as such:
./configure CXXFLAGS='-g -O2'

./configure CFLAGS='-g -O2'

./configure CPPFLAGS='-DDEBUG_MY_FEATURE'
To see other configuration options run
./configure --help
Once you have run configure you can build Thrift via make:
make
and run the test suite:
make check
and the cross language test suite:
sh test/test.sh
Issues while compiling
"compiler/cpp/thriftl.cc:2190: undefined reference to `yywrap'"
you need to install the Flex library (See also Apache Thrift Requirements ) and re-run the configuration script.
mv: cannot stat "'.deps/TBinaryProtocol.Tpo': No such file or directory" while building the Thrift Runtime Library
Re-reun configure with
--enable-libtool-lock
or by turning off parallel make by placing .NOTPARALLEL: in lib/cpp/Makefile or
make -j
Although the thrift compiler build appears to be compatible with parallel make without libtool lock, the thrift runtime build is not.
Installing
From the top directory, become superuser and do:
make install
Note that some language packages must be installed manually using build tools better suited to those languages (this applies to Java, Ruby, PHP).
Look for the README file in the lib/<language>/ folder for more details on the installation of each language library package.
tar -xvf thrift-0.9..tar.gz
第2步,输入以下命令:
$cd thrift-0.9.

$./configure

$make

#sudo make install
关于配置的问题可以查看命令:
./configure --help
可以关闭你不熟悉的语言,因为thrift支持的语言非常多,可以关闭一些用不到的,如python,gt4等;
关闭命令为:
./configure --without-qt4
在install的过程中如果报一些test方面的error可以忽略.
上面的步骤走完以后,可以在任意一个目录下输入如下命令进行测试:
amosli@amosli-pc:~/workspace$ thrift -version

Thrift version 0.9.
四.Thrift基本概念
- 基本类型:
- bool:布尔值,true 或 false,对应 Java 的 boolean
- byte:8 位有符号整数,对应 Java 的 byte
- i16:16 位有符号整数,对应 Java 的 short
- i32:32 位有符号整数,对应 Java 的 int
- i64:64 位有符号整数,对应 Java 的 long
- double:64 位浮点数,对应 Java 的 double
- string:utf-8编码的字符串,对应 Java 的 String
- 结构体类型:
- struct:定义公共的对象,类似于 C 语言中的结构体定义,在 Java 中是一个 JavaBean
- 容器类型:
- list:对应 Java 的 ArrayList
- set:对应 Java 的 HashSet
- map:对应 Java 的 HashMap
- 异常类型:
- exception:对应 Java 的 Exception
- 服务类型:
- service:对应服务的类
2.服务端编码基本步骤:
- 实现服务处理接口impl
- 创建TProcessor
- 创建TServerTransport
- 创建TProtocol
- 创建TServer
- 启动Server
3.客户端编码基本步骤:
- 创建Transport
- 创建TProtocol
- 基于TTransport和TProtocol创建 Client
- 调用Client的相应方法
4.数据传输协议
- TBinaryProtocol : 二进制格式.
- TCompactProtocol : 压缩格式
- TJSONProtocol : JSON格式
- TSimpleJSONProtocol : 提供JSON只写协议, 生成的文件很容易通过脚本语言解析
tips:客户端和服务端的协议要一致
五.Java实例
  <dependency>

            <groupId>org.apache.thrift</groupId>

            <artifactId>libthrift</artifactId>

            <version>0.9.1</version>

  </dependency>

  <dependency>

            <groupId>org.slf4j</groupId>

            <artifactId>slf4j-log4j12</artifactId>

            <version>1.5.8</version>

 </dependency>
2.创建Thrift文件
创建Thrift文件:amosli@amosli-pc:/media/f91a4cca-0b96-4c30-b140-7918a196de3e/amosli/java/rpc/DemoTest/demoHello.thrift ,内容如下:
namespace java com.amos.thrift.demo

service  HelloWorldService {

  string sayHello(1:string username)

}
3.生成java文件:
thrift -r -gen java demoHello.thrift
文件目录如下:
$ tree

.

├── demoHello.thrift

└── gen-java

    └── com

        └── amos

            └── thrift

                └── demo

                    └── HelloWorldService.java
把生成的HelloWorldService.java文件拷贝到项目中去.
4.实现接口Iface
package com.amos;

/**

 * Created by amosli on 14-8-12.

 */

public class HelloWorldImpl implements HelloWorldService.Iface {

    public HelloWorldImpl() {

    }

    @Override

    public String sayHello(String username) {

        return "Hi," + username + " ,Welcome to the thrift's world !";

    }

}
5.TSimpleServer服务端
简单的单线程服务模型,一般用于测试。
编写服务端server代码:HelloServerDemo.java
package com.amos;

import org.apache.thrift.protocol.TBinaryProtocol;

import org.apache.thrift.protocol.TCompactProtocol;

import org.apache.thrift.server.TServer;

import org.apache.thrift.server.TSimpleServer;

import org.apache.thrift.transport.TServerSocket;

/**

 * Created by amosli on 14-8-12.

 */

public class HelloServerDemo {

    public static final int SERVER_PORT = 8090;

    /**

     * @param args

     */

    public static void main(String[] args) {

        HelloServerDemo server = new HelloServerDemo();

        server.startServer();

    }

    public void startServer() {

        try {

            System.out.println("HelloWorld TSimpleServer start ....");

//          TProcessor tprocessor = new HelloWorldService.Processor<HelloWorldService.Iface>(new  HelloWorldImpl());

            HelloWorldService.Processor<HelloWorldService.Iface> tprocessor = new HelloWorldService.Processor<HelloWorldService.Iface>(new HelloWorldImpl());

            // 简单的单线程服务模型,一般用于测试

            TServerSocket serverTransport = new TServerSocket(SERVER_PORT);

            TServer.Args tArgs = new TServer.Args(serverTransport);

            tArgs.processor(tprocessor);

//            tArgs.protocolFactory(new TBinaryProtocol.Factory());

            tArgs.protocolFactory(new TCompactProtocol.Factory());

            // tArgs.protocolFactory(new TJSONProtocol.Factory());

            TServer server = new TSimpleServer(tArgs);

            server.serve();

        } catch (Exception e) {

            System.out.println("Server start error!!!");

            e.printStackTrace();

        }

    }

}
6.编写客户端代码
package com.amos;

import org.apache.thrift.TException;

import org.apache.thrift.protocol.TBinaryProtocol;

import org.apache.thrift.protocol.TCompactProtocol;

import org.apache.thrift.protocol.TProtocol;

import org.apache.thrift.transport.TSocket;

import org.apache.thrift.transport.TTransport;

import org.apache.thrift.transport.TTransportException;

/**

 * Created by amosli on 14-8-12.

 */

public class HelloClientDemo {

    public static final String SERVER_IP = "localhost";

    public static final int SERVER_PORT = 8090;

    public static final int TIMEOUT = 30000;

    /**

     * @param args

     */

    public static void main(String[] args) {

        HelloClientDemo client = new HelloClientDemo();

        client.startClient("amosli");

    }

    /**

     * @param userName

     */

    public void startClient(String userName) {

        TTransport transport = null;

        try {

            transport = new TSocket(SERVER_IP, SERVER_PORT, TIMEOUT);

            // 协议要和服务端一致

//            TProtocol protocol = new TBinaryProtocol(transport);

            TProtocol protocol = new TCompactProtocol(transport);

            // TProtocol protocol = new TJSONProtocol(transport);

            HelloWorldService.Client client = new HelloWorldService.Client(

                    protocol);

            transport.open();

            String result = client.sayHello(userName);

            System.out.println("Thrift client result =: " + result);

        } catch (TTransportException e) {

            e.printStackTrace();

        } catch (TException e) {

            e.printStackTrace();

        } finally {

            if (null != transport) {

                transport.close();

            }

        }

    }

}
项目最终结构图:

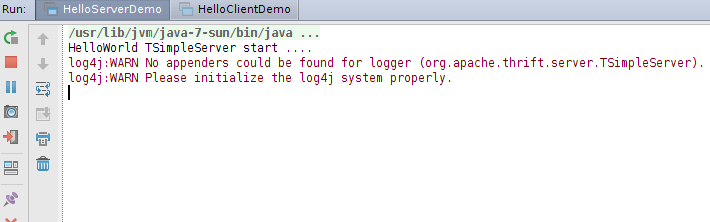
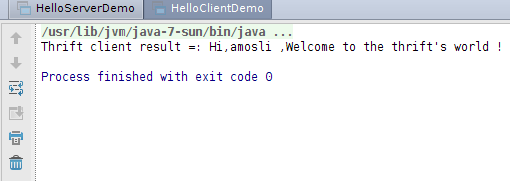
7.最终运行效果
服务端:
客户端:
本文源码:https://github.com/amosli/rpc
参考:
1.http://baike.baidu.com/view/1698865.htm?fr=aladdin
2.http://thrift.apache.org/docs/BuildingFromSource
3.http://www.micmiu.com/soa/rpc/thrift-sample/
4.http://blog.chinaunix.net/uid-20357359-id-2876170.html
5.http://baike.baidu.com/view/7287257.htm?fromtitle=RPC&fr=aladdin
RPC学习----Thrift快速入门和Java简单示例的更多相关文章
- Thrift快速入门
Thrift 简单示例 2017-01-19 16:47:57 首先通过先面两个示例简单感受一下Thrift(RPC)服务端与客户端之间的通信...... RPC学习----Thrift快速入门和Ja ...
- Netty学习——Thrift的入门使用
Netty学习——Thrift的入门使用 希望你能够,了解并使用它.因为它是一个效率很高的框架 官网地址:http://thrift.apache.org/ 1.Thrift数据类型 一门技术如果需要 ...
- 前端学习 node 快速入门 系列 —— 初步认识 node
其他章节请看: 前端学习 node 快速入门 系列 初步认识 node node 是什么 node(或者称node.js)是 javaScript(以下简称js) 运行时的一个环境.不是一门语言. 以 ...
- MongoDB学习笔记:快速入门
MongoDB学习笔记:快速入门 一.MongoDB 简介 MongoDB 是由C++语言编写的,是一个基于分布式文件存储的开源数据库系统.在高负载的情况下,添加更多的节点,可以保证服务器性能.M ...
- 前端学习 node 快速入门 系列 —— npm
其他章节请看: 前端学习 node 快速入门 系列 npm npm 是什么 npm 是 node 的包管理器,绝大多数 javascript 相关的包都放在 npm 上. 所谓包,就是别人提供出来供他 ...
- 前端学习 node 快速入门 系列 —— 模块(module)
其他章节请看: 前端学习 node 快速入门 系列 模块(module) 模块的导入 核心模块 在 初步认识 node 这篇文章中,我们在读文件的例子中用到了 require('fs'),在写最简单的 ...
- 前端学习 node 快速入门 系列 —— 简易版 Apache
其他章节请看: 前端学习 node 快速入门 系列 简易版 Apache 我们用 node 来实现一个简易版的 Apache:提供静态资源访问的能力. 实现 直接上代码. - demo - stati ...
- 前端学习 node 快速入门 系列 —— 服务端渲染
其他章节请看: 前端学习 node 快速入门 系列 服务端渲染 在简易版 Apache一文中,我们用 node 做了一个简单的服务器,能提供静态资源访问的能力. 对于真正的网站,页面中的数据应该来自服 ...
- 前端学习 node 快速入门 系列 —— 报名系统 - [express]
其他章节请看: 前端学习 node 快速入门 系列 报名系统 - [express] 最简单的报名系统: 只有两个页面 人员信息列表页:展示已报名的人员信息列表.里面有一个报名按钮,点击按钮则会跳转到 ...
随机推荐
- Python 装饰器学习
Python装饰器学习(九步入门) 这是在Python学习小组上介绍的内容,现学现卖.多练习是好的学习方式. 第一步:最简单的函数,准备附加额外功能 1 2 3 4 5 6 7 8 # -*- c ...
- android bundle存放数据详解
转载自:android bundle存放数据详解 正如大家所知道,Activity之间传递数据,是将数据存放在Intent或者Bundle中 例如: 将数据存放倒Intent中传递: 将数据放到Bun ...
- 如何在IDEA上 添加GIT和maven、mybatis插件
IDEA工具上,添加GIT和maven.mybatis插件,相对比较简单: 首先下载GIT.maven.mybatis. 先添加GIT插件: 首先在IDEA找到file中找到setting,然后搜索g ...
- Servlet--表单、超链接、转发、重定向4种情况的路径
Servlet中相对路径总结 假设web工程使用如下目录结构: 在介绍相对路径和绝对路径前需要先了解几个概念: 服务器的站点根目录:以tomcat服务器为例,tomcat服务器站点根目录就是apach ...
- 有一字符串,包含n个字符。写一函数,将此字符串中从第m个字符开始的全部字符复制成为另一个字符串。
[提交][状态][讨论版] 题目描述 有一字符串,包含n个字符.写一函数,将此字符串中从第m个字符开始的全部字符复制成为另一个字符串. 输入 数字n 一行字符串 数字m 输出 从m开始的子串 样例输入 ...
- Sql With as 用法
with district as ( select * from Area where AbbrTW= N'中國' union all select a.* from Ar ...
- Scala学习笔记之伴生对象
所谓伴生对象, 也是一个Scala中的单例对象, 使用object关键字修饰. 除此之外, 还有一个使用class关键字定义的同名类, 这个类和单例对象存在于同一个文件中, 这个类就叫做这个单例对象的 ...
- Maven的包依赖冲突可引发java.lang.IncompatibleClassChangeError错误
新版API上线后,发现LOG文件没有正常输出.查看Tomcat的Log文件发现如下的错误信息 May , :: AM com.sun.xml.ws.server.sei.EndpointMethodH ...
- CentOS安装squid代理服务器
Squid是一个Linux系统下优秀的代理服务器软件.Squid可以配置普通上网代理(正向代理).反向代理.透明代理.系统是CentOS6.2.Squid主机IP为192.168.1.100. 安装s ...
- python基础知识---操作文件
一.打开文件 open()函数 open函数返回一个文件对象. 用法:open('文件名','模式') 打开文件的模式有: r,只读模式(默认). w,只写模式.[不可读:不存在则创建:存在则删除内 ...