Android二维码之创建
由于微信的推出二维码走进了我们的生活,并且越来越多的人们正在发挥着自己的想象力去使用它,来方便我们的生活,我曾经听说过一个笑话,当我们死后,墓碑上不再有墓志铭,而会出现一个记录你一生信息的二维码,当人们走到你们的墓碑前,掏出手机扫一扫就可以看到你一生的丰功伟绩。这是不是很有意思,我都认这会在不久的将来成为现实,哈哈,玩笑说完了,下面我们来一起学习一下如何在Android开发中让二维码为我们服务。
本篇我将会带领朋友们实现一个记录个人基本信息的二维码设计思路,对于搞过算法的大牛们,这里要让你们失望了,对于二维码生成的算法,本人才疏学浅尚且无法为大家分享,本篇事例的实现我们将借助core.jar实现,对于这个jar包的下载,我为大家提供一个链接,方便大家学习使用:http://pan.baidu.com/s/1bnGZoF9
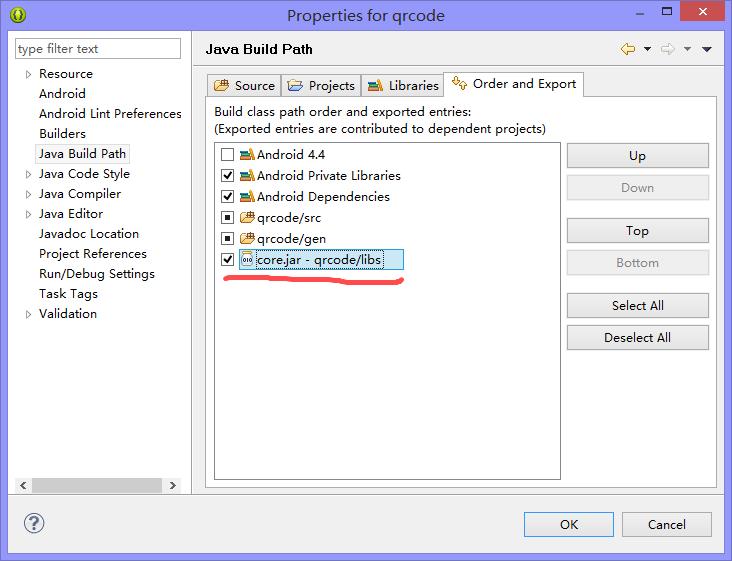
准备好我们的jar包后,我们开始今天的设计,第一步:创建工程,导入jar包
在我们的集成开发环境中,创建一个Android工程项目,为我们今天事例的设计做铺垫。创建好工程后,将我们刚刚下载好的jar包导入到我们的工程中,Ctrl+c我们的jar包,在我们的工程目录下找到libs文件夹Ctrl+v,然后呢?就是通过集成开发环境将我们的jar包导入到工程。
第二步:创建我们的布局文件:
<RelativeLayout xmlns:android="http://schemas.android.com/apk/res/android"

    xmlns:tools="http://schemas.android.com/tools"

    android:layout_width="match_parent"

    android:layout_height="match_parent"

    android:paddingBottom="@dimen/activity_vertical_margin"

    android:paddingLeft="@dimen/activity_horizontal_margin"

    android:paddingRight="@dimen/activity_horizontal_margin"

    android:paddingTop="@dimen/activity_vertical_margin"

    tools:context=".MainActivity" >

  <LinearLayout

            android:layout_width="fill_parent"

            android:layout_height="wrap_content"

            android:orientation="vertical"

            android:id="@+id/ll"

            >

     <!-- 用于展示我们创建的二维码 -->

    <ImageView

        android:id="@+id/imgCode"

        android:layout_width="100dip"

        android:layout_height="100dip"

        android:layout_gravity="center_horizontal" />

            <!-- 公司 -->

            <LinearLayout

                android:layout_width="fill_parent"

                android:layout_height="wrap_content"

                android:orientation="horizontal" >

                <TextView

                    android:layout_width="wrap_content"

                    android:layout_height="wrap_content"

                    android:text="公司" />

                <EditText

                    android:id="@+id/etCompany"

                    android:layout_width="fill_parent"

                    android:layout_height="wrap_content"

                    android:hint="选填" />

            </LinearLayout>

            <!-- 电话 -->

            <LinearLayout

                android:layout_width="fill_parent"

                android:layout_height="wrap_content"

                android:orientation="horizontal" >

                <TextView

                    android:layout_width="wrap_content"

                    android:layout_height="wrap_content"

                    android:text="电话" />

                <EditText

                    android:id="@+id/etPhone"

                    android:layout_width="fill_parent"

                    android:layout_height="wrap_content"

                    android:hint="选填" />

            </LinearLayout>

            <!-- 邮箱 -->

            <LinearLayout

                android:layout_width="fill_parent"

                android:layout_height="wrap_content"

                android:orientation="horizontal" >

                <TextView

                    android:layout_width="wrap_content"

                    android:layout_height="wrap_content"

                    android:text="邮箱" />

                <EditText

                    android:id="@+id/etEmail"

                    android:layout_width="fill_parent"

                    android:layout_height="wrap_content"

                    android:hint="选填" />

            </LinearLayout>

            <!-- 网址 -->

            <LinearLayout

                android:layout_width="fill_parent"

                android:layout_height="wrap_content"

                android:orientation="horizontal" >

                <TextView

                    android:layout_width="wrap_content"

                    android:layout_height="wrap_content"

                    android:text="网址" />

                <EditText

                    android:id="@+id/etWeb"

                    android:layout_width="fill_parent"

                    android:layout_height="wrap_content"

                    android:text="http://" />

            </LinearLayout>

            <Button  android:id="@+id/but"

                android:layout_width="fill_parent"

                android:layout_height="wrap_content"

                android:text="生成二维码"/>

        </LinearLayout>

</RelativeLayout>
第三步:编辑我们Activity:
public class MainActivity extends Activity {

    private EditText etCompany;

    private EditText etPhone;

    private EditText etEmail;

    private EditText etWeb;

    private Bitmap logo;

    private static final int IMAGE_HALFWIDTH = 40;//宽度值,影响中间图片大小

    @Override

    protected void onCreate(Bundle savedInstanceState) {

        super.onCreate(savedInstanceState);

        setContentView(R.layout.activity_main);

        //获得资源图片,可改成获取本地图片或拍照获取图片

        logo=BitmapFactory.decodeResource(super.getResources(), R.drawable.ic_launcher);

        etCompany =(EditText) findViewById(R.id.etCompany);

        etPhone=(EditText) findViewById(R.id.etPhone);

        etEmail =(EditText) findViewById(R.id.etEmail);

        etWeb =(EditText) findViewById(R.id.etWeb);

        findViewById(R.id.but).setOnClickListener(new OnClickListener() {

            @Override

            public void onClick(View v) {

                String company=etCompany.getText().toString().trim() ;

                String phone =etPhone .getText().toString().trim() ;

                String email = etEmail.getText().toString().trim() ;

                String web = etWeb.getText().toString().trim() ;

                //二维码中包含的文本信息

                String contents= "BEGIN:VCARD\nVERSION:3.0\nORG:"+company+"\nTEL:"+phone+"\nURL:"+web+"\nEMAIL:"+email+"\nEND:VCARD";

            try {

                //调用方法createCode生成二维码

                Bitmap bm=createCode(contents, logo, BarcodeFormat.QR_CODE);

                ImageView img=(ImageView)findViewById(R.id.imgCode) ;

                //将二维码在界面中显示

                img.setImageBitmap(bm);

            } catch (WriterException e) {

                e.printStackTrace();

            }

            }

        });

    }

    /**

     * 生成二维码

     * @param string 二维码中包含的文本信息

     * @param mBitmap logo图片

     * @param format  编码格式

     * @return Bitmap 位图

     * @throws WriterException

     */

    public Bitmap createCode(String string,Bitmap mBitmap, BarcodeFormat format)

            throws WriterException {

        Matrix m = new Matrix();

        float sx = (float) 2 * IMAGE_HALFWIDTH / mBitmap.getWidth();

        float sy = (float) 2 * IMAGE_HALFWIDTH

                / mBitmap.getHeight();

        m.setScale(sx, sy);//设置缩放信息

        //将logo图片按martix设置的信息缩放

        mBitmap = Bitmap.createBitmap(mBitmap, 0, 0,

                mBitmap.getWidth(), mBitmap.getHeight(), m, false);

        MultiFormatWriter writer = new MultiFormatWriter();//

        Hashtable<EncodeHintType, String> hst = new Hashtable<EncodeHintType, String>();

        hst.put(EncodeHintType.CHARACTER_SET, "UTF-8");//设置字符编码

        BitMatrix matrix = writer.encode(string, format, 400, 400, hst);//生成二维码矩阵信息

        int width = matrix.getWidth();//矩阵高度

        int height = matrix.getHeight();//矩阵宽度

        int halfW = width / 2;

        int halfH = height / 2;

        int[] pixels = new int[width * height];//定义数组长度为矩阵高度*矩阵宽度,用于记录矩阵中像素信息

        for (int y = 0; y < height; y++) {//从行开始迭代矩阵

            for (int x = 0; x < width; x++) {//迭代列

                if (x > halfW - IMAGE_HALFWIDTH && x < halfW + IMAGE_HALFWIDTH

                        && y > halfH - IMAGE_HALFWIDTH

                        && y < halfH + IMAGE_HALFWIDTH) {//次处位置用于存放图片信息

                    pixels[y * width + x] = mBitmap.getPixel(x - halfW

                            + IMAGE_HALFWIDTH, y - halfH + IMAGE_HALFWIDTH);//记录图片每个像素信息

                } else {

                    if (matrix.get(x, y)) {//如果有黑块点,记录信息

                        pixels[y * width + x] = 0xff000000;//记录黑块信息

                    }

                }

            }

        }

        Bitmap bitmap = Bitmap.createBitmap(width, height,

                Bitmap.Config.ARGB_8888);

        // 通过像素数组生成bitmap

        bitmap.setPixels(pixels, 0, width, 0, 0, width, height);

        return bitmap;

    }

}
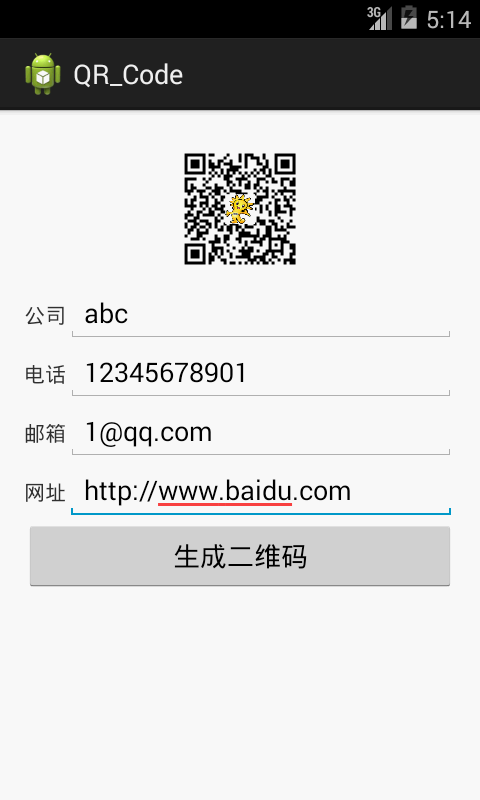
上面的代码注释已经非常详细,这里我再简单说几句,这部分代码分为上下两部分,上部分都是我们经常使用的,下部分则是我们二维码创建的重点。ok到这里我们的效果就实现了,最后上一张效果图:
Android二维码之创建的更多相关文章
- Android二维码识别 开源项目ZXing的编译
Android二维码识别 开源项目ZXing的编译 Android端的条形码/二维码识别功能 因为手机端的输入不是很方便,所以条形码/二维码的扫描是一种很有效的解决手段. 比较流行的手机应用中,常用的 ...
- android 二维码生成+扫描
android 二维码生成+扫描 1.在Android应用当中,很多时候都要用到二维码扫描,来避免让用户手动输入的麻烦. Google官方自己推出了一个二维码开源项目:ZXing库. 2.这里简单介绍 ...
- Android二维码开源项目zxing用例简化和生成二维码、条形码
上一篇讲到:Android二维码开源项目zxing编译,编译出来后有一个自带的測试程序:CaptureActivity比較复杂,我仅仅要是把一些不用的东西去掉,用看起来更方便,二维码和条形码的流行性自 ...
- Android二维码扫描、生成
Android二维码扫描.生成 现在使用二维码作为信息的载体已经越来越普及,那么二维码的生成以及扫描是如何实现的呢 google为我们提供了zxing开源库供我们使用 zxing GitHub源码地址 ...
- Android 二维码 生成和识别(附Demo源码)
今天讲一下目前移动领域很常用的技术——二维码.现在大街小巷.各大网站都有二维码的踪迹,不管是IOS. Android.WP都有相关支持的软件.之前我就想了解二维码是如何工作,最近因为工作需要使用相关技 ...
- Android 二维码 生成和识别(转)
原博客地址 :http://www.cnblogs.com/weixing/archive/2013/08/28/3287120.html 还有几个写的也可以参考一下:http://www.itnos ...
- 【转】Android 二维码 生成和识别(附Demo源码)--不错
原文网址:http://www.cnblogs.com/mythou/p/3280023.html 今天讲一下目前移动领域很常用的技术——二维码.现在大街小巷.各大网站都有二维码的踪迹,不管是IOS. ...
- Android二维码扫描功能的集成开发
二维码开发主要依赖ZXing开源项目 项目地址:https://github.com/zxing/zxing 这个开源项目可以扫描一维,和二维码, 一维码指的是书后面的条形码 首先配置ZXing库和A ...
- XAMARIN ANDROID 二维码扫描示例
现在二维码的应用越来越普及,二维码扫描也成为手机应用程序的必备功能了.本文将基于 Xamarin.Android 平台使用 ZXing.Net.Mobile 做一个简单的 Android 条码扫描示 ...
随机推荐
- angularjs ocLazyLoad分步加载js文件,angularjs ocLazyLoad按需加载js
用angular有一段时间了,平日里只顾着写代码,没有注意到性能优化的问题,而今有时间,于是捋了捋,讲学习过程记录于此: 问题描述:由于采用angular做了网页的单页面应用,需要一次性在主布局中将所 ...
- Runtime 动态加载方法
动态加载 #import"ViewController.h" #import"Person.h" @interfaceViewController() @end ...
- struts2 国际化的一个日期封装bug
输入用户的生日:时间格式是yyyy-MM-dd,这样的.使用struts2,在action中有一个熟悉是:private Date birth;struts2在默认的情况下会将birth值自动绑定,简 ...
- 分享:写了一个 java 调用 C语言 开发的动态库的范例
分享:写了一个 java 调用 C语言 开发的动态库的范例 cfunction.h 代码#pragma once#ifdef __cplusplusextern "C" {#e ...
- AMD加载器实现笔记(三)
上一篇文章中我们为config添加了baseUrl和packages的支持,那么这篇文章中将会看到对shim与paths的支持. 要添加shim与paths,第一要务当然是了解他们的语义与用法.先来看 ...
- 初探ECMAScript6
基础变化 String类型新增了三个方法,不必使用indexOf来判断一个字符串是否在另一个字符串内 //String changes var a = "Hello world"; ...
- java.sql.SQLException: No suitable driver 问题解决
最近在学习java,用到c3p0数据库连接池,遇到一个很奇怪的现象,用main方法测试是可以正常连接数据库的,但是使用jsp调用代码,就会报如下图的错误! 最下面的java.sql.SQLExcept ...
- [异常解决] ubuntu上安装虚拟机遇到的问题(vmware坑了,virtual-box简单安装,在virtual-box中安装精简版win7)
利用周末时间将整个电脑格式化,换成了ubuntu系统- 所谓:扫清屋子再请客! 但是有些软件只在win上有,于是还是考虑装个虚拟机来个——逐步过度策略,一点点地从win上转移到linux上 我的系统是 ...
- Qt QT_BEGIN_NAMESPACE
问题 阅读Qt的Demo源码的时候,经常在头文件中, 声明类型的部分有以下这样的代码: class MyClassA; ///< 自定义类的声明 QT_BEGIN_NAMESPACE class ...
- Android 数据传递(二)Activity与fragment之间的通信
在网上找到了一篇总结的非常好的文章,我这里就贴出他的博文地址.自己就不再写这个方面的总结了. Activity与Fragment通信(99%)完美解决方案