Spring 3.1新特性之一:spring注解之@profile
前言
由于在项目中使用Maven打包部署的时候,经常由于配置参数过多(比如Nginx服务器的信息、ZooKeeper的信息、数据库连接、Redis服务器地址等),导致实际现网的配置参数与测试服务器参数混淆,一旦在部署的时候某个参数忘记修改了,那么就必须重新打包部署,这确实让人感到非常头疼。因此就想到使用Spring中的Profile来解决上面描述的问题,并且在此记录一下其使用的方式,如果有不对的地方,请指正!(感谢)。
本文从如下3方面探讨Spring的Profile:
- Spring中的Profile是什么
- 为什么要使用Profile
- 如何使用Profile
1.Spring中的Profile 是什么?
Spring中的Profile功能其实早在Spring 3.1的版本就已经出来,它可以理解为我们在Spring容器中所定义的Bean的逻辑组名称,只有当这些Profile被激活的时候,才会将Profile中所对应的Bean注册到Spring容器中。举个更具体的例子,我们以前所定义的Bean,当Spring容器一启动的时候,就会一股脑的全部加载这些信息完成对Bean的创建;而使用了Profile之后,它会将Bean的定义进行更细粒度的划分,将这些定义的Bean划分为几个不同的组,当Spring容器加载配置信息的时候,首先查找激活的Profile,然后只会去加载被激活的组中所定义的Bean信息,而不被激活的Profile中所定义的Bean定义信息是不会加载用于创建Bean的。
2.为什么要使用Profile
由于我们平时在开发中,通常会出现在开发的时候使用一个开发数据库,测试的时候使用一个测试的数据库,而实际部署的时候需要一个数据库。以前的做法是将这些信息写在一个配置文件中,当我把代码部署到测试的环境中,将配置文件改成测试环境;当测试完成,项目需要部署到现网了,又要将配置信息改成现网的,真的好烦。。。而使用了Profile之后,我们就可以分别定义3个配置文件,一个用于开发、一个用户测试、一个用户生产,其分别对应于3个Profile。当在实际运行的时候,只需给定一个参数来激活对应的Profile即可,那么容器就会只加载激活后的配置文件,这样就可以大大省去我们修改配置信息而带来的烦恼。
3.配置Spring profile
在介绍完Profile以及为什么要使用它之后,下面让我们以一个例子来演示一下Profile的使用,这里还是使用传统的XML的方式来完成Bean的装配。
3.1 例子需要的Maven依赖
由于只是做一个简单演示,因此无需引入Spring其他模块中的内容,只需引入核心的4个模块+测试模块即可。
<properties>

        <project.build.sourceEncoding>UTF-8</project.build.sourceEncoding>

        <!--指定Spring版本,该版本必须大于等于3.1-->

        <spring.version>4.2.4.RELEASE</spring.version>

        <!--指定JDK编译环境-->

        <java.version>1.7</java.version>

    </properties>

    <dependencies>

        <dependency>

            <groupId>org.springframework</groupId>

            <artifactId>spring-core</artifactId>

            <version>${spring.version}</version>

        </dependency>

        <dependency>

            <groupId>org.springframework</groupId>

            <artifactId>spring-beans</artifactId>

            <version>${spring.version}</version>

        </dependency>

        <dependency>

            <groupId>org.springframework</groupId>

            <artifactId>spring-context</artifactId>

            <version>${spring.version}</version>

        </dependency>

        <dependency>

            <groupId>org.springframework</groupId>

            <artifactId>spring-expression</artifactId>

            <version>${spring.version}</version>

        </dependency>

        <dependency>

            <groupId>org.springframework</groupId>

            <artifactId>spring-test</artifactId>

            <version>${spring.version}</version>

            <scope>test</scope>

        </dependency>

        <dependency>

            <groupId>junit</groupId>

            <artifactId>junit</artifactId>

            <version>4.12</version>

            <scope>test</scope>

        </dependency>

    </dependencies>

    <build>

        <plugins>

            <plugin>

                <groupId>org.apache.maven.plugins</groupId>

                <artifactId>maven-compiler-plugin</artifactId>

                <version>2.3.2</version>

                <configuration>

                    <source>${java.version}</source>

                    <target>${java.version}</target>

                </configuration>

            </plugin>

        </plugins>

    </build>
3.2 例子代码
package com.panlingxiao.spring.profile.service;

/**

 * 定义接口,在实际中可能是一个数据源

 * 在开发的时候与实际部署的时候分别使用不同的实现

 */

public interface HelloService {

    public String sayHello();

}
定义生产环境使用的实现类
package com.panlingxiao.spring.profile.service.produce;

import org.springframework.beans.factory.annotation.Value;

import org.springframework.stereotype.Component;

import com.panlingxiao.spring.profile.service.HelloService;

/**

 * 模拟在生产环境下需要使用的类

 */

@Component

public class ProduceHelloService implements HelloService {

    //这个值读取生产环境下的配置注入

    @Value("#{config.name}")

    private String name;

    public String sayHello() {

        return String.format("hello,I'm %s,this is a produce environment!",

                name);

    }

}
定义开发下使用的实现类
package com.panlingxiao.spring.profile.service.dev;

import org.springframework.beans.factory.annotation.Value;

import org.springframework.stereotype.Component;

import com.panlingxiao.spring.profile.service.HelloService;

/**

 * 模拟在开发环境下使用类

 */

@Component

public class DevHelloService implements HelloService{

    //这个值是读取开发环境下的配置文件注入

    @Value("#{config.name}")

    private String name;

    public String sayHello() {

        return String.format("hello,I'm %s,this is a development environment!", name);

    }

}
定义配置Spring配置文件
<?xml version="1.0" encoding="UTF-8"?>

<beans xmlns="http://www.springframework.org/schema/beans"

    xmlns:xsi="http://www.w3.org/2001/XMLSchema-instance" xmlns:context="http://www.springframework.org/schema/context"

    xmlns:util="http://www.springframework.org/schema/util"

    xsi:schemaLocation="http://www.springframework.org/schema/beans http://www.springframework.org/schema/beans/spring-beans-4.2.xsd

        http://www.springframework.org/schema/context http://www.springframework.org/schema/context/spring-context-4.2.xsd

        http://www.springframework.org/schema/util http://www.springframework.org/schema/util/spring-util-4.2.xsd">

    <!-- 定义开发的profile -->

    <beans profile="development">

        <!-- 只扫描开发环境下使用的类 -->

        <context:component-scan base-package="com.panlingxiao.spring.profile.service.dev" />

        <!-- 加载开发使用的配置文件 -->

        <util:properties id="config" location="classpath:dev/config.properties"/>

    </beans>

    <!-- 定义生产使用的profile -->

    <beans profile="produce">

        <!-- 只扫描生产环境下使用的类 -->

        <context:component-scan

            base-package="com.panlingxiao.spring.profile.service.produce" />

        <!-- 加载生产使用的配置文件 -->

        <util:properties id="config" location="classpath:produce/config.properties"/>

    </beans>

</beans>
开发使用的配置文件,dev/config.properties
name=Tomcat生产使用的配置文件,produce/config.properties
name=Jetty编写测试类
package com.panlingxiao.spring.profile.test;

import org.junit.Test;

import org.junit.runner.RunWith;

import org.springframework.beans.factory.annotation.Autowired;

import org.springframework.test.context.ActiveProfiles;

import org.springframework.test.context.ContextConfiguration;

import org.springframework.test.context.junit4.SpringJUnit4ClassRunner;

import com.panlingxiao.spring.profile.service.HelloService;

@RunWith(SpringJUnit4ClassRunner.class)

@ContextConfiguration(locations="classpath:spring-profile.xml")

/*

 * 使用注册来完成对profile的激活,

 * 传入对应的profile名字即可,可以传入produce或者dev

 */

@ActiveProfiles("produce")

public class TestActiveProfile {

    @Autowired

    private HelloService hs;

    @Test

    public void testProfile() throws Exception {

        String value = hs.sayHello();

        System.out.println(value);

    }

}


4.激活Profile的其他几种方式
上面介绍了如何使用Profile以及在单元测试的环境下激活指定的Profile,除了使用@ActiveProfiles注解来激活profile外,Spring还提供了其他的几种激活Profile,这些方式在实际的开发中使用的更多。
Spring通过两个不同属性来决定哪些profile可以被激活(注意:profile是可以同时激活多个的),一个属性是spring.profiles.active和spring.profiles.default。(注:spring在确定那个profile处于激活状态的时,需要依赖两个独立的属性:spring.profiles.active和spring.profile.default。如果设置了spring.profiles.actives属性,那么它的值就会用来确定那个profile是激活的。如果没有设置spring.profiles.active属性的话,那spring将会查找spring.profiles.default的值。如果spring.profiles.active和spring.profiles.default均没有设置。)
这两个常量值在Spring的AbstractEnvironment中有定义,查看AbstractEnvironment源码:
/**

     * Name of property to set to specify active profiles: {@value}. Value may be comma

     * delimited.

     * <p>Note that certain shell environments such as Bash disallow the use of the period

     * character in variable names. Assuming that Spring's {@link SystemEnvironmentPropertySource}

     * is in use, this property may be specified as an environment variable as

     * {@code SPRING_PROFILES_ACTIVE}.

     * @see ConfigurableEnvironment#setActiveProfiles

     */

    public static final String ACTIVE_PROFILES_PROPERTY_NAME = "spring.profiles.active";

    /**

     * Name of property to set to specify profiles active by default: {@value}. Value may

     * be comma delimited.

     * <p>Note that certain shell environments such as Bash disallow the use of the period

     * character in variable names. Assuming that Spring's {@link SystemEnvironmentPropertySource}

     * is in use, this property may be specified as an environment variable as

     * {@code SPRING_PROFILES_DEFAULT}.

     * @see ConfigurableEnvironment#setDefaultProfiles

     */

    public static final String DEFAULT_PROFILES_PROPERTY_NAME = "spring.profiles.default";
如果当spring.profiles.active属性被设置时,那么Spring会优先使用该属性对应值来激活Profile。当spring.profiles.active没有被设置时,那么Spring会根据spring.profiles.default属性的对应值来进行Profile进行激活。如果上面的两个属性都没有被设置,那么就不会有任务Profile被激活,只有定义在Profile之外的Bean才会被创建。我们发现这两个属性值其实是Spring容器中定义的属性,而我们在实际的开发中很少会直接操作Spring容器本身,所以如果要设置这两个属性,其实是需要定义在特殊的位置,让Spring容器自动去这些位置读取然后自动设置,这些位置主要为如下定义的地方:
- 作为SpringMVC中的DispatcherServlet的初始化参数
<servlet>

    <servlet-name>springMVC</servlet-name>

    <servlet-class>org.springframework.web.servlet.DispatcherServlet</servlet-class>

    <init-param>

        <param-name>contextConfigLocation</param-name>

        <param-value>classpath:/spring-servlet.xml</param-value>

    </init-param>

    <init-param>

        <param-name>spring.profiles.default</param-name>

        <param-value>dev</param-value>

    </init-param>

    <load-on-startup>1</load-on-startup>

</servlet>- 作为Web 应用上下文中的初始化参数
- 作为JNDI的入口
- 作为环境变量
- 作为虚拟机的系统参数
- 在spring-junit使用使用@AtivceProfile来进行激活
@RunWith(SpringJUnit4ClassRunner.class)

@ContextConfiguration(locations = "/spring-config.xml")

@ActiveProfiles("dev")

public class MainTest {

    ...

}- 在servlet上下文中进行配置(web.xml)
<context-param>

    <param-name>spring.profiles.default</param-name>

    <param-value>dev</param-value>

</context-param>
我们在实际的使用过程中,可以定义默认的profile为开发环境,当实际部署的时候,主需要在实际部署的环境服务器中将spring.profiles.active定义在环境变量中来让Spring自动读取当前环境下的配置信息,这样就可以很好的避免不同环境而频繁修改配置文件的麻烦。
spring boot中的@profile使用示例
package com.dxz.demo.profile;

public interface ProductRpc {

    public String productBaseInfo(Long sku);

}

package com.dxz.demo.profile.impl;

import org.springframework.context.annotation.Profile;

import org.springframework.stereotype.Service;

import com.dxz.demo.profile.ProductRpc;

/** 配置生产环境调用类 **/

@Service("productRpc")

@Profile("dev")

public class MockProductRpcImpl implements ProductRpc {

    public String productBaseInfo(Long sku) {

        return "iphone7";

    }

}

package com.dxz.demo.profile.impl;

import org.springframework.context.annotation.Profile;

import org.springframework.stereotype.Service;

import com.dxz.demo.profile.ProductRpc;

/** 配置生产环境调用类 **/

@Service("productRpc")

@Profile("product")

public class ProductRpcImpl implements ProductRpc {

    @Override

    public String productBaseInfo(Long sku) {

        return "product env";

    }

}

package com.dxz.demo.profile.impl;

import javax.annotation.Resource;

import org.springframework.web.bind.annotation.RequestMapping;

import org.springframework.web.bind.annotation.RestController;

import com.dxz.demo.profile.ProductRpc;

/** 调用类 **/

@RestController

public class Client {

    @Resource(name = "productRpc")

    private ProductRpc productRpc;

    @RequestMapping(value = "demo")

    public void demo() {

        System.out.println("in demo()");

        String skuInfo = productRpc.productBaseInfo(123123L);

        System.out.println(skuInfo);

    }

}
在IDE里激活profile方法
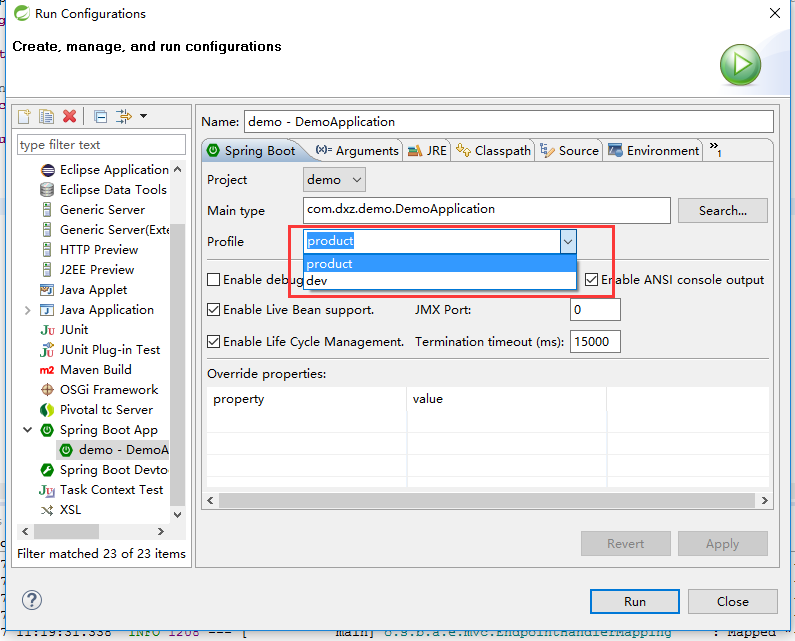
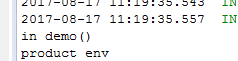
如选择product后,运行结果如下,
转自:http://www.jianshu.com/p/948c303b2253
Spring 3.1新特性之一:spring注解之@profile的更多相关文章
- Java8新特性之重复注解(repeating annotations)浅析
Java8新特性之重复注解(repeating annotations)浅析 学习了:https://www.jb51.net/article/50827.htm
- Python 3 新特性:类型注解——类似注释吧,反正解释器又不做校验
Python 3 新特性:类型注解 Crossin 上海交通大学 计算机应用技术硕士 95 人赞同了该文章 前几天有同学问到,这个写法是什么意思: def add(x:int, y:int) - ...
- Spring 3.1新特性之二:@Enable*注解的源码,spring源码分析之定时任务Scheduled注解
分析SpringBoot的自动化配置原理的时候,可以观察下这些@Enable*注解的源码,可以发现所有的注解都有一个@Import注解.@Import注解是用来导入配置类的,这也就是说这些自动开启的实 ...
- 【2.0新特性】Spring Boot 2.0新特性
以Java 8 为基准 Spring Boot 2.0 要求Java 版本必须8以上, Java 6 和 7 不再支持. 内嵌容器包结构调整 为了支持reactive使用场景,内嵌的容器包结构被重构了 ...
- 我这样回答了Spring 5的新特性,面试官对我刮目相看
最近,有一个小伙伴拿到了自己满意的Offer,和他交谈的过程中得知他面试官问他关于Spring的问题比较多,其中最让面试官满意的就是自己回答关于Spring 5的知识点回答的不错. Spring5于2 ...
- Spring Cloud Greenwich 新特性和F升级分享
2019.01.23 期待已久的Spring Cloud Greenwich 发布了release版本,作为我们团队也第一时间把RC版本替换为release,以下为总结,希望对你使用Spring Cl ...
- Spring 3.1新特性之三:Spring对声明式缓存的支持
一.概述: Spring 3.1 引入了激动人心的基于注释(annotation)的缓存(cache)技术,它本质上不是一个具体的缓存实现方案(例如EHCache 或者 OSCache),而是一个对缓 ...
- 【Finchley】【新特性】Spring Cloud Finchley 新特性
Finchley 正式版的发布貌似经历了相当长的时间,这次的重大发布主要带来了以下 4 项重大更新. 重大更新 1.新增 Spring Cloud Gateway 组件 Spring Cloud Ga ...
- 【servlet3.0新特性】Annotation注解配置
servlet3.0新特性Servlet3.0引入的若干重要新特性,包括异步处理.新增的注解支持.可插性支持等等,为读者顺利向新版本过渡扫清障碍.Servlet3.0新特性概述Servlet3.0作为 ...
随机推荐
- 玩转X-CTR100 l STM32F4 l W25Q64 SPI串行FLASH存储
我造轮子,你造车,创客一起造起来!塔克创新资讯[塔克社区 www.xtark.cn ][塔克博客 www.cnblogs.com/xtark/ ] 本文介绍X-CTR100控制器 板载FLA ...
- MyEclipse 2017 CI 9 发布(附下载)
挑战全年最低价!MyEclipse线上狂欢继续!火热开启中>> 在进入年底之时,2017 CI 9是我们最大的版本发布之一.在新版本中,我们添加了对Angular 5和TypeScript ...
- core servlets & server pages 上面的HttpClient GUI工具
我没怎么细读源码,等下次详细看的时候将这句话去掉. import java.awt.*; import java.awt.event.*; import java.io.*; import java. ...
- php session和cookie知识
- TJson.format() 输出错误的CRLF
下面的JSON串: { "a":"x=\"a,b\"" } 通过下面代码输出,多了CRLF: procedure JsonFormatTes ...
- CSS3之border-image
先上效果图,类似于IPHONE手机左上角的返回按钮样式,如果是在CSS2那么就要做一张背景图片扩展就没那么灵活了,CSS3内就不需要了,CSS3样式挺强大方便的. 源图片: 样式: .banner { ...
- Android_ndk_jni_hello-jni_hacking
/*************************************************************************** * Android_ndk_jni_hello ...
- 如何查看Window10系统隐藏文件夹
1 . 打开我的电脑(此电脑)等等诸如此类的称呼 2 . 点击左上角的查看选项 3 . 选中“隐藏的选项” 4 . 完成
- CodeForces - 1093F:Vasya and Array (DP&计数)
题意:N,K,L,以及给定长度为N的序列,表示其对应的颜色,-1表示还没有涂色,现在让你去涂色,使得最后没有大于等于L的连续的同色的情况. 思路:我们用dp[i][j]表示第i个位置颜色为j的合法方案 ...
- CF1142E/1143B Lynyrd Skynyrd
CF1142E/1143B Lynyrd Skynyrd 开始读错题了,以为是连续的一段,敲完后才发现是 \(subsequence\) ... 考虑对于 \(a\) 中的每个 \(a_i\) 找到它 ...