OpenWRT使用wifidog实现强制认证的WIFI热点
首先安装wifidog到OpenWRT的路由器:
opkg update
opkg install wifidog
wifidog依赖下面这些模块:
iptables-mod-extra
iptables-mod-ipopt
kmod-ipt-nat
iptables-mod-nat-extra
libpthread
由于trunk的固件更新会比较频繁,会导致直接opkg install wifidog安装不了,如果你凑巧又没有备份与固件对应的Packages的话,就需要到http://downloads.openwrt.org/snapshots/trunk升级固件,然后再安装wifidog。我备份了一个2013年7月份(kernel =3.10.3-1-9da5017d589c0594e545ab00a51eecea)的版本的Packages,需要的话拿去用:
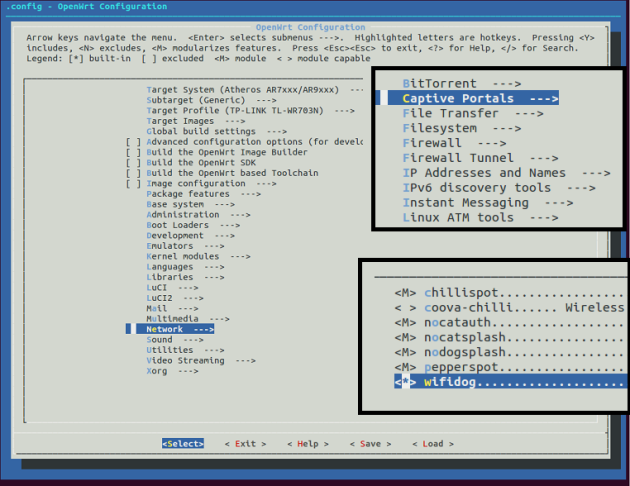
如果你的路由器不是openwrt官方支持的版本的话,那就需要自己编译固件。make menuconfig后,在Network–>Captive Portals中选择wifidog.
安装完成后,
/etc/init.d/wifidog enable
/etc/init.d/wifidog start
这时会抛出一个错误,因为我们还没有设置AuthServer的信息。关于安装wifidog更多的信息可以参考:http://wiki.openwrt.org/doc/howto/wireless.hotspot.wifidog
下面安装Auth Server,按照官方的说法:
AuthPuppy is the next generation authentication server for Wifidog networks.
源文档 <http://www.authpuppy.org/>
不过貌似这wifidog和Authpuppy都已经N久没更新了。。。
AuthPutty是需要安装apache2, php5和MySQL。详细介绍在这里:http://www.authpuppy.org/doc/Getting_Started (Windows版点这里)。
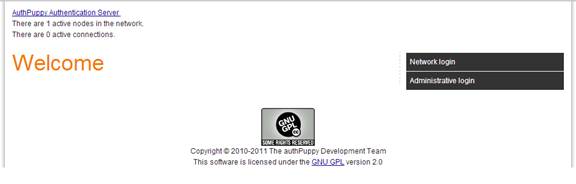
安装成功后,访问AuthPuppy会要求设置一些数据库信息,全部设置完成后能看到首页:
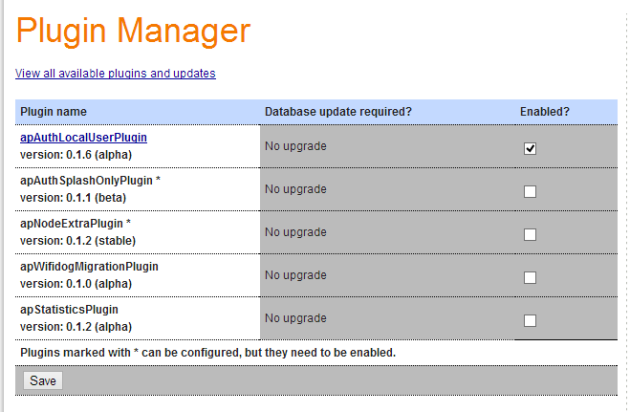
当然了,我们还需要设置管理员的账号。
进入Manage plugins,Install apAuthLocalUserPlugin,记得要enable这个插件。
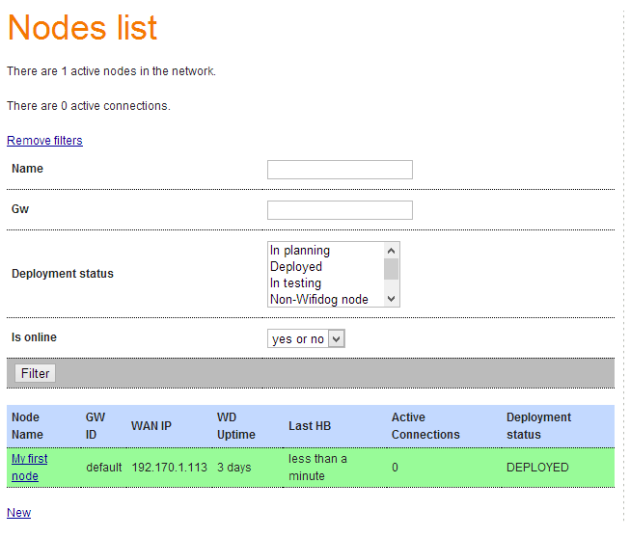
然后,点击Manage Nodes,把默认节点的status改成deployed。这个GW(Gateway) ID default后面配置wifidog.conf的时候需要使用。
到这里,AuthPuppy就基本配置完毕了。
下面回到路由器,编辑wifidog.conf,一般情况下,我们之后配置ExternalInterface,GatewayInterface和AuthServer这三项就可以,其他默认。下面是我的配置:
GatewayIDdefault #注意这个ID必须跟AuthPuppy的GW ID一致
# Parameter: ExternalInterface
# Default: NONE
# Optional
#
# Set this to the external interface (the one going out to the Inernet or your larger LAN).
# Typically vlan1 for OpenWrt, and eth0 or ppp0 otherwise,
# Normally autodetected
ExternalInterface eth0 #路由器外网的物理接口
# Parameter: GatewayInterface
# Default: NONE
# Mandatory
#
# Set this to the internal interface (typically your wifi interface).
# Typically br-lan for OpenWrt, and eth1, wlan0, ath0, etc. otherwise
GatewayInterface wlan0 #路由器内网的物理接口
AuthServer {
Hostname 192.170.1.104
SSLAvailable no
Path /
}
CheckInterval 60
ClientTimeout 5
FirewallRuleSet global {
}
FirewallRuleSet validating-users {
FirewallRule allow to 0.0.0.0/0
}
FirewallRuleSet known-users {
FirewallRule allow to 0.0.0.0/0
}
FirewallRuleSet unknown-users {
FirewallRule allow udp port 53
FirewallRule allow tcp port 53
FirewallRule allow udp port 67
FirewallRule allow tcp port 67
}
FirewallRuleSet locked-users {
FirewallRule block to 0.0.0.0/0
}
注意这个Interface是物理接口,而不是下面OpenWRT web界面中看到的interface。注意不是下面这个:
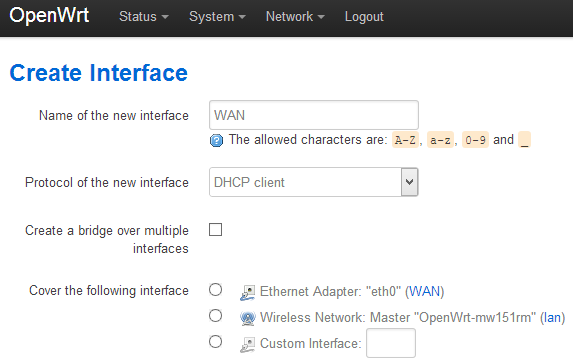
可以看到我的Interface里面没有wlan0之类的选项,/etc/config/network里面也看不到。
root@OpenWrt:~# cat /etc/config/network
config interface ‘loopback’
option ifname ‘lo’
option proto ‘static’
option ipaddr ‘127.0.0.1’
option netmask ‘255.0.0.0’
config globals ‘globals’
option ula_prefix ‘fd09:fd03:490d::/48′
config interface ‘lan’
option proto ‘static’
option ipaddr ‘192.168.1.1’
option netmask ‘255.255.255.0’
option ip6assign ’60’
option _orig_ifname ‘eth0′
option _orig_bridge ‘false’
config interface ‘WAN’
option proto ‘dhcp’
option _orig_ifname ‘gretap0′
option _orig_bridge ‘false’
option ifname ‘eth0′
之前我用gretap0和eth0设置ExternalInterface和GatewayInterface,不行。反着来也不行。网上搜了一圈,找到下面的方法来获取physical interface:
root@OpenWrt:~# ls -l /sys/class/net
lrwxrwxrwx 1 root root 0 Jan 1 1970 eth0 -> ../../devices/platform/ag71xx.0/net/eth0
lrwxrwxrwx 1 root root 0 Jan 1 1970 lo -> ../../devices/virtual/net/lo
lrwxrwxrwx 1 root root 0 Aug 2 15:58 wlan0 -> ../../devices/platform/ar933x_wmac/net/wlan0
OK,原来我这边也是有wlan0这个interface的,找到之后添加在wifidog.conf上。重启wifidog,成功。
另外:
You can also run wifidog in foreground/debug mode:
wifidog -f -d 7
-f means to run in foreground (do not become a background daemon)
-d 7 increases debug output level to the maximum
源文档 <http://wiki.openwrt.org/doc/howto/wireless.hotspot.wifidog>
OpenWRT使用wifidog实现强制认证的WIFI热点的更多相关文章
- [转载]OpenWRT使用wifidog实现强制认证的WIFI热点 | 半个橙子
首先安装wifidog到OpenWRT的路由器: opkg update opkg install wifidog wifidog依赖下面这些模块: iptables-mod-extra iptabl ...
- OpenWRT TP_LINK703N 校园网 锐捷认证解决办法
OpenWRT TP_LINK703N 校园网 锐捷认证解决办法 一.准备的工具 1) SSH登录工具,推荐使用MobaXterm_Personal下载链接https://moba.en.s ...
- 一行代码实现笔记本跳过微信认证连接WIFI
一行代码实现笔记本跳过微信认证连接WIFI 本文作者原创,没有参考其他文章,方法很简单但是很实用,转载请注明出处,谢谢! 问题 有一些WIFI需要通过微信认证才能连接,手机当然是可以的,但是我们手头的 ...
- Android 开发 创建WiFi、WiFi热点 ---开发集合
WIFI 权限 <uses-permission android:name="android.permission.CHANGE_WIFI_STATE" /> < ...
- 创建假的wifi热点
本帖介绍怎么创建假的wifi热点,然后抓取连接到这个wifi用户的敏感数据.我们还会给周围的无线路由器发送未认证的包,使这些路由器瘫痪,强迫用户连接(或自动连接)我们创建的假wifi热点. 这种攻击也 ...
- Android WiFi开发教程(一)——WiFi热点的创建与关闭
相对于BlueTooth,WiFi是当今使用最广的一种无线网络传输技术, 几乎所有智能手机.平板电脑和笔记本电脑都支持Wi-Fi上网.因此,掌握基本的WiFI开发技术是非常必要的.本教程将围绕一个小D ...
- 用DD-WRT自建计费WiFi热点
架设无线网络(Wlan)向周围的用户有偿共享网络. 传统的方法,能够使用专业的无线与宽带计费网关设备和软件.比方MikroTik等. 只是,对于个人架设WiFi热点来说.这些方案太过昂贵,安装设置也很 ...
- 树莓派搭建钓鱼wifi热点
我们连接的公共wifi其实是非常不安全的网络,骇客可以利用wifi路由设备进行中间人攻击,劫持DNS伪造钓鱼网站.接下来我会做个简单的实验,伪造中国电信的路由ChinaNet并发射出热点wifi等待别 ...
- Linux创建WiFi热点
手机流量用完,需要开WiFi,由于是LinuxMint,感觉配置还算容易,找到一个不错的教程,收藏一下,以备后用.除了修改配置文件那步在我的电脑不需要外其他基本正确,而且Mint本来就衍生自Ubunt ...
随机推荐
- C#基于SMTP协议和SOCKET通信,实现邮件内容和附件的发送,并可隐藏收件人
经过几天的努力,从完全不懂SMTP到折腾出个可以发送邮件内容和附件的DEMO.话少说,直接上代码. using System; using System.Collections.Generic; us ...
- QQ去除未读状态的动画
QQ去除未读状态的动画 by 伍雪颖 watermark/2/text/aHR0cDovL2Jsb2cuY3Nkbi5uZXQvcmFpbmxlc3Zpbw==/font/5a6L5L2T/fonts ...
- ASP.NET Web API中实现版本的几种方式
在ASP.NET Web API中,当我们的API发生改变,就涉及到版本问题了.如何实现API的版本呢? 1.通过路由设置版本 最简单的一种方式是通过路由设置,不同的路由,不同的版本,不同的contr ...
- 在ASP.NET Web API中使用OData的单例模式
从OData v4开始增加了对单例模式的支持,我们不用每次根据主键等来获取某个EDM,就像在C#中使用单例模式一样.实现方式大致需要两步: 1.在需要实现单例模式的导航属性上加上[Singleton] ...
- C#编程(五十三)----------字典Dictionary<TKey,TValue>
字典 关键字:Dicitionary 说明: 必须包含命名空间System.Collection.Generic Dictionary里面的每一个元素都是一个键值对(由两个元组组成:键和值). 键必须 ...
- Android4.1中BinderService的作用
http://blog.csdn.net/lsdmx2016/article/details/8772583 Android4.1 中出现了一个新的类,BinderService,所有的Native ...
- spring 4.1.4 发布
Spring 框架今天发布了三个更新版本,分别是 4.1.4.4.0.9 和 3.2.13 版本. 这三个版本都是新年的维护版本,修复了各种小 bug,小改进等. via spring blog De ...
- Java 条件编译
在C/C++中,使用#ifdef…#endif的代码,如果不满足条件,编译器是不会对这部分代码进行编译的.Java中并没有这种“条件编译”特性.这种特性在C语言里是用来解决代码的跨平台问题的,可以通过 ...
- 「BZOJ」「3262」陌上花开
CDQ分治 WA :在solve时,对y.z排序以后,没有处理「y.z相同」的情况,也就是说可能(1,2,3)这个点被放到了(2,2,3)的后面,也就是统计答案在前,插入该点在后……也就没有统计到! ...
- 使用C++ Builder XE5获取Sensor值之Light Sensor
献上代码C++代码,仅供參考. 若使用Delphi.请參考文献,http://blogs.embarcadero.com/davidi/2013/12/02/43032/ 一定记得要安装FireMon ...