eclipse Maven 使用记录 ------ 建立 webapp项目
<?xml version="1.0" encoding="UTF-8"?><projectDescription><name>mmvc</name><comment></comment><projects></projects><buildSpec><buildCommand><name>org.eclipse.wst.jsdt.core.javascriptValidator</name><arguments></arguments></buildCommand><buildCommand><name>org.eclipse.jdt.core.javabuilder</name><arguments></arguments></buildCommand><buildCommand><name>org.eclipse.wst.common.project.facet.core.builder</name><arguments></arguments></buildCommand><buildCommand><name>org.eclipse.wst.validation.validationbuilder</name><arguments></arguments></buildCommand><buildCommand><name>org.eclipse.m2e.core.maven2Builder</name><arguments></arguments></buildCommand></buildSpec><natures><nature>org.eclipse.m2e.core.maven2Nature</nature><nature>org.eclipse.jem.workbench.JavaEMFNature</nature><nature>org.eclipse.wst.common.modulecore.ModuleCoreNature</nature><nature>org.eclipse.wst.common.project.facet.core.nature</nature><nature>org.eclipse.jdt.core.javanature</nature><nature>org.eclipse.wst.jsdt.core.jsNature</nature></natures></projectDescription>
<?xml version="1.0" encoding="UTF-8"?><classpath><classpathentry kind="src" path="/src/main/webapp"/> //改这里<classpathentry kind="con" path="org.eclipse.wst.jsdt.launching.JRE_CONTAINER"/><classpathentry kind="con" path="org.eclipse.wst.jsdt.launching.WebProject"><attributes><attribute name="hide" value="true"/></attributes></classpathentry><classpathentry kind="con" path="org.eclipse.wst.jsdt.launching.baseBrowserLibrary"/><classpathentry kind="output" path=""/></classpath>
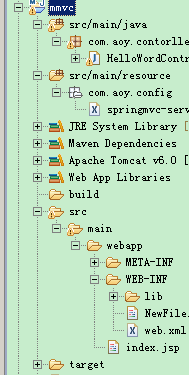
<?xml version="1.0" encoding="UTF-8"?><project-modules id="moduleCoreId" project-version="1.5.0"><wb-module deploy-name="mmvc"><wb-resource deploy-path="/" source-path="/src/main/webapp" tag="defaultRootSource"/><wb-resource deploy-path="/WEB-INF/classes" source-path="/src/main/java"/><wb-resource deploy-path="/WEB-INF/classes" source-path="/src/main/resource"/><property name="context-root" value="mmvc"/><property name="java-output-path" value="/mmvc/build/classes"/></wb-module></project-modules>
<project xmlns="http://maven.apache.org/POM/4.0.0" xmlns:xsi="http://www.w3.org/2001/XMLSchema-instance" xsi:schemaLocation="http://maven.apache.org/POM/4.0.0 http://maven.apache.org/xsd/maven-4.0.0.xsd"><modelVersion>4.0.0</modelVersion><groupId>mmvc</groupId><artifactId>mmvc</artifactId><version>1</version><packaging>war</packaging><properties><project.build.sourceEncoding>UTF-8</project.build.sourceEncoding><spring.version>3.0.5.RELEASE</spring.version></properties><dependencies><dependency><groupId>org.apache.openejb</groupId><artifactId>javaee-api</artifactId><version>5.0-1</version><scope>provided</scope></dependency><dependency><groupId>javax.faces</groupId><artifactId>jsf-api</artifactId><version>1.2_04</version><scope>provided</scope></dependency><dependency><groupId>javax.servlet</groupId><artifactId>jstl</artifactId><version>1.2</version><scope>provided</scope></dependency><dependency><groupId>javax.servlet.jsp</groupId><artifactId>jsp-api</artifactId><version>2.1</version><scope>provided</scope></dependency><dependency><groupId>javax.faces</groupId><artifactId>jsf-impl</artifactId><version>1.2_04</version><scope>provided</scope></dependency><dependency><groupId>org.springframework</groupId><artifactId>spring-webmvc</artifactId><version>${spring.version}</version><scope>runtime</scope></dependency></dependencies><build><!-- 列出所依赖的 plugin mvn自动选择包含的 --><pluginManagement><plugins><plugin><groupId>org.apache.maven.plugins</groupId><artifactId>maven-compiler-plugin</artifactId><configuration><source>1.6</source><target>1.6</target></configuration></plugin><plugin><groupId>org.eclipse.m2e</groupId><artifactId>lifecycle-mapping</artifactId><version>1.0.0</version><configuration><lifecycleMappingMetadata><pluginExecutions><pluginExecution><pluginExecutionFilter><groupId>org.apache.maven.plugins</groupId><artifactId>maven-dependency-plugin</artifactId><versionRange>[2.0,)</versionRange><goals><goal>copy-dependencies</goal></goals></pluginExecutionFilter><action><ignore /></action></pluginExecution></pluginExecutions></lifecycleMappingMetadata></configuration></plugin></plugins></pluginManagement><plugins><!-- remove jar plugins --><plugin><groupId>org.apache.maven.plugins</groupId><artifactId>maven-clean-plugin</artifactId><executions><execution><id>clean</id><phase>install</phase><goals><goal>clean</goal></goals><configuration><directory>/src/main/webapp/WEB-INF/lib</directory></configuration></execution></executions></plugin><!-- copy jar plugins --><plugin><groupId>org.apache.maven.plugins</groupId><artifactId>maven-dependency-plugin</artifactId><executions><execution><id>copy-dependencies</id><phase>package</phase><goals><goal>copy-dependencies</goal></goals><configuration><outputDirectory>src/main/webapp/WEB-INF/lib</outputDirectory><excludeTransitive>false</excludeTransitive><stripVersion>false</stripVersion> <!-- 复制jar 的时候去掉版本信息 true : 去掉 false: 不去掉 --><includeScope>runtime</includeScope></configuration></execution></executions></plugin></plugins></build></project>
eclipse Maven 使用记录 ------ 建立 webapp项目的更多相关文章
- eclipse Maven 使用记录 ------ 建立app项目
maven 项目构建工具 , 如今已逐渐取代ant的笨拙配置方式 ,使项目管理更加简单,规范,结构更加清晰,这里记录跟eclipse集成的一些步骤 1.从apache maven项目下下载maven ...
- 用Eclipse Maven 创建 Web 3.0 项目问题 正确的处理步骤
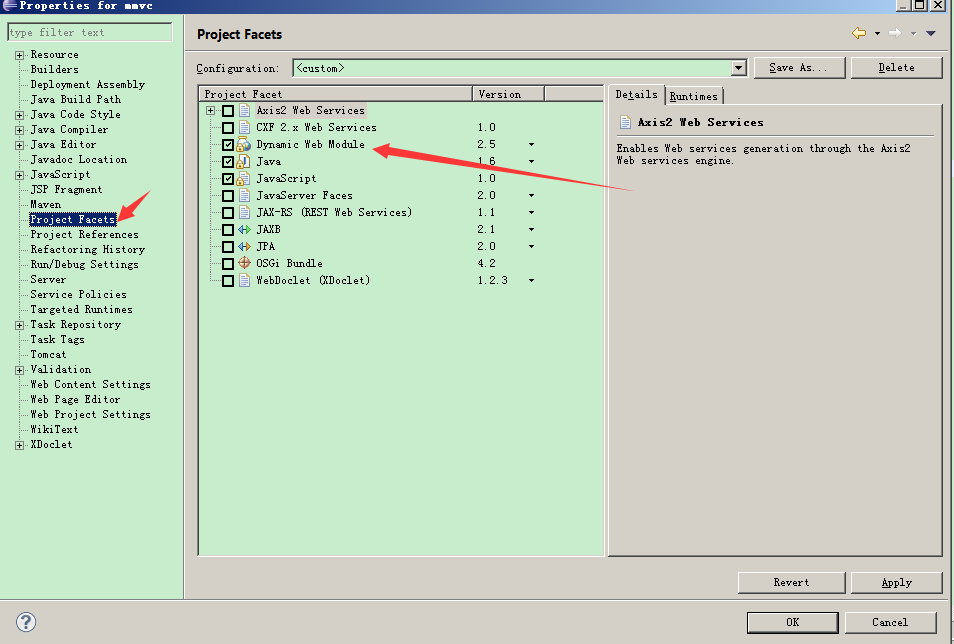
在Eclipse 安装好Maven插件后,创建Maven webapp项目,在工程 properties -> project facets 界面中将 Dynamic Web Module 修改 ...
- 手工MAVEN建立WEBAPP项目并打包部署
参考URL: http://my.oschina.net/zimingforever/blog/266028 最简单的东东,可以就两条命令: 建立目录及POM.XML: mvn archetype:g ...
- Eclipse Maven 创建Hello World Web项目
通过Eclipse创建Maven Web项目的简单步骤 先决条件 (Prerequisites) 1,JDK environment, 具体的安装JDK的步骤和环境配置一般网上都有,这里就不在赘述. ...
- eclipse maven jdk1.8 还原站点项目红感叹号总是小结
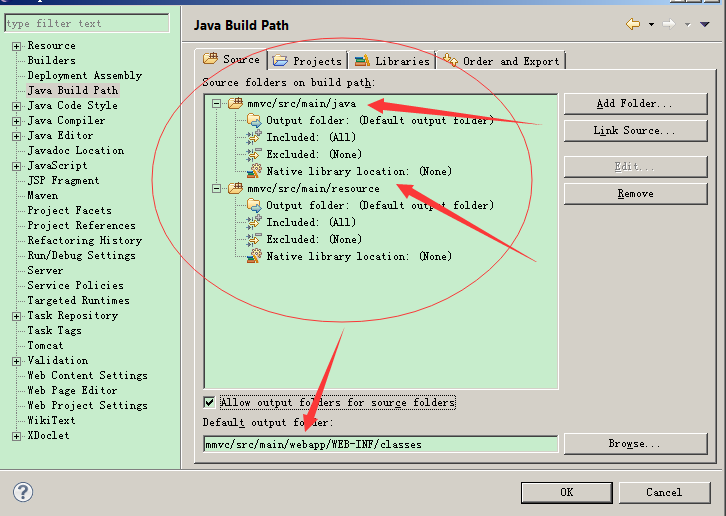
问题背景有三 maven 默认是jdk1.5jdk1.8 目录文件夹不全操作: 在项目上右击-> build path-->config build path-->libraries ...
- 如何使用maven开启一个webapp项目
1.使用maven创建好一个webapp项目 2.pom.xml: 第一步:修改版本 <properties> <project.build.sourceEncoding>UT ...
- Eclipse+Maven创建webapp项目<一><二><三>
转-http://www.cnblogs.com/candle806/p/3439469.html Eclipse+Maven创建webapp项目<一> 1.开启eclipse,右键new ...
- Eclipse+Maven创建webapp项目<一>(转)
还在为jar下载而烦恼吗?还在为jar依赖关系而烦恼吗?还在为jar冲突而烦恼吗?强大的maven项目管理工具来拯救你们呢?自动下载jar,自动下载jar依赖包.你什么都不用做,只需要在中央仓库中co ...
- Eclipse+maven创建webapp项目<二>(转)
原文地址:http://www.cnblogs.com/candle806/p/3439469.html 1.开启eclipse,右键new-->other,如下图找到maven project ...
随机推荐
- 【DeepLearning】Exercise:Convolution and Pooling
Exercise:Convolution and Pooling 习题链接:Exercise:Convolution and Pooling cnnExercise.m %% CS294A/CS294 ...
- 进阶之路(中级篇) - 018 基于arduino的简易版智能衣架
一. 设备及要求 目的:制作一个可以自动根据事实的天气的状况进行对衣架上的衣服进行晾晒. 基础装置:可伸缩的晾衣架. 开发环境:Arduino1. 8.1 主控板:Arduino UNO 动力装 ...
- iOS中app的分发测试
知识的学习在于分享.分享出来才能共同进步. 关于测试 有几种方式 1.开发人员直接在电脑上 用模拟器 2. 真机调试,测试人员可以拿着测试机找开发人员在电脑上跑真机测试 3. 公司和个人账号 直接 ...
- Spring 注解 hibernate 实体方法 <property name="packagesToScan" value="com.sise.domain"/>
<property name="annotatedClasses"> <list> <value>com.sise.domain.Admin&l ...
- scala+hadoop+spark环境搭建
一.JDK环境构建 在指定用户的根目录下编辑.bashrc文件,添加如下部分: # .bashrc # Source global definitions if [ -f /etc/bashrc ]; ...
- numpy 的通用函数
1 CSV文件 CSV,Comma Separate Values,是逗号分隔文件的缩写,是一种存储数据的纯文本格式,通常用于存储电子表格或数据库软件 特点 每条记录占一行 以逗号为分隔符 逗号前后的 ...
- Exception的妙用
实际工作中遇到的一个例子: 一.看这样一个方法: /** 传入以微秒(us)为单位的时间字符串,转换成可读的(年-月-日 时:分:秒)日期格式*/ public String getDateStrin ...
- jQuery的prop和attr的区别,及判断复选框是否选中
jQuery的prop和attr的区别 对于HTML元素本身就带有的固有属性,在处理时,使用prop方法. 对于HTML元素我们自己自定义的DOM属性,在处理时,使用attr方法. 参数有区别,att ...
- StringBoot集成Rabbit Redis和ack机制双重保险,保障消息一定能够正确的消费
转: StringBoot集成Rabbit,根据业务返回ACK 原文链接 : http://www.jianshu.com/p/baed9ec92410 为了维护消息的有效性,当消费消息时候处理失败时 ...
- mysql 大数据提取
今天要重五百多万的一个数据库表 提取 大约五十万条数据,刚开始的解决思路是: 先把数据查询出来,然后再导出来,然后再设计一个数据库表格,把这些数据导入,最后导出数据和导入数据花费了很多时间,最后向同事 ...