
深入理解Spring系列之十二:@Transactional是如何工作的
首先从tx:annotation-driven/说起。配置了tx:annotation-driven/,就必定有对应的标签解析器类,查看NamespaceHandler接口的实现类,可以看到一个TxNamespaceHandler,它注册了AnnotationDrivenBeanDefinitionParser对annotation-driven元素进行解析。
public class TxNamespaceHandler extends NamespaceHandlerSupport {

    static final String TRANSACTION_MANAGER_ATTRIBUTE = "transaction-manager";

    static final String DEFAULT_TRANSACTION_MANAGER_BEAN_NAME = "transactionManager";

    public TxNamespaceHandler() {

    }

    static String getTransactionManagerName(Element element) {

        return element.hasAttribute("transaction-manager") ? element.getAttribute("transaction-manager") : "transactionManager";

    }

    public void init() {

        this.registerBeanDefinitionParser("advice", new TxAdviceBeanDefinitionParser());

        // <tx:annotation-driven/> 标签解析器

        this.registerBeanDefinitionParser("annotation-driven", new AnnotationDrivenBeanDefinitionParser());

        this.registerBeanDefinitionParser("jta-transaction-manager", new JtaTransactionManagerBeanDefinitionParser());

    }

}
进入AnnotationDrivenBeanDefinitionParser类,重点看parse方法。
public BeanDefinition parse(Element element, ParserContext parserContext) {

        this.registerTransactionalEventListenerFactory(parserContext);

        String mode = element.getAttribute("mode");

        if ("aspectj".equals(mode)) {

            this.registerTransactionAspect(element, parserContext);

        } else {

            AnnotationDrivenBeanDefinitionParser.AopAutoProxyConfigurer.configureAutoProxyCreator(element, parserContext);

        }

        return null;

    }
从代码中可以看出,如果<tx:annotation-driven/>中没有配置mode参数,则默认使用代理模式进行后续处理;如果配置了mode=aspectj,则使用aspectj代码织入模式进行后续处理。
本篇分析使用代理模式的代码,进入AopAutoProxyConfigurer.configureAutoProxyCreator方法。
public static void configureAutoProxyCreator(Element element, ParserContext parserContext) {

            // 重点代码

            AopNamespaceUtils.registerAutoProxyCreatorIfNecessary(parserContext, element);

            String txAdvisorBeanName = "org.springframework.transaction.config.internalTransactionAdvisor";

            if (!parserContext.getRegistry().containsBeanDefinition(txAdvisorBeanName)) {

                Object eleSource = parserContext.extractSource(element);

                RootBeanDefinition sourceDef = new RootBeanDefinition("org.springframework.transaction.annotation.AnnotationTransactionAttributeSource");

                sourceDef.setSource(eleSource);

                sourceDef.setRole(2);

                String sourceName = parserContext.getReaderContext().registerWithGeneratedName(sourceDef);

                RootBeanDefinition interceptorDef = new RootBeanDefinition(TransactionInterceptor.class);

                interceptorDef.setSource(eleSource);

                interceptorDef.setRole(2);

                AnnotationDrivenBeanDefinitionParser.registerTransactionManager(element, interceptorDef);

                interceptorDef.getPropertyValues().add("transactionAttributeSource", new RuntimeBeanReference(sourceName));

                String interceptorName = parserContext.getReaderContext().registerWithGeneratedName(interceptorDef);

                RootBeanDefinition advisorDef = new RootBeanDefinition(BeanFactoryTransactionAttributeSourceAdvisor.class);

                advisorDef.setSource(eleSource);

                advisorDef.setRole(2);

                advisorDef.getPropertyValues().add("transactionAttributeSource", new RuntimeBeanReference(sourceName));

                advisorDef.getPropertyValues().add("adviceBeanName", interceptorName);

                if (element.hasAttribute("order")) {

                    advisorDef.getPropertyValues().add("order", element.getAttribute("order"));

                }

                parserContext.getRegistry().registerBeanDefinition(txAdvisorBeanName, advisorDef);

                CompositeComponentDefinition compositeDef = new CompositeComponentDefinition(element.getTagName(), eleSource);

                compositeDef.addNestedComponent(new BeanComponentDefinition(sourceDef, sourceName));

                compositeDef.addNestedComponent(new BeanComponentDefinition(interceptorDef, interceptorName));

                compositeDef.addNestedComponent(new BeanComponentDefinition(advisorDef, txAdvisorBeanName));

                parserContext.registerComponent(compositeDef);

            }

        }
上面的代码中标出了一行核心代码,容易被忽略。进入 AopNamespaceUtils.registerAutoProxyCreatorIfNecessary 方法。
public static void registerAutoProxyCreatorIfNecessary(

			ParserContext parserContext, Element sourceElement) {

        // 重点代码

		BeanDefinition beanDefinition = AopConfigUtils.registerAutoProxyCreatorIfNecessary(

				parserContext.getRegistry(), parserContext.extractSource(sourceElement));

		useClassProxyingIfNecessary(parserContext.getRegistry(), sourceElement);

		registerComponentIfNecessary(beanDefinition, parserContext);

	}
重点关注上面标出的代码,进入AopConfigUtils.registerAutoProxyCreatorIfNecessary方法。
	public static BeanDefinition registerAutoProxyCreatorIfNecessary(BeanDefinitionRegistry registry, Object source) {

		return registerOrEscalateApcAsRequired(InfrastructureAdvisorAutoProxyCreator.class, registry, source);

	}
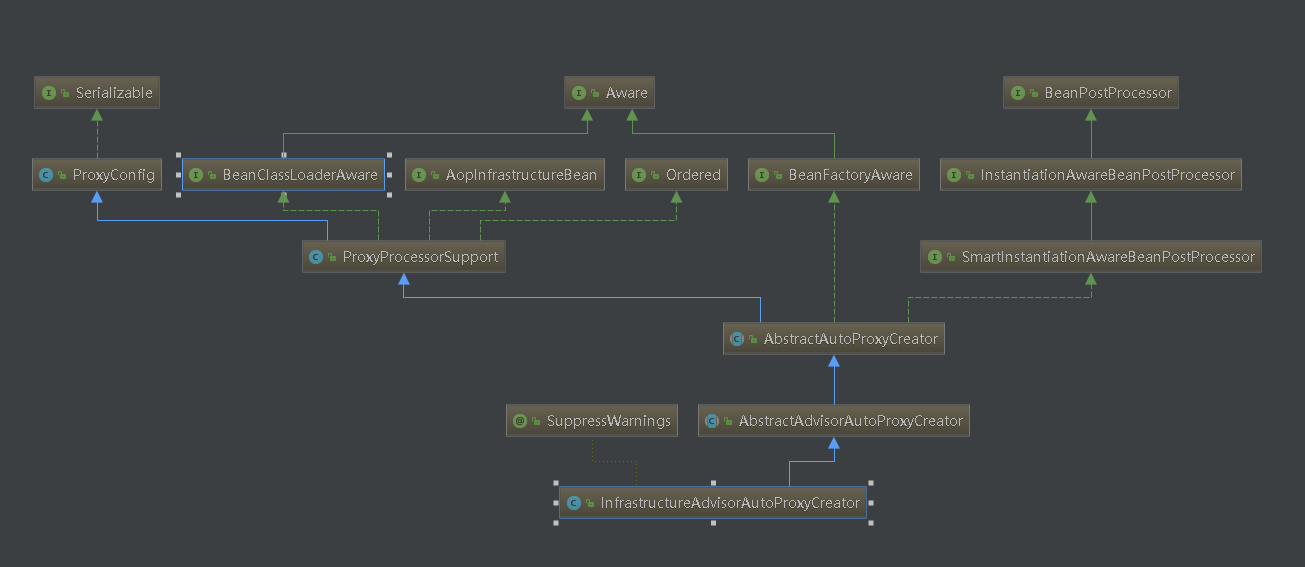
上面中的代码向Spring容器中注册了一个InfrastructureAdvisorAutoProxyCreator类。可能会疑问为什么要注册这个类,有什么作用?
查看InfrastructureAdvisorAutoProxyCreator类继承关系。
	@Override

	public Object postProcessAfterInitialization(Object bean, String beanName) throws BeansException {

		if (bean != null) {

			Object cacheKey = getCacheKey(bean.getClass(), beanName);

			if (!this.earlyProxyReferences.contains(cacheKey)) {

			    // 重点代码: 是创建代理对象的核心方法

				return wrapIfNecessary(bean, beanName, cacheKey);

			}

		}

		return bean;

	}
其中 wrapIfNecessary 方法 是创建代理对象的核心方法。
protected Object wrapIfNecessary(Object bean, String beanName, Object cacheKey) {

		if (beanName != null && this.targetSourcedBeans.contains(beanName)) {

			return bean;

		}

		if (Boolean.FALSE.equals(this.advisedBeans.get(cacheKey))) {

			return bean;

		}

		if (isInfrastructureClass(bean.getClass()) || shouldSkip(bean.getClass(), beanName)) {

			this.advisedBeans.put(cacheKey, Boolean.FALSE);

			return bean;

		}

		// Create proxy if we have advice.

		//重点代码:获取事务属性切面

		Object[] specificInterceptors = getAdvicesAndAdvisorsForBean(bean.getClass(), beanName, null);

		if (specificInterceptors != DO_NOT_PROXY) {

			this.advisedBeans.put(cacheKey, Boolean.TRUE);

			// 重点代码: 创建一个AOP代理

			Object proxy = createProxy(

					bean.getClass(), beanName, specificInterceptors, new SingletonTargetSource(bean));

			this.proxyTypes.put(cacheKey, proxy.getClass());

			return proxy;

		}

		this.advisedBeans.put(cacheKey, Boolean.FALSE);

		return bean;

	}
getAdvicesAndAdvisorsForBean方法会遍历容器中所有的切面,查找与当前实例化bean匹配的切面,这里就是获取事务属性切面,查找@Transactional注解及其属性值,具体实现比较复杂,这里暂不深入分析,最终会得到 BeanFactoryTransactionAttributeSourceAdvisor 实例,然后根据得到的切面进入createProxy方法,创建一个AOP代理。
protected Object createProxy(

			Class<?> beanClass, String beanName, Object[] specificInterceptors, TargetSource targetSource) {

		if (this.beanFactory instanceof ConfigurableListableBeanFactory) {

			AutoProxyUtils.exposeTargetClass((ConfigurableListableBeanFactory) this.beanFactory, beanName, beanClass);

		}

		ProxyFactory proxyFactory = new ProxyFactory();

		proxyFactory.copyFrom(this);

		if (!proxyFactory.isProxyTargetClass()) {

			if (shouldProxyTargetClass(beanClass, beanName)) {

				proxyFactory.setProxyTargetClass(true);

			}

			else {

				evaluateProxyInterfaces(beanClass, proxyFactory);

			}

		}

		Advisor[] advisors = buildAdvisors(beanName, specificInterceptors);

		proxyFactory.addAdvisors(advisors);

		proxyFactory.setTargetSource(targetSource);

		customizeProxyFactory(proxyFactory);

		proxyFactory.setFrozen(this.freezeProxy);

		if (advisorsPreFiltered()) {

			proxyFactory.setPreFiltered(true);

		}

        //重点代码

		return proxyFactory.getProxy(getProxyClassLoader());

	}
进入ProxyFactory.getProxy方法。
public Object getProxy(ClassLoader classLoader) {

        // 重点代码:进入 createAopProxy() 方法

		return createAopProxy().getProxy(classLoader);

	}
createAopProxy方法决定使用JDK还是Cglib创建代理。createAopProxy方法代码如下:
	protected final synchronized AopProxy createAopProxy() {

		if (!this.active) {

			activate();

		}

		// 重点代码: 进入 createAopProxy 方法

		return getAopProxyFactory().createAopProxy(this);

	}

    @Override

	public AopProxy createAopProxy(AdvisedSupport config) throws AopConfigException {

		if (config.isOptimize() || config.isProxyTargetClass() || hasNoUserSuppliedProxyInterfaces(config)) {

			Class<?> targetClass = config.getTargetClass();

			if (targetClass == null) {

				throw new AopConfigException("TargetSource cannot determine target class: " +

						"Either an interface or a target is required for proxy creation.");

			}

			if (targetClass.isInterface() || Proxy.isProxyClass(targetClass)) {

				return new JdkDynamicAopProxy(config);

			}

			return new ObjenesisCglibAopProxy(config);

		}

		else {

			return new JdkDynamicAopProxy(config);

		}

	}
可以看出默认是使用JDK动态代理创建代理,如果目标类是接口,则使用JDK动态代理,否则使用Cglib。这里分析使用JDK动态代理的方式,进入JdkDynamicAopProxy.getProxy方法。
    @Override

	public Object getProxy() {

		return getProxy(ClassUtils.getDefaultClassLoader());

	}

	@Override

	public Object getProxy(ClassLoader classLoader) {

		if (logger.isDebugEnabled()) {

			logger.debug("Creating JDK dynamic proxy: target source is " + this.advised.getTargetSource());

		}

		Class<?>[] proxiedInterfaces = AopProxyUtils.completeProxiedInterfaces(this.advised, true);

		findDefinedEqualsAndHashCodeMethods(proxiedInterfaces);

		//重点代码

		return Proxy.newProxyInstance(classLoader, proxiedInterfaces, this);

	}
可以看到很熟悉的创建代理的代码Proxy.newProxyInstance。这里要注意的是,newProxyInstance方法的最后一个参数是JdkDynamicAopProxy类本身,也就是说在对目标类进行调用的时候,会进入JdkDynamicAopProxy的invoke方法。这里只关注JdkDynamicAopProxy的invoke方法的重点代码。
@Override

	public Object invoke(Object proxy, Method method, Object[] args) throws Throwable {

		MethodInvocation invocation;

		Object oldProxy = null;

		boolean setProxyContext = false;

		TargetSource targetSource = this.advised.targetSource;

		Class<?> targetClass = null;

		Object target = null;

		try {

			if (!this.equalsDefined && AopUtils.isEqualsMethod(method)) {

				// The target does not implement the equals(Object) method itself.

				return equals(args[0]);

			}

			else if (!this.hashCodeDefined && AopUtils.isHashCodeMethod(method)) {

				// The target does not implement the hashCode() method itself.

				return hashCode();

			}

			else if (method.getDeclaringClass() == DecoratingProxy.class) {

				// There is only getDecoratedClass() declared -> dispatch to proxy config.

				return AopProxyUtils.ultimateTargetClass(this.advised);

			}

			else if (!this.advised.opaque && method.getDeclaringClass().isInterface() &&

					method.getDeclaringClass().isAssignableFrom(Advised.class)) {

				// Service invocations on ProxyConfig with the proxy config...

				return AopUtils.invokeJoinpointUsingReflection(this.advised, method, args);

			}

			Object retVal;

			if (this.advised.exposeProxy) {

				// Make invocation available if necessary.

				oldProxy = AopContext.setCurrentProxy(proxy);

				setProxyContext = true;

			}

			// May be null. Get as late as possible to minimize the time we "own" the target,

			// in case it comes from a pool.

			target = targetSource.getTarget();

			if (target != null) {

				targetClass = target.getClass();

			}

			// Get the interception chain for this method.

			// 重点代码

			List<Object> chain = this.advised.getInterceptorsAndDynamicInterceptionAdvice(method, targetClass);

			// Check whether we have any advice. If we don't, we can fallback on direct

			// reflective invocation of the target, and avoid creating a MethodInvocation.

			if (chain.isEmpty()) {

				// We can skip creating a MethodInvocation: just invoke the target directly

				// Note that the final invoker must be an InvokerInterceptor so we know it does

				// nothing but a reflective operation on the target, and no hot swapping or fancy proxying.

				Object[] argsToUse = AopProxyUtils.adaptArgumentsIfNecessary(method, args);

				// 重点代码

				retVal = AopUtils.invokeJoinpointUsingReflection(target, method, argsToUse);

			}

			else {

				// We need to create a method invocation...

			    // 重点代码

				invocation = new ReflectiveMethodInvocation(proxy, target, method, args, targetClass, chain);

				// Proceed to the joinpoint through the interceptor chain.

				retVal = invocation.proceed();

			}

			// Massage return value if necessary.

			Class<?> returnType = method.getReturnType();

			if (retVal != null && retVal == target &&

					returnType != Object.class && returnType.isInstance(proxy) &&

					!RawTargetAccess.class.isAssignableFrom(method.getDeclaringClass())) {

				// Special case: it returned "this" and the return type of the method

				// is type-compatible. Note that we can't help if the target sets

				// a reference to itself in another returned object.

				retVal = proxy;

			}

			else if (retVal == null && returnType != Void.TYPE && returnType.isPrimitive()) {

				throw new AopInvocationException(

						"Null return value from advice does not match primitive return type for: " + method);

			}

			return retVal;

		}

		finally {

			if (target != null && !targetSource.isStatic()) {

				// Must have come from TargetSource.

				targetSource.releaseTarget(target);

			}

			if (setProxyContext) {

				// Restore old proxy.

				AopContext.setCurrentProxy(oldProxy);

			}

		}

	}
深入理解Spring系列之十二:@Transactional是如何工作的的更多相关文章
- 深入理解Spring系列之十:DispatcherServlet请求分发源码分析
转载 https://mp.weixin.qq.com/s/-kEjAeQFBYIGb0zRpST4UQ DispatcherServlet是SpringMVC的核心分发器,它实现了请求分发,是处理请 ...
- 深入理解Spring系列之二:BeanDefinition解析
转载 https://mp.weixin.qq.com/s?__biz=MzI0NjUxNTY5Nw==&mid=2247483814&idx=1&sn=ddf49931d55 ...
- webpack4 系列教程(十二):处理第三方JavaScript库
教程所示图片使用的是 github 仓库图片,网速过慢的朋友请移步<webpack4 系列教程(十二):处理第三方 JavaScript 库>原文地址.或者来我的小站看更多内容:godbm ...
- Java 设计模式系列(十二)策略模式(Strategy)
Java 设计模式系列(十二)策略模式(Strategy) 策略模式属于对象的行为模式.其用意是针对一组算法,将每一个算法封装到具有共同接口的独立的类中,从而使得它们可以相互替换.策略模式使得算法可以 ...
- CRL快速开发框架系列教程十二(MongoDB支持)
本系列目录 CRL快速开发框架系列教程一(Code First数据表不需再关心) CRL快速开发框架系列教程二(基于Lambda表达式查询) CRL快速开发框架系列教程三(更新数据) CRL快速开发框 ...
- spring boot / cloud (十二) 异常统一处理进阶
spring boot / cloud (十二) 异常统一处理进阶 前言 在spring boot / cloud (二) 规范响应格式以及统一异常处理这篇博客中已经提到了使用@ExceptionHa ...
- Spring Cloud(十二):分布式链路跟踪 Sleuth 与 Zipkin【Finchley 版】
Spring Cloud(十二):分布式链路跟踪 Sleuth 与 Zipkin[Finchley 版] 发表于 2018-04-24 | 随着业务发展,系统拆分导致系统调用链路愈发复杂一个前端请 ...
- OSGi 系列(十二)之 Http Service
OSGi 系列(十二)之 Http Service 1. 原始的 HttpService (1) 新建 web-osgi 工程,目录结构如下: (2) HomeServlet package com. ...
- 深入理解Spring系列之七:web应用自动装配Spring配置
转载 https://mp.weixin.qq.com/s/Lf4akWFmcyn9ZVGUYNi0Lw 在<深入理解Spring系列之一:开篇>的示例代码中使用如下方式去加载Spring ...
随机推荐
- Spring-MVC理解之二:前置控制器
原文链接:http://www.cnblogs.com/brolanda/p/4265749.html 一.前置控制器配置与讲解 上篇中理解了IOC容器的初始化时机,并理解了webApplicatio ...
- Shell逐行读取文件的3种方法
方法1:while循环中执行效率最高,最常用的方法. while read linedoecho $linedone < filename 注释:这种方式在结束的时候需要执行文件,就好像是执行 ...
- 弱网络模拟测试工具---易测app
易测功能介绍 易测是一款基于无线客户端研发场景的通用测试工具, 它通过在研发人员的自持机上提供各种辅助能力&标准化的专项测试服务来提升研发质量&效率. 易测app是阿里巴巴做的 ...
- 洛谷P2894[USACO08FEB]酒店Hotel(线段树)
问题描述 奶牛们最近的旅游计划,是到苏必利尔湖畔,享受那里的湖光山色,以及明媚的阳光.作为整个旅游的策划者和负责人,贝茜选择在湖边的一家著名的旅馆住宿.这个巨大的旅馆一共有N (1 <= N & ...
- P3984 高兴的津津
题目描述 津津上高中了.她在自己的妈妈的魔鬼训练下,成为了一个神犇,每次参加一次OI比赛必拿Au虐全场.每次她拿到一个Au后就很高兴.假设津津不会因为其它事高兴,并且她的高兴会持续T天(包包含获奖当天 ...
- Oracle Parameter使用
string sqlStr = "update sys_case t set t.content =:CONTENT,t.property=:PROPERTY where id=:ID&qu ...
- 【刷题】BZOJ 3172 [Tjoi2013]单词
Description 某人读论文,一篇论文是由许多单词组成.但他发现一个单词会在论文中出现很多次,现在想知道每个单词分别在论文中出现多少次. Input 第一个一个整数N,表示有多少个单词,接下来N ...
- VC 生成后事件 Post-Build Event
原文链接地址:https://blog.csdn.net/jfkidear/article/details/27313643.https://blog.csdn.net/kevindr/article ...
- 洛谷 P2664 树上游戏 解题报告
P2664 树上游戏 题目描述 \(\text{lrb}\)有一棵树,树的每个节点有个颜色.给一个长度为\(n\)的颜色序列,定义\(s(i,j)\) 为 \(i\) 到 \(j\) 的颜色数量.以及 ...
- NOIP 2012 洛谷P1081 开车旅行
Description: 就是两个人开车,只能向东开.向东有n个城市,城市之间的距离为他们的高度差.A,B轮流开车,A喜欢到次近的城市,B喜欢到最近的城市.如果车子开到底了或者车子开的路程已经超过了限 ...