一步一步带你分析 requirejs
详细源代码一共就2000多行,来看我这篇分析的同学应该都下载下来了,好了,话不多说,开始:
代码的开头就出现3个全局变量: requirejs, require, define
var requirejs, require, define;

(function(global, setTimeout){

balababla......

})(this, (typeof setTimeout === 'undefined' ? undefined : setTimeout)))
require 和 define 大家应该都知道上干什么的,说实话,我是不知道的,在分析代码的时候,我从来也没用过这个框架,就听过AMD,就来直接看源码了。
如果你也不是很清楚,这2个变量是干什么的,我就来简单介绍一下,懂得的同学要是发现我说错了,希望指点我也一下。
主页面 index.html:
注意src是引入我们的requirejs库, data-main:就是我们第一次用requrie的地方:
<html>

<head>

    <title></title>

</head>

<body>

  <script src="require.js" type="text/javascript" data-main="main.js"></script>

</body>

</html>
main.js:
这里2个代码块都是依赖require的:
(1)require.config:配置
(2)requrie(); 加载需要的函数,注意里面的 ['name', 'say'],其实都是文件名,它们都在./js/ 目录下,具体看conifg
require.config({

  baseUrl: '',

  paths: {

    'nameDep': 'js/nameDep',

    'say': 'js/say',

    'name': 'js/name'

  },

  shim: {

    'name': {

      deps: ['nameDep']

    }

  }

});

require(['name', 'say'], function (name, say) {

  say(name);

});
./js/name.js 和 ./js/say.js
//name

define([''], function () {

  return '测试';

});
//say

define([], function () {

  return function (name) {

    console.log(name);

  };

});
最后注意在config中有个skim,这里面也是定义js文件的,只是由于他可能不符合AMD加载的规范
./js/nameDep.js
console.log("nameDep.js")
以上分析,我们大概看得出 require 和 define 都是 function
--------------------------------------分割线-------------------------------------------------------------------------
下面进入2000多行匿名函数的讲解:
首先说一下2个参数: global 和 setTimeout
(function (global, setTimeout) {

})(this, (typeof setTimeout === 'undefined' ? undefined : setTimeout))
如果在浏览器的环境中,就是平时我们所知的 windows对象 和 windows.setTimeout方法 。本文只讨论浏览器环境,别的环境咱不考虑。
接下来就是一大堆的变量和函数的定义,太多了!反正我就扫了一眼,记不住?无所谓,只需要记住这开头这3个变量就行了:req,contexts,cfg
2个是空对象 cfg,contexts ,还有一个函数 req 。
为什么它是函数??? 你一拉到底,一定会看到 req = requirejs = function(){} 的定义,眼神不好也没关系,看我下面的代码框里有req({});
  var req,

       ....

       contexts = {},

        cfg = {},

       ....

      //各种function定义

      ....

        //Create default context.

      req({});

     .....
好了把眼神定位到 req({})吧, 因为这是上面一大堆定义后,第一次执行了代码!!!!
req这个函数长什么样子?? 你用文字匹配往上找:
/**

     * Main entry point.

     *

     * If the only argument to require is a string, then the module that

     * is represented by that string is fetched for the appropriate context.

     *

     * If the first argument is an array, then it will be treated as an array

     * of dependency string names to fetch. An optional function callback can

     * be specified to execute when all of those dependencies are available.

     *

     * Make a local req variable to help Caja compliance (it assumes things

     * on a require that are not standardized), and to give a short

     * name for minification/local scope use.

     */

    req = requirejs = function (deps, callback, errback, optional) {

        //Find the right context, use default

        var context, config,

            contextName = defContextName; //开头定义了 defContextName = "_"

        // Determine if have config object in the call.

        if (!isArray(deps) && typeof deps !== 'string') {

            // deps is a config object

            config = deps;

            if (isArray(callback)) {

                // Adjust args if there are dependencies

                deps = callback;

                callback = errback;

                errback = optional;

            } else {

                deps = [];

            }

        }

           //第一次没有config.context 跳过

        if (config && config.context) {

            contextName = config.context;

        }

           //第一次context == undefined

        context = getOwn(contexts, contextName);

           //第一次进入

        if (!context) {

            //只有第一次会调用newContext("_")

            context = contexts[contextName] = req.s.newContext(contextName);

        }

        if (config) {

            context.configure(config);

        }

        return context.require(deps, callback, errback);

    };
上面代码 context出现的频率非常高,说明这小子很重要。那我们来看看这小子到底是啥!!!
直接找到它的定义:
context = contexts[contextName] = req.s.newContext(contextName);
那 newContext 又是什么鬼! 搜它!!!!!
function newContext(contextName) {

       var context

          ...

       //一大堆function定义

         ....

        context={

              .....

         }

        context.require = context.makeRequire();

        return context;

    }
用20秒的时间扫一眼!老套路,一大堆的变量,函数的定义。 一直到最后return 一个 context变量。
再往上拉看看 context 到底是个什么鬼!!
记忆力没毛病的话,发现context对象里装的全是刚才定义过一些变量,函数。
-----------------------------------------------------------------------------------------------
| 其中return的上一行代码: |
| context.require = context.makeRequire(); |
| 有兴趣就去看一眼,很简单,就是返回一个叫localRequire的闭包 |
------------------------------------------------------------------------------------------------
OK,这个newContext函数我们已经差不多了解了,就是返回一个对象,通过这个对象控制newContext里的一系列私有变量和对象。
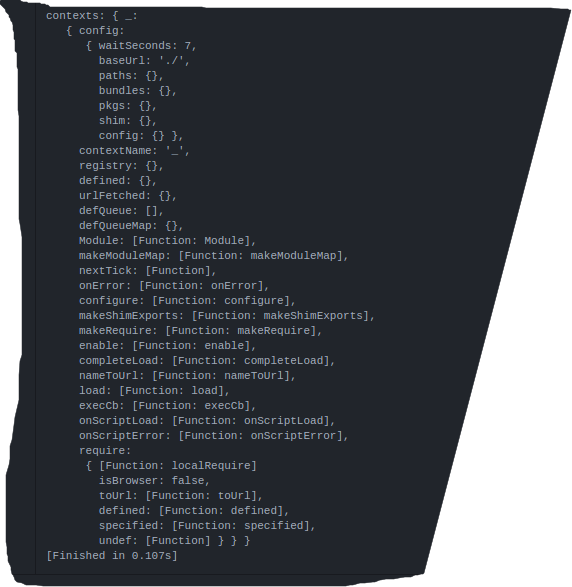
我们的contexts就如下图所示:
接下去走
context.configure(config);
我建议你去看一下,因为里面啥也没干,你只需要花10秒左右的时间就可以看完。。。
然后走
return context.require(deps, callback, errback);
看上面的图,context.require 就是 localRequire
接下来,我们走进localRequire的世界里一探究竟!!!!其中deps = [ ]
  function localRequire(deps, callback, errback) {

                    var id, map, requireMod;

                    if (options.enableBuildCallback && callback && isFunction(callback)) {

                        callback.__requireJsBuild = true;

                    }

                    if (typeof deps === 'string') {

                        if (isFunction(callback)) {

                            //Invalid call

                            return onError(makeError('requireargs', 'Invalid require call'), errback);

                        }

                        //If require|exports|module are requested, get the

                        //value for them from the special handlers. Caveat:

                        //this only works while module is being defined.

                        if (relMap && hasProp(handlers, deps)) {

                            return handlers[deps](registry[relMap.id]);

                        }

                        //Synchronous access to one module. If require.get is

                        //available (as in the Node adapter), prefer that.

                        if (req.get) {

                            return req.get(context, deps, relMap, localRequire);

                        }

                        //Normalize module name, if it contains . or ..

                        map = makeModuleMap(deps, relMap, false, true);

                        id = map.id;

                        if (!hasProp(defined, id)) {

                            return onError(makeError('notloaded', 'Module name "' +

                                        id +

                                        '" has not been loaded yet for context: ' +

                                        contextName +

                                        (relMap ? '' : '. Use require([])')));

                        }

                        return defined[id];

                    }

                    //Grab defines waiting in the global queue.

                    intakeDefines();

                    //Mark all the dependencies as needing to be loaded.

                    context.nextTick(function () {

                        //Some defines could have been added since the

                        //require call, collect them.

                        intakeDefines();

                        requireMod = getModule(makeModuleMap(null, relMap));

                        //Store if map config should be applied to this require

                        //call for dependencies.

                        requireMod.skipMap = options.skipMap;

                        requireMod.init(deps, callback, errback, {

                            enabled: true

                        });

                        checkLoaded();

                    });

                    return localRequire;

                }
很快我们就把目光锁定到(因为,前面的一大段代码都是if语句,不符合条件进不去)
      //Grab defines waiting in the global queue.

                    intakeDefines();
intakeDefines --》takeGlobalQueue--》context.nextTick--》intakeDefines --》 requireMod.init --》 checkLoaded();
里面大致就是上面所示,因为有点复杂,我这里暂时先不说,接续走简单的。。
到此为止,我们已经走完了一边req。
大致流程如下图所示:

接下去,我们再一拉到底!!!!
倒数第二行:
    //Set up with config info.

    req(cfg);
cfg还记得是什么吗?? 一开始是定义为空对象啊!!!
有地方修改过它吗? 往上拉一拉!!
  //Look for a data-main script attribute, which could also adjust the baseUrl.

  if (isBrowser && !cfg.skipDataMain) {

    //Figure out baseUrl. Get it from the script tag with require.js in it.

    eachReverse(scripts(), function(script) {

      //Set the 'head' where we can append children by

      //using the script's parent.

      if (!head) {

        head = script.parentNode;

      }

      //Look for a data-main attribute to set main script for the page

      //to load. If it is there, the path to data main becomes the

      //baseUrl, if it is not already set.

      dataMain = script.getAttribute('data-main');

      if (dataMain) {

        //Preserve dataMain in case it is a path (i.e. contains '?')

        mainScript = dataMain;

        //Set final baseUrl if there is not already an explicit one,

        //but only do so if the data-main value is not a loader plugin

        //module ID.

        if (!cfg.baseUrl && mainScript.indexOf('!') === -1) {

          //Pull off the directory of data-main for use as the

          //baseUrl.

          src = mainScript.split('/');

          mainScript = src.pop();

          subPath = src.length ? src.join('/') + '/' : './';

          cfg.baseUrl = subPath;

        }

        //Strip off any trailing .js since mainScript is now

        //like a module name.

        mainScript = mainScript.replace(jsSuffixRegExp, '');

        //If mainScript is still a path, fall back to dataMain

        if (req.jsExtRegExp.test(mainScript)) {

          mainScript = dataMain;

        }

        //Put the data-main script in the files to load.

        cfg.deps = cfg.deps ? cfg.deps.concat(mainScript) : [mainScript];

        return true;

      }

    });

  }
这里面做的事情很简单,就是找到页面中包含 "data-main" 属性的script标签,分析路径。
最后得到这样的结果:

好了。再回到req(cfg);
这一次我们好好的走一走上面流程图里的步骤。。。。
把目光迅速锁定到:
return context.require(deps, callback, errback);

一步一步带你分析 requirejs的更多相关文章
- 在net中json序列化与反序列化 面向对象六大原则 (第一篇) 一步一步带你了解linq to Object 10分钟浅谈泛型协变与逆变
在net中json序列化与反序列化 准备好饮料,我们一起来玩玩JSON,什么是Json:一种数据表示形式,JSON:JavaScript Object Notation对象表示法 Json语法规则 ...
- 一步一步带你实现virtual dom(二) -- Props和事件
很高兴我们可以继续分享编写虚拟DOM的知识.这次我们要讲解的是产品级的内容,其中包括:设置和DOM一致性.以及事件的处理. 使用Babel 在继续之前,我们需要弥补前一篇文章中没有详细讲解的内容.假设 ...
- 一步一步带你实现virtual dom(一)
一步一步带你实现virtual dom(一) 一步一步带你实现virtual dom(二)--Props和事件 要写你自己的虚拟DOM,有两件事你必须知道.你甚至都不用翻看React的源代码,或者其他 ...
- requirejs源码分析: requirejs 方法–2. context.require(deps, callback, errback);
上一篇 requirejs源码分析: requirejs 方法–1. 主入口 中的return context.require(deps, callback, errback); 调用的是make ...
- 一步一步带你入门MySQL中的索引和锁 (转)
出处: 一步一步带你入门MySQL中的索引和锁 索引 索引常见的几种类型 索引常见的类型有哈希索引,有序数组索引,二叉树索引,跳表等等.本文主要探讨 MySQL 的默认存储引擎 InnoDB 的索引结 ...
- requirejs源码分析: requirejs 方法–1. 主入口
该方法是 主要的入口点 也是最常用的方法. req = requirejs = function (deps, callback, errback, optional) { //Find the ri ...
- (第一篇) 一步一步带你了解linq to Object
要想学好linq to object 我们必须要先学习lambda 表达式,学习lambda 表达式呢我们必须了解匿名函数和匿名类及扩展方法,学习匿名函数,我们必须学会委托,这是本文的宗旨.下面开始第 ...
- 一步一步带你做WebApi迁移ASP.NET Core2.0
随着ASP.NET Core 2.0发布之后,原先运行在Windows IIS中的ASP.NET WebApi站点,就可以跨平台运行在Linux中.我们有必要先说一下ASP.NET Core. ASP ...
- 一步一步带你安装史上最难安装的 vim 插件 —— YouCompleteMe
YouCompleteMe is a fast, as-you-type, fuzzy-search code completion engine for Vim.参考: https://github ...
随机推荐
- 转 WCF WebService区别
下面我们来详细讨论一下二者的区别.Web Service和WCF的到底有什么区别. [1]Web Service:严格来说是行业标准,也就是Web Service 规范,也称作WS-*规范,既不是框架 ...
- 工作总结 获取html 标签 自定义属性值 根据html 自定义属性 获取 到标签
FFID HFID function getElementByAttr(tag, attr, value) { var aElements = document.getElementsByTag ...
- ZAP介绍
Zed Attack Proxy简写为ZAP,是一个简单易用的渗透测试工具,是发现Web应用中的漏洞的利器,更是渗透测试爱好者的好东西.ZAP下载地址:https://www.owasp.org/in ...
- MongoDB 的聚集操作
聚合引言 聚集操作就是出来数据记录并返回计算结果的操作.MongoDB提供了丰富的聚集操作.可以检測和执行数据集上的计算.执行在mongod上的数据聚集简化了代码和资源限制. 像查询一样,在Mongo ...
- C++类型转换运算符 static_cast,dynamic_cast,reinterpret_cast,const_cast
类型转换是一种让程序猿可以临时或永久性改变编译器对对象的解释机制.可改变对象解释方式的运算符称为类型转换运算符. 为何须要进行类型转换 通常为了实现使用不同环境的个人和厂商编写的模块可以相互调用和协作 ...
- Linux下性能分析工具汇总
来自:http://os.51cto.com/art/201104/253114.htm 本文讲述的是:CPU性能分析工具.Memory性能分析工具.I/O性能分析工具.Network性能分析工具. ...
- git设置全局和单个仓库账号和密码
Git全局配置和单个仓库的用户名邮箱配置 配置全局仓库的账号和密码 git config --global user.name "userName" //你的用户名 git con ...
- nginx反向代理带路径访问问题
nginx的配置为192.168.0.219:80分别映射到upstream组192.168.0.55:8080和192.168.0.206:8080,那如何配置做到访问192.168.0.219:8 ...
- bootstrap input 加了 disabled 后台竟然接受不到值
下午做了一个input 值需要不可改变.在input属性中加入了 disabled .在后台接受 var_dump($_POST); 竟然看不到值. <input type="t ...
- python学习 01 变量
1.变量不是‘盒子’. 1.1 不同的值,变量名没变, 变量地址也会变. 1.2 相同的值,不同的变量名,变量地址是相同的