
ActiveMQ实例2--Spring JMS发送消息
参考文章:http://my.oschina.net/xiaoxishan/blog/381209#OSC_h3_7
一,步骤参照参考文献
二、新建的项目

三、补充
web.xml
 <?xml version="1.0" encoding="UTF-8"?>

 <web-app version="3.0" xmlns="http://java.sun.com/xml/ns/javaee"

     xmlns:xsi="http://www.w3.org/2001/XMLSchema-instance"

     xsi:schemaLocation="http://java.sun.com/xml/ns/javaee

     http://java.sun.com/xml/ns/javaee/web-app_3_0.xsd">

     <display-name>activemq</display-name>

     <!-- Spring ApplicationContext配置文件的路径,可使用通配符,用于后面的Spring Context Loader -->

     <context-param>

         <param-name>contextConfigLocation</param-name>

         <param-value>

             classpath:applicationContext.xml

         </param-value>

     </context-param>

     <!--Spring ApplicationContext 载入 -->

     <listener>

         <listener-class>org.springframework.web.context.ContextLoaderListener</listener-class>

     </listener>

     <!-- Spring MVC Servlet -->

     <servlet>

         <servlet-name>dispatcher</servlet-name>

         <servlet-class>com.alibaba.dubbo.remoting.http.servlet.DispatcherServlet</servlet-class>

         <init-param>

             <param-name>contextConfigLocation</param-name>

             <param-value>classpath:DispatcherServlet.xml</param-value>

         </init-param>

         <load-on-startup>1</load-on-startup>

     </servlet>

     <servlet-mapping>

         <servlet-name>dispatcher</servlet-name>

         <url-pattern>/</url-pattern>

     </servlet-mapping>

     <welcome-file-list>

         <welcome-file>index.html</welcome-file>

     </welcome-file-list>

 </web-app>
applicationContext.xml
 <?xml version="1.0" encoding="UTF-8"?>

 <beans

         xmlns="http://www.springframework.org/schema/beans"

         xmlns:xsi="http://www.w3.org/2001/XMLSchema-instance"

         xmlns:context="http://www.springframework.org/schema/context"

         xmlns:goldfish="http://www.fangdd.com/schema/goldfish"

         xsi:schemaLocation="http://www.springframework.org/schema/beans http://www.springframework.org/schema/beans/spring-beans.xsd

           http://www.springframework.org/schema/context http://www.springframework.org/schema/context/spring-context.xsd

           http://www.fangdd.com/schema/goldfish http://www.fangdd.com/schema/goldfish/goldfish-1.0.0.xsd">

       <context:annotation-config/>

     <context:component-scan base-package="com.zp.test" >

     </context:component-scan>

     <!-- 使用annotation 自动注册bean,并保证@Required,@Autowired的属性被注入 -->

     <context:component-scan base-package="com.activemqtest.*"/>

     <!-- 配置JMS连接工厂 -->

     <bean id="connectionFactory" class="org.apache.activemq.ActiveMQConnectionFactory">

         <property name="brokerURL" value="failover:(tcp://localhost:61616)" />

     </bean>

     <!-- 定义消息队列(Queue) -->

     <bean id="queueDestination" class="org.apache.activemq.command.ActiveMQQueue">

         <!-- 设置消息队列的名字 -->

         <constructor-arg>

             <value>queue1</value>

         </constructor-arg>

     </bean>

     <!-- 配置JMS模板(Queue),Spring提供的JMS工具类,它发送、接收消息。 -->

     <bean id="jmsTemplate" class="org.springframework.jms.core.JmsTemplate">

         <property name="connectionFactory" ref="connectionFactory" />

         <property name="defaultDestination" ref="queueDestination" />

         <property name="receiveTimeout" value="10000" />

     </bean>

     <!--queue消息生产者 -->

     <bean id="producerService" class="com.activemqtest.serviceImpl.ProducerServiceImpl">

         <property name="jmsTemplate" ref="jmsTemplate"></property>

     </bean>

     <!--queue消息消费者 -->

     <bean id="consumerService" class="com.activemqtest.serviceImpl.ConsumerServiceImpl">

         <property name="jmsTemplate" ref="jmsTemplate"></property>

     </bean>

     <!-- 定义消息队列(Queue),我们监听一个新的队列,queue2 -->

     <bean id="queueDestination2" class="org.apache.activemq.command.ActiveMQQueue">

         <!-- 设置消息队列的名字 -->

         <constructor-arg>

             <value>queue2</value>

         </constructor-arg>

     </bean>

     <!-- 配置消息队列监听者(Queue),代码下面给出,只有一个onMessage方法 -->

     <bean id="queueMessageListener" class="com.activemqtest.serviceImpl.QueueMessageListener" />

     <!-- 消息监听容器(Queue),配置连接工厂,监听的队列是queue2,监听器是上面定义的监听器 -->

     <bean id="jmsContainer"

         class="org.springframework.jms.listener.DefaultMessageListenerContainer">

         <property name="connectionFactory" ref="connectionFactory" />

         <property name="destination" ref="queueDestination2" />

         <property name="messageListener" ref="queueMessageListener" />

     </bean>

     <!-- 定义消息主题(Topic) -->

     <bean id="topicDestination" class="org.apache.activemq.command.ActiveMQTopic">

         <constructor-arg>

             <value>JY_topic</value>

         </constructor-arg>

     </bean>

     <!-- 配置JMS模板(Topic),pubSubDomain="true"-->

     <bean id="topicJmsTemplate" class="org.springframework.jms.core.JmsTemplate">

         <property name="connectionFactory" ref="connectionFactory" />

         <property name="defaultDestination" ref="topicDestination" />

         <property name="pubSubDomain" value="true" />

         <property name="receiveTimeout" value="10000" />

     </bean>

     <!--topic消息发布者 -->

     <bean id="topicProvider" class="com.activemqtest.serviceImpl.TopicProvider">

         <property name="topicJmsTemplate" ref="topicJmsTemplate"></property>

     </bean>

     <!-- 消息主题监听者 和 主题监听容器 可以配置多个,即多个订阅者 -->

     <!-- 消息主题监听者(Topic) -->

     <bean id="topicMessageListener" class="com.activemqtest.serviceImpl.TopicMessageListener" />

     <!-- 主题监听容器 (Topic) -->

     <bean id="topicJmsContainer"

         class="org.springframework.jms.listener.DefaultMessageListenerContainer">

         <property name="connectionFactory" ref="connectionFactory" />

         <property name="destination" ref="topicDestination" />

         <property name="messageListener" ref="topicMessageListener" />

     </bean>

     </beans>
DispactcherServlet.xml
 <?xml version="1.0" encoding="UTF-8"?>

 <beans xmlns="http://www.springframework.org/schema/beans"

        xmlns:xsi="http://www.w3.org/2001/XMLSchema-instance"

        xmlns:context="http://www.springframework.org/schema/context"

        xmlns:mvc="http://www.springframework.org/schema/mvc"

        xsi:schemaLocation="http://www.springframework.org/schema/mvc http://www.springframework.org/schema/mvc/spring-mvc-4.0.xsd

         http://www.springframework.org/schema/beans http://www.springframework.org/schema/beans/spring-beans-4.0.xsd

         http://www.springframework.org/schema/context http://www.springframework.org/schema/context/spring-context-4.0.xsd">

     <context:annotation-config />

     <context:component-scan base-package="com.zp.test.controller">

         <context:include-filter type="annotation" expression="org.springframework.stereotype.Controller"/>

     </context:component-scan>

  </beans>
四、运行结果

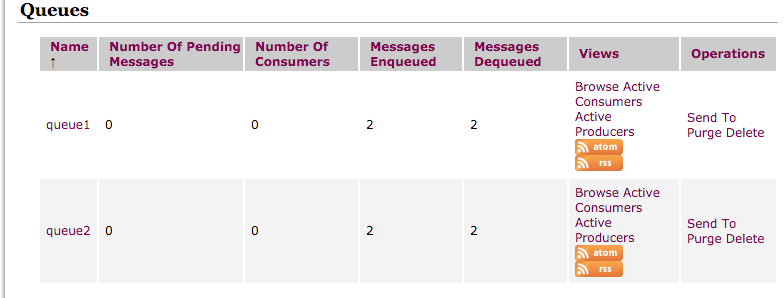
因为运行了两遍,所以是双数
五、遇到的问题
问题:Java.lang.IllegalStateException: Failed to load ApplicationContext
原因:因为applicationContext里的包没有与实际的包对应,或者是没有注解导入对应的变量
ActiveMQ实例2--Spring JMS发送消息的更多相关文章
- ActiveMQ消息队列从入门到实践(4)—使用Spring JMS收发消息
Java消息服务(Java Message Service ,JMS)是一个Java标准,定义了使用消息代理的通用API .在JMS出现之前,每个消息代理都有私有的API,这就使得不同代理之间的消息代 ...
- Spring AMQP 发送消息到 RabbitMQ 收到 x-queue-type 错误
在使用 Spring AMQP 发送消息到 RabbitMQ 的时候收到错误信息: inequivalent arg 'x-queue-type' for queue 'com.ossez.real. ...
- ActiveMQ学习笔记(5)——使用Spring JMS收发消息
摘要 ActiveMQ学习笔记(四)http://my.oschina.net/xiaoxishan/blog/380446 中记录了如何使用原生的方式从ActiveMQ中收发消息.可以看出,每次 ...
- ActiveMQ实例1--简单的发送和接收消息
一.环境准备 1,官网http://activemq.apache.org/下载最新版本的ActiveMQ,并解压 2,打开对应的目录,在Mac环境下,一般可以运行命令: cd /Users/***/ ...
- Spring-boot JMS 发送消息慢的问题解决
1:在<ActiveMQ 基于zookeeper的主从(levelDB Master/Slave)搭建以及Spring-boot下使用>(http://www.cnblogs.com/ys ...
- ActiveMQ持久化机制和JMS可靠消息
1.ActiveMQ持久化机制 1.1 JDBC将数据持久化到数据库 1.2 AMQ生成日志文件 1.3 KahaDB:本次磁盘生成数据文件(默认) 1.4 LevelDB:谷歌K/V数据库 1.5 ...
- 阿里高级架构师教你使用Spring JMS处理消息事务源码案例
消费者在接收JMS异步消息的过程中会发生执行错误,这可能会导致信息的丢失.该源码展示如何使用本地事务解决这个问题.这种解决方案可能会导致在某些情况下消息的重复(例如,当它会将信息储存到数据库,然后监听 ...
- ActiveMQ JMS实现消息发送
一.创建配置消息发送接收目的地. ActiveMQ中间件地址 JMS_BROKER_URL=failover://(tcp://192.168.1.231:61616) QUEUE_BUSP_TP_S ...
- 使用Spring JMS轻松实现异步消息传递
异步进程通信是面向服务架构(SOA)一个重要的组成部分,因为企业里很多系统通信,特别是与外部组织间的通信,实质上都是异步的.Java消息服务(JMS)是用于编写使用异步消息传递的JEE应用程序的API ...
随机推荐
- P5056 【模板】插头dp
\(\color{#0066ff}{ 题目描述 }\) 给出n*m的方格,有些格子不能铺线,其它格子必须铺,形成一个闭合回路.问有多少种铺法? \(\color{#0066ff}{输入格式}\) 第1 ...
- 有趣的数 zoj 月赛
题目描述 让我们来考虑1到N的正整数集合.让我们把集合中的元素按照字典序排列,例如当N=11时,其顺序应该为:1,10,11,2,3,4,5,6,7,8,9. 定义K在N个数中的位置为Q(N,K),例 ...
- 谁能赢呢? BZOJ 2463
题目描述 小明和小红经常玩一个博弈游戏.给定一个n×n的棋盘,一个石头被放在棋盘的左上角.他们轮流移动石头.每一回合,选手只能把石头向上,下,左,右四个方向移动一格,并且要求移动到的格子之前不能被访问 ...
- Maven入门(二)pom.xml和核心概念
一.pom.xml文件说明 1.pom意思就是project object model. 2.pom.xml包含了项目构建的信息,包括项目的信息.项目的依赖等. 3.pom.xml文件是可以继承的,大 ...
- 使用RestTemplate时报错java.lang.IllegalStateException: No instances available for 127.0.0.1
我在RestTemplate的配置类里使用了 @LoadBalanced@Componentpublic class RestTemplateConfig { @Bean @LoadBalanced ...
- 批量mvn 打包 bat文件命令
@echo off cd /d "E:\project\Branches\Source\" svn up mvn clean install -Dmaven.test.skip=t ...
- matplotlib学习笔记(四)
利用matplotlib可以显示图像 imread()和imshow()提供了简单的图像载入和显示功能. img = plt.imread("xxx.jpg") imread()可 ...
- sharepoint_study_7
描述:sharepoint网站上部署WebPart出错后,如何删除错误的WebPart?如何恢复原页面? 解决:到管理中心去将该解决方案收回并删除,可以恢复原页面,但是错误的webpart信息会保留, ...
- django 母版与继承
在子页面的页面最上方使用下面的语法来继承母版. {% extends 'layouts.html' %} 块: 通过在母版中使用{% block xxx %}来定义块.在子页面中通过定义母版中的blo ...
- RequestContextHolder与RequestContextUtils
org.springframework.web.servlet.support.RequestContextUtils 在spring-webmvc中, 主要用来获取WebApplicationCon ...