
用Docker搭建Nexus私服
- 搜索Nexus
- 在docker容器中加载Nexus镜像
- 发布本地项目到Nexus私服
- 配置连接方式
- 发布指令
- 打源码包上传插件
搜索Nexus
在我们打算使用Nexus时,我们先搜索一下docker景象仓库中现成的Nexus镜像。
docker search nexus- 1
其展示的结果如下:
[root@localhost ~]# docker search nexus
INDEX       NAME                                                   DESCRIPTION                                     STARS     OFFICIAL   AUTOMATED
docker.io   docker.io/sonatype/nexus                               Sonatype Nexus                                  379                  [OK]
docker.io   docker.io/sonatype/nexus3                              Sonatype Nexus Repository Manager 3             337
docker.io   docker.io/sonatype/docker-nexus3                       Sonatype Nexus 3 [DEPRECATED]                   27                   [OK]
docker.io   docker.io/clearent/nexus                                                                               21
docker.io   docker.io/baselibrary/nexus                            ThoughtWorks Docker Image: nexus                7                    [OK]
docker.io   docker.io/accenture/adop-nexus                         ADOP Nexus                                      5                    [OK]
docker.io   docker.io/bradbeck/nexus-https                         Dockerized version of Nexus Repo Manager 3...   5                    [OK]
docker.io   docker.io/frekele/nexus                                docker run --rm --name nexus -p 8081:8081 ...   4                    [OK]
docker.io   docker.io/shifudao/nexus3                              clone from nexus3 image but based from ope...   3                    [OK]
docker.io   docker.io/sonatype/nexus-iq-server                     Sonatype Nexus IQ Server                        3
docker.io   docker.io/cavemandaveman/nexus                         Sonatype Nexus container                        2                    [OK]
docker.io   docker.io/fabric8/nexus                                                                                2                    [OK]
docker.io   docker.io/madmuffin/nexus3                             Sonatype Nexus3 Milestone7 docker image         2                    [OK]
docker.io   docker.io/mcreations/jenkins-with-nexus-support        Jenkins image with correct SSL config for ...   1                    [OK]
docker.io docker.io/openshiftdemos/nexus Sonatype Nexus with JBoss Enterprise repos... 1 - 1
- 2
- 3
- 4
- 5
- 6
- 7
- 8
- 9
- 10
- 11
- 12
- 13
- 14
- 15
- 16
- 17
在这里,被大家使用频率越高的版本往往STARS指数越高,排位也就越靠前,这样,我们直接拉取第一个来使用就可以了。
docker pull docker.io/sonatype/nexus- 1
如下:
[root@localhost ~]# docker pull docker.io/sonatype/nexus
Using default tag: latest
Trying to pull repository docker.io/sonatype/nexus ...
latest: Pulling from docker.io/sonatype/nexus
af4b0a2388c6: Pull complete
e2c659f5d884: Pull complete
37f6e458506e: Pull complete
b8ce98aa6771: Pull complete
90969e21cd0f: Pull complete
Digest: sha256:90f8ec0dadf5fef6bab1269a96f4e71583dadb366dde3cc664c599da5e1421e7
[root@localhost ~]# docker run -d -p 8081:8081 --name nexus docker.io/sonatype/nexus
5f23e18df895901f33a7abf01870984a65257f977e27266d6d319706b6e06719- 1
- 2
- 3
- 4
- 5
- 6
- 7
- 8
- 9
- 10
- 11
- 12
在docker容器中加载Nexus镜像
指令如下:
docker run -d -p 8081:8081 --name nexus docker.io/sonatype/nexus- 1
运行结果:
[root@localhost ~]# docker run -d -p 8081:8081 --name nexus docker.io/sonatype/nexus
5f23e18df895901f33a7abf01870984a65257f977e27266d6d319706b6e06719- 1
- 2
在Nexus运行时,这可能需要等待一段很短的时间,我们可以通过查看Nexus的日志来了解Nexus的运行情况,其指令如下:
docker logs -f nexus- 1
当docker运行起来后,我们就可以在浏览器中进行访问了,访问地址为:
http://192.168.44.128:8081/nexus/#welcome- 1
其中192.168.44.128为虚拟机所对应的ip地址,大家在这里填写自己所在的ip地址即可。
运行的界面如下:
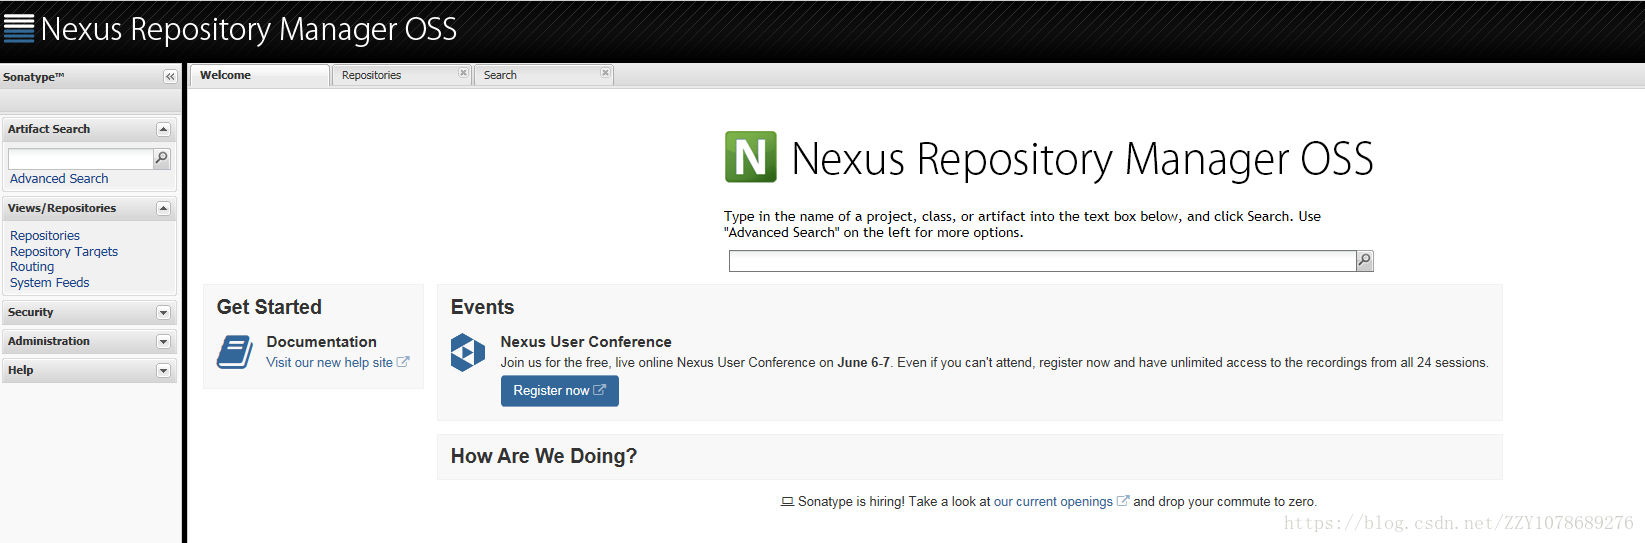
当看到这里时,这说明我们的Nexus已经正常运行,可以进行使用了。
如果想查看与Nexus相关的更多docker镜像信息,可以到这里去查看Nexus的docker镜像官方文档。
https://hub.docker.com/r/sonatype/nexus/- 1
在这里,docker的默认账号为admin,默认密码为admin123,直接将其拿来就可以使用了。
发布本地项目到Nexus私服
配置连接方式
配置Maven的settings.xml
    <server>
      <id>user-release</id>
      <username>admin</username>
      <password>admin123</password>
    </server>
    <server>
      <id>user-snapshots</id>
      <username>admin</username>
      <password>admin123</password>
</server>- 1
- 2
- 3
- 4
- 5
- 6
- 7
- 8
- 9
- 10
配置项目的pom.xml
<distributionManagement>
    <repository>
      <id>user-release</id>
      <name>user release resp</name>
      <url>http://192.168.44.128:8081/nexus/content/repositories/releases/</url>
    </repository>
    <snapshotRepository>
      <id>user-snapshots</id>
      <name>user snapshots resp</name>
      <url>http://192.168.44.128:8081/nexus/content/repositories/snapshots/</url>
    </snapshotRepository>
</distributionManagement>- 1
- 2
- 3
- 4
- 5
- 6
- 7
- 8
- 9
- 10
- 11
- 12
该连接地址在Nexus的页面中就可以找到,如:
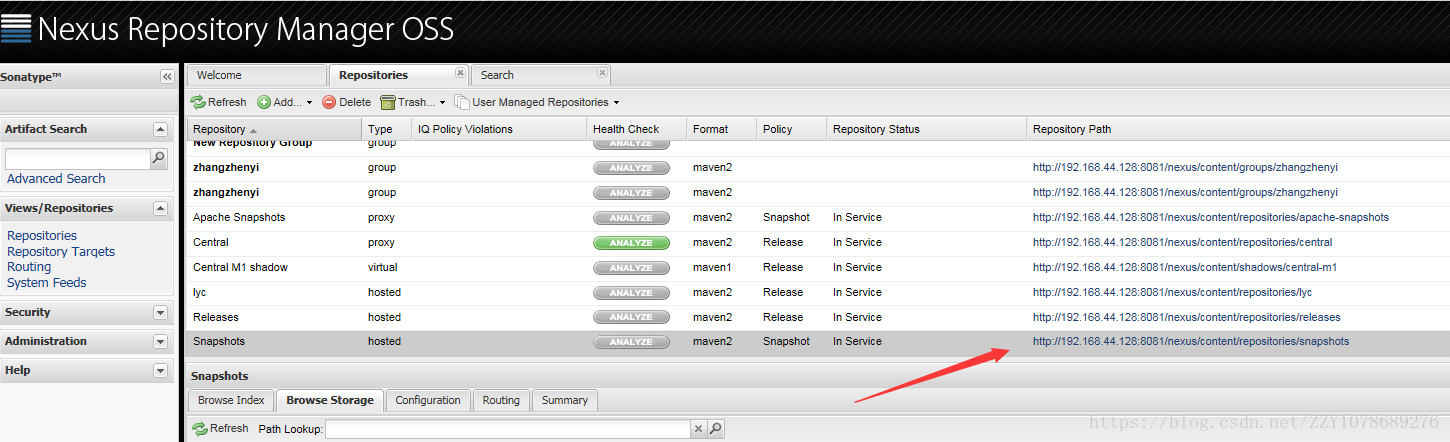
直接来拿复制粘贴就可以了。
发布指令
在项目中,运行下列指令将项目发布到私服中
mvn deploy- 1
或点击IDEA中的deploy快捷指令
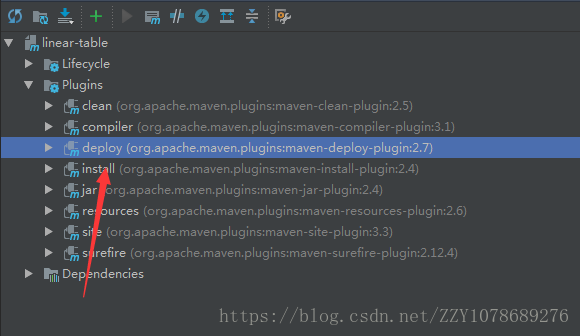
运行结果:
Downloading from user-snapshots: http:www.255055.cn/ //192.168.44.128:8081/nexus/content/repositories/snapshots/com/mycompany/linear-table/2.0-SNAPSHOT/maven-metadata.xml
Uploading to user-snapshots: http://192.168.44.128:8081/nexus/content/repositories/snapshots/com/mycompany/linear-table/2.0-SNAPSHOT/linear-table-2.0-20180409.124308-1.jar
Uploaded to user-snapshots: http://www.douniu178.com 192.168.44.128:8081/nexus/content/repositories/snapshots/com/mycompany/linear-table/2.0-SNAPSHOT/linear-table-2.0-20180409.124308-1.jar (17 kB at 114 kB/s)
Uploading to user-snapshots: http://192.168.44.128:8081/nexus/content/repositories/snapshots/com/mycompany/linear-table/2.0-SNAPSHOT/linear-table-2.0-20180409.124308-1.pom
Uploaded to user-snapshots: http://www.chuangyed.com 192.168.44.128:8081/nexus/content/repositories/snapshots/com/mycompany/linear-table/2.0-SNAPSHOT/linear-table-2.0-20180409.124308-1.pom (1.8 kB at 30 kB/s)
Downloading from user-snapshots: http://192.168.44.128:8081/nexus/content/repositories/snapshots/com/mycompany/linear-table/maven-metadata.xml
Uploading to user-snapshots: http://192.168.44.128:8081/nexus/content/repositories/snapshots/com/mycompany/linear-table/2.0-SNAPSHOT/maven-metadata.xml
Uploaded to user-snapshots: http://192.168.44.128:8081/nexus/content/repositories/snapshots/com/mycompany/linear-table/2.0-SNAPSHOT/maven-metadata.xml (769 B at 20 kB/s)
Uploading to user-snapshots: http://192.168.44.128:8081/nexus/content/repositories/snapshots/com/mycompany/linear-table/maven-metadata.xml
Uploaded to user-snapshots: http://192.168.44.128:8081/nexus/content/repositories/snapshots/com/mycompany/linear-table/maven-metadata.xml (283 B at 7.6 kB/s)
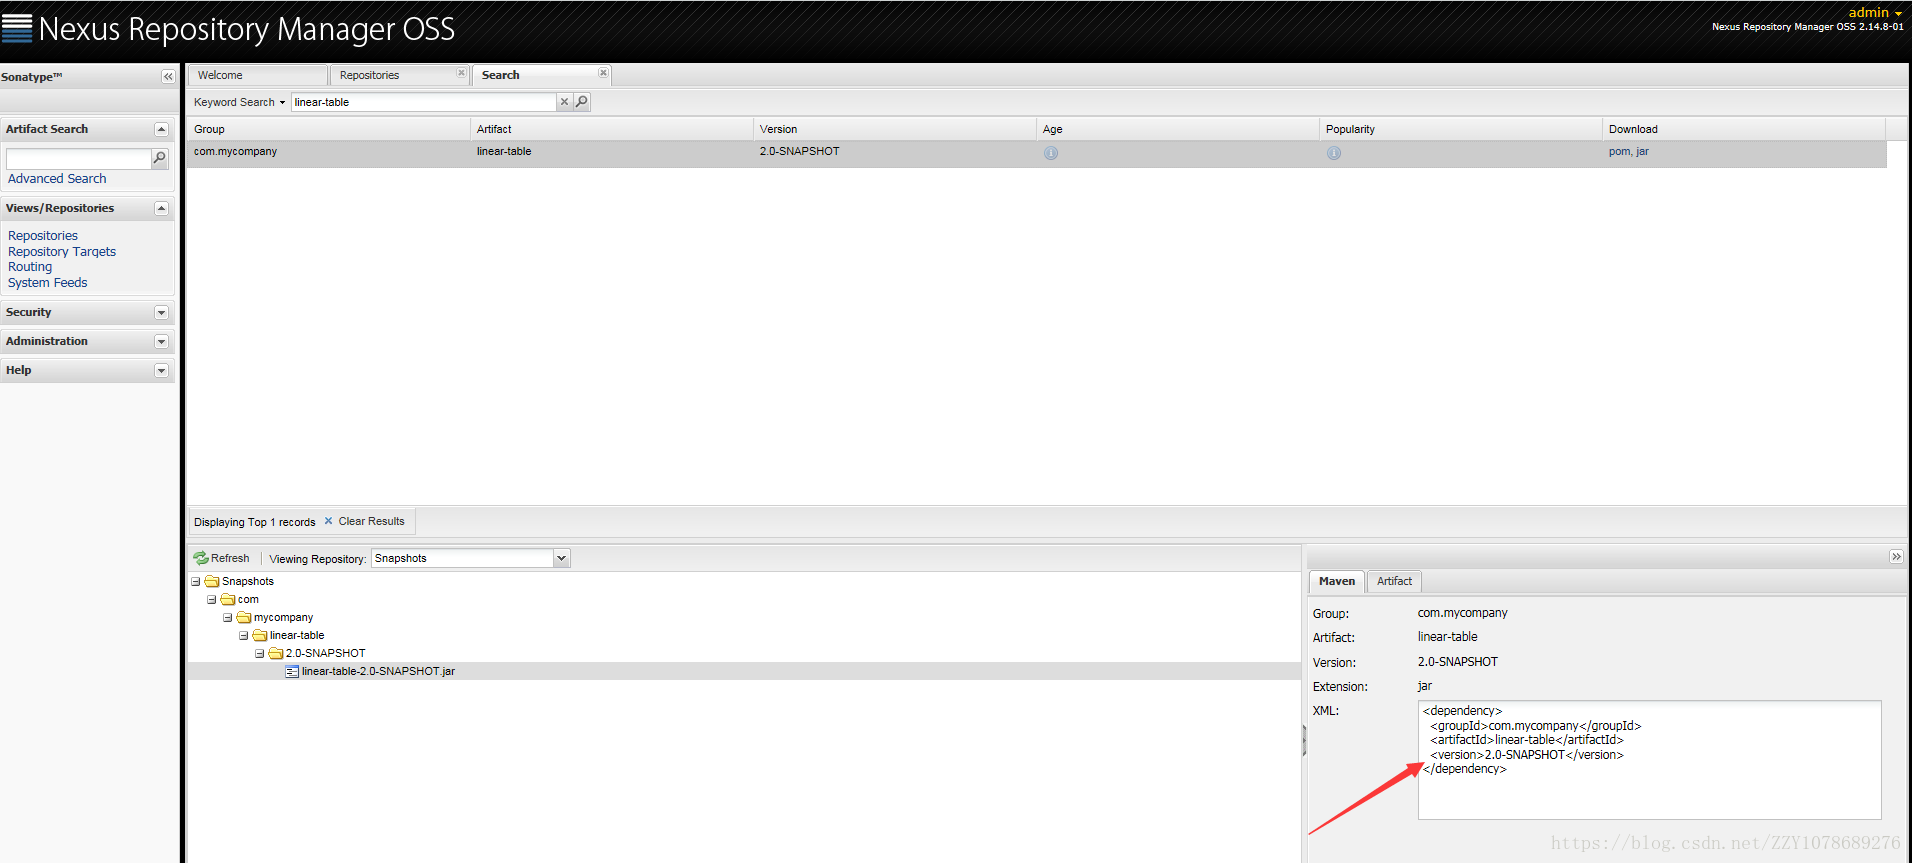
发布后的结果:
打源码包上传插件
源码包上传插件如下,将其添加到项目的pom.xml文件中即可。
<build>
    <plugins>
      <plugin> <!-- 打jar包 -->
        <groupId>org.apache.maven.plugins</groupId>
        <artifactId>maven-jar-plugin</artifactId>
        <version>3.0.1</version>
        <configuration>
          <excludes>
            <exclude>**/*.properties</exclude>
          </excludes>
        </configuration>
      </plugin>
      <plugin> <!-- 打源码 -->
        <groupId>org.apache.maven.plugins</groupId>
        <artifactId>maven-source-plugin</artifactId>
        <version>3.0.1<www.boshenyl.cn /version>
        <configuration>
          <attach>true</attach>
        </configuration>
        <executions>
          <execution>
            <phase>compile</phase>
            <goals>
              <goal>jar<www.mcyllpt.com/goal>
            <www.feihuanyule.com /goals>
          </execution>
        </executions>
      </plugin>
    <www.gouyiflb.cn /plugins>
<www.caibaoyule.cn /build> 当添加上上述插件后,当我们执行mvn deploy时,我们的项目源码包也将会一并发布到Nexus私服中
用Docker搭建Nexus私服的更多相关文章
- Docker 搭建nexus私服
一.概述 有三种专门的Maven仓库管理软件可以用来帮助大家建立私服:Apache基金会的Archiva.JFrog的Artifactory和Sonatype的Nexus.而Nexus是当前最流行的M ...
- Linux Centos7 基于Docker 搭建 Nexus私服搭建
创建Blob Stores[本地文件存储目录,统一管理] 1.设置名称和工作路径: ps[注意事项]: 1.storage name:自定义名称 2.storage path:存储路径,默认[/nex ...
- Linux_Centos中搭建nexus私服
1.在Linux下搭建Nexus私服 1).下载并且解压 下载 nexus-2.11.2-03-bundle.zip unzip nexus-2.11.2-03-bundle.z ...
- Linux 安装配置maven3.0 以及搭建nexus私服
http://carvin.iteye.com/blog/785365 一.软件准备 1.apache-maven-3.0-bin.tar.gz 下载地址:http://www.apache.org/ ...
- 搭建nexus私服(maven)
这里提供nexus的直接下载页面的链接: https://www.sonatype.com/download-oss-sonatype maven获取依赖jar包是从中央仓库获取,但很莫名的出现jar ...
- Linux安装配置maven以及搭建nexus私服(编写启动脚本)
2011年07月12日16:32 下面介绍在Linux操作系统下安装配置maven和搭建nexus私服. 一.安装前的准备 下载 jdk http://www.oracle.com/technetw ...
- 搭建nexus私服,无法下载相关jar包,报错Repository proxy-mode is BLOCKED_AUTO
在搭建nexus私服的时候,之前没直接用来下载maven的相关插件jar包,一直可以使用, 结果今天要编译hadoop的时候,在linux上新用maven就报错了,无法下载maven的相关插件(如下) ...
- 【原创】Docker 搭建Maven私服nexus 3.17初始密码登录不上问题/admin登陆不上问题
[原创-转载请说明出处] 博主最近在虚拟机中搭建Maven私服,遇到了一个关键问题就是nexus 3.17版本后初始密码不是admin/admin123. 对于nexus不熟悉的我弄了很长时间!!!心 ...
- 基于Docker搭建Maven私服Nexus,Nexus详解
备注:首先在linux环境安装Java环境和Docker,私服需要的服务器性能和硬盘存储要高一点,内存不足可能到时启动失败,这里以4核8GLinux服务器做演示 一:基于Docker安装nexus3 ...
随机推荐
- LiteOS创建任务的一个BUG
在任务创建的时候,参数无法传递,第二个参数本来是用来做参数传递的,但是却没用到,很尴尬啊,缺少了这个功能,很多无法写了? osThreadId_t osThreadNew (osThreadFunc_ ...
- Nginx+Tomcat多站点访问默认主页问题-狒狒完美解决-Q9715234
<Engine name="Catalina" defaultHost="www.abc.com"> <Host name="www ...
- Spring的cache缓存介绍
从3.1开始,Spring引入了对Cache的支持.其使用方法和原理都类似于Spring对事务管理的支持.Spring Cache是作用在方法上的,其核心思想是这样的:当我们在调用一个缓存方法时会把该 ...
- 中文乱码的处理—@北河的ppt
- CSP201709-1:打酱油
引言:CSP(http://www.cspro.org/lead/application/ccf/login.jsp)是由中国计算机学会(CCF)发起的"计算机职业资格认证"考试, ...
- Centos7下安装mysql服务
yum install -y perl-Module-Install.noarch yum -y install perl perl-devel #命令下载mysql wget http://dev. ...
- nginx 应用篇
nginx 信号控制(commanLine) kill singel pid ps aux|grep nginx nginx 有两个进程,一个 master 一个worker 一个master管理一 ...
- UVa 1585 - Score - ACM/ICPC Seoul 2005 解题报告 - C语言
1.题目大意 给出一个由O和X组成的字符串(长度为80以内),每个O的得分为目前连续出现的O的数量,X得分为0,统计得分. 2.思路 实在说不出了,这题没过脑AC的.直接贴代码吧.=_= 3.代码 # ...
- 七:HDFS Permissions Guide 权限
1.权限模式 简单:启动HDFS的操作系统用户即为超级用户,可以通过HADOOP_USER_NAME指定 kerberos: 2.group mapping 组列表由grou ...
- MFC常用数据类型
下面这些是和Win32程序共同使用的数据类型BOOL:布尔值,取值为TRUE or FALSEBSTR:32-bit 字符指针BYTE:8-bit整数,未带正负号COLORREF:32-bit数值,代 ...