Spring Cloud2.0之Oauth2环境搭建(授权码模式和密码授权模式)
oauth2 server 微服务授权中心, github源码 https://github.com/spring-cloud/spring-cloud-security
对微服务接口做一些权限控制。要给合作伙伴。 通过授权码或者通过密码方式获取accessToken,通过token去获取调用权限。
对于商户来说需要有appId 和 appSecret。
对于之前的连接做进一步解析:
https://graph.qq.com/oauth2.0/authorize?response_type=code&client_id=101462456&state=888&redirect_uri=http://toov5.fuck.com/qqLoginBack
type是授权码形式 appId 回调地址
用户点击确定之后会到后面的回调地址中,浏览器的格式是: 回调地址+auth
开发步骤:(非常类似腾讯QQ互联)
1. 获取授权码,连接拼接:授权类型、 appId 、 回调地址(与数据库表是一致的)
toov5 使用Spring Cloud Oauth2.0搭建
http://localhost:8080/oauth/authorize?response_type=code&client_id=client_1&redirect_uri=http://www.toov5.com
2.使用授权码获取Access Token
http://localhost:8080/oauth/token?grant_type=authorization_code&code=fOdmx2&redirect_uri=http://www.toov5.com&scope=all
用这几个参数去表里查询获取 accessToken 码
获取到accessToken就可以调用接口了
用Oauth2.0 管理微服务中的开放接口,对接口进行授权认证:
在Spring Cloud需要使用oauth2来实现多个微服务的统一认证授权,通过向OAUTH服务发送某个类型的grant type进行集中认证和授权,从而获得access_token,而这个token是受其他微服务信任的,我们在后续的访问可以通过access_token来进行,从而实现了微服务的统一认证授权。
客户端根据约定的ClientID、ClientSecret、Scope来从Access Token URL地址获取AccessToken,并经过AuthURL认证,用得到的AccessToken来访问其他资源接口。
注: Spring Cloud oauth2 需要依赖Spring security 在引入Oauth框架是需要引入Spring security
注意表结构就好了
所以综上所述:
别人在调用我的接口时候,需要申请appId。需要申请的话就需要在我的项目表中插入一条数据
微服务安全框架 SpringBootSecurity,Oauth2角色划分
1、Resource Server:被授权访问的资源
2、Authotization Server:OAUTH2认证授权中心
3、Resource Owner: 用户
4、Client:使用API的客户端(如Android 、IOS、web app)
OAuth2四种授权方式
1、授权码模式(authorization code)用在客户端与服务端应用之间授权
2、简化模式(implicit)用在移动app或者web app(这些app是在用户的设备上的,如
在手机上调起微信来进行认证授权)
3、密码模式(resource owner password credentials)应用直接都是受信任的(都是由一家公司开发的)
4、客户端模式(client credentials)用在应用API访问
密码形式的和授权形式的: 第一个是不用授权,通过密码调用。 第二个是需要授权
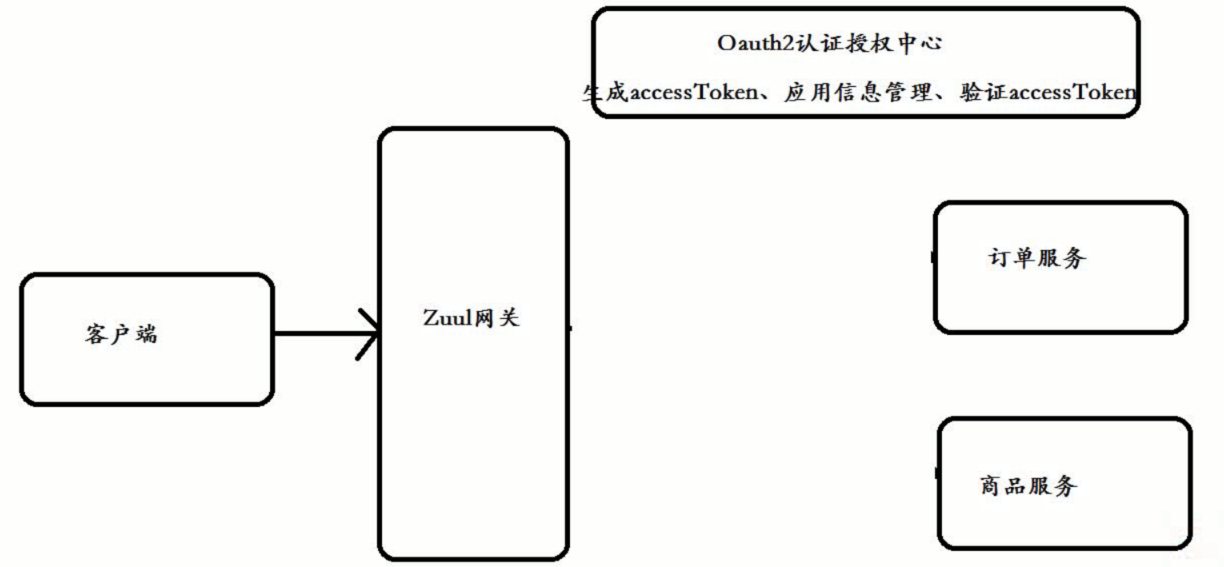
架构:
客户端不能直接调用订单服务的,需要走网关,然后进入到订单服务里面。后期服务比较多时候,需要授权认证。
使用授权码获取accessToken
对每个服务进行验证accessToken
应用信息appId appkey 回调地址
添加一层 Oauth2.0授权中心 ,对于订单服务、商品服务 都要做accessToken验证的 。 通过网关之后还有一层认证授权中心。
客户端先去获取accessToken,而accessToken生成于Oauth2.0认证授权中心。即为: 客户端到认证授权中心,通过appId和appSerect拿到accessToken。
验证accessToken是否有效等等也是通过它实现的。
认证授权中心是管理accessToken相关的
过程:客户端携带appid和授权码去Oauth2.0认证授权中心,获取accessToken。
客户端携带accessToken去访问,经过网关,网关转发到订单服务,然后去Oauth2.0认证授权中心去验证accessToken。
注:客户端代表某一个合作机构
资源中心概念: 有哪些接口需要去授权认证 。对开放接口进行授权认证。
要想调用接口 首先要去任重授权中心获取accessToken
小结:
合作机构必须要调用oauth2任重授权中心获取对应的accessToken
再使用accessToken代用微服务器中开放接口
搭建:Oauth2.0授权中心 然后资源服务中心 两步走。
架构实现:
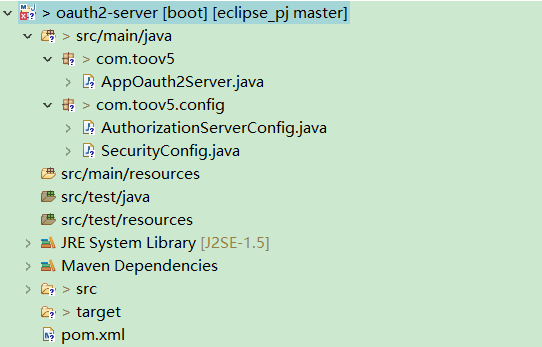
1. 搭建认证授权中心
创建maven工程: oauth2-server
相应的创建授权类信息: AuthorizationServerConfig
pom.xml:
<project xmlns="http://maven.apache.org/POM/4.0.0" xmlns:xsi="http://www.w3.org/2001/XMLSchema-instance" xsi:schemaLocation="http://maven.apache.org/POM/4.0.0 http://maven.apache.org/xsd/maven-4.0.0.xsd">
  <modelVersion>4.0.0</modelVersion>
  <groupId>com.toov5</groupId>
  <artifactId>oauth2-server</artifactId>
  <version>0.0.1-SNAPSHOT</version>

  <parent>
        <groupId>org.springframework.boot</groupId>
        <artifactId>spring-boot-starter-parent</artifactId>
        <version>2.0.1.RELEASE</version>
    </parent>
    <!-- 管理依赖 -->
    <dependencyManagement>
        <dependencies>
            <dependency>
                <groupId>org.springframework.cloud</groupId>
                <artifactId>spring-cloud-dependencies</artifactId>
                <version>Finchley.M7</version>
                <type>pom</type>
                <scope>import</scope>
            </dependency>
        </dependencies>
    </dependencyManagement>
    <dependencies>
        <!-- SpringBoot整合Web组件 -->
        <dependency>
            <groupId>org.springframework.boot</groupId>
            <artifactId>spring-boot-starter-web</artifactId>
        </dependency>
        <dependency>
            <groupId>org.projectlombok</groupId>
            <artifactId>lombok</artifactId>
        </dependency>

        <!-- springboot整合freemarker -->
        <dependency>
            <groupId>org.springframework.boot</groupId>
            <artifactId>spring-boot-starter-freemarker</artifactId>
        </dependency>

        <!-->spring-boot 整合security -->
        <dependency>
            <groupId>org.springframework.boot</groupId>
            <artifactId>spring-boot-starter-security</artifactId>
        </dependency>
        <!-- spring-cloud-starter-oauth2 -->
        <dependency>
            <groupId>org.springframework.cloud</groupId>
            <artifactId>spring-cloud-starter-oauth2</artifactId>
        </dependency>

    </dependencies>
    <!-- 注意: 这里必须要添加, 否者各种依赖有问题 -->
    <repositories>
        <repository>
            <id>spring-milestones</id>
            <name>Spring Milestones</name>
            <url>https://repo.spring.io/libs-milestone</url>
            <snapshots>
                <enabled>false</enabled>
            </snapshots>
        </repository>
    </repositories>

</project>
config:
package com.toov5.config;
import org.springframework.context.annotation.Bean;
import org.springframework.context.annotation.Configuration;
import org.springframework.http.HttpMethod;
import org.springframework.security.authentication.AuthenticationManager;
import org.springframework.security.authentication.AuthenticationProvider;
import org.springframework.security.authentication.dao.DaoAuthenticationProvider;
import org.springframework.security.core.Authentication;
import org.springframework.security.core.AuthenticationException;
import org.springframework.security.core.userdetails.User;
import org.springframework.security.core.userdetails.UserDetailsService;
import org.springframework.security.crypto.bcrypt.BCryptPasswordEncoder;
import org.springframework.security.crypto.password.PasswordEncoder;
import org.springframework.security.oauth2.config.annotation.configurers.ClientDetailsServiceConfigurer;
import org.springframework.security.oauth2.config.annotation.web.configuration.AuthorizationServerConfigurerAdapter;
import org.springframework.security.oauth2.config.annotation.web.configuration.EnableAuthorizationServer;
import org.springframework.security.oauth2.config.annotation.web.configurers.AuthorizationServerEndpointsConfigurer;
import org.springframework.security.oauth2.config.annotation.web.configurers.AuthorizationServerSecurityConfigurer;
import org.springframework.security.provisioning.InMemoryUserDetailsManager;
//配置授权中心信息
@Configuration
@EnableAuthorizationServer // 开启认证授权中心
public class AuthorizationServerConfig extends AuthorizationServerConfigurerAdapter {
// accessToken有效期
private int accessTokenValiditySeconds = 7200; // 两小时
private int refreshTokenValiditySeconds = 7200; // 两小时
// 添加商户信息
public void configure(ClientDetailsServiceConfigurer clients) throws Exception {
//方式一授权码授权模式 appid appkey
clients.inMemory().withClient("client_1").secret(passwordEncoder().encode("123456"))
.redirectUris("http://www.baidu.com").authorizedGrantTypes("authorization_code").scopes("all"). //回调地址 授权模式
accessTokenValiditySeconds(accessTokenValiditySeconds) //有效期时间
.refreshTokenValiditySeconds(refreshTokenValiditySeconds); //刷新时间// 设置token类型
public void configure(AuthorizationServerEndpointsConfigurer endpoints) {
endpoints.authenticationManager(authenticationManager()).allowedTokenEndpointRequestMethods(HttpMethod.GET,
HttpMethod.POST);
}
@Override
public void configure(AuthorizationServerSecurityConfigurer oauthServer) {
// 允许表单认证
oauthServer.allowFormAuthenticationForClients();
// 允许check_token访问
oauthServer.checkTokenAccess("permitAll()");
}
@Bean
AuthenticationManager authenticationManager() {
AuthenticationManager authenticationManager = new AuthenticationManager() {
public Authentication authenticate(Authentication authentication) throws AuthenticationException {
return daoAuhthenticationProvider().authenticate(authentication);
}
};
return authenticationManager;
}
@Bean
public AuthenticationProvider daoAuhthenticationProvider() {
DaoAuthenticationProvider daoAuthenticationProvider = new DaoAuthenticationProvider();
daoAuthenticationProvider.setUserDetailsService(userDetailsService());
daoAuthenticationProvider.setHideUserNotFoundExceptions(false);
daoAuthenticationProvider.setPasswordEncoder(passwordEncoder());
return daoAuthenticationProvider;
}
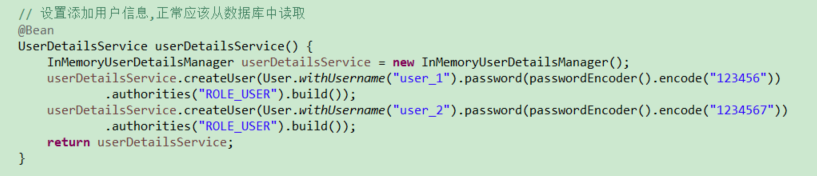
// 设置添加用户信息,正常应该从数据库中读取
@Bean
UserDetailsService userDetailsService() {
InMemoryUserDetailsManager userDetailsService = new InMemoryUserDetailsManager();
userDetailsService.createUser(User.withUsername("user_1").password(passwordEncoder().encode("123456"))
.authorities("ROLE_USER").build());
userDetailsService.createUser(User.withUsername("user_2").password(passwordEncoder().encode("1234567"))
.authorities("ROLE_USER").build());
return userDetailsService;
}
@Bean //password加密的方式 相当于把PasswordEncoder类对象 注册到容器中
PasswordEncoder passwordEncoder() {
// 加密方式
PasswordEncoder passwordEncoder = new BCryptPasswordEncoder();
return passwordEncoder;
}
}
访授权中心:授权链接 要 与配置中的参数一致 !

此时访问必然报错!
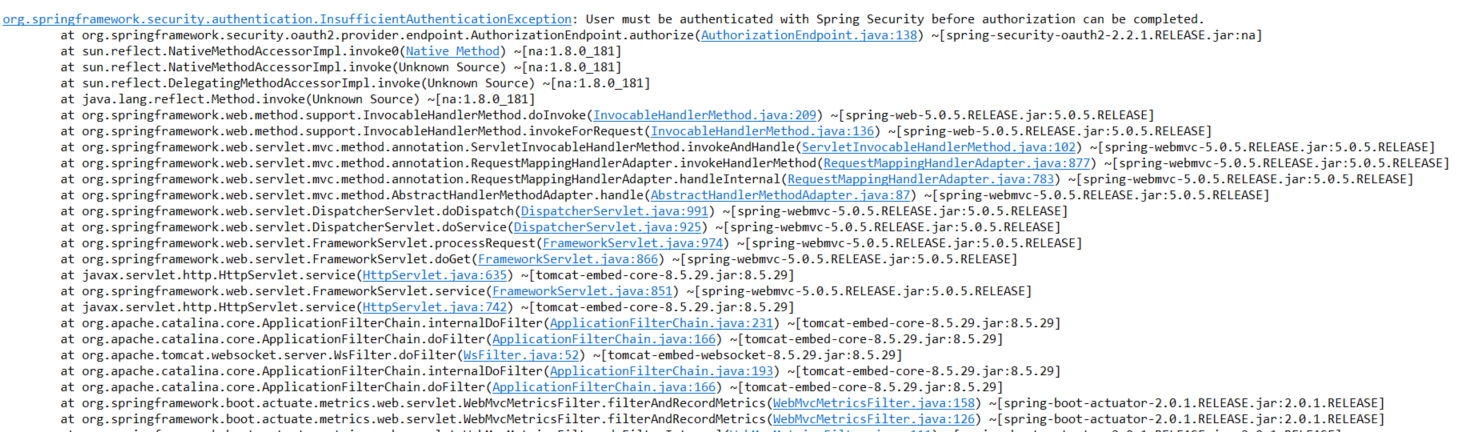
因为依赖于security框架!必须要配置。强制要求配置
解决办法 添加Security权限:
package com.toov5.config;

import org.springframework.context.annotation.Bean;
import org.springframework.security.authentication.AuthenticationManager;
import org.springframework.security.config.annotation.web.builders.HttpSecurity;
import org.springframework.security.config.annotation.web.configuration.WebSecurityConfigurerAdapter;
import org.springframework.security.crypto.bcrypt.BCryptPasswordEncoder;
import org.springframework.security.crypto.password.PasswordEncoder;
import org.springframework.stereotype.Component;

@Component
public class SecurityConfig extends WebSecurityConfigurerAdapter {

    // 授权中心管理器
    @Bean
    @Override
    public AuthenticationManager authenticationManagerBean() throws Exception {
        AuthenticationManager manager = super.authenticationManagerBean();
        return manager;
    }

    @Bean
    public PasswordEncoder passwordEncoder() {
        return new BCryptPasswordEncoder();
    }

    // 拦截所有请求,使用httpBasic方式登陆
    @Override
    protected void configure(HttpSecurity http) throws Exception {

        http.authorizeRequests().antMatchers("/**").fullyAuthenticated().and().httpBasic();  //拦截所有请求 通过httpBasic进行认证
    }
}
重新启动后:

验证token 刷新token 都有日志
访问:
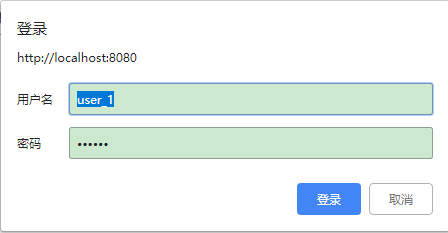
点击确认后: 应用client_1 是否接受资源授权? 接受 和 拒绝

点击接受:跳转到回调地址中去 并且 拿到授权码 (生成授权码的流程 全部框架自带的)

相当于QQ授权登录的:

授权中心项目结构:
表结构:https://blog.csdn.net/qq_27384769/article/details/79440449
补充下:
正常项目流程下,还有一个protal门户网站,用户申请appId。
密码授权模式:
使用用户用户名称和密码进行获取accessToken, 小项目这样做的多
(appid是应用于哪个机构)
验证授权:
获取accessToken请求地址: http://localhost:8080/oauth/token
看下面的例子,注意正常情况下都是读数据库的。这里为了方便介绍,写死了
配置:
package com.toov5.config;

import org.springframework.context.annotation.Bean;
import org.springframework.context.annotation.Configuration;
import org.springframework.http.HttpMethod;
import org.springframework.security.authentication.AuthenticationManager;
import org.springframework.security.authentication.AuthenticationProvider;
import org.springframework.security.authentication.dao.DaoAuthenticationProvider;
import org.springframework.security.core.Authentication;
import org.springframework.security.core.AuthenticationException;
import org.springframework.security.core.userdetails.User;
import org.springframework.security.core.userdetails.UserDetailsService;
import org.springframework.security.crypto.bcrypt.BCryptPasswordEncoder;
import org.springframework.security.crypto.password.PasswordEncoder;
import org.springframework.security.oauth2.config.annotation.configurers.ClientDetailsServiceConfigurer;
import org.springframework.security.oauth2.config.annotation.web.configuration.AuthorizationServerConfigurerAdapter;
import org.springframework.security.oauth2.config.annotation.web.configuration.EnableAuthorizationServer;
import org.springframework.security.oauth2.config.annotation.web.configurers.AuthorizationServerEndpointsConfigurer;
import org.springframework.security.oauth2.config.annotation.web.configurers.AuthorizationServerSecurityConfigurer;
import org.springframework.security.provisioning.InMemoryUserDetailsManager;

//配置授权中心信息
@Configuration
@EnableAuthorizationServer // 开启认证授权中心
public class AuthorizationServerConfig extends AuthorizationServerConfigurerAdapter {
    // accessToken有效期
    private int accessTokenValiditySeconds = 7200; // 两小时
    private int refreshTokenValiditySeconds = 7200; // 两小时

    // 添加商户信息
    public void configure(ClientDetailsServiceConfigurer clients) throws Exception {
        //方式一授权码授权模式    appid                           appkey
//        clients.inMemory().withClient("client_1").secret(passwordEncoder().encode("123456"))
//        .redirectUris("http://www.baidu.com").authorizedGrantTypes("authorization_code").scopes("all"). //回调地址 授权模式
//         accessTokenValiditySeconds(accessTokenValiditySeconds)  //有效期时间
//         .refreshTokenValiditySeconds(refreshTokenValiditySeconds); //刷新时间

        //方式二密码授权模式
        // withClient appid                                 appkey (也叫appSecrete)
        clients.inMemory().withClient("client_1").secret(passwordEncoder().encode("123456"))
                .authorizedGrantTypes("password","client_credentials","refresh_token").scopes("all").accessTokenValiditySeconds(accessTokenValiditySeconds); //有效期时间
    }

    // 设置token类型
    public void configure(AuthorizationServerEndpointsConfigurer endpoints) {
        endpoints.authenticationManager(authenticationManager()).allowedTokenEndpointRequestMethods(HttpMethod.GET,
                HttpMethod.POST);
    }

    @Override
    public void configure(AuthorizationServerSecurityConfigurer oauthServer) {
        // 允许表单认证
        oauthServer.allowFormAuthenticationForClients();
        // 允许check_token访问
        oauthServer.checkTokenAccess("permitAll()");
    }

    @Bean
    AuthenticationManager authenticationManager() {
        AuthenticationManager authenticationManager = new AuthenticationManager() {

            public Authentication authenticate(Authentication authentication) throws AuthenticationException {
                return daoAuhthenticationProvider().authenticate(authentication);
            }
        };
        return authenticationManager;
    }

    @Bean
    public AuthenticationProvider daoAuhthenticationProvider() {
        DaoAuthenticationProvider daoAuthenticationProvider = new DaoAuthenticationProvider();
        daoAuthenticationProvider.setUserDetailsService(userDetailsService());
        daoAuthenticationProvider.setHideUserNotFoundExceptions(false);
        daoAuthenticationProvider.setPasswordEncoder(passwordEncoder());
        return daoAuthenticationProvider;
    }

    // 设置添加用户信息,正常应该从数据库中读取
    @Bean
    UserDetailsService userDetailsService() {
        InMemoryUserDetailsManager userDetailsService = new InMemoryUserDetailsManager();
        userDetailsService.createUser(User.withUsername("user_1").password(passwordEncoder().encode("123456"))
                .authorities("ROLE_USER").build());
        userDetailsService.createUser(User.withUsername("user_2").password(passwordEncoder().encode("1234567"))
                .authorities("ROLE_USER").build());
        return userDetailsService;
    }

    @Bean  //password加密的方式 相当于把PasswordEncoder类对象 注册到容器中
    PasswordEncoder passwordEncoder() {
        // 加密方式
        PasswordEncoder passwordEncoder = new BCryptPasswordEncoder();
        return passwordEncoder;
    }
}
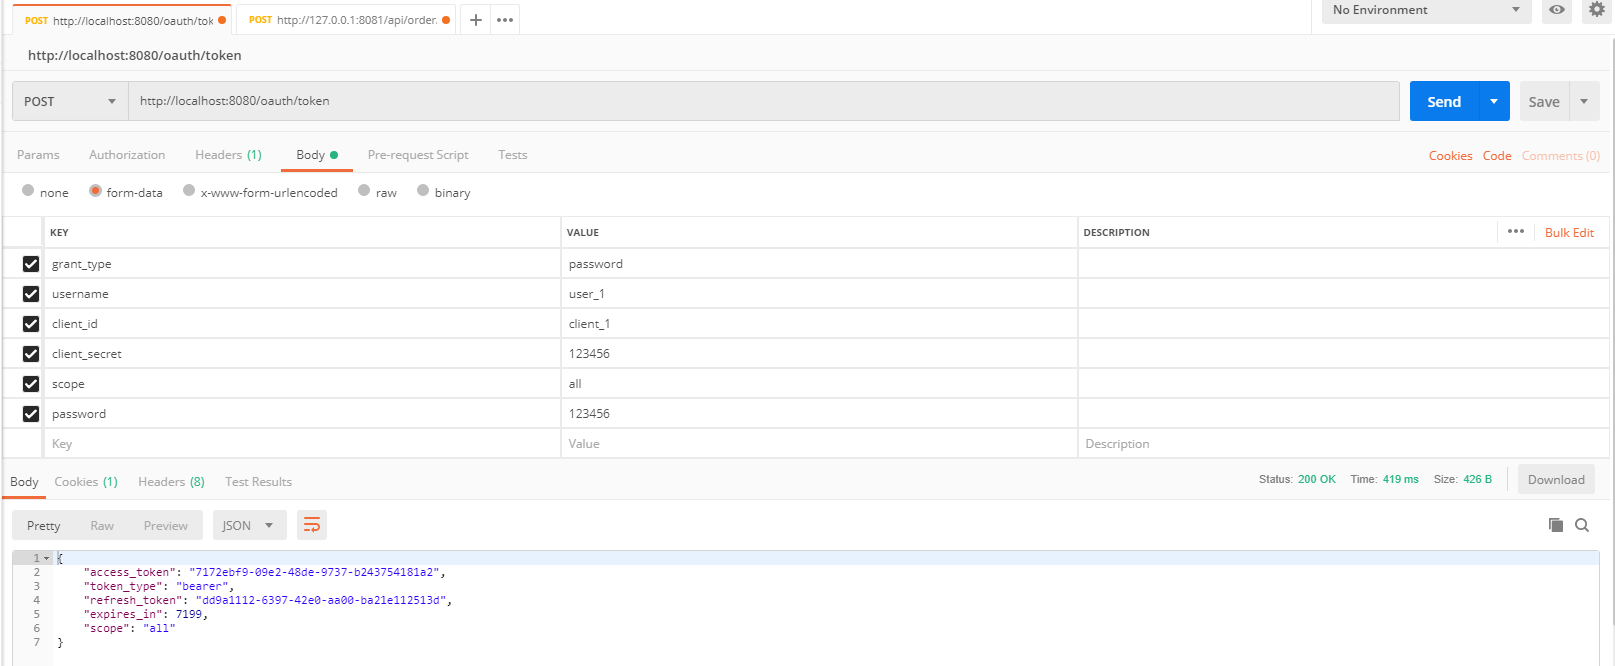
postman:

这样获取到了 accessToken
小结:密码模式想要获取到accessToken,不用authorization code . 使用用户名和密码,就可以获取到accessToken了。
用户名 和 密码要与配置的一致,实际项目时候用的是读数据库动态获取。
补充: 如果clientId appId 同时使用密码模式和授权码,获取accessToken。 会获取相同的accessToken! 因为是与appId 进行关联的。
刷新和验证accessToken
accessToken过期怎么处理? 使用刷新令牌获取新的accessToken
至少提前十分钟,刷新令牌接口进行判断。


用户需要使用这个token 换取accessToken就OK了
用户访问:
刷新新的accessToken
http://localhost:8080/oauth/token?grant_type=refresh_token&refresh_token=45e3b7d0-408f-49c8-8600-64a01479063c&client_id=client_1&client_secret=123456
获取新的accessToken

访问后报错!

类型是唯一的,需要修改
// 设置token类型
    public void configure(AuthorizationServerEndpointsConfigurer endpoints) {
        endpoints.authenticationManager(authenticationManager()).allowedTokenEndpointRequestMethods(HttpMethod.GET,
                HttpMethod.POST);
        //重新设置userDetailsService  不然刷新accessToken时候会报错!!!
        endpoints.authenticationManager(authenticationManager());
        endpoints.userDetailsService(userDetailsService());

    }
重新发送刷新的链接及其参数:

不停的刷新不停的修改
验证accessToken是否有效接口:
http://localhost:8080/oauth/check_token?token=b1d4b07f-b40b-4932-b3f0-1c5c898e086a

资源服务中心的搭建
pom:
<project xmlns="http://maven.apache.org/POM/4.0.0" xmlns:xsi="http://www.w3.org/2001/XMLSchema-instance" xsi:schemaLocation="http://maven.apache.org/POM/4.0.0 http://maven.apache.org/xsd/maven-4.0.0.xsd">
  <modelVersion>4.0.0</modelVersion>
  <groupId>com.toov5</groupId>
  <artifactId>oauth2-resource-order</artifactId>
  <version>0.0.1-SNAPSHOT</version>
  <parent>
        <groupId>org.springframework.boot</groupId>
        <artifactId>spring-boot-starter-parent</artifactId>
        <version>2.0.1.RELEASE</version>
    </parent>
    <!-- 管理依赖 -->
    <dependencyManagement>
        <dependencies>
            <dependency>
                <groupId>org.springframework.cloud</groupId>
                <artifactId>spring-cloud-dependencies</artifactId>
                <version>Finchley.M7</version>
                <type>pom</type>
                <scope>import</scope>
            </dependency>
        </dependencies>
    </dependencyManagement>
    <dependencies>
        <!-- SpringBoot整合Web组件 -->
        <dependency>
            <groupId>org.springframework.boot</groupId>
            <artifactId>spring-boot-starter-web</artifactId>
        </dependency>
        <dependency>
            <groupId>org.projectlombok</groupId>
            <artifactId>lombok</artifactId>
        </dependency>

        <!-- springboot整合freemarker -->
        <dependency>
            <groupId>org.springframework.boot</groupId>
            <artifactId>spring-boot-starter-freemarker</artifactId>
        </dependency>

        <!-->spring-boot 整合security -->
        <dependency>
            <groupId>org.springframework.boot</groupId>
            <artifactId>spring-boot-starter-security</artifactId>
        </dependency>
        <!-- spring-cloud-starter-oauth2 -->
        <dependency>
            <groupId>org.springframework.cloud</groupId>
            <artifactId>spring-cloud-starter-oauth2</artifactId>
        </dependency>

    </dependencies>
    <!-- 注意: 这里必须要添加, 否者各种依赖有问题 -->
    <repositories>
        <repository>
            <id>spring-milestones</id>
            <name>Spring Milestones</name>
            <url>https://repo.spring.io/libs-milestone</url>
            <snapshots>
                <enabled>false</enabled>
            </snapshots>
        </repository>
    </repositories>

</project>
yml:
##应用端 角色  合作机构

server:
  port: 8081

logging:
  level:
    org.springframework.security: DEBUG

security:
  oauth2:
    resource:
      ####从认证授权中心上验证token
      tokenInfoUri: http://localhost:8080/oauth/check_token
      preferTokenInfo: true
    client:   ## 获取accesstoken地址
      accessTokenUri: http://localhost:8080/oauth/token
      userAuthorizationUri: http://localhost:8080/oauth/authorize  ###授权地址
      ###appid
      clientId: client_1
      ###appSecret
      clientSecret: 123456
资源服务:
package com.toov5.controller;

import org.springframework.web.bind.annotation.RequestMapping;
import org.springframework.web.bind.annotation.RestController;
/*
 * 资源服务请求
 */
@RestController
@RequestMapping("/api/order")
public class OrderController {

    @RequestMapping("/addOrder")
    public String addOrder() {
        return "addOrder";
    }

}
资源拦截配置:
package com.toov5.config;

import org.springframework.context.annotation.Configuration;
import org.springframework.security.config.annotation.web.builders.HttpSecurity;
import org.springframework.security.oauth2.config.annotation.web.configuration.EnableResourceServer;
import org.springframework.security.oauth2.config.annotation.web.configuration.ResourceServerConfigurerAdapter;

@Configuration
@EnableResourceServer  //开启资源服务中心
public class ResourceServerConfiguration extends ResourceServerConfigurerAdapter {

    @Override
    public void configure(HttpSecurity http) throws Exception {
        // 对 api/order 请求进行拦截   验证accessToken  与controller 的要有关系
        http.authorizeRequests().antMatchers("/api/order/**").authenticated();
    }

}
启动类:
package com.toov5;

import org.springframework.boot.SpringApplication;
import org.springframework.boot.autoconfigure.SpringBootApplication;
import org.springframework.boot.autoconfigure.security.oauth2.client.EnableOAuth2Sso;

@SpringBootApplication
@EnableOAuth2Sso
public class AppOrder {

    public static void main(String[] args) {
        SpringApplication.run(AppOrder.class, args);
    }
}
先启动 认证授权中心,再启动资源中心
请求资源: http://127.0.0.1:8081/api/order/addOrder

需要添加token
通过postman获取: http://localhost:8080/oauth/token

访问服务资源: http://127.0.0.1:8081/api/order/addOrder
Authorization bearer 31820c84-2e52-408f-9d21-a62483aad59d 注意要有空格!

注:
正常情况下拦截服务资源 是在网关里面的!
拦截资源统一由网关进行Oauth2.0验证
开放接口和内部接口一定要独立出来! 可以封装业务逻辑相同,但是内部外部一定要相同
public开头的 需要做Oauth2.0验证的
动态读取表信息权限校验
官方推荐SQL:
我直接给抄过来了:
create table oauth_client_details (
  client_id ) PRIMARY KEY,
  resource_ids ),
  client_secret ),
  scope ),
  authorized_grant_types ),
  web_server_redirect_uri ),
  authorities ),
  access_token_validity INTEGER,
  refresh_token_validity INTEGER,
  additional_information ),
  autoapprove )
);

create table oauth_client_token (
  token_id ),
  token LONGVARBINARY,
  authentication_id ) PRIMARY KEY,
  ),
  client_id )
);

create table oauth_access_token (
  token_id ),
  token LONGVARBINARY,
  authentication_id ) PRIMARY KEY,
  ),
  client_id ),
  authentication LONGVARBINARY,
  refresh_token )
);

create table oauth_refresh_token (
  token_id ),
  token LONGVARBINARY,
  authentication LONGVARBINARY
);

create table oauth_code (
  code ), authentication LONGVARBINARY
);

create table oauth_approvals (
    userId ),
    clientId ),
    scope ),
    status ),
    expiresAt TIMESTAMP,
    lastModifiedAt TIMESTAMP
);

-- customized oauth_client_details table
create table ClientDetails (
  appId ) PRIMARY KEY,
  resourceIds ),
  appSecret ),
  scope ),
  grantTypes ),
  redirectUrl ),
  authorities ),
  access_token_validity INTEGER,
  refresh_token_validity INTEGER,
  additionalInformation ),
  autoApproveScopes )
);
注: 这里面索引太长,报错。大家可以修改下InnoDB索引长度
索引太长会降低性能,这里我统一修改为25,作为测试用。实际开发视情况而定。
根据本次的设计:
create database oauth2;

USE oauth2;
create table oauth_client_details (
  client_id ) PRIMARY KEY,
  resource_ids ),
  client_secret ),
  scope ),
  authorized_grant_types ),
  web_server_redirect_uri ),
  authorities ),
  access_token_validity INTEGER,
  refresh_token_validity INTEGER,
  additional_information ),
  autoapprove )
);

create table oauth_client_token (
  token_id ),
  token BLOB,
  authentication_id ) PRIMARY KEY,
  ),
  client_id )
);

create table oauth_access_token (
  token_id ),
  token BLOB,
  authentication_id ) PRIMARY KEY,
  ),
  client_id ),
  authentication BLOB,
  refresh_token )
);

create table oauth_refresh_token (
  token_id ),
  token BLOB,
  authentication BLOB
);

create table oauth_code (
  code ), authentication BLOB
);

create table oauth_approvals (
    userId ),
    clientId ),
    scope ),
    status ),
    expiresAt TIMESTAMP,
    lastModifiedAt TIMESTAMP
);

-- customized oauth_client_details table
create table ClientDetails (
  appId ) PRIMARY KEY,
  resourceIds ),
  appSecret ),
  scope ),
  grantTypes ),
  redirectUrl ),
  authorities ),
  access_token_validity INTEGER,
  refresh_token_validity INTEGER,
  additionalInformation ),
  autoApproveScopes )
);
注: 表名不要随便改,字段也不要随便改!
动态的配置:
maven 中引入数据库的jdbc等链接jar包依赖
<project xmlns="http://maven.apache.org/POM/4.0.0" xmlns:xsi="http://www.w3.org/2001/XMLSchema-instance" xsi:schemaLocation="http://maven.apache.org/POM/4.0.0 http://maven.apache.org/xsd/maven-4.0.0.xsd">
  <modelVersion>4.0.0</modelVersion>
  <groupId>com.toov5</groupId>
  <artifactId>oauth2-server</artifactId>
  <version>0.0.1-SNAPSHOT</version>

  <parent>
        <groupId>org.springframework.boot</groupId>
        <artifactId>spring-boot-starter-parent</artifactId>
        <version>2.0.1.RELEASE</version>
    </parent>
    <!-- 管理依赖 -->
    <dependencyManagement>
        <dependencies>
            <dependency>
                <groupId>org.springframework.cloud</groupId>
                <artifactId>spring-cloud-dependencies</artifactId>
                <version>Finchley.M7</version>
                <type>pom</type>
                <scope>import</scope>
            </dependency>
        </dependencies>
    </dependencyManagement>
    <dependencies>
        <!-- SpringBoot整合Web组件 -->
        <dependency>
            <groupId>org.springframework.boot</groupId>
            <artifactId>spring-boot-starter-web</artifactId>
        </dependency>
        <dependency>
            <groupId>org.projectlombok</groupId>
            <artifactId>lombok</artifactId>
        </dependency>

        <!-- springboot整合freemarker -->
        <dependency>
            <groupId>org.springframework.boot</groupId>
            <artifactId>spring-boot-starter-freemarker</artifactId>
        </dependency>

        <!-->spring-boot 整合security -->
        <dependency>
            <groupId>org.springframework.boot</groupId>
            <artifactId>spring-boot-starter-security</artifactId>
        </dependency>
        <!-- spring-cloud-starter-oauth2 -->
        <dependency>
            <groupId>org.springframework.cloud</groupId>
            <artifactId>spring-cloud-starter-oauth2</artifactId>
        </dependency>

           <dependency>
            <groupId>org.springframework.boot</groupId>
            <artifactId>spring-boot-starter-jdbc</artifactId>
        </dependency>

        <dependency>
            <groupId>mysql</groupId>
            <artifactId>mysql-connector-java</artifactId>
        </dependency>

    </dependencies>
    <!-- 注意: 这里必须要添加, 否者各种依赖有问题 -->
    <repositories>
        <repository>
            <id>spring-milestones</id>
            <name>Spring Milestones</name>
            <url>https://repo.spring.io/libs-milestone</url>
            <snapshots>
                <enabled>false</enabled>
            </snapshots>
        </repository>
    </repositories>

</project>
Application.yml 配置数据库信息
spring:
  datasource:
    hikari:
      connection-test-query: SELECT 1
      minimum-idle: 1
      maximum-pool-size: 5
      pool-name: dbcp1
    driver-class-name: com.mysql.jdbc.Driver
    url: jdbc:mysql://localhost:3306/oauth2?autoReconnect=true&useSSL=false
    username: root
    password: root
配置文件:
package com.toov5.config;

import javax.sql.DataSource;

import org.springframework.beans.factory.annotation.Autowired;
import org.springframework.beans.factory.annotation.Qualifier;
import org.springframework.context.annotation.Bean;
import org.springframework.context.annotation.Configuration;
import org.springframework.security.authentication.AuthenticationManager;
import org.springframework.security.authentication.AuthenticationProvider;
import org.springframework.security.authentication.dao.DaoAuthenticationProvider;
import org.springframework.security.core.Authentication;
import org.springframework.security.core.AuthenticationException;
import org.springframework.security.core.userdetails.User;
import org.springframework.security.core.userdetails.UserDetailsService;
import org.springframework.security.crypto.bcrypt.BCryptPasswordEncoder;
import org.springframework.security.crypto.password.PasswordEncoder;
import org.springframework.security.oauth2.config.annotation.configurers.ClientDetailsServiceConfigurer;
import org.springframework.security.oauth2.config.annotation.web.configuration.AuthorizationServerConfigurerAdapter;
import org.springframework.security.oauth2.config.annotation.web.configuration.EnableAuthorizationServer;
import org.springframework.security.oauth2.config.annotation.web.configurers.AuthorizationServerEndpointsConfigurer;
import org.springframework.security.oauth2.config.annotation.web.configurers.AuthorizationServerSecurityConfigurer;
import org.springframework.security.oauth2.provider.token.TokenStore;
import org.springframework.security.oauth2.provider.token.store.JdbcTokenStore;
import org.springframework.security.provisioning.InMemoryUserDetailsManager;

// 配置授权中心信息
@Configuration
@EnableAuthorizationServer // 开启认证授权中心
public class AuthorizationServerConfig extends AuthorizationServerConfigurerAdapter {

    @Autowired
    //@Qualifier("authenticationManagerBean")
    private AuthenticationManager authenticationManager;

    @Autowired
    @Qualifier("dataSource")
    private DataSource dataSource;

   //默认token都是存在内存中去的  一种是redis  一种是数据库中

    @Bean
    public TokenStore tokenStore() {
        // return new InMemoryTokenStore(); //使用内存中的 token store
        return new JdbcTokenStore(dataSource); /// 使用Jdbctoken store
    }

    @Override
    public void configure(ClientDetailsServiceConfigurer clients) throws Exception {

        // 添加授权用户
        clients.jdbc(dataSource)
          .withClient("client_1").secret(new BCryptPasswordEncoder().encode(""))
        .authorizedGrantTypes("password", "refresh_token", "authorization_code")// 允许授权范围
        .redirectUris("http://www.toov5.com").authorities("ROLE_ADMIN", "ROLE_USER")// 客户端可以使用的权限
        .scopes(").refreshTokenValiditySeconds();
    }

    @Override
    public void configure(AuthorizationServerEndpointsConfigurer endpoints) throws Exception {
        endpoints.tokenStore(tokenStore()).authenticationManager(authenticationManager)
                .userDetailsService(userDetailsService());// 必须设置
                                                            // UserDetailsService
                                                            // 否则刷新token 时会报错
    }

    @Bean
    UserDetailsService userDetailsService() {
        InMemoryUserDetailsManager userDetailsService = new InMemoryUserDetailsManager();
        userDetailsService.createUser("))
                .authorities("ROLE_USER").build());
        userDetailsService.createUser(User.withUsername("user_2")
                .password(new BCryptPasswordEncoder().encode("")).authorities("ROLE_USER").build());
        return userDetailsService;
    }

    @Override
    public void configure(AuthorizationServerSecurityConfigurer security) throws Exception {
        security.tokenKeyAccess("permitAll()").checkTokenAccess("isAuthenticated()")
                .allowFormAuthenticationForClients();// 允许表单登录

    }

    @Bean
    AuthenticationManager authenticationManager() {
        AuthenticationManager authenticationManager = new AuthenticationManager() {

            public Authentication authenticate(Authentication authentication) throws AuthenticationException {
                return daoAuhthenticationProvider().authenticate(authentication);
            }
        };
        return authenticationManager;
    }
    @Bean
    public AuthenticationProvider daoAuhthenticationProvider() {
        DaoAuthenticationProvider daoAuthenticationProvider = new DaoAuthenticationProvider();
        daoAuthenticationProvider.setUserDetailsService(userDetailsService());
        daoAuthenticationProvider.setHideUserNotFoundExceptions(false);
        daoAuthenticationProvider.setPasswordEncoder(passwordEncoder());
        return daoAuthenticationProvider;
    }

    @Bean
    PasswordEncoder passwordEncoder() {
        // 加密方式
        PasswordEncoder passwordEncoder = new BCryptPasswordEncoder();
        return passwordEncoder;
    }

}
访问:
授权中心将数据存储到数据库中:

authentication_id 是加密的密码
重新启动,再次访问肯定报错,因为有这个数据了
上述实现体验为目的,实际情况下,搭建个web端,管理表,进行插入数据。
进行增删改查,密码通过
new BCryptPasswordEncoder().encode("123456")  进行加密

客户端进行使用时候: 携带 accessToken
Spring Cloud2.0之Oauth2环境搭建(授权码模式和密码授权模式)的更多相关文章
- spring boot2.0(一 ) 基础环境搭建
1.基础配置 开发环境:window jdk版本:1.8(spring boot2.0最低要求1.8) 开发工具:eclipse 构建方式:maven3 2.POM配置文件 <project x ...
- Hadoop2.7.3+Spark2.1.0 完全分布式环境 搭建全过程
一.修改hosts文件 在主节点,就是第一台主机的命令行下; vim /etc/hosts 我的是三台云主机: 在原文件的基础上加上; ip1 master worker0 namenode ip2 ...
- Hadoop2.5.0伪分布式环境搭建
本章主要介绍下在Linux系统下的Hadoop2.5.0伪分布式环境搭建步骤.首先要搭建Hadoop伪分布式环境,需要完成一些前置依赖工作,包括创建用户.安装JDK.关闭防火墙等. 一.创建hadoo ...
- 我是如何进行Spring MVC文档翻译项目的环境搭建、项目管理及自动化构建工作的
感兴趣的同学可以关注这个翻译项目 . 我的博客原文 和 我的Github 前段时间翻译的Spring MVC官方文档完成了第一稿,相关的文章和仓库可以点击以下链接.这篇文章,主要是总结一下这个翻译项目 ...
- SSM Spring+SpringMVC+mybatis+maven+mysql环境搭建
SSM Spring+SpringMVC+mybatis+maven环境搭建 1.首先右键点击项目区空白处,选择new->other..在弹出框中输入maven,选择Maven Project. ...
- Spring框架入门之开发环境搭建(MyEclipse2017平台)
基于MyEclipse2017平台搭建Spring开发环境,这里MyEclipse已将Spring集成好了,我们只需要做一简单配置即可 一.环境配置 OS:Windows7 64位 IDE工具:MyE ...
- Spring MVC基础知识整理➣环境搭建和Hello World
概述 Spring MVC属于SpringFrameWork的产品,采用Model-View-Controller进行数据交互,已经融合在Spring Web Flow里面.Spring 框架提供了构 ...
- spring+springMVC+mybatis+maven+mysql环境搭建(一)
环境搭建是最基础的,但是发现平时很多时候大家都是ctrl c+ctrl v,这样对于很多细节完全不清楚,来,一起深入了解下 一.准备工作 首先得准备好maven.mysql啥的,这些略... 并且my ...
- Spring Cloud2.0之整合Consul作为注册中心
使用Consul来替换Eureka Consul简介 Consul 是一套开源的分布式服务发现和配置管理系统,由 HashiCorp 公司用 Go 语言开发. 它具有很多优点.包括: 基于 raft ...
随机推荐
- UIWebview打开.txt文件中文乱码解决
用UIWebview打开txt文件有时候会出现乱码的情况,这种情况应该是txt的编码问题,解决方案如下: txt分带编码和不带编码两种,带编码的如UTF-8格式txt,不带编码的如ANSI格式txt. ...
- Ubuntu右键添加:open in terminal
1.安装软件nautilus-open-terminal sudo apt-get install nautilus-open-terminal 2.重新加载文件管理器 nautilus -q 重新打 ...
- JZOJ.5273【NOIP2017模拟8.14】亲戚
Description
- iOS中的armv6、armv7、armv7s
armv6.armv7.armv7s是arm CPU的指令集,原则上是向下兼容的,如:iPhone4sCPU支持armv7,但它会兼容armv6,只是使用armv6指令可能无法充分发挥它的特性.iph ...
- NET Framework 4.5新特性 (二) 控制台支持 Unicode (UTF-16) 编码
从 .NET Framework 4.5 开始,Console 类支持与 UnicodeEncoding 类的 UTF-16 编码. 显示 Unicode 字符到控制台,你可以设置 OutputEn ...
- 前端代码tomcat下简单部署
软件 filezilla [ftp] + visionapp Remote Desktop[远程桌面] (前提:前后端代码分离,如前端angular实现) ftp上传到机器{软件 filezill ...
- 160706、Java HashMap工作原理及实现
1. 概述 从本文你可以学习到: 什么时候会使用HashMap?他有什么特点? 你知道HashMap的工作原理吗? 你知道get和put的原理吗?equals()和hashCode()的都有什么作用? ...
- Extjs3 combobox使用
Combobox 在程序中应用十分普遍,每个combobox的选项 一般对应两个值:一个用于前台显示的值,一个与显示值对应的value值.在后台获取value的值需使用combobox的 Hidden ...
- 个人觉得存成char(12),优于varchar(12)
w 延展一点:0----(还是上边的url),varchar(10)则数据库的存储1-11bytes,而不是0-10bytes;varchar(256)则为2-258bytes; 1----如果待入库 ...
- 面试常见的selenium问题
1.如何切换iframe 问题:如果你在一个default content中查找一个在iframe中的元素,那肯定是找不到的.反之你在一个iframe中查找另一个iframe元素或default co ...