
接口自动化测试 (三)request.post
上一节介绍了 requests.get() 方法的基本使用,本节介绍 requests.post() 方法的使用:
本文目录:
一、方法定义
二、post方法简单使用
1、带数据的post
2、带header的post
3、带json的post
4、带参数的post
5、普通文件上传
6、定制化文件上传
7、多文件上传
一、方法定义:
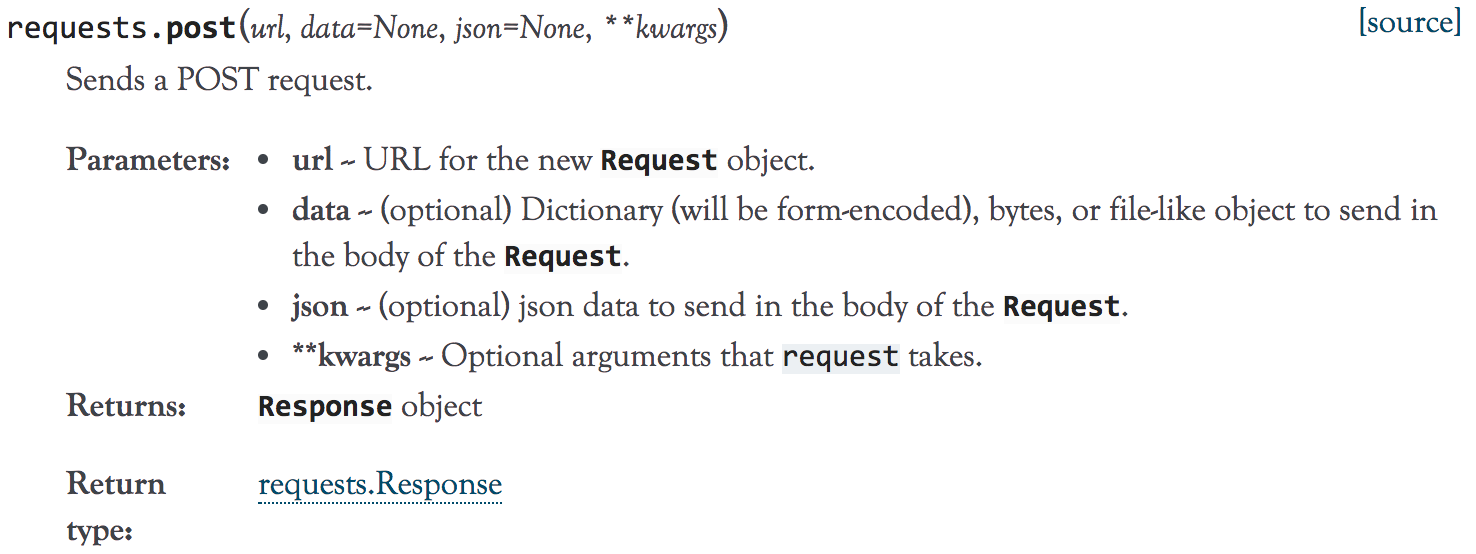
1、到官方文档去了下requests.post()方法的定义,如下:
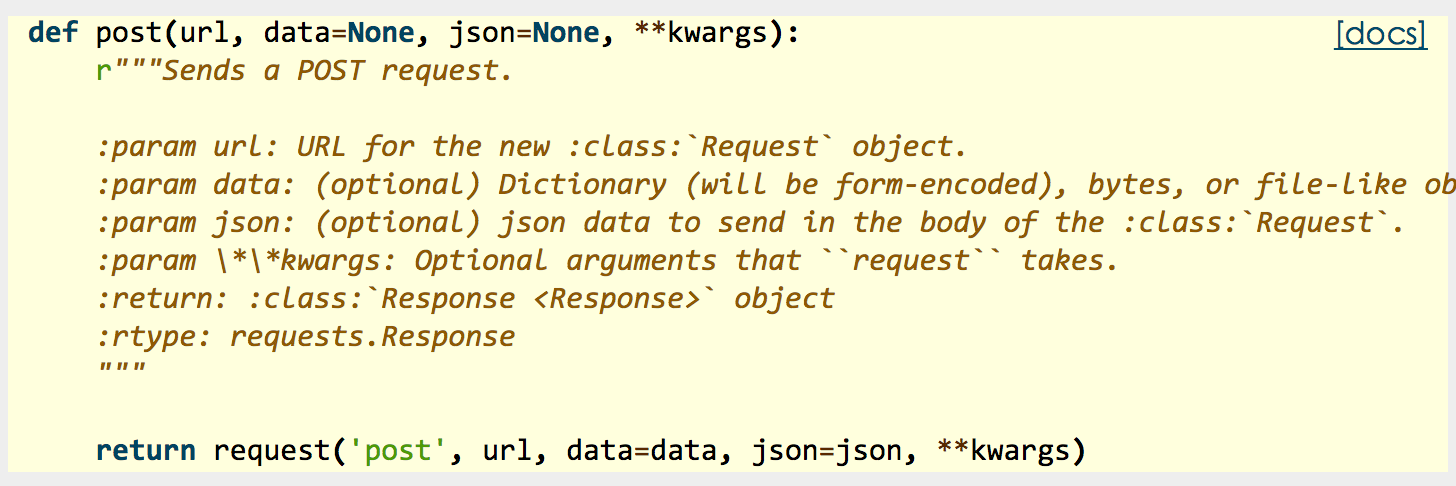
2、源码:
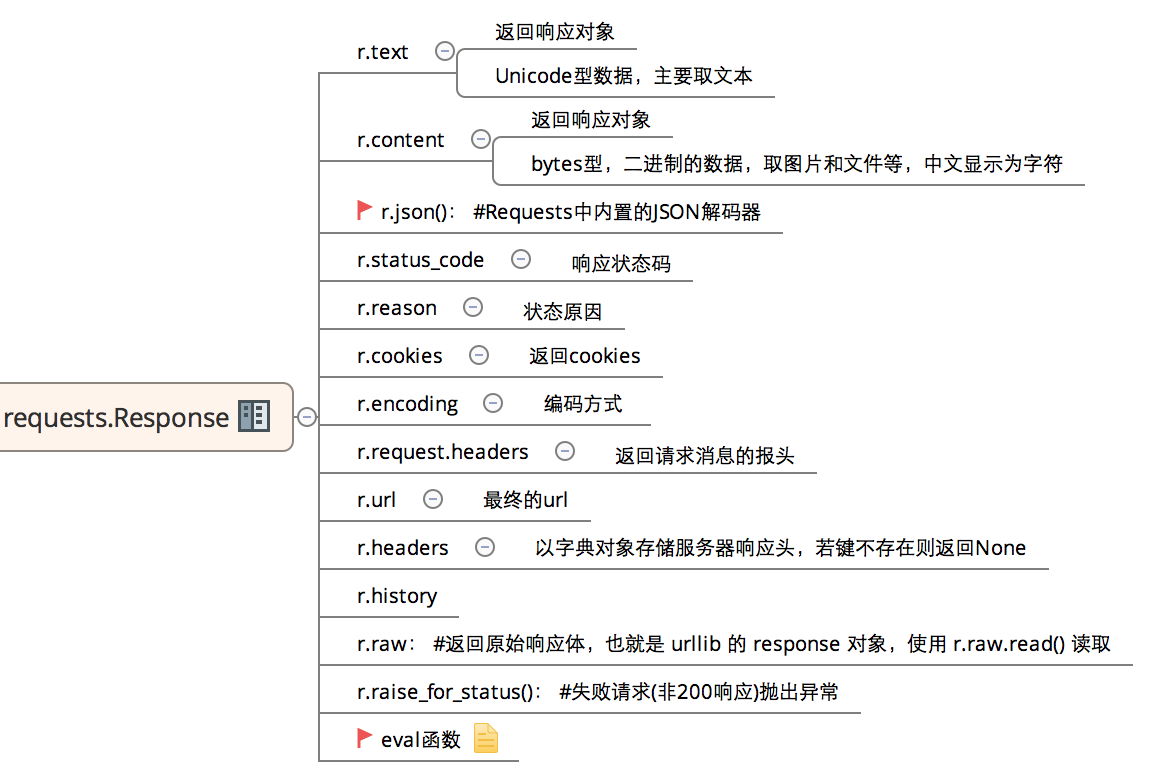
3、常用返回信息:
二、post方法简单使用:
1、带数据的post:

# -*- coding:utf-8 -*-

import requests

import json

host = "http://httpbin.org/"

endpoint = "post"

url = ''.join([host,endpoint])

data = {'key1':'value1','key2':'value2'}

r = requests.post(url,data=data)

#response = r.json()

print (r.text)
输出:
{

  "args": {},

  "data": "",

  "files": {},

  "form": {

    "key1": "value1",

    "key2": "value2"

  },

  "headers": {

    "Accept": "*/*",

    "Accept-Encoding": "gzip, deflate",

    "Connection": "close",

    "Content-Length": "23",

    "Content-Type": "application/x-www-form-urlencoded",

    "Host": "httpbin.org",

    "User-Agent": "python-requests/2.18.1"

  },

  "json": null,

  "origin": "183.14.133.88",

  "url": "http://httpbin.org/post"

}
2、带header的post:
# -*- coding:utf-8 -*-

import requests

import json


host = "http://httpbin.org/"

endpoint = "post"

url = ''.join([host,endpoint])

headers = {"User-Agent":"test request headers"}

# r = requests.post(url)

r = requests.post(url,headers=headers)

#response = r.json()
输出:
{

  "args": {},

  "data": "",

  "files": {},

  "form": {},

  "headers": {

    "Accept": "*/*",

    "Accept-Encoding": "gzip, deflate",

    "Connection": "close",

    "Content-Length": "0",

    "Host": "httpbin.org",

    "User-Agent": "test request headers"

  },

  "json": null,

  "origin": "183.14.133.88",

  "url": "http://httpbin.org/post"

}
3、带json的post:
# -*- coding:utf-8 -*-

import requests

import json

host = "http://httpbin.org/"

endpoint = "post"


url = ''.join([host,endpoint])

data = {

    "sites": [

                { "name":"test" , "url":"www.test.com" },

                { "name":"google" , "url":"www.google.com" },

                { "name":"weibo" , "url":"www.weibo.com" }

    ]

}

r = requests.post(url,json=data)

# r = requests.post(url,data=json.dumps(data))

response = r.json()
输出:
{

  "args": {},

  "data": "{\"sites\": [{\"url\": \"www.test.com\", \"name\": \"test\"}, {\"url\": \"www.google.com\", \"name\": \"google\"}, {\"url\": \"www.weibo.com\", \"name\": \"weibo\"}]}",

  "files": {},

  "form": {},

  "headers": {

    "Accept": "*/*",

    "Accept-Encoding": "gzip, deflate",

    "Connection": "close",

    "Content-Length": "140",

    "Content-Type": "application/json",

    "Host": "httpbin.org",

    "User-Agent": "python-requests/2.18.1"

  },

  "json": {

    "sites": [

      {

        "name": "test",

        "url": "www.test.com"

      },

      {

        "name": "google",

        "url": "www.google.com"

      },

      {

        "name": "weibo",

        "url": "www.weibo.com"

      }

    ]

  },

  "origin": "183.14.133.88",

  "url": "http://httpbin.org/post"

}
4、带参数的post:
# -*- coding:utf-8 -*-

import requests

import json

host = "http://httpbin.org/"

endpoint = "post"

url = ''.join([host,endpoint])

params = {'key1':'params1','key2':'params2'}

# r = requests.post(url)

r = requests.post(url,params=params)

#response = r.json()

print (r.text)
输出:
{

  "args": {

    "key1": "params1",

    "key2": "params2"

  },

  "data": "",

  "files": {},

  "form": {},

  "headers": {

    "Accept": "*/*",

    "Accept-Encoding": "gzip, deflate",

    "Connection": "close",

    "Content-Length": "0",

    "Host": "httpbin.org",

    "User-Agent": "python-requests/2.18.1"

  },

  "json": null,

  "origin": "183.14.133.88",

  "url": "http://httpbin.org/post?key2=params2&key1=params1"

}
5、普通文件上传:
# -*- coding:utf-8 -*-

import requests

import json

host = "http://httpbin.org/"

endpoint = "post"


url = ''.join([host,endpoint])

#普通上传

files = {

            'file':open('test.txt','rb')

        }

r = requests.post(url,files=files)

print (r.text)
输出:
{

  "args": {},

  "data": "",

  "files": {

    "file": "hello world!\n"

  },

  "form": {},

  "headers": {

    "Accept": "*/*",

    "Accept-Encoding": "gzip, deflate",

    "Connection": "close",

    "Content-Length": "157",

    "Content-Type": "multipart/form-data; boundary=392865f79bf6431f8a53c9d56c62571e",

    "Host": "httpbin.org",

    "User-Agent": "python-requests/2.18.1"

  },

  "json": null,

  "origin": "183.14.133.88",

  "url": "http://httpbin.org/post"

}
6、定制化文件上传:
# -*- coding:utf-8 -*-

import requests

import json

host = "http://httpbin.org/"

endpoint = "post"

url = ''.join([host,endpoint])

#自定义文件名,文件类型、请求头

files = {

        'file':('test.png',open('test.png','rb'),'image/png')

}

r = requests.post(url,files=files)

print (r.text)heman793
输出比较在,就不帖了。
7、多文件上传:
# -*- coding:utf-8 -*-

import requests

import json

host = "http://httpbin.org/"

endpoint = "post"

url = ''.join([host,endpoint])

#多文件上传

files = [

    ('file1',('test.txt',open('test.txt', 'rb'))),

    ('file2', ('test.png', open('test.png', 'rb')))

    ]

r = requests.post(url,files=files)

print (r.text)
输出上,太多内容,不帖了。
8、流式上传:
# -*- coding:utf-8 -*-

import requests

import json

host = "http://httpbin.org/"

endpoint = "post"

url = ''.join([host,endpoint])

#流式上传

with open( 'test.txt' ) as f:

    r = requests.post(url,data = f)

print (r.text)
输出:
{

  "args": {},

  "data": "hello world!\n",

  "files": {},

  "form": {},

  "headers": {

    "Accept": "*/*",

    "Accept-Encoding": "gzip, deflate",

    "Connection": "close",

    "Content-Length": "13",

    "Host": "httpbin.org",

    "User-Agent": "python-requests/2.18.1"

  },

  "json": null,

  "origin": "183.14.133.88",

  "url": "http://httpbin.org/post"

}
接口自动化测试 (三)request.post的更多相关文章
- 接口自动化测试unittest+request+excel(一)
注: 学习python自动化测试,需要先学习python基础,主要还是多敲代码,多联系,孰能生巧,你也会是一名合格的程序员 python基础学习: http://c.biancheng.net/pyt ...
- python接口自动化测试三十三:获取时间戳(10位和13位)
很多时候,在调用接口时,需要对请求进行签名.需要用到unix时间戳. 在python里,在网上介绍的很多方法,得到的时间戳是10位.而java里默认是13位(milliseconds,毫秒级的). 下 ...
- python接口自动化测试(三)-requests.post()
上一节介绍了 requests.get() 方法的基本使用,本节介绍 requests.post() 方法的使用: 本文目录: 一.方法定义 二.post方法简单使用 1.带数据的post 2 ...
- python接口自动化测试(一)-request模块
urllib.request模块是python3针对处理url的. 1. 首先导入: from urllib import request 2. 构造url,构造url的headers信息和传参[re ...
- python接口自动化测试三:代码发送HTTP请求
get请求: 1.get请求(无参数): 2.get请求(带参数): 接口地址:http://japi.juhe.cn/qqevaluate/qq 返回格式:json 请求方式:get post 请求 ...
- python接口自动化测试三十六:数据驱动参数化之paramunittest
官方文档1.官方文档地址:https://pypi.python.org/pypi/ParamUnittest/2.github源码下载地址:https://github.com/rik0/Param ...
- python接口自动化测试三十五:用BeautifulReport生成报告
GitHub传送门:https://github.com/TesterlifeRaymond/BeautifulReport 配置BeautifulReport 下载.解压并修改名字为Beautifu ...
- python接口自动化测试三十四:github上某接口测试平台及配置
TeserHome地址:https://testerhome.com/opensource_projects/60前端:https://github.com/pencil1/ApiTestWeb 实现 ...
- 【python3+request】python3+requests接口自动化测试框架实例详解教程
转自:https://my.oschina.net/u/3041656/blog/820023 [python3+request]python3+requests接口自动化测试框架实例详解教程 前段时 ...
- python+request+HTMLTestRunner+unittest接口自动化测试框架
转自https://my.oschina.net/u/3041656/blog/820023 正在调研使用python进行自动化测试,在网上发现一篇比较好的博文,作者使用的是python3,但目前自己 ...
随机推荐
- JavaWeb中过滤器Filter的使用示例
https://github.com/YouXianMing/Java-Web-Study/tree/master/Servlet-Filter 过滤器示例基于以下流程 测试效果如下 web.xml配 ...
- mysql导入自定义函数不成功的解决方法
进入mysql控制台:mysql -uroot -p set global log_bin_trust_function_creators=1;
- Android ListView滚动到指定的位置
这篇文章主要给大家介绍了Android中的ListView如何滚动到指定的位置,文章给出了两种解决的方法,并给出详细的示例代码,相信会对大家的理解和学习很有帮助,有需要的朋友们下面来一起看看吧. 本文 ...
- Skyline中加载WMTS地图
Skyline中默认是Bing地图,必应虽然免费无偏移,但在国内的影像质量并不是很好.不用担心,Skyline支持多种影像图层,包括WFS.WMS.WMTS地图服务.使用地图作为底图有两个好处: (1 ...
- html5学习笔记——基础
一:Canvas <canvas> 标签只是图形容器,图形的绘制需要用JS来定义. 1:绘制与填充 stroke():绘制,空心. fillXX():填充,实心. 2:绘制线条 var c ...
- mybatis检测mysql表是否存在
1.优先使用information_schema来检查,如果没有查询这个的权限则使用show tables来检查. mapper: import java.util.Map; import org.a ...
- Tomcat 部署多个项目出现错误
有时,我们会遇到部署同样项目可是不同版本号来回切换的问题.可是有时就是莫名奇异的会起不来. 也没太多时间去解决这些问题,所以就又一次把纯净版的Tomcat部署进去就能够了. 我想非常有可能就是Tomc ...
- Android 网络编程之最新OKHTTP:3.9.0
本节前言 本来是想围绕着HttpClient讲解的,后来发先Android4.4之后okhttp代替了hc,所以将不再讲解hc okhttp的简单使用,主要包含: 一般的get请求 一般的post请求 ...
- linux内核剖析(九)进程间通信之-信号signal
信号及信号来源 什么是信号 信号是UNIX和Linux系统响应某些条件而产生的一个事件,接收到该信号的进程会相应地采取一些行动.通常信号是由一个错误产生的.但它们还可以作为进程间通信或修改行为的一种方 ...
- 【转载】史上最全:TensorFlow 好玩的技术、应用和你不知道的黑科技
[导读]TensorFlow 在 2015 年年底一出现就受到了极大的关注,经过一年多的发展,已经成为了在机器学习.深度学习项目中最受欢迎的框架之一.自发布以来,TensorFlow 不断在完善并增加 ...