记录--Vue开发历程---音乐播放器
这里给大家分享我在网上总结出来的一些知识,希望对大家有所帮助

一、audio标签的使用
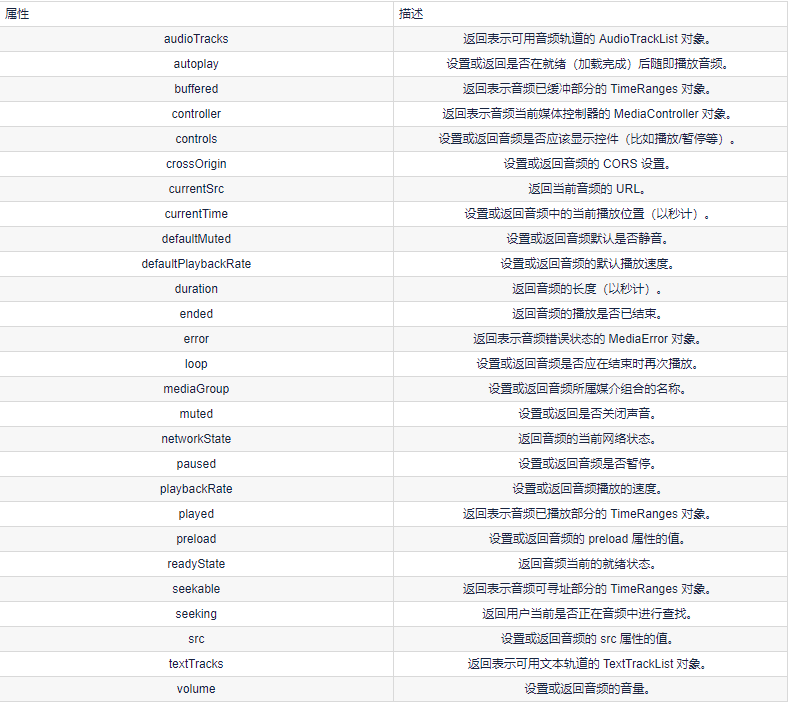
1、Audio 对象属性
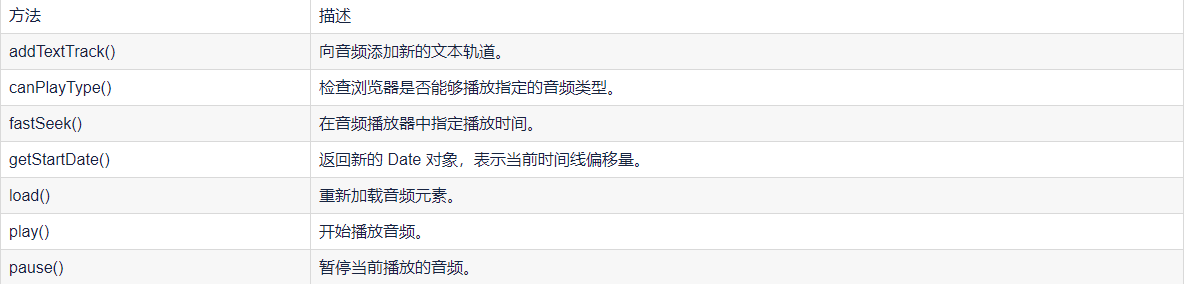
2、对象方法
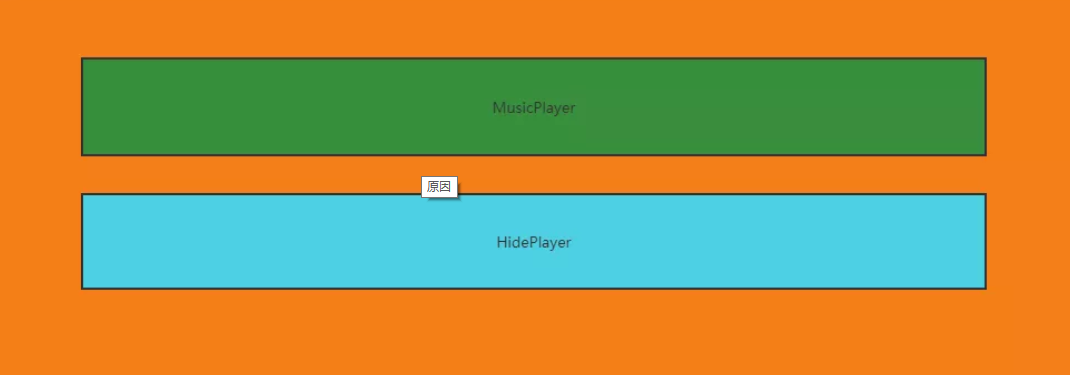
二、效果
效果如下:

三、代码
代码如下: MusicPlayer.vue
<template>

    <div class="music">

        <!-- 占位 -->

        <div class="m_hold">

        </div>

        <div class="m_img">

            <img :src="this.$parent.songNames[this.$parent.index].png" width="90px" :class="this.$parent.isRun">

        </div>

        <!-- 歌曲信息 -->

        <div class="m_text">

            {{ this.$parent.songNames[this.$parent.index].name }}

            <div class="block" style="margin-top:5px">

                <el-slider :v-model="value1"></el-slider>

            </div>

        </div>

        <!-- 按钮 -->

        <div class="m_btn">

            <a href="#" class="m_prev" @click="playLastSong()"></a>

            <a href="#" class="m_play" @click="changeState()" v-show="this.$parent.isShow"></a>

            <a href="#" class="m_pause" @click="changeState()" v-show="!this.$parent.isShow"></a>

            <a href="#" class="m_next" @click="playNextSong()"></a>

        </div>

        <!-- 折叠功能 -->

        <div class="m_close" @click="changeCloseState()">

            <a href=""></a>

        </div>

    </div>

</template>

<script>

export default {

    name: 'MusicPlayer',

    data() {

        return {

            songName: '',

            value1:0

        }

    },

    methods: {

        changeState() {

            this.$emit("play")

        },

        changeCloseState() {

            this.$emit("hello");

        },

        playNextSong() {

            this.$emit("nextSongs");

            this.songName = this.$parent.songNames[this.$parent.index].name

        },

        playLastSong() {

            this.$emit("lastSongs");

            this.songName = this.$parent.songNames[this.$parent.index].name

        }

    },

    watch:

    {

    }, mounted() {

        this.songName = this.$parent.songNames[this.$parent.index].name

    }

}

</script>

<style scoped>

/* 关于播放器的样式 */

.music {

    width: 100%;

    height: 120px;

    background: black;

    /* 相对浏览器定位 */

    position: absolute;

    left: 0px;

    bottom: 100px;

    border-bottom: 50px;

    /* 透明度 */

    opacity: 0.8;

    /* 阴影值 */

    box-shadow: 10px 15px 15px 1px black

}

.music .m_hold {

    float: left;

    width: 90px;

    height: 90px;

}

/* 调整音乐盒图片 */

.music .m_img {

    margin-top: 15px;

    margin-left: 10px;

    margin-right: 10px;

    /* 左浮动 */

    float: left;

    width: 90px;

    height: 90px;

    border-radius: 50%;

    overflow: hidden;

}

/* 修改文字 */

.music .m_text {

    /* 左浮动 */

    float: left;

    color: white;

    font-size: 20px;

    /* 字体加粗 */

    font-weight: bold;

    margin-top: 25px;

    margin-left: 20px;

    margin-bottom: 10px;

    width: 25%;

}

/* 使得所有a标签一起移动 */

.music .m_btn {

    float: left;

    position: absolute;

    /* 绝对定位:防止歌曲名称过长,挤出div */

    left: 40%;

}

/* 修改a标签 */

.music .m_btn a {

    width: 32px;

    height: 32px;

    float: left;

    margin-top: 50px;

    margin-left: 20px;

    background: url(@/assets/player_bg.png);

}

.music .m_btn .m_prev {

    background-position: -69px 0px;

}

.music .m_btn .m_next {

    background-position: -150px 0px;

}

.music .m_btn .m_play {

    background-position: -107px -5px;

}

.music .m_btn .m_prev:hover {

    background-position: -69px -32px;

}

.music .m_btn .m_next:hover {

    background-position: -150px -32px;

}

.music .m_btn .m_play:hover {

    background-position: -107px -47px;

}

.music .m_btn .m_pause {

    background-position: -292px -94px;

}

.music .m_btn .m_pause:hover {

    background-position: -334px -94px;

}

/* 还有一个悬停 没写 */

/* 设置最右边的关闭样式 */

.music .m_close {

    float: right;

    background: white;

    cursor: pointer;

    width: 23px;

    height: 100px;

    margin-top: 10px;

    background: url(@/assets/player_bg.png);

}

/* 设置最右边的关闭样式 */

.music_hide {

    float: left;

    background: white;

    cursor: pointer;

    width: 23px;

    height: 100px;

    margin-top: 2px;

}

.go {

    animation: bounce-in 2s linear infinite;

}

.come {

    animation: none;

}

@keyframes bounce-in {

    from {

        transform: rotate(0deg);

    }

    to {

        transform: rotate(360deg);

    }

}

.open-enter-active {

    animation: slide-in linear 0.5s;

}

.open-leave-active {

    animation: slide-in reverse linear 0.5s;

}

@keyframes slide-in {

    from {

        transform: translateX(-100%);

    }

    to {

        transform: translateX(0%);

    }

}

</style>
HideMusic.vue
<template>

    <div class="music_hide" @click="changeCloseState()"><a href="#" class="m_open"></a></div>

</template>

<script>

export default {

    name:'HidePlayer',

    methods:{

        changeCloseState()

        {

            this.$emit("hello");

        }

    }

}

</script>

<style scoped>

.music_hide {

    float: left;

    background: url(@/assets/player_bg.png);

    cursor: pointer;

    width: 23px;

    height: 100px;

    margin-top: 10px;

    bottom: 100px;

    position: absolute;

    background-position-x: -45px;

}

</style>
MyPlayer.vue
<template>

    <div>

        <transition name="open" mode="out-in">

            <component v-bind:is="view" @hello="changeSlideState" @play="changePlayState" @lastSongs="lastSongs"

                @nextSongs="nextSongs"></component>

        </transition>

        <audio class="m_mp3" id="m_mp3" :src="this.songNames[this.index].Url" autoplay loop>

        </audio>

    </div>

</template>

<script>

import HidePlayer from '@/part/HidePlayer'

import MusicPlayer from '@/part/MusicPlayer'

export default {

    name: 'MyPlayer',

    data() {

        return {

            view: MusicPlayer,

            isClose: false,

            isShow: true,

            isRun: 'come',

            index: 0,

            songNum: 2,

            currentTime: '0:00',

            duration: '0:00',

            songNames: [

                {

                    id: 1,

                    name: '张韶涵-篇章',

                    Url: require('@/assets/张韶涵-篇章.mp3'),

                    png: require('@/assets/篇章.png'),

                },

                {

                    id: 2,

                    name: '爱就一个字 抒情版',

                    Url: require('@/assets/爱就一个字 抒情版.mp3'),

                    png: require('@/assets/爱就一个字.png'),

                },

                {

                    id: 3,

                    name: '最伟大的作品-周杰伦',

                    Url: require('@/assets/最伟大的作品-周杰伦.mp3'),

                    png: require('@/assets/周杰伦.jpg'),

                },

                {

                    id: 4,

                    name: '等你下课 (with 杨瑞代)-周杰伦',

                    Url: require('@/assets/等你下课 (with 杨瑞代)-周杰伦.mp3'),

                    png: require('@/assets/等你下课.png'),

                },

                {

                    id: 5,

                    name: '告白气球-周杰伦',

                    Url: require('@/assets/告白气球-周杰伦.mp3'),

                    png: require('@/assets/告白气球.png'),

                },

                {

                    id: 6,

                    name: '还在流浪-周杰伦',

                    Url: require('@/assets/还在流浪-周杰伦.mp3'),

                    png: require('@/assets/还在流浪.png'),

                },

            ]

        }

    },

    components: {

        HidePlayer,

        MusicPlayer

    },

    methods: {

        changeSlideState() {

            this.isClose = !this.isClose;

            if (this.isClose) {

                this.view = HidePlayer;

            } else {

                this.view = MusicPlayer;

            }

        },

        changePlayState() {

            if (!this.isShow) {

                this.isShow = true;

                this.isRun = "come";

                document.getElementById("m_mp3").pause();

            } else {

                this.isShow = false;

                this.isRun = "go";

                var my_mp3 = document.getElementById("m_mp3");

                my_mp3.play();

            }

        },

        nextSongs() {

            if (this.isShow) {

                this.isShow = false;

                this.isRun = "go";

            }

            this.index = (this.index + 1) % this.songNum;

        },

        lastSongs() {

            if (this.isShow) {

                this.isShow = false;

                this.isRun = "go";

            }

            if (this.index == 0) {

                this.index = this.songNum - 1;

            } else {

                this.index = this.index - 1;

            }

        }

    }, mounted() {

        this.songNum = this.songNames.length;

    }

}

</script>

<style scoped>

.open-enter-active {

    animation: slide-in linear 0.5s;

}

.open-leave-active {

    animation: slide-in reverse linear 0.5s;

}

@keyframes slide-in {

    from {

        transform: translateX(-100%);

    }

    to {

        transform: translateX(0%);

    }

}

</style>
四、难点解析
1、过渡动画的实现

参考了vue文档过渡&动画中多个组件的过渡(下面三份代码)
<transition name="component-fade" mode="out-in">

  <component v-bind:is="view"></component>

</transition>
new Vue({

  el: '#transition-components-demo',

  data: {

    view: 'v-a'

  },

  components: {

    'v-a': {

      template: '<div>Component A</div>'

    },

    'v-b': {

      template: '<div>Component B</div>'

    }

  }

})
.component-fade-enter-active, .component-fade-leave-active {

  transition: opacity .3s ease;

}

.component-fade-enter, .component-fade-leave-to

/* .component-fade-leave-active for below version 2.1.8 */ {

  opacity: 0;

}
因此分化出MusicPlayer.vue 和 HideMusic.vue,由此又产生了组件内通信的问题。
2、组件内通信
为什么会产生组件内的通信?原因在于:MusicPlayer组件和HidePlayer组件,只能有一个展示,但是在不展示的过程中,他的数据应该也是实时改变的。例如MusicPlayer组件上有播放按钮,如果不采用组件通信,那么MusicPlayer重新渲染的时候,播放按钮会回到最初的设定,是不符合逻辑的。所以需要采用组件内通信的方式。实现的方式也比较简单,子组件直接访问父组件的数据,子组件通过$emit调用父组件的方法,修改父组件的数据。
3、旋转动画的实现
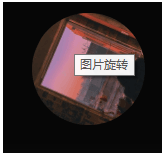
首先,编写动画。
.go {

    animation: bounce-in 2s linear infinite;

}

.come {

    animation: none;

}

@keyframes bounce-in {

    from {

        transform: rotate(0deg);

    }

    to {

        transform: rotate(360deg);

    }

}
然后,动态绑定class,isRun两个值即为"go","come"。
<div class="m_img">

   <img :src="this.$parent.songNames[this.$parent.index].png" width="90px" :class="this.$parent.isRun">

</div>
本文转载于:
https://blog.51cto.com/u_15807146/5807883
如果对您有所帮助,欢迎您点个关注,我会定时更新技术文档,大家一起讨论学习,一起进步。

记录--Vue开发历程---音乐播放器的更多相关文章
- vue实现音乐播放器实战笔记
原文链接:https://blog.csdn.net/Forever201295/article/details/80266600 一.项目说明该播放器的是基于学习vue的实战练习,不用于其他途径.应 ...
- Vue中音乐播放器
一.安装依赖 yarn add vue-aplayer or` npm i vue-aplayer 二.使用 <template> <div class="vue_ap ...
- Vue实现音乐播放器(七):轮播图组件(二)
轮播图组件 <template> <div class="slider" ref="slider"> <div class=&qu ...
- Vue实现音乐播放器(六):jsonp的应用+抓取轮播图数据
用jsonp来获取数据 通过封装方法来获取 在src文件夹下的api文件夹里面去封装一些获取相关部分组件的数据的方法 在api文件夹下的recommend.js中 配置一下公共参数 请求的真实的u ...
- Vue实现音乐播放器(四):页面入口+header组件的编写
首先下载三个包 babel-runtime对es语法进行转义 fastclick解决移动端点击300毫秒延迟的问题 babel-polyfill对es6 api进行转义 下载了包之后要在main.js ...
- Vue实现音乐播放器(二)-Vue-cli脚手架安装
- 一个基于H5audio标签的vue音乐播放器
<!DOCTYPE html> <html lang="en"> <head> <meta charset="UTF-8&quo ...
- 02 Vue介绍与安装,指令系统 v-*、音乐播放器
VUE文档 https://cn.vuejs.org/v2/guide/ 1.vue的介绍 尤雨溪 1.vue的优点 2.vue的介绍 3.vue的安装 4.声明式渲染 <body> &l ...
- vue音乐播放器
利用vue写一个简单的音乐播放器,包括功能有歌曲搜索.歌曲播放.歌曲封面.歌曲评论.播放动画.mv播放六个功能. <template> <div class="wrap&q ...
- vue小练习--音乐播放器
1 首先建一个文件夹 放几首歌曲 2 看代码 1)基本版本 <!DOCTYPE html> <html lang="zh-CN"> <head> ...
随机推荐
- 探索C语言的内存魔法:动态内存管理解析
欢迎大家来到贝蒂大讲堂 养成好习惯,先赞后看哦~ 所属专栏:C语言学习 贝蒂的主页:Betty's blog 1. 静态开辟内存 通过前面的学习,我们已经掌握了两种开辟内存的方法,分别是: #incl ...
- NC14685 加边的无向图
题目链接 题目 题目描述 给你一个 n 个点,m 条边的无向图,求至少要在这个的基础上加多少条无向边使得任意两个点可达~ 输入描述 第一行两个正整数 n 和 m . 接下来的m行中,每行两个正整数 i ...
- Windows下,SpringBoot JDBC无法连接的问题
问题症状 在Win7和Win10下启动时均会出现下面的错误,但是在OSX和Linux下没问题 com.mysql.jdbc.exceptions.jdbc4.CommunicationsExcepti ...
- 【Unity3D】血条(HP)
1 需求实现 人机交互Input 中实现了通过键盘控制坦克运动,通过鼠标控制坦克发射炮弹,本文将在此基础上,增加血条(HP)功能.炮弹命中后,HP 值会减少,因此需要应用到 刚体组件Rigidbo ...
- 使用TensorFlow实现MNIST数据集分类
1 MNIST数据集 MNIST数据集由70000张28x28像素的黑白图片组成,每一张图片都写有0~9中的一个数字,每个像素点的灰度值在0 ~ 255(0是黑色,255是白色)之间. MINST数据 ...
- Swoole从入门到入土(2)——TCP服务器[初步接触]
我们知道Swoole弥补了PHP没办法实现长连接的短板,在接下来的话题中,我们会从TCP服务器.HTTP服务器.WebSocket服务器.协程.管道.中间件等话题,一个个进行讨论. 1.开篇 我们以S ...
- Java序列化(Serializable)与反序列化详解
什么是序列化? Java序列化是在JDK 1.1中引入的,是Java内核的重要特性之一. Java序列化API允许我们将一个对象转换为流,并通过网络发送,或将其存入文件或数据库以便未来使用, 反序列化 ...
- Rtmp 开发学习
参考文章:视频传输协议详解(RTMP.RTSP.HLS) RTMP--Real Time Messaging Protocol(实时消息传输协议) RTMP 是由 Adobe 公司提出的,在互联网 T ...
- django学习第九天---raw查询原生sql和python脚本中调用django环境和ORM锁和事务
ORM执行原生sql语句 在模型查询api不够用的情况下,我们还可以使用原始的sql语句进行查询 方式1 raw() raw()方法,返回模型的实例django.db.models.query.Raw ...
- 【LeetCode链表#8】翻转链表(双指针+递归)/K个一组翻转
翻转链表 力扣题目链接(opens new window) 题意:反转一个单链表. 示例: 输入: 1->2->3->4->5->NULL 输出: 5->4-> ...