python的requests模块详解
原文链接:https://www.cnblogs.com/lanyinhao/p/9634742.html
1、模块说明
requests是使用Apache2 licensed 许可证的HTTP库。
用python编写。
比urllib2模块更简洁。
Request支持HTTP连接保持和连接池,支持使用cookie保持会话,支持文件上传,支持自动响应内容的编码,支持国际化的URL和POST数据自动编码。
在python内置模块的基础上进行了高度的封装,从而使得python进行网络请求时,变得人性化,使用Requests可以轻而易举的完成浏览器可有的任何操作。
现代,国际化,友好。
requests会自动实现持久连接keep-alive
2、基础入门
1)导入模块
import requests
2)发送请求的简洁
示例代码:获取一个网页(个人github)
import requests

r = requests.get('https://github.com/Ranxf')       # 最基本的不带参数的get请求

r1 = requests.get(url='http://dict.baidu.com/s', params={'wd': '小马'})      # 带参数的get请求
不带参数:

带参数:


我们就可以使用该方式使用以下各种方法
1   requests.get(‘https://github.com/timeline.json’)                                # GET请求

2   requests.post(“http://httpbin.org/post”)                                        # POST请求

3   requests.put(“http://httpbin.org/put”)                                          # PUT请求

4   requests.delete(“http://httpbin.org/delete”)                                    # DELETE请求

5   requests.head(“http://httpbin.org/get”)                                         # HEAD请求

6   requests.options(“http://httpbin.org/get” )                                     # OPTIONS请求
3)为url传递参数,#获取请求的url(包含参数)
>>> url_params = {'key':'value'}       #    字典传递参数,如果值为None的键不会被添加到url中

>>> r = requests.get('your url',params = url_params)

>>> print(r.url)

  your url?key=value


4)响应的内容

r.encoding #获取当前的编码
r.encoding = 'utf-8' #设置编码
r.text #以encoding解析返回内容。字符串方式的响应体,会自动根据响应头部的字符编码进行解码。
r.content #以字节形式(二进制)返回。字节方式的响应体,会自动为你解码 gzip 和 deflate 压缩。 r.headers #以字典对象存储服务器响应头,但是这个字典比较特殊,字典键不区分大小写,若键不存在则返回None r.status_code #响应状态码
r.raw #返回原始响应体,也就是 urllib 的 response 对象,使用 r.raw.read()
r.ok # 查看r.ok的布尔值便可以知道是否登陆成功
#*特殊方法*#
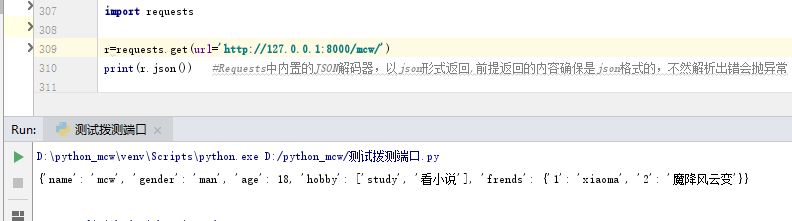
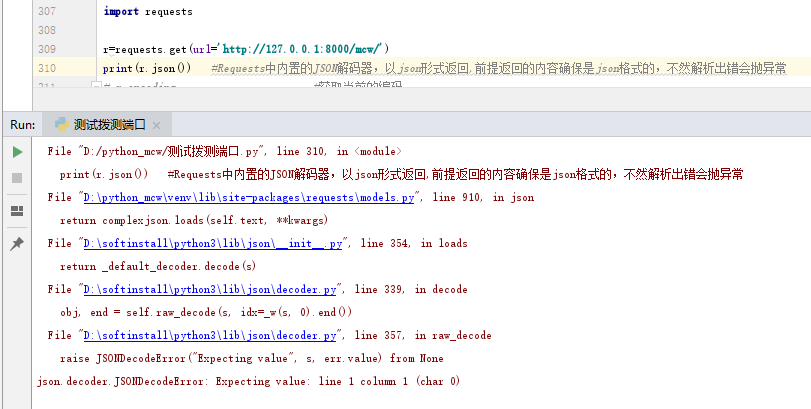
r.json() #Requests中内置的JSON解码器,以json形式返回,前提返回的内容确保是json格式的,不然解析出错会抛异常
r.raise_for_status() #失败请求(非200响应)抛出异常
r.txt
r.content

r.header

r.status_code
r.raw

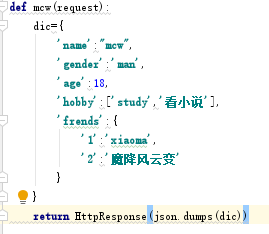
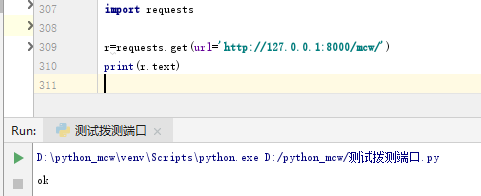
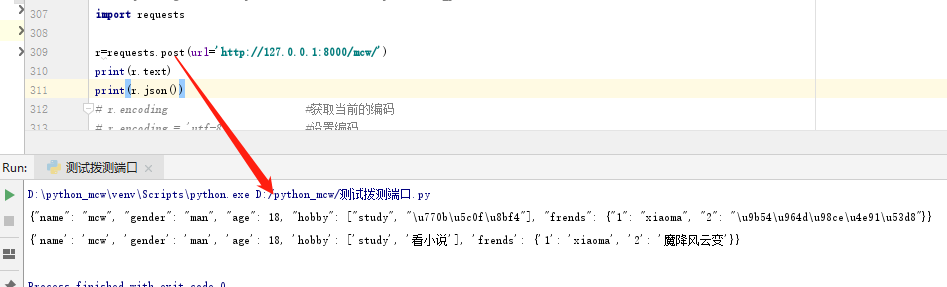
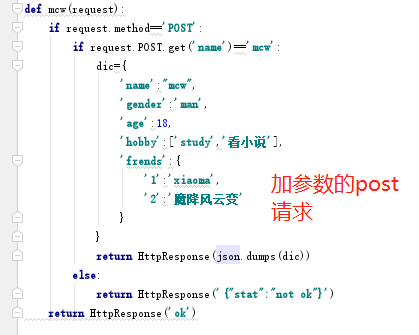
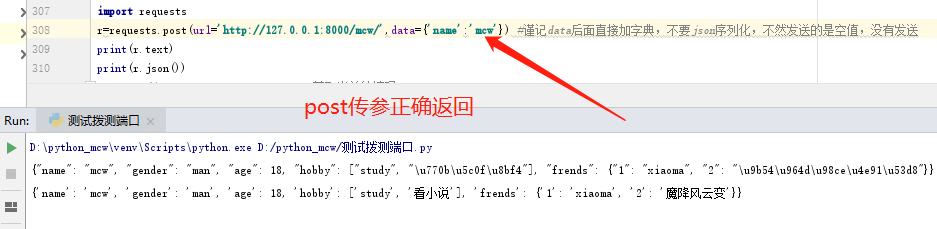
这是要请求的接口结果,视图函数,以及requests模块请求结果:

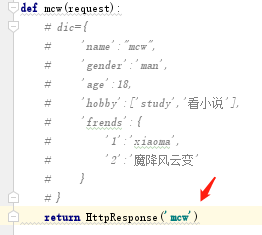
假如返回的不是json格式:
r.raise_for_status()
前端中文要正常显示,这里要加参数

post发送json请求:
1 import requests

2 import json

3

4 r = requests.post('https://api.github.com/some/endpoint', data=json.dumps({'some': 'data'}))

5 print(r.json())
视图函数:
get请求:
post请求:
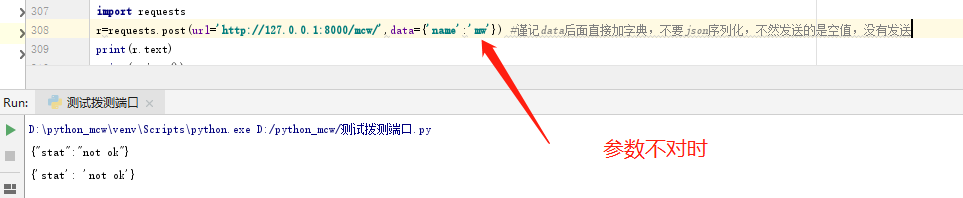
加参数的post请求
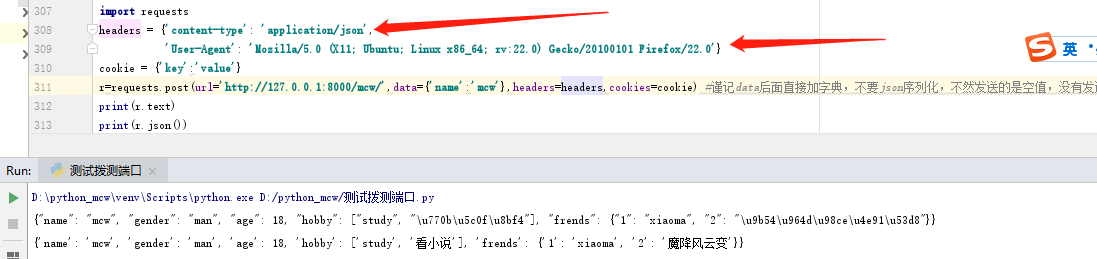
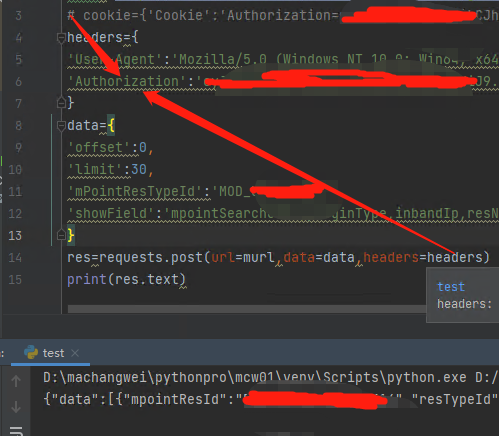
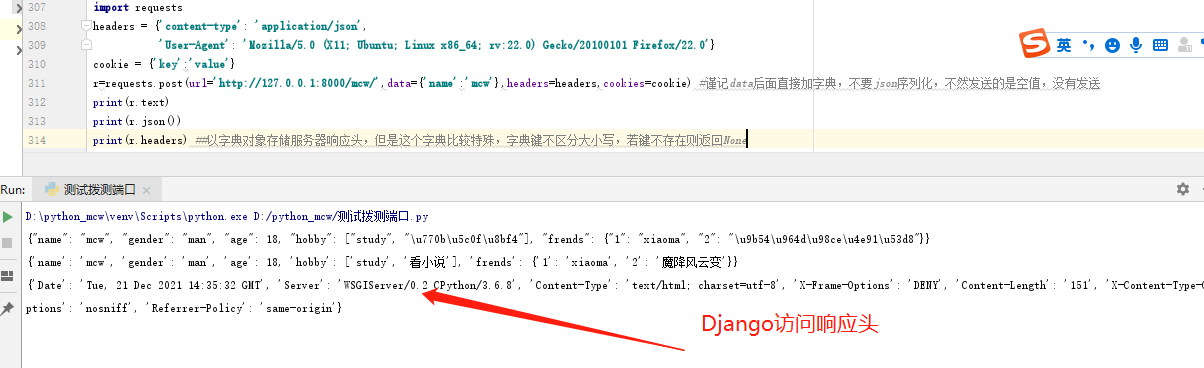
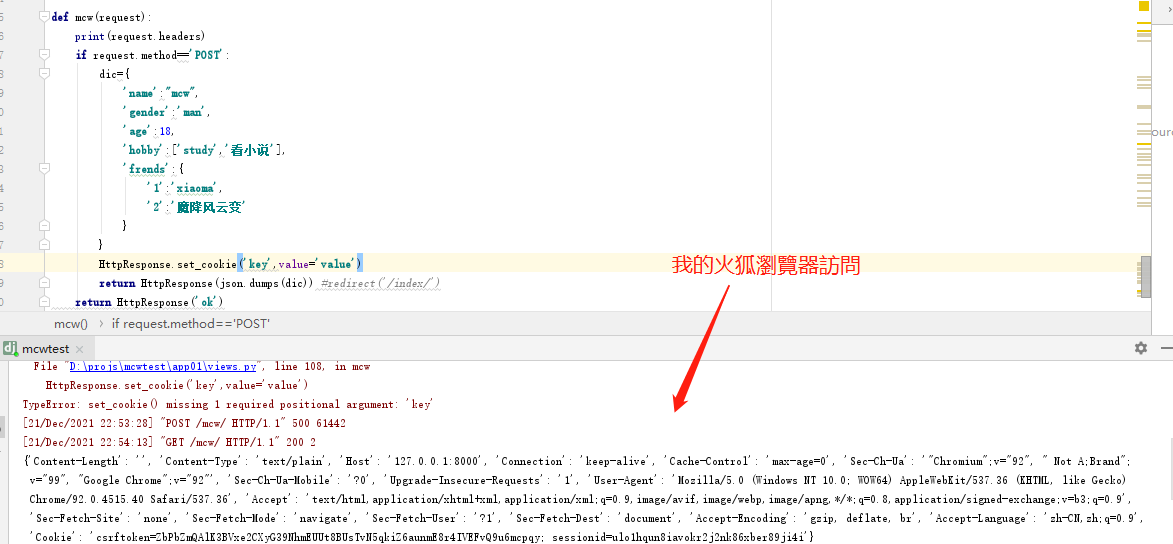
5)定制头和cookie信息
header = {'user-agent': 'my-app/0.0.1''}

cookie = {'key':'value'}

 r = requests.get/post('your url',headers=header,cookies=cookie)
data = {'some': 'data'}

headers = {'content-type': 'application/json',

           'User-Agent': 'Mozilla/5.0 (X11; Ubuntu; Linux x86_64; rv:22.0) Gecko/20100101 Firefox/22.0'}

r = requests.post('https://api.github.com/some/endpoint', data=data, headers=headers)

print(r.text)
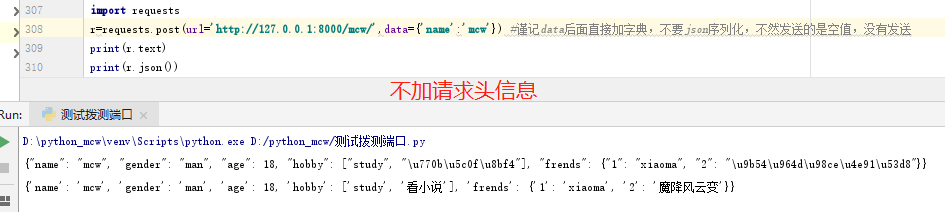
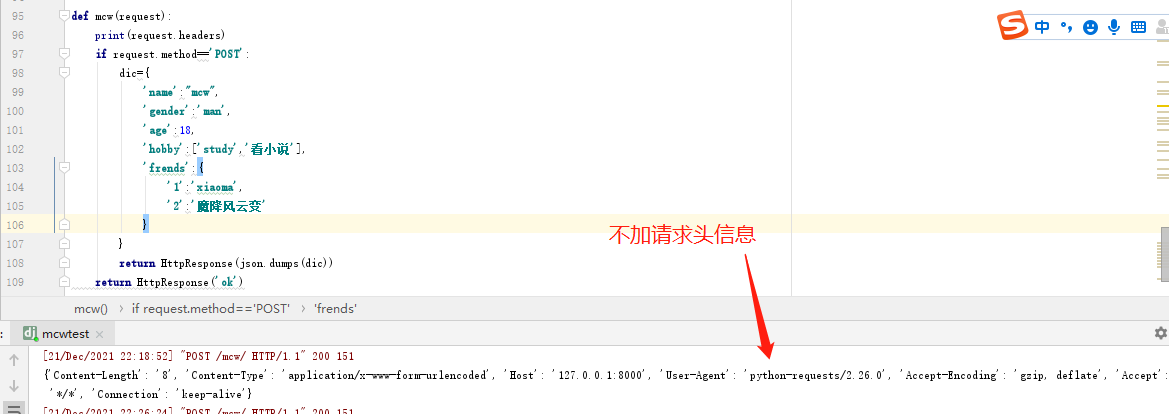
添加请求头信息之后:
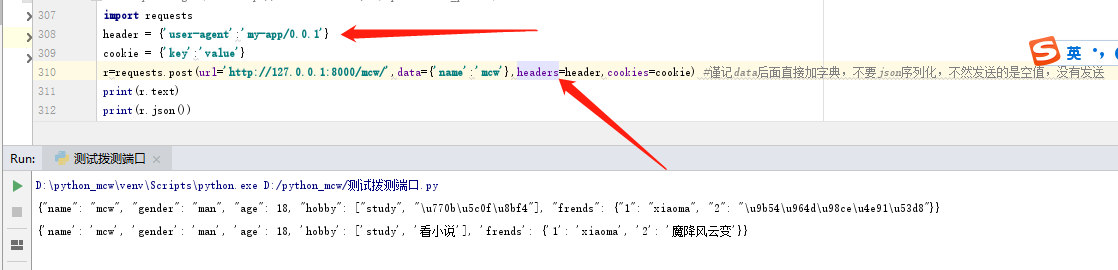
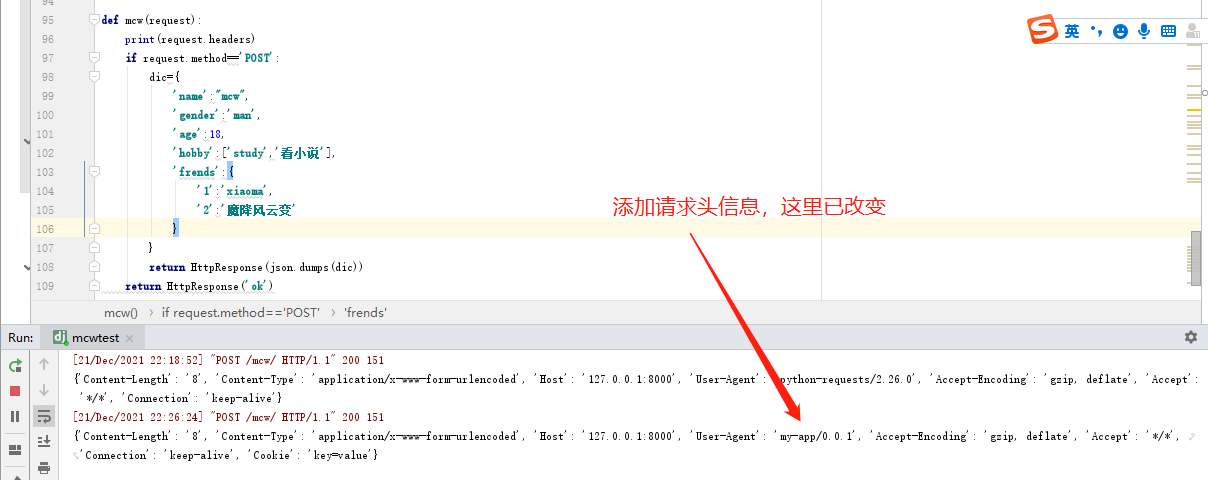
修改请求内容类型为json,用户使用火狐浏览器访问
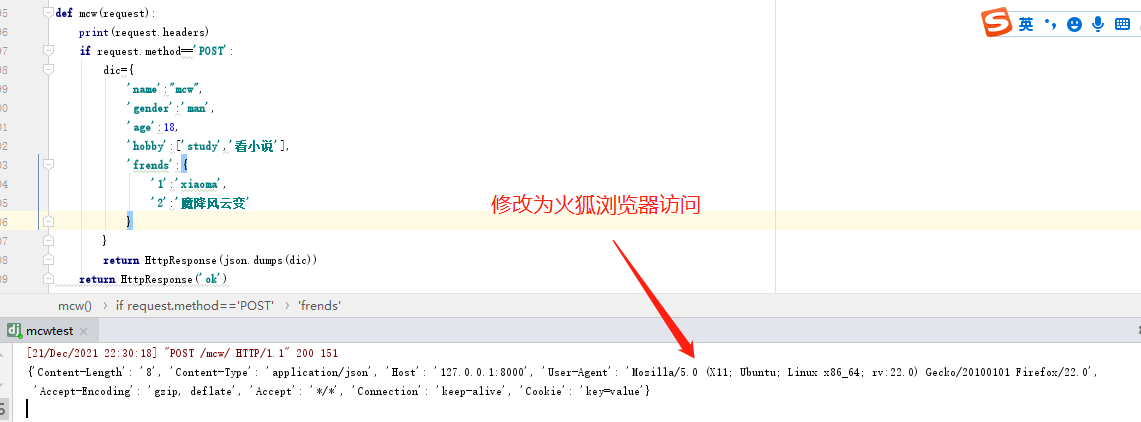
cookie放在cookies里没成功,把键值对放到请求头成功了。回头研究一下,再
6)响应状态码
使用requests方法后,会返回一个response对象,其存储了服务器响应的内容,如上实例中已经提到的 r.text、r.status_code……
获取文本方式的响应体实例:当你访问 r.text 之时,会使用其响应的文本编码进行解码,并且你可以修改其编码让 r.text 使用自定义的编码进行解码。
1 r = requests.get('http://www.itwhy.org')

2 print(r.text, '\n{}\n'.format('*'*79), r.encoding)

3 r.encoding = 'GBK'

4 print(r.text, '\n{}\n'.format('*'*79), r.encoding)
示例代码:
1 import requests

2

3 r = requests.get('https://github.com/Ranxf')       # 最基本的不带参数的get请求

4 print(r.status_code)                               # 获取返回状态

5 r1 = requests.get(url='http://dict.baidu.com/s', params={'wd': 'python'})      # 带参数的get请求

6 print(r1.url)

7 print(r1.text)        # 打印解码后的返回数据
运行结果:
/usr/bin/python3.5 /home/rxf/python3_1000/1000/python3_server/python3_requests/demo1.py

200

http://dict.baidu.com/s?wd=python

…………

Process finished with exit code 0
r.status_code #如果不是200,可以使用 r.raise_for_status() 抛出异常
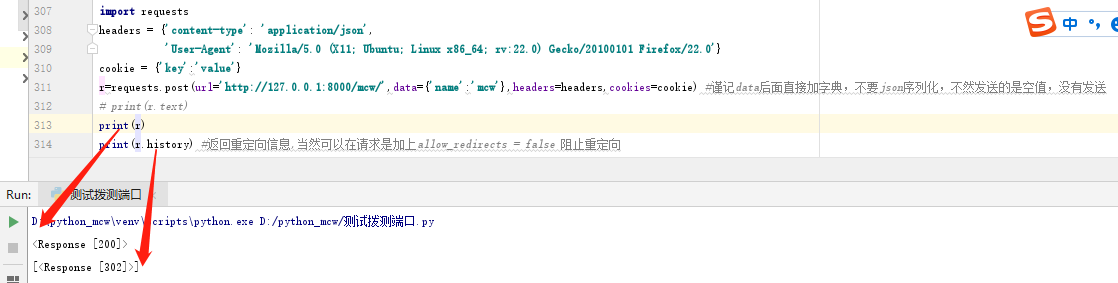
7)响应
r.headers                                  #返回字典类型,头信息

r.requests.headers                         #返回发送到服务器的头信息  #这个不清楚是个啥呢

r.cookies                                  #返回cookie

r.history                                  #返回重定向信息,当然可以在请求是加上allow_redirects = false 阻止重定向
8)超时
r = requests.get('url',timeout=1) #设置秒数超时,仅对于连接有效
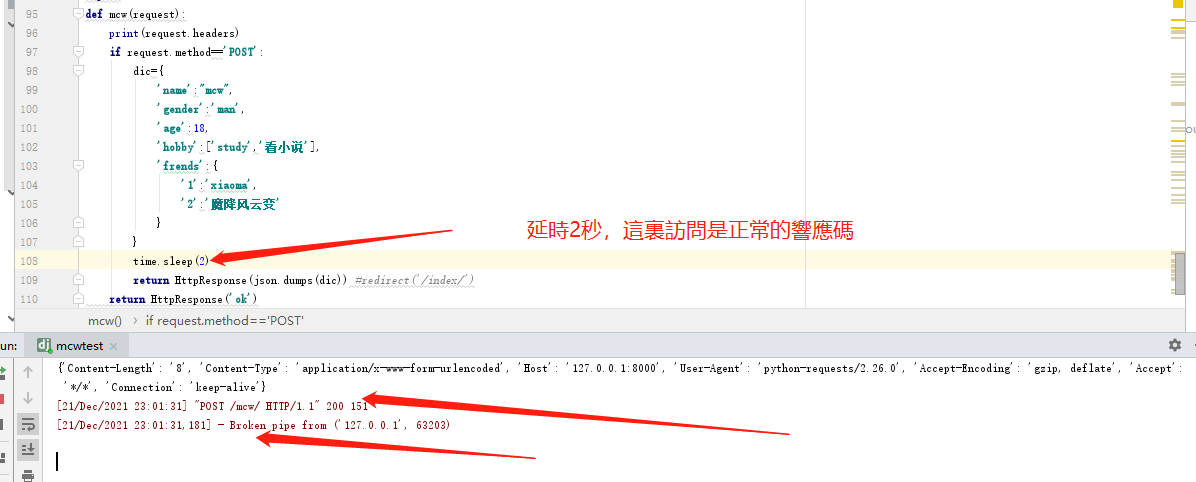
这边设置超时时间1秒,但是响应时间是2秒,所以超时了,报错读取超时

9)会话对象,能够跨请求保持某些参数
s = requests.Session()

s.auth = ('auth','passwd')

s.headers = {'key':'value'}

r = s.get('url')

r1 = s.get('url1')
10)代理
proxies = {'http':'ip1','https':'ip2' }

requests.get('url',proxies=proxies)
汇总:
# HTTP请求类型

# get类型

r = requests.get('https://github.com/timeline.json')

# post类型

r = requests.post("http://m.ctrip.com/post")

# put类型

r = requests.put("http://m.ctrip.com/put")

# delete类型

r = requests.delete("http://m.ctrip.com/delete")

# head类型

r = requests.head("http://m.ctrip.com/head")

# options类型

r = requests.options("http://m.ctrip.com/get")

# 获取响应内容

print(r.content) #以字节的方式去显示,中文显示为字符

print(r.text) #以文本的方式去显示

#URL传递参数

payload = {'keyword': '香港', 'salecityid': '2'}

r = requests.get("http://m.ctrip.com/webapp/tourvisa/visa_list", params=payload)

print(r.url) #示例为http://m.ctrip.com/webapp/tourvisa/visa_list?salecityid=2&keyword=香港

#获取/修改网页编码

r = requests.get('https://github.com/timeline.json')

print (r.encoding)

#json处理

r = requests.get('https://github.com/timeline.json')

print(r.json()) # 需要先import json

# 定制请求头

url = 'http://m.ctrip.com'

headers = {'User-Agent' : 'Mozilla/5.0 (Linux; Android 4.2.1; en-us; Nexus 4 Build/JOP40D) AppleWebKit/535.19 (KHTML, like Gecko) Chrome/18.0.1025.166 Mobile Safari/535.19'}

r = requests.post(url, headers=headers)

print (r.request.headers)

#复杂post请求

url = 'http://m.ctrip.com'

payload = {'some': 'data'}

r = requests.post(url, data=json.dumps(payload)) #如果传递的payload是string而不是dict,需要先调用dumps方法格式化一下

# post多部分编码文件

url = 'http://m.ctrip.com'

files = {'file': open('report.xls', 'rb')}

r = requests.post(url, files=files)

# 响应状态码

r = requests.get('http://m.ctrip.com')

print(r.status_code)

# 响应头

r = requests.get('http://m.ctrip.com')

print (r.headers)

print (r.headers['Content-Type'])

print (r.headers.get('content-type')) #访问响应头部分内容的两种方式

# Cookies

url = 'http://example.com/some/cookie/setting/url'

r = requests.get(url)

r.cookies['example_cookie_name']    #读取cookies

url = 'http://m.ctrip.com/cookies'

cookies = dict(cookies_are='working')

r = requests.get(url, cookies=cookies) #发送cookies

#设置超时时间

r = requests.get('http://m.ctrip.com', timeout=0.001)

#设置访问代理

proxies = {

           "http": "http://10.10.1.10:3128",

           "https": "http://10.10.1.100:4444",

          }

r = requests.get('http://m.ctrip.com', proxies=proxies)

#如果代理需要用户名和密码,则需要这样:

proxies = {

    "http": "http://user:pass@10.10.1.10:3128/",

}
其它:
3、示例代码
GET请求
1 # 1、无参数实例

 2

 3 import requests

 4

 5 ret = requests.get('https://github.com/timeline.json')

 6

 7 print(ret.url)

 8 print(ret.text)

 9

10

11

12 # 2、有参数实例

13

14 import requests

15

16 payload = {'key1': 'value1', 'key2': 'value2'}

17 ret = requests.get("http://httpbin.org/get", params=payload)

18

19 print(ret.url)

20 print(ret.text)
POST请求
# 1、基本POST实例

import requests

payload = {'key1': 'value1', 'key2': 'value2'}

ret = requests.post("http://httpbin.org/post", data=payload)

print(ret.text)

# 2、发送请求头和数据实例

import requests

import json

url = 'https://api.github.com/some/endpoint'

payload = {'some': 'data'}

headers = {'content-type': 'application/json'}

ret = requests.post(url, data=json.dumps(payload), headers=headers)

print(ret.text)

print(ret.cookies)
请求参数
 请求参数 参数示例代码
json请求:
#! /usr/bin/python3

import requests

import json

class url_request():

    def __init__(self):

        ''' init '''

if __name__ == '__main__':

    heard = {'Content-Type': 'application/json'}

    payload = {'CountryName': '中国',

               'ProvinceName': '四川省',

               'L1CityName': 'chengdu',

               'L2CityName': 'yibing',

               'TownName': '',

               'Longitude': '107.33393',

               'Latitude': '33.157131',

               'Language': 'CN'}

    r = requests.post("http://www.xxxxxx.com/CityLocation/json/LBSLocateCity", heards=heard, data=payload)

    data = r.json()

    if r.status_code!=200:

        print('LBSLocateCity API Error' + str(r.status_code))

    print(data['CityEntities'][0]['CityID'])  # 打印返回json中的某个key的value

    print(data['ResponseStatus']['Ack'])

    print(json.dump(data, indent=4, sort_keys=True, ensure_ascii=False))  # 树形打印json,ensure_ascii必须设为False否则中文会显示为unicode
Xml请求:
#! /usr/bin/python3

import requests

class url_request():

    def __init__(self):

        """init"""

if __name__ == '__main__':

    heards = {'Content-type': 'text/xml'}

    XML = '<?xml version="1.0" encoding="utf-8"?><soap:Envelope xmlns:xsi="http://www.w3.org/2001/XMLSchema-instance" xmlns:xsd="http://www.w3.org/2001/XMLSchema" xmlns:soap="http://schemas.xmlsoap.org/soap/envelope/"><soap:Body><Request xmlns="http://tempuri.org/"><jme><JobClassFullName>WeChatJSTicket.JobWS.Job.JobRefreshTicket,WeChatJSTicket.JobWS</JobClassFullName><Action>RUN</Action><Param>1</Param><HostIP>127.0.0.1</HostIP><JobInfo>1</JobInfo><NeedParallel>false</NeedParallel></jme></Request></soap:Body></soap:Envelope>'

    url = 'http://jobws.push.mobile.xxxxxxxx.com/RefreshWeiXInTokenJob/RefreshService.asmx'

    r = requests.post(url=url, heards=heards, data=XML)

    data = r.text

    print(data)
状态异常处理
import requests

URL = 'http://ip.taobao.com/service/getIpInfo.php'  # 淘宝IP地址库API

try:

    r = requests.get(URL, params={'ip': '8.8.8.8'}, timeout=1)

    r.raise_for_status()  # 如果响应状态码不是 200,就主动抛出异常

except requests.RequestException as e:

    print(e)

else:

    result = r.json()

    print(type(result), result, sep='\n')
上传文件
使用request模块,也可以上传文件,文件的类型会自动进行处理:
import requests

url = 'http://127.0.0.1:8080/upload'

files = {'file': open('/home/rxf/test.jpg', 'rb')}

#files = {'file': ('report.jpg', open('/home/lyb/sjzl.mpg', 'rb'))}     #显式的设置文件名

r = requests.post(url, files=files)

print(r.text)
request更加方便的是,可以把字符串当作文件进行上传:
import requests

url = 'http://127.0.0.1:8080/upload'

files = {'file': ('test.txt', b'Hello Requests.')}     #必需显式的设置文件名

r = requests.post(url, files=files)

print(r.text)
6) 身份验证
基本身份认证(HTTP Basic Auth)
import requests

from requests.auth import HTTPBasicAuth

r = requests.get('https://httpbin.org/hidden-basic-auth/user/passwd', auth=HTTPBasicAuth('user', 'passwd'))

# r = requests.get('https://httpbin.org/hidden-basic-auth/user/passwd', auth=('user', 'passwd'))    # 简写

print(r.json())
另一种非常流行的HTTP身份认证形式是摘要式身份认证,Requests对它的支持也是开箱即可用的:
requests.get(URL, auth=HTTPDigestAuth('user', 'pass')
Cookies与会话对象
如果某个响应中包含一些Cookie,你可以快速访问它们:
import requests

r = requests.get('http://www.google.com.hk/')

print(r.cookies['NID'])

print(tuple(r.cookies))
要想发送你的cookies到服务器,可以使用 cookies 参数:
import requests

url = 'http://httpbin.org/cookies'

cookies = {'testCookies_1': 'Hello_Python3', 'testCookies_2': 'Hello_Requests'}

# 在Cookie Version 0中规定空格、方括号、圆括号、等于号、逗号、双引号、斜杠、问号、@,冒号,分号等特殊符号都不能作为Cookie的内容。

r = requests.get(url, cookies=cookies)

print(r.json())
会话对象让你能够跨请求保持某些参数,最方便的是在同一个Session实例发出的所有请求之间保持cookies,且这些都是自动处理的,甚是方便。
下面就来一个真正的实例,如下是快盘签到脚本:
import requests

headers = {'Accept': 'text/html,application/xhtml+xml,application/xml;q=0.9,*/*;q=0.8',

           'Accept-Encoding': 'gzip, deflate, compress',

           'Accept-Language': 'en-us;q=0.5,en;q=0.3',

           'Cache-Control': 'max-age=0',

           'Connection': 'keep-alive',

           'User-Agent': 'Mozilla/5.0 (X11; Ubuntu; Linux x86_64; rv:22.0) Gecko/20100101 Firefox/22.0'}

s = requests.Session()

s.headers.update(headers)

# s.auth = ('superuser', '123')

s.get('https://www.kuaipan.cn/account_login.htm')

_URL = 'http://www.kuaipan.cn/index.php'

s.post(_URL, params={'ac':'account', 'op':'login'},

       data={'username':'****@foxmail.com', 'userpwd':'********', 'isajax':'yes'})

r = s.get(_URL, params={'ac':'zone', 'op':'taskdetail'})

print(r.json())

s.get(_URL, params={'ac':'common', 'op':'usersign'})
requests模块抓取网页源码并保存到文件示例
这是一个基本的文件保存操作,但这里有几个值得注意的问题:
1.安装requests包,命令行输入pip install requests即可自动安装。很多人推荐使用requests,自带的urllib.request也可以抓取网页源码
2.open方法encoding参数设为utf-8,否则保存的文件会出现乱码。
3.如果直接在cmd中输出抓取的内容,会提示各种编码错误,所以保存到文件查看。
4.with open方法是更好的写法,可以自动操作完毕后释放资源
#! /urs/bin/python3

import requests

'''requests模块抓取网页源码并保存到文件示例'''

html = requests.get("http://www.baidu.com")

with open('test.txt', 'w', encoding='utf-8') as f:

    f.write(html.text)

'''读取一个txt文件,每次读取一行,并保存到另一个txt文件中的示例'''

ff = open('testt.txt', 'w', encoding='utf-8')

with open('test.txt', encoding="utf-8") as f:

    for line in f:

        ff.write(line)

        ff.close()
因为在命令行中打印每次读取一行的数据,中文会出现编码错误,所以每次读取一行并保存到另一个文件,这样来测试读取是否正常。(注意open的时候制定encoding编码方式)
自动登陆"示例:
抽屉新热榜
#!/usr/bin/env python

# -*- coding:utf-8 -*-

import requests

from bs4 import BeautifulSoup

# ############## 方式一 ##############

#

# # 1. 访问登陆页面,获取 authenticity_token

# i1 = requests.get('https://github.com/login')

# soup1 = BeautifulSoup(i1.text, features='lxml')

# tag = soup1.find(name='input', attrs={'name': 'authenticity_token'})

# authenticity_token = tag.get('value')

# c1 = i1.cookies.get_dict()

# i1.close()

#

# # 1. 携带authenticity_token和用户名密码等信息,发送用户验证

# form_data = {

# "authenticity_token": authenticity_token,

#     "utf8": "",

#     "commit": "Sign in",

#     "login": "wupeiqi@live.com",

#     'password': 'xxoo'

# }

#

# i2 = requests.post('https://github.com/session', data=form_data, cookies=c1)

# c2 = i2.cookies.get_dict()

# c1.update(c2)

# i3 = requests.get('https://github.com/settings/repositories', cookies=c1)

#

# soup3 = BeautifulSoup(i3.text, features='lxml')

# list_group = soup3.find(name='div', class_='listgroup')

#

# from bs4.element import Tag

#

# for child in list_group.children:

#     if isinstance(child, Tag):

#         project_tag = child.find(name='a', class_='mr-1')

#         size_tag = child.find(name='small')

#         temp = "项目:%s(%s); 项目路径:%s" % (project_tag.get('href'), size_tag.string, project_tag.string, )

#         print(temp)

# ############## 方式二 ##############

# session = requests.Session()

# # 1. 访问登陆页面,获取 authenticity_token

# i1 = session.get('https://github.com/login')

# soup1 = BeautifulSoup(i1.text, features='lxml')

# tag = soup1.find(name='input', attrs={'name': 'authenticity_token'})

# authenticity_token = tag.get('value')

# c1 = i1.cookies.get_dict()

# i1.close()

#

# # 1. 携带authenticity_token和用户名密码等信息,发送用户验证

# form_data = {

#     "authenticity_token": authenticity_token,

#     "utf8": "",

#     "commit": "Sign in",

#     "login": "wupeiqi@live.com",

#     'password': 'xxoo'

# }

#

# i2 = session.post('https://github.com/session', data=form_data)

# c2 = i2.cookies.get_dict()

# c1.update(c2)

# i3 = session.get('https://github.com/settings/repositories')

#

# soup3 = BeautifulSoup(i3.text, features='lxml')

# list_group = soup3.find(name='div', class_='listgroup')

#

# from bs4.element import Tag

#

# for child in list_group.children:

#     if isinstance(child, Tag):

#         project_tag = child.find(name='a', class_='mr-1')

#         size_tag = child.find(name='small')

#         temp = "项目:%s(%s); 项目路径:%s" % (project_tag.get('href'), size_tag.string, project_tag.string, )

#         print(temp)
#!/usr/bin/env python

# -*- coding:utf-8 -*-

import time

import requests

from bs4 import BeautifulSoup

session = requests.Session()

i1 = session.get(

    url='https://www.zhihu.com/#signin',

    headers={

        'User-Agent': 'Mozilla/5.0 (Macintosh; Intel Mac OS X 10_10_5) AppleWebKit/537.36 (KHTML, like Gecko) Chrome/54.0.2840.98 Safari/537.36',

    }

)

soup1 = BeautifulSoup(i1.text, 'lxml')

xsrf_tag = soup1.find(name='input', attrs={'name': '_xsrf'})

xsrf = xsrf_tag.get('value')

current_time = time.time()

i2 = session.get(

    url='https://www.zhihu.com/captcha.gif',

    params={'r': current_time, 'type': 'login'},

    headers={

        'User-Agent': 'Mozilla/5.0 (Macintosh; Intel Mac OS X 10_10_5) AppleWebKit/537.36 (KHTML, like Gecko) Chrome/54.0.2840.98 Safari/537.36',

    })

with open('zhihu.gif', 'wb') as f:

    f.write(i2.content)

captcha = input('请打开zhihu.gif文件,查看并输入验证码:')

form_data = {

    "_xsrf": xsrf,

    'password': 'xxooxxoo',

    "captcha": 'captcha',

    'email': '424662508@qq.com'

}

i3 = session.post(

    url='https://www.zhihu.com/login/email',

    data=form_data,

    headers={

        'User-Agent': 'Mozilla/5.0 (Macintosh; Intel Mac OS X 10_10_5) AppleWebKit/537.36 (KHTML, like Gecko) Chrome/54.0.2840.98 Safari/537.36',

    }

)

i4 = session.get(

    url='https://www.zhihu.com/settings/profile',

    headers={

        'User-Agent': 'Mozilla/5.0 (Macintosh; Intel Mac OS X 10_10_5) AppleWebKit/537.36 (KHTML, like Gecko) Chrome/54.0.2840.98 Safari/537.36',

    }

)

soup4 = BeautifulSoup(i4.text, 'lxml')

tag = soup4.find(id='rename-section')

nick_name = tag.find('span',class_='name').string

print(nick_name)
#!/usr/bin/env python

# -*- coding:utf-8 -*-

import re

import json

import base64

import rsa

import requests

def js_encrypt(text):

    b64der = 'MIGfMA0GCSqGSIb3DQEBAQUAA4GNADCBiQKBgQCp0wHYbg/NOPO3nzMD3dndwS0MccuMeXCHgVlGOoYyFwLdS24Im2e7YyhB0wrUsyYf0/nhzCzBK8ZC9eCWqd0aHbdgOQT6CuFQBMjbyGYvlVYU2ZP7kG9Ft6YV6oc9ambuO7nPZh+bvXH0zDKfi02prknrScAKC0XhadTHT3Al0QIDAQAB'

    der = base64.standard_b64decode(b64der)

    pk = rsa.PublicKey.load_pkcs1_openssl_der(der)

    v1 = rsa.encrypt(bytes(text, 'utf8'), pk)

    value = base64.encodebytes(v1).replace(b'\n', b'')

    value = value.decode('utf8')

    return value

session = requests.Session()

i1 = session.get('https://passport.cnblogs.com/user/signin')

rep = re.compile("'VerificationToken': '(.*)'")

v = re.search(rep, i1.text)

verification_token = v.group(1)

form_data = {

    'input1': js_encrypt('wptawy'),

    'input2': js_encrypt('asdfasdf'),

    'remember': False

}

i2 = session.post(url='https://passport.cnblogs.com/user/signin',

                  data=json.dumps(form_data),

                  headers={

                      'Content-Type': 'application/json; charset=UTF-8',

                      'X-Requested-With': 'XMLHttpRequest',

                      'VerificationToken': verification_token}

                  )

i3 = session.get(url='https://i.cnblogs.com/EditDiary.aspx')

print(i3.text)
#!/usr/bin/env python

# -*- coding:utf-8 -*-

import requests

# 第一步:访问登陆页,拿到X_Anti_Forge_Token,X_Anti_Forge_Code

# 1、请求url:https://passport.lagou.com/login/login.html

# 2、请求方法:GET

# 3、请求头:

#    User-agent

r1 = requests.get('https://passport.lagou.com/login/login.html',

                 headers={

                     'User-Agent': 'Mozilla/5.0 (Windows NT 6.1; WOW64) AppleWebKit/537.36 (KHTML, like Gecko) Chrome/63.0.3239.132 Safari/537.36',

                 },

                 )

X_Anti_Forge_Token = re.findall("X_Anti_Forge_Token = '(.*?)'", r1.text, re.S)[0]

X_Anti_Forge_Code = re.findall("X_Anti_Forge_Code = '(.*?)'", r1.text, re.S)[0]

print(X_Anti_Forge_Token, X_Anti_Forge_Code)

# print(r1.cookies.get_dict())

# 第二步:登陆

# 1、请求url:https://passport.lagou.com/login/login.json

# 2、请求方法:POST

# 3、请求头:

#    cookie

#    User-agent

#    Referer:https://passport.lagou.com/login/login.html

#    X-Anit-Forge-Code:53165984

#    X-Anit-Forge-Token:3b6a2f62-80f0-428b-8efb-ef72fc100d78

#    X-Requested-With:XMLHttpRequest

# 4、请求体:

# isValidate:true

# username:15131252215

# password:ab18d270d7126ea65915c50288c22c0d

# request_form_verifyCode:''

# submit:''

r2 = requests.post(

    'https://passport.lagou.com/login/login.json',

    headers={

        'User-Agent': 'Mozilla/5.0 (Windows NT 6.1; WOW64) AppleWebKit/537.36 (KHTML, like Gecko) Chrome/63.0.3239.132 Safari/537.36',

        'Referer': 'https://passport.lagou.com/login/login.html',

        'X-Anit-Forge-Code': X_Anti_Forge_Code,

        'X-Anit-Forge-Token': X_Anti_Forge_Token,

        'X-Requested-With': 'XMLHttpRequest'

    },

    data={

        "isValidate": True,

        'username': '15131255089',

        'password': 'ab18d270d7126ea65915c50288c22c0d',

        'request_form_verifyCode': '',

        'submit': ''

    },

    cookies=r1.cookies.get_dict()

)

print(r2.text)
参考:
http://cn.python-requests.org/zh_CN/latest/user/quickstart.html#id4
http://www.python-requests.org/en/master/
http://docs.python-requests.org/en/latest/user/quickstart/
https://www.cnblogs.com/tangdongchu/p/4229049.html#t0
http://www.cnblogs.com/wupeiqi/articles/6283017.html
参考链接:https://www.cnblogs.com/lanyinhao/p/9634742.html
python的requests模块详解的更多相关文章
- python的requests用法详解
Requests是一个Python语言写的http相关设置或者请求的一个库 安装:pip install Requests或者pip3 install requests 使用的时候要import re ...
- python之OS模块详解
python之OS模块详解 ^_^,步入第二个模块世界----->OS 常见函数列表 os.sep:取代操作系统特定的路径分隔符 os.name:指示你正在使用的工作平台.比如对于Windows ...
- python之sys模块详解
python之sys模块详解 sys模块功能多,我们这里介绍一些比较实用的功能,相信你会喜欢的,和我一起走进python的模块吧! sys模块的常见函数列表 sys.argv: 实现从程序外部向程序传 ...
- python中threading模块详解(一)
python中threading模块详解(一) 来源 http://blog.chinaunix.net/uid-27571599-id-3484048.html threading提供了一个比thr ...
- Python中time模块详解
Python中time模块详解 在平常的代码中,我们常常需要与时间打交道.在Python中,与时间处理有关的模块就包括:time,datetime以及calendar.这篇文章,主要讲解time模块. ...
- Python的logging模块详解
Python的logging模块详解 作者:尹正杰 版权声明:原创作品,谢绝转载!否则将追究法律责任. 一.日志级别 日志级别指的是产生的日志的事件的严重程度. 设置一个级别后,严重程度 ...
- Python—requests模块详解
1.模块说明 requests是使用Apache2 licensed 许可证的HTTP库. 用python编写. 比urllib2模块更简洁. Request支持HTTP连接保持和连接池,支持使用co ...
- python中常用模块详解二
log模块的讲解 Python 使用logging模块记录日志涉及四个主要类,使用官方文档中的概括最为合适: logger提供了应用程序可以直接使用的接口API: handler将(logger创建的 ...
- python的requests库详解
快速上手 迫不及待了吗?本页内容为如何入门 Requests 提供了很好的指引.其假设你已经安装了 Requests.如果还没有,去安装一节看看吧. 首先,确认一下: Requests 已安装 Req ...
- python的re模块详解
一.正则表达式的特殊字符介绍 正则表达式 ^ 匹配行首 $ 匹配行尾 . 任意单个字符 [] 匹配包含在中括号中的任意字符 [^] 匹配包含在中括号中的字符之外的字符 [-] 匹配指定范围的任意单个字 ...
随机推荐
- FastWiki发布`0.2.4`支持js 函数
FastWiki发布0.2.4支持js 函数 Release v0.2.4 · AIDotNet/fast-wiki (github.com) 支持JS动态functioncall调用 支持动态fun ...
- OpenHarmony——内核IPC机制数据结构解析
一.前言 OpenAtom OpenHarmony(以下简称"OpenHarmony")是由开放原子开源基金会(OpenAtom Foundation)孵化及运营的开源项目,目标是 ...
- 自动编号工具类:NumAutoUtils详解
在软件开发中,经常需要生成唯一的编号,例如订单号.发票号.实验编号等.为了简化这一过程,本文将介绍一个Java工具类NumAutoUtils,它可以帮助我们生成带有前缀和日期的自动编号. 概述 Num ...
- 【开发者说】XstoryMaker快速书写剧本场景动画
原文:https://mp.weixin.qq.com/s/63V0dfD2IufbX92JeD-G_A,点击链接查看更多技术内容. [开发者说]栏目是为HarmonyOS开发者提供的展示和分享平台, ...
- WEB 版的报表工具有没有意义?
这个问题得从两个方面看. 如果这个 web 版的报表工具指的是现在的自助报表,也就是 BI.多维分析,那它是有意义的, 而且各厂商们都已经做的挺好,可以让业务人员通过简单的拖拽进行各种数据分析,生成自 ...
- css block,inline和inline-block概念和区别
总体概念 block和inline这两个概念是简略的说法,完整确切的说应该是 block-level elements (块级元素) 和 inline elements (内联元素).block元素通 ...
- 密码学系列——数字签名(c# 代码实操)
前言 结合消息摘要.非对称加密.数字签名三篇,进行代码实操. 代码完整,可复制运行. 正文 代码如下: public class SignatureHelper { /// <summary&g ...
- MySQL正则表达式:REGEXP 和 LIKE
正则表达式作用: 根据指定的匹配模式匹配文中符合要求的特殊字符. REGEXP : ①操作符中常用的匹配列表: ②匹配特殊字符使用\\进行转义 \\. 能够匹配 . \\f 换页 \\n 换行 ...
- 2022飞天技术峰会:硬之城如何基于 SAE 打造数智化电子工业互联网平台
简介: 全球数字化时代已经到来,数字经济正推动生产方式.生活方式和治理方式的深刻变化,成为重组全球要素资源,重塑经济结构,改变全球竞争格局的关键力量. 本文根据硬之城 CEO 李六七先生在峰会上的分享 ...
- MaxCompute Spark 资源使用优化祥解
简介: 本文主要讲解MaxCompute Spark资源调优,目的在于在保证Spark任务正常运行的前提下,指导用户更好地对Spark作业资源使用进行优化,极大化利用资源,降低成本. 本文作者:吴数傑 ...