Java源码分析系列笔记-15.CompletableFuture
1. 是什么
用于异步编程。(准备说是非阻塞)
Java中所谓的异步编程其实就是把阻塞的代码放在一个单独的线程中执行,并且有结果时会通知主线程
2. Future VS CompletableFutre
| Future | CompletableFutre | |
|---|---|---|
| 结果获取方式 | 主动轮询。使用isDone来检查调用是否完成,get用来获取执行的结果 | 异步回调。使用回调函数 |
| 异常处理 | 不支持 | 支持 |
| 链式调用 | 不支持 | 支持 |
| 可以手动完成一个任务 | 不支持 | 支持 |
3. 使用
3.1. 运行一个不返回结果的任务
CompletableFuture<Void> future = CompletableFuture.runAsync(() -> {

        try

        {

            TimeUnit.SECONDS.sleep(5);

        }

        catch (InterruptedException e)

        {

            throw new IllegalStateException(e);

        }

        System.out.println("后台任务完成");

    });

    future.get();
3.2. 运行一个返回结果的任务
CompletableFuture<String> future = CompletableFuture.supplyAsync(() -> {

        try

        {

            TimeUnit.SECONDS.sleep(5);

        }

        catch (InterruptedException e)

        {

            throw new IllegalStateException(e);

        }

       return "后台任务完成";

    });

    String s = future.get();

    System.out.println(s);
3.3. 线程池
默认使用ForkJoin的commonpool里的线程池执行任务,但是也可以使用Executor作为第二个参数指定运行的线程池
Executor executor = Executors.newFixedThreadPool(10);

CompletableFuture<String> future = CompletableFuture.supplyAsync(() -> {

try {

    TimeUnit.SECONDS.sleep(1);

} catch (InterruptedException e) {

    throw new IllegalStateException(e);

}

return "Result of the asynchronous computation";

}, executor);
3.4. 手动完成任务
CompletableFuture<String> stringCompletableFuture = new CompletableFuture<>();

    new Thread(()->{

        try

        {

            TimeUnit.SECONDS.sleep(5);

        }

        catch (InterruptedException e)

        {

            e.printStackTrace();

        }

       stringCompletableFuture.complete("手动完成任务");

    }).run();

    String s = stringCompletableFuture.get();

    System.out.println(s);
3.5. 回调
- thenApply() 接受结果作为参数,有返回
- thenAccept() 接受结果作为参数,无返回
- thenRun() 无参数,无返回
System.out.println("start");

    CompletableFuture<String> future = CompletableFuture.supplyAsync(() -> {

        try

        {

            TimeUnit.SECONDS.sleep(5);

        }

        catch (InterruptedException e)

        {

            throw new IllegalStateException(e);

        }

        return "后台任务完成";

    });

    future.thenAccept(System.out::println);

    System.out.println("主线程继续执行并且休眠10s");

    TimeUnit.SECONDS.sleep(10);
3.6. 链式调用
System.out.println("start");

    CompletableFuture<String> future = CompletableFuture.supplyAsync(() -> {

        try

        {

            TimeUnit.SECONDS.sleep(5);

        }

        catch (InterruptedException e)

        {

            throw new IllegalStateException(e);

        }

        return "后台任务完成";

    });

    future.thenApply(s->{

        System.out.println(Thread.currentThread().getName() + "s");

        return s;

    }).thenApply(s->{

        System.out.println(Thread.currentThread().getName() + "s");

        return s;

    });

    System.out.println("主线程继续执行并且休眠10s");

    TimeUnit.SECONDS.sleep(10);
3.7. 组合多个CompletableFuture
- thenCompose() 有依赖的两个Future
- thenCombine() 没有依赖的两个Future
- CompletableFuture.allOf 所有Future完成
- CompletableFuture.anyOf 任意一个Future完成
System.out.println("start runnning............");

    long start = System.currentTimeMillis();

    CompletableFuture<String> future1

            = CompletableFuture.supplyAsync(() ->

            {

                try

                {

                    TimeUnit.SECONDS.sleep(5);

                }

                catch (InterruptedException e)

                {

                    e.printStackTrace();

                }

                System.out.println("Hello" + Thread.currentThread().getName());

                return "Hello";

            }

    );

    CompletableFuture<String> future2

            = CompletableFuture.supplyAsync(() ->

            {

                try

                {

                    TimeUnit.SECONDS.sleep(8);

                }

                catch (InterruptedException e)

                {

                    e.printStackTrace();

                }

                System.out.println("Beautiful" + Thread.currentThread().getName());

                return "Beautiful";

            }

    );

    CompletableFuture<String> future3

            = CompletableFuture.supplyAsync(() ->

            {

                try

                {

                    TimeUnit.SECONDS.sleep(10);

                }

                catch (InterruptedException e)

                {

                    e.printStackTrace();

                }

                System.out.println("World" + Thread.currentThread().getName());

                return "World";

            }

    );

    CompletableFuture<Void> combinedFuture

            = CompletableFuture.allOf(future1, future2, future3);

    combinedFuture.get();

    long end = System.currentTimeMillis();

    System.out.println("finish run...time is " + (end-start));

    assertTrue(future1.isDone());

    assertTrue(future2.isDone());

    assertTrue(future3.isDone());

    System.out.println(future1.get());

    System.out.println(future2.get());

    System.out.println(future3.get());
3.8. 异常处理
- exceptionally发生异常的时候调用
- handle无论发生异常与否都调用
CompletableFuture<Object> future = CompletableFuture.supplyAsync(() -> {

            throw new IllegalArgumentException("Age can not be negative");

    }).exceptionally(ex -> {

        System.out.println("Oops! We have an exception - " + ex.getMessage());

        return "Unknown!";

    });

System.out.println(future.get());
4. 源码分析
4.1. 类图
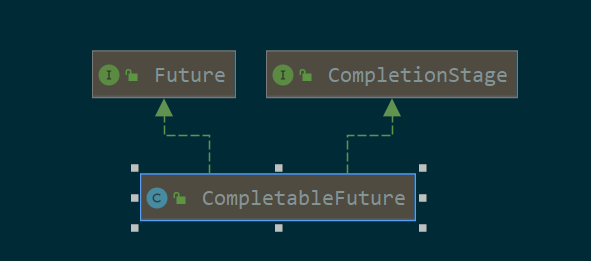
可以看出CompletableFuture实现了Future接口,因此这玩意也是一个可以获取异步执行结果的接口
4.2. 属性
volatile Object result;       // Either the result or boxed AltResult

volatile Completion stack;    // Top of Treiber stack of dependent actions
运行的结果存在Object result,如果发生了异常那么封装在AltResult
4.2.1. AltResult
static final class AltResult { // See above

    final Throwable ex;        // null only for NIL

    AltResult(Throwable x) { this.ex = x; }

}

/** The encoding of the null value. */

static final AltResult NIL = new AltResult(null);
4.3. runAsync
public static CompletableFuture<Void> runAsync(Runnable runnable) {

    return asyncRunStage(asyncPool, runnable);

}
传入asyncPool和runnable任务调用asyncRunStage方法
我们先看看asyncPool是怎么初始化的
4.3.1. 初始化默认的线程池
//返回true

private static final boolean useCommonPool =

    (ForkJoinPool.getCommonPoolParallelism() > 1);

//这里使用的是ForkJoinPool.commonPool()

private static final Executor asyncPool = useCommonPool ?

    ForkJoinPool.commonPool() : new ThreadPerTaskExecutor();
所以默认使用的是ForkJoinPool.commonPool()
有了默认的线程池,接下来调用的asyncRunStage方法
- asyncRunStage
static CompletableFuture<Void> asyncRunStage(Executor e, Runnable f) {

    if (f == null) throw new NullPointerException();

    CompletableFuture<Void> d = new CompletableFuture<Void>();

    e.execute(new AsyncRun(d, f));

    return d;

}
- 2行:任务为空那么抛出异常
- 3行:构造CompletableFuture,用于接收结果
- 4行:先用CompletableFuture和Runnable构造AsyncRun,接口调用线程池Executor的execute方法执行这个AsyncRun
- 5行:返回CompletableFuture
4.3.2. 把执行的任务【Runnable】和接收结果【CompletableFuture】封装到AsyncRun
先看看AsyncRun类
- AsyncRun
static final class AsyncRun extends ForkJoinTask<Void>

        implements Runnable, AsynchronousCompletionTask {

    CompletableFuture<Void> dep; Runnable fn;

    AsyncRun(CompletableFuture<Void> dep, Runnable fn) {

        this.dep = dep; this.fn = fn;

    }

    public final Void getRawResult() { return null; }

    public final void setRawResult(Void v) {}

    public final boolean exec() { run(); return true; }

    public void run() {

        CompletableFuture<Void> d; Runnable f;

        if ((d = dep) != null && (f = fn) != null) {

            //清空CompletableFuture和Runnable

            dep = null; fn = null;

            //如果CompletableFuture的结果为空

            if (d.result == null) {

                try {

                    //那么执行Runnable方法

                    f.run();

                    //CAS设置CompletableFuture的结果为AltResult NIL--详见上面的AltResult

                    d.completeNull();

                } catch (Throwable ex) {

                    //抛出了异常则CAS设置CompletableFuture的结果为AltResult(异常)--详见上面的AltResult

                    d.completeThrowable(ex);

                }

            }

            d.postComplete();

        }

    }

}
- 2行:实现了Runnable接口
- 4-6行:构造方法只是保存了传进来的Runnable和CompletableFuture
- 12-26行:线程池的execute方法最终会调用这个run方法。详细说明见注释。
我们可以看看设置null结果和异常结果的方法
- completeNull【null】
final boolean completeNull() {

    //CAS设置RESULT为NIL

    return UNSAFE.compareAndSwapObject(this, RESULT, null,

                                       NIL);

}
- completeThrowable【异常】
static AltResult encodeThrowable(Throwable x) {

    return new AltResult((x instanceof CompletionException) ? x :

                         new CompletionException(x));

}

/** Completes with an exceptional result, unless already completed. */

final boolean completeThrowable(Throwable x) {

    //CAS设置RESULT为AltResult(异常)

    return UNSAFE.compareAndSwapObject(this, RESULT, null,

                                       encodeThrowable(x));

}
4.3.3. 调用线程池的execute方法执行上面的AsyncRun
执行AsyncRun的时候最终会调用AsyncRun的run方法,分析如上面的把执行的任务【Runnable】和接收结果【CompletableFuture】封装到AsyncRun
4.4. supplyAsync
public static <U> CompletableFuture<U> supplyAsync(Supplier<U> supplier) {

    return asyncSupplyStage(asyncPool, supplier);

}
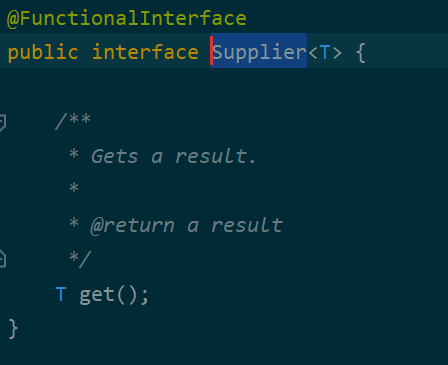
传入默认的线程池asyncPool和任务supplier,这个supplier是Supplier【函数式接口】,如下图:
4.4.1. 初始化默认的线程池
初始化默认的线程池跟上面的runAsync一样
我们接着跟踪asyncSupplyStage方法
- asyncSupplyStage
static <U> CompletableFuture<U> asyncSupplyStage(Executor e,

                                                 Supplier<U> f) {

    if (f == null) throw new NullPointerException();

    CompletableFuture<U> d = new CompletableFuture<U>();

    e.execute(new AsyncSupply<U>(d, f));

    return d;

}
- 2行:任务为空那么抛出异常
- 3行:构造CompletableFuture,用于接收结果
- 4行:先用CompletableFuture和Supplier构造AsyncSupply,接口调用线程池Executor的execute方法执行这个AsyncSupply
- 5行:返回CompletableFuture
4.4.2. 把执行的任务【Supplier】和接收结果【CompletableFuture】封装到AsyncSupply
- AsyncSupply
static final class AsyncSupply<T> extends ForkJoinTask<Void>

        implements Runnable, AsynchronousCompletionTask {

    CompletableFuture<T> dep; Supplier<T> fn;

    AsyncSupply(CompletableFuture<T> dep, Supplier<T> fn) {

        this.dep = dep; this.fn = fn;

    }

    public final Void getRawResult() { return null; }

    public final void setRawResult(Void v) {}

    public final boolean exec() { run(); return true; }

    public void run() {

        CompletableFuture<T> d; Supplier<T> f;

        if ((d = dep) != null && (f = fn) != null) {

            //清空CompletableFuture和Runnable

            dep = null; fn = null;

            //如果CompletableFuture的结果为空

            if (d.result == null) {

                try {

                    //调用Supplier.get获取结果

                    //然后调用CompletableFuture.completeValue把结果设置进

                    d.completeValue(f.get());

                } catch (Throwable ex) {

                    //抛出了异常则CAS设置CompletableFuture的结果为AltResult(异常)--详见上面的AltResult

                    d.completeThrowable(ex);

                }

            }

            d.postComplete();

        }

    }

}
- 2行:实现了Runnable接口
- 4-6行:构造方法只是保存了传进来的Runnable和CompletableFuture
- 12-26行:线程池的execute方法最终会调用这个run方法。详细说明见注释。
我们可以看看设置结果的completeValue方法
- completeValue
final boolean completeValue(T t) {

    return UNSAFE.compareAndSwapObject(this, RESULT, null,

                                       (t == null) ? NIL : t);

}
4.4.3. 调用线程池的execute方法执行上面的AsyncRun
执行AsyncRun的时候最终会调用AsyncRun的run方法,分析如上面的把执行的任务【Supplier】和接收结果【CompletableFuture】封装到AsyncSupply
4.5. complete
public boolean complete(T value) {

    boolean triggered = completeValue(value);

    postComplete();

    return triggered;

}
- 2行:手动设置结果
- 3行:执行钩子方法
4.5.1. 手动设置结果
final boolean completeValue(T t) {

    return UNSAFE.compareAndSwapObject(this, RESULT, null,

                                       (t == null) ? NIL : t);

}
4.5.2. 执行钩子方法
这段代码确定没看懂要干啥
final void postComplete() {

    /*

     * On each step, variable f holds current dependents to pop

     * and run.  It is extended along only one path at a time,

     * pushing others to avoid unbounded recursion.

     */

    CompletableFuture<?> f = this; Completion h;

    while ((h = f.stack) != null ||

           (f != this && (h = (f = this).stack) != null)) {

        CompletableFuture<?> d; Completion t;

        if (f.casStack(h, t = h.next)) {

            if (t != null) {

                if (f != this) {

                    pushStack(h);

                    continue;

                }

                h.next = null;    // detach

            }

            f = (d = h.tryFire(NESTED)) == null ? this : d;

        }

    }

}
5. 参考
Java源码分析系列笔记-15.CompletableFuture的更多相关文章
- Java源码分析系列之HttpServletRequest源码分析
从源码当中 我们可以 得知,HttpServletRequest其实 实际上 并 不是一个类,它只是一个标准,一个 接口而已,它的 父类是ServletRequest. 认证方式 public int ...
- Java源码分析系列
1) 深入Java集合学习系列:HashMap的实现原理 2) 深入Java集合学习系列:LinkedHashMap的实现原理 3) 深入Java集合学习系列:HashSet的实现原理 4) 深入Ja ...
- Spring Ioc源码分析系列--Ioc容器BeanFactoryPostProcessor后置处理器分析
Spring Ioc源码分析系列--Ioc容器BeanFactoryPostProcessor后置处理器分析 前言 上一篇文章Spring Ioc源码分析系列--Ioc源码入口分析已经介绍到Ioc容器 ...
- jQuery源码分析系列
声明:本文为原创文章,如需转载,请注明来源并保留原文链接Aaron,谢谢! 版本截止到2013.8.24 jQuery官方发布最新的的2.0.3为准 附上每一章的源码注释分析 :https://git ...
- MyCat源码分析系列之——结果合并
更多MyCat源码分析,请戳MyCat源码分析系列 结果合并 在SQL下发流程和前后端验证流程中介绍过,通过用户验证的后端连接绑定的NIOHandler是MySQLConnectionHandler实 ...
- MyCat源码分析系列之——BufferPool与缓存机制
更多MyCat源码分析,请戳MyCat源码分析系列 BufferPool MyCat的缓冲区采用的是java.nio.ByteBuffer,由BufferPool类统一管理,相关的设置在SystemC ...
- jquery2源码分析系列
学习jquery的源码对于提高前端的能力很有帮助,下面的系列是我在网上看到的对jquery2的源码的分析.等有时间了好好研究下.我们知道jquery2开始就不支持IE6-8了,从jquery2的源码中 ...
- [Tomcat 源码分析系列] (二) : Tomcat 启动脚本-catalina.bat
概述 Tomcat 的三个最重要的启动脚本: startup.bat catalina.bat setclasspath.bat 上一篇咱们分析了 startup.bat 脚本 这一篇咱们来分析 ca ...
- [转]jQuery源码分析系列
文章转自:jQuery源码分析系列-Aaron 版本截止到2013.8.24 jQuery官方发布最新的的2.0.3为准 附上每一章的源码注释分析 :https://github.com/JsAaro ...
- MyBatis 源码分析系列文章导读
1.本文速览 本篇文章是我为接下来的 MyBatis 源码分析系列文章写的一个导读文章.本篇文章从 MyBatis 是什么(what),为什么要使用(why),以及如何使用(how)等三个角度进行了说 ...
随机推荐
- Jenkins pipeline jenkinsfile的两种写作方式声明式和脚本式
Jenkins pipeline jenkinsfile的两种写作方式,声明式和脚本式. 为什么需要pipeline? 在多年前Jenkins成为最流行的持续集成服务器的Jenkins 1.x时代,所 ...
- idea远程访问docker查看控制台中文乱码问题
今天心血来潮想把自己的项目部署到docker,部署完成后通过idea远程访问docker.发现控制台日志出现中文乱码,起初还以为docker或者项目编码没有设置好,一一排查后发现服务器编码和环境都没有 ...
- il热更新(一)
转载请标明出处:http://www.cnblogs.com/zblade/ 最近研究了一下如何在unity中实现c#的热更新,对于整个DLL热更新的过程和方案有一个初步的了解,这儿就写下来,便于后续 ...
- K8S 部署 Deepseek 要 3 天?别逗了!Ollama+GPU Operator 1 小时搞定
最近一年我都在依赖大模型辅助工作,比如 DeepSeek.豆包.Qwen等等.线上大模型确实方便,敲几个字就能生成文案.写代码.做表格,极大提高了效率.但对于企业来说:公司内部数据敏感.使用外部大模型 ...
- 微信小程序/H5 调起确认收款界面
微信小程序/H5 调起确认收款界面详解(附代码+平台兼容处理) 场景:用户点击「收款」按钮后,系统调起微信收款组件,用户确认后完成转账或收款流程.该能力广泛用于现金营销.二手交易.佣金报酬.企业赔付等 ...
- [笔记]PHP里类的申明和对象的实例化(笔记)
1.申明类 class 类名{ //属性---------- public 属性 = 值: public 属性: //方法----------- function 方法名($n1,$n2){ ...
- 1.4K star!几分钟搞定AI视频创作,这个开源神器让故事可视化如此简单!
嗨,大家好,我是小华同学,关注我们获得"最新.最全.最优质"开源项目和高效工作学习方法 story-flicks 是一个基于AI技术的自动化视频生成工具,能够将文字剧本快速转化为高 ...
- SpringMVC返回值
字符串 /** * 测试返回字符串 * @param model model * @return 返回的字符串,通过视图解析器调整到jsp页面 */ @RequestMapping("/te ...
- 01Spring-01jdbc 未使用spring代码编写
目录 pom.xml JdbcDemo1.java pom.xml <?xml version="1.0" encoding="UTF-8"?> & ...
- 关于ADB-数据包抓取-反编译工具(手机刷机使用)
1 逆向基本流程 1 获取目标app(官网,豌豆荚),尽量不要去华为应用市场,小米应用市场下载--多渠道打包,安装到手机上 2 使用抓包工具抓包分析(charles,fiddler...) 3 使用反 ...