Unity使用外部版本控制
Using External Version Control Systems with Unity
Unity offers an Asset Server add-on product for easy integrated versioning of your projects. If you for some reason are not able use the Unity Asset Server, it is possible to store your project in any other version control system, such as Subversion, Perforce or Bazaar. This requires some initial manual setup of your project.
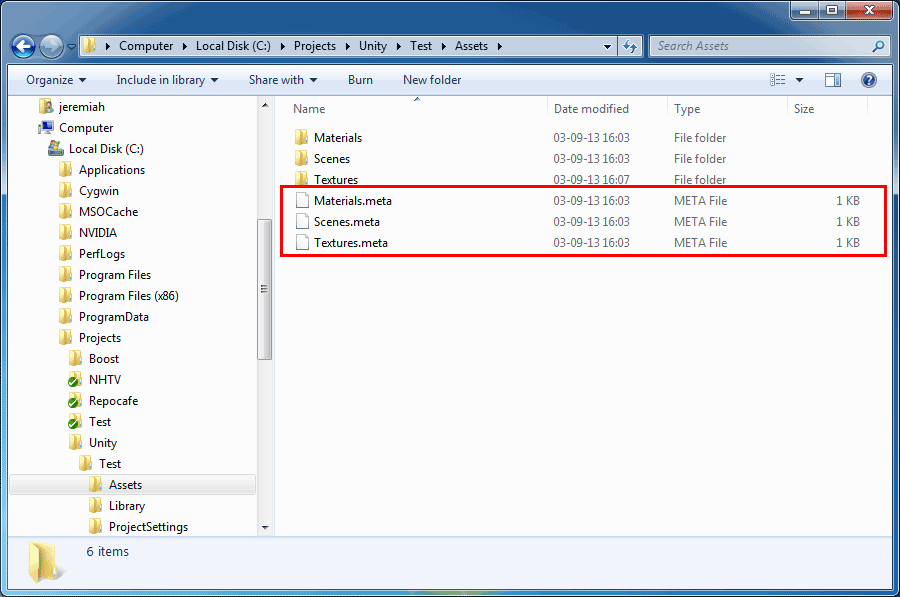
Before checking your project in, you have to tell Unity to modify the project structure slightly to make it compatible with storing assets in an external version control system. This is done by selecting Edit->Project Settings->Editor in the application menu and enabling External Version Control support by selecting Metafiles in the dropdown for Version Control. This will create a text file for every asset in the Assets directory containing the necessary bookkeeping information required by Unity. The files will have a.meta file extension with the first part being the full file name of the asset it is associated with. Moving and renaming assets within Unity should also update the relevant.meta files. However, if you move or rename assets from an external tool, make sure to syncronize the relevant .meta files as well.
When checking the project into a version control system, you should add the Assets and the ProjectSettings directories to the system. The Library directory should be completely ignored - when using external version control, it's only a local cache of imported assets.
When creating new assets, make sure both the asset itself and the associated .meta file is added to version control.
Example: Creating a new project and importing it to a Subversion repository.
First, let's assume that we have a subversion repository at svn://my.svn.server.com/ and want to create a project at svn://my.svn.server.com/MyUnityProject. Then follow these steps to create the initial import in the system:
- Create a new project inside Unity and call it
InitialUnityProject. You can add any initial assets here or add them later on. - Enable Meta files in Edit->Project Settings->Editor
- Quit Unity (this ensures that all the files are saved).
- Delete the
Librarydirectory inside your project directory. - Import the project directory into Subversion. If you are using the command line client, this is done like this from the directory where your initial project is located:
svn import -m"Initial project import" InitialUnityProject svn://my.svn.server.com/MyUnityProject
If successful, the project should now be imported into subversion and you can delete theInitialUnityProjectdirectory if you wish. - Check out the project back from subversion
svn co svn://my.svn.server.com/MyUnityProject
And check that theAssetsandProjectSettingsdirectory are versioned. - Open the checked out project with Unity by launching it while holding down the Option or the left Alt key. Opening the project will recreate the
Librarydirectory in step 4 above. - Optional: Set up an ignore filter for the unversioned
Librarydirectory:svn propedit svn:ignore MyUnityProject/
Subversion will open a text editor. Add the Library directory. - Finally commit the changes. The project should now be set up and ready:
svn ci -m"Finishing project import" MyUnityProject
 In this article, I will briefly describe how to setup a Unity project together with a Version Control System (VCS). I will show you how you can setup a Unity project to work with Subversion (SVN) but the method to use Unity with other version control systems should be similar.
Table of Contents
Introduction
Unity is a game development tool that allows you to create great games and deploy them to almost any platform you can imagine. Unity provides a great asset handling pipeline. Most of your game assets (like models, textures, audio files, and scripts) are automatically built for the platform for which they are to be used.
Although Unity is a great platform for creating games, historically it has not always been very easy to work in large teams with Unity. Unity has traditionally encouraged developers to use the Unity Asset Server for managing the Unity project across large teams. And although the Unity Asset Server is a good solution for working in large teams, it does incur additional licensing costs that may not be practical for smaller teams.
The developers at Unity recognized that their users wanted to integrate their Unity projects into their existing version control systems so they provided the ability to work with meta files which are used to keep track of the different assets in the project. By enabling these meta files, you can now work with version control systems like Subversion and Git in large teams and across different platforms without losing the references to your assets.
Meta Files
It is important to understand the need for Meta Files when wor king with a Version Control System. When you reference a game asset in a scene, Unity does not use the name and location and name of an asset internally, instead Unity uses a Globally Unique Identifier (GUID) to uniquely refer to an asset in your project. This GUID is stored in a meta file that is created for each folder and each asset in your Unity project’s Asset folder.
The use of GUIDs has its advantages but it also has its disadvantages. The advantage of using GUIDs is that you can move or rename or modify the contents of an asset and the asset can still be referenced by its GUID (as long as the GUID stays the same, the asset can be referenced). The disadvantage is that you must be aware of the presence of the meta file that is associated to a particular asset. If you delete the meta file that is associated with a particular asset, Unity will think the original asset has been deleted a new GUID is generated and associated to that asset. This is the most common reason why references to assets will suddenly break in your scene file.
In addition to the GUID, the meta files store information about the asset that is used to re-import it. For example, texture assets can be configured to be imported as a standard texture, a normal map, a GUI texture, a cookie, texture, or a lightmap texture. These import settings are also stored in the meta file.
Enable Meta Files
By default, meta files are not enabled for new projects. You must explicitly enable meta files for each new Unity project you want to manage with version control.
To do this, open your Unity project in the Unity game editor. If you don’t yet have a project, download the unityproject file below and import it into an empty Unity project (It’s just a crate, but it’s enough to use as an example).
With Unity open, go to Edit > Project Settings > Editor.
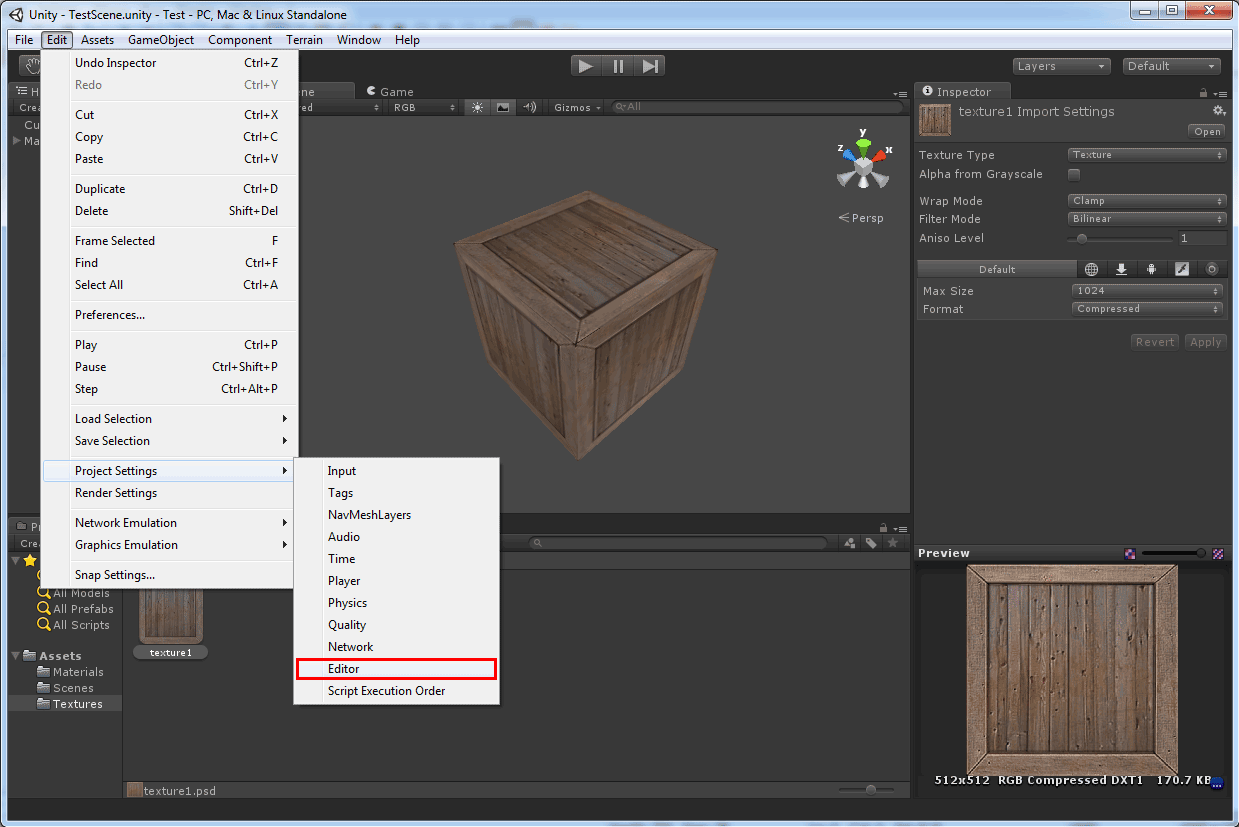
Unity – Enable Meta Files
You will notice that the Inspector panel turns into Editor Settings.
Select the Meta Files option for the Mode setting under Version Control.
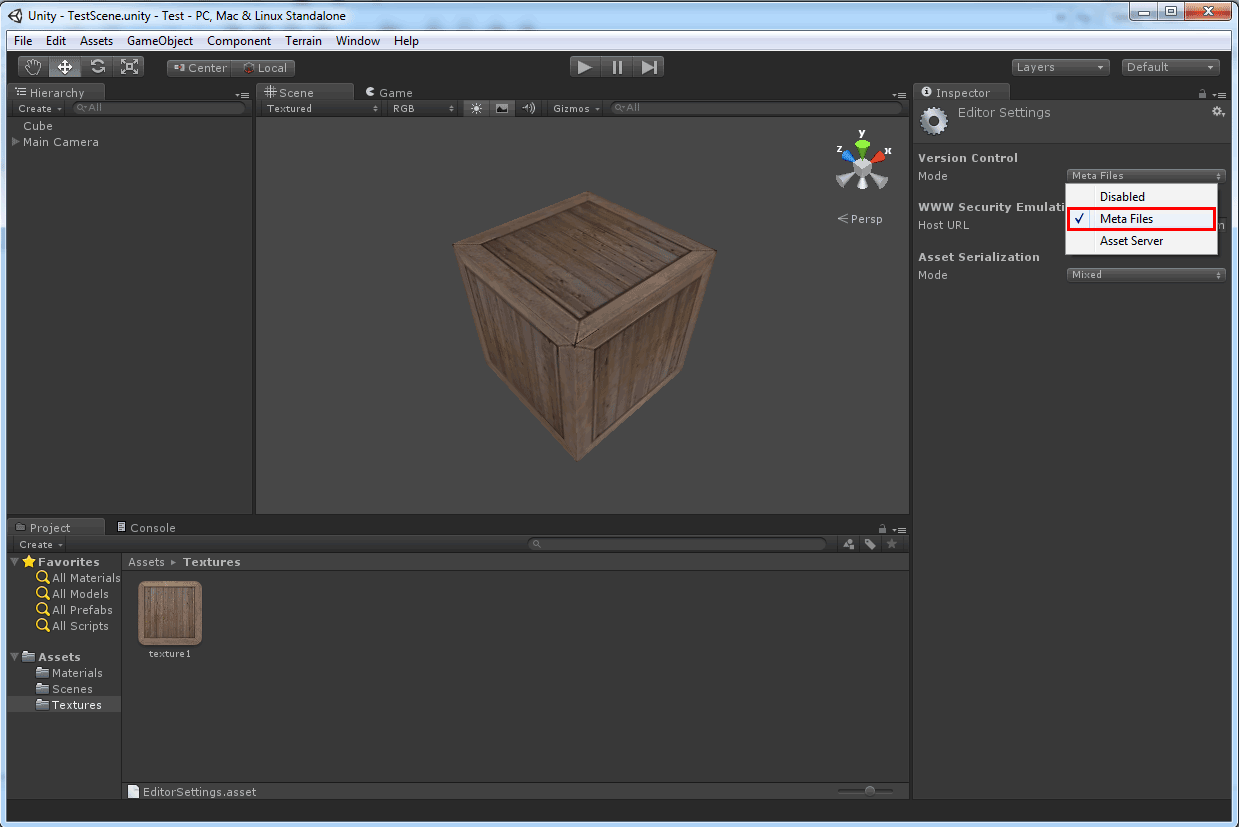
Unity – Enable Meta Files
After enabling this option, you should see a .meta file for every file and folder in your Unity project’s Asset folder.
Meta Files
Working with Version Control
At this point, I assume you have access to a version control repository somewhere. Setting up a repository is beyond the scope of this article so I will not explain that here.
I will show how to work with Subversion using the TortoiseSVN client on Windows. Working with other version control systems will be similar but the steps to manage your repository may be different.
Checkout
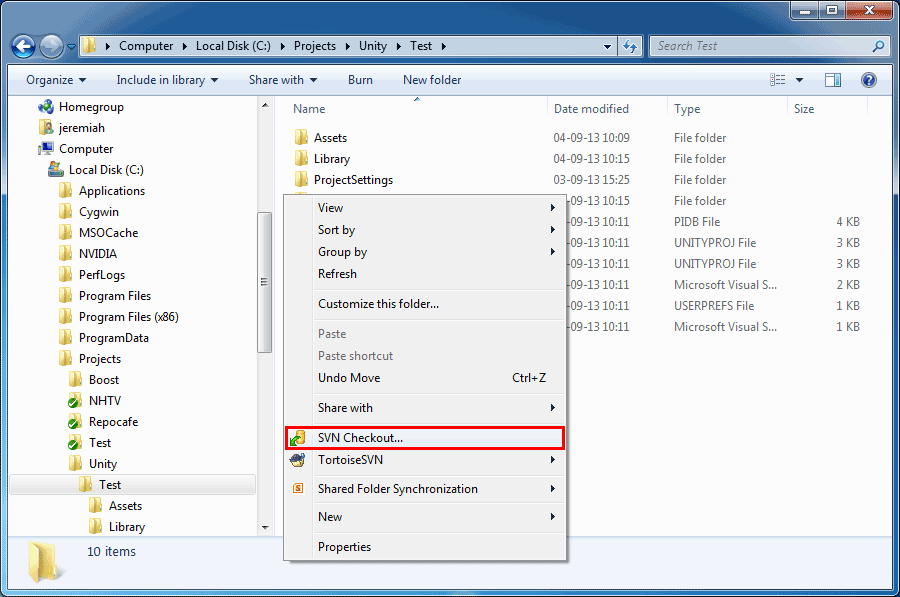
Before you can add your files to the repository, you need to perform a checkoutoperation (if you haven’t already done so). If you already have a working copy where you want to put your Unity project, then you can skip this step.
Navigate to the directory where you created your Unity project.
Right-click on the project root folder (the folder that contains the Assets folder) and select “SVN Checkout…” from the pop-up menu that appear.
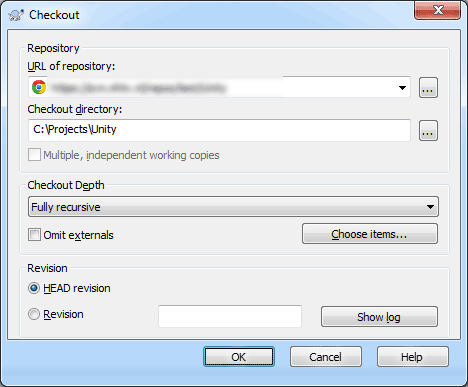
SVN Checkout
Specify the URL of the Subversion repository and the directory where you want to create the working copy (this should be the root of your Unity project folder) and press OK to perform the checkout operation.
SVN Checkout Dialog
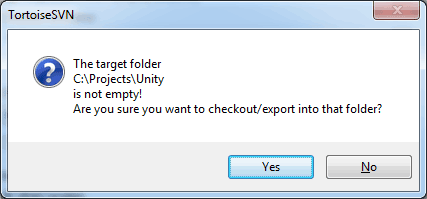
The TortoiseSVN client should display a warning dialog box stating that the directory is not empty. Confirm that you want to checkout to this folder by clicking the Yes button.
TortoiseSVN Warning
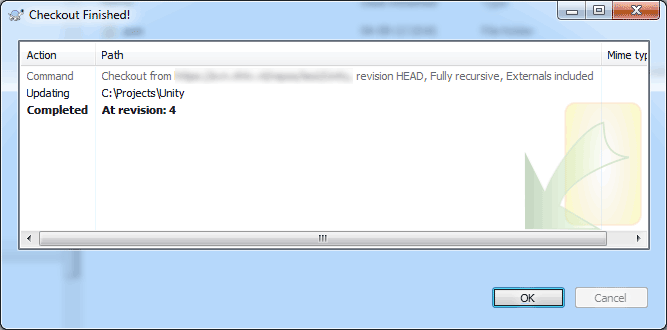
You should be presented with a confirmation dialog stating that the checkout operation completed.
Checkout Confirmation
Adding Files
Now that we’ve created a working of the SVN repository, we can add the necessary files to it.
Not all of the files in the Unity project folder should be added to the repository.
DO ADD THESE FILES
Only two folder (and all of their contents) should be added to the repository:
- Assets
- ProjectSettings
DON’T ADD THESE FILES
The following folders should NOT be added to version control:
- Library
- Temp
Also, all of the files that Unity generates in the root folder of the Unity project folder should not be added to version control (because these can be regenerated by selecting Assets > Sync MonoDevelop Project from the main menu in the Unity editor).
Ignore Files
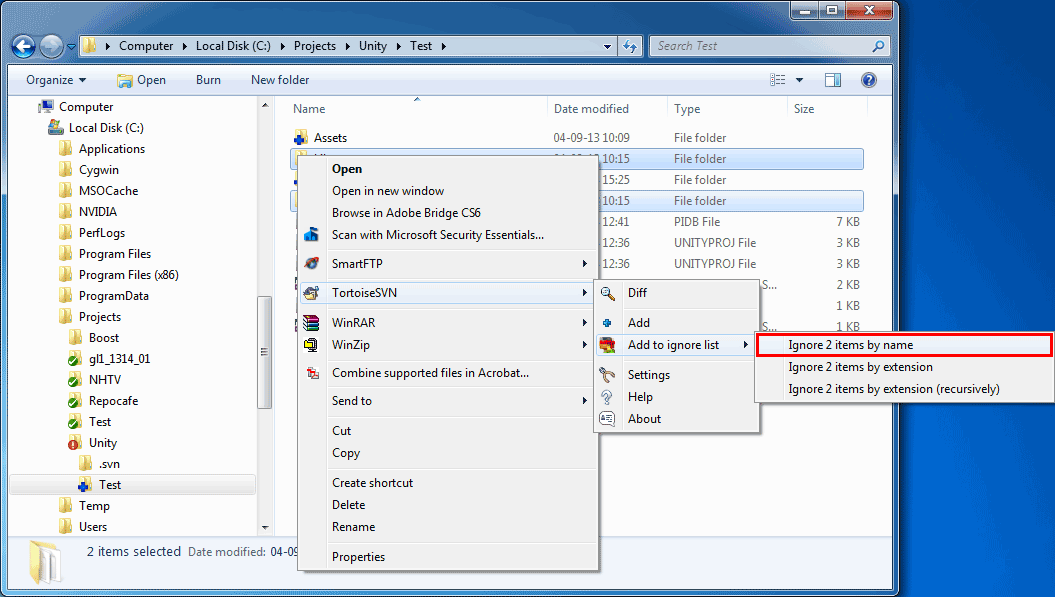
It is highly recommended that you tell subversion to always ignore the files and directories that you do not need to add to version control. To do this, right-click on the files/folders that you do not want to add to version control and select TortoiseSVN > Add to ignore list > Ignore items by name (or ignore by extension if you want to ignore all files with a particular extension).
SVN Ignore Folders
Once a file or folder has been ignored, it won’t show up in the commit dialog anymore.
Commit Changes
Once the necessary files have been added to the working copy and the Library, Temp, and other files have been marked as ignore, we need to commit the changes to the SVN repository.
Do do that, right-click on the root folder of the Unity project and select SVN Commit…from the pop-up menu that appears.
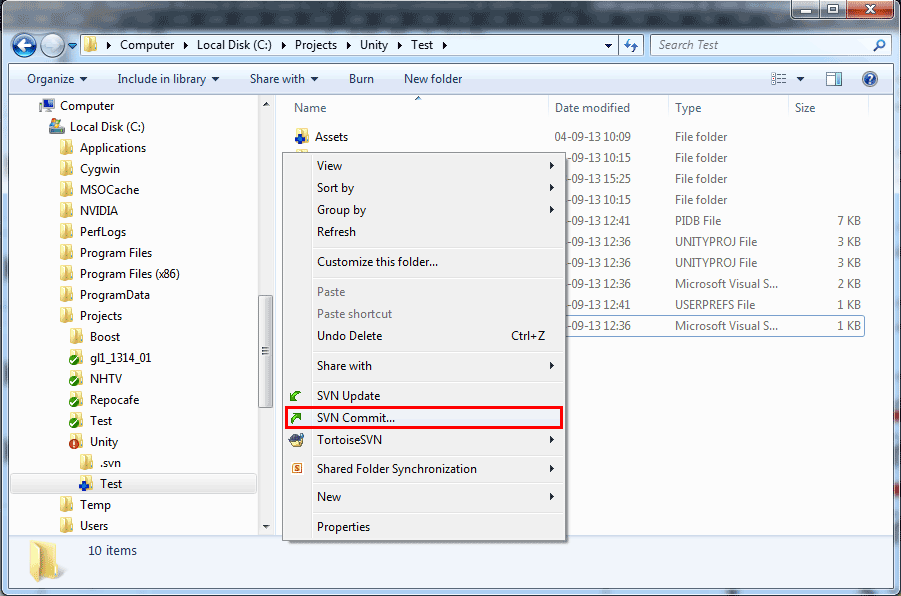
SVN Commit
You should be presented with a commit dialog box. Enter a message that describes the changes you are committing and confirm that all of the files and folders that should be added to the repository are checked (including the .meta files!)
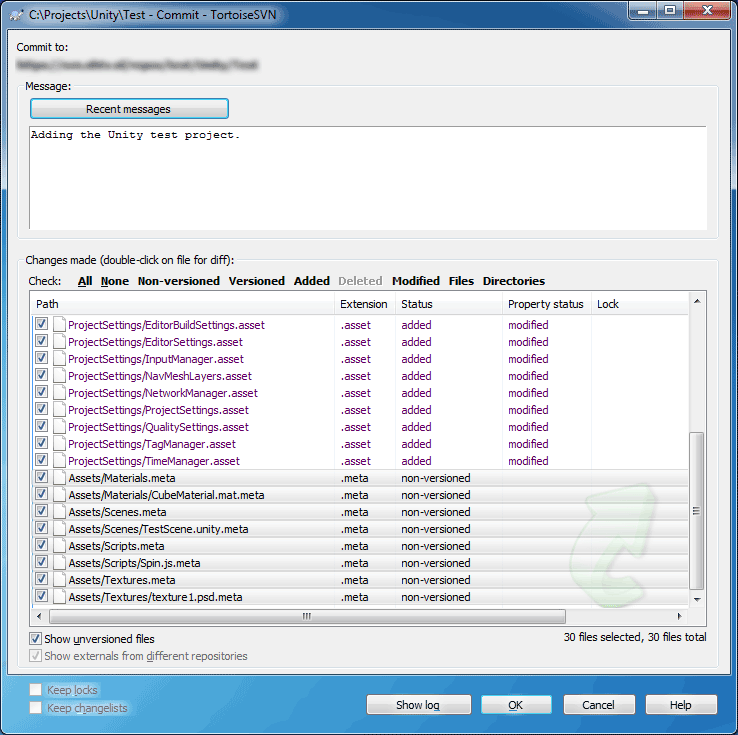
Commit Changes
Click OK to confirm you want to commit the changes to the repository. If everything was okay, you should see the following dialog box:
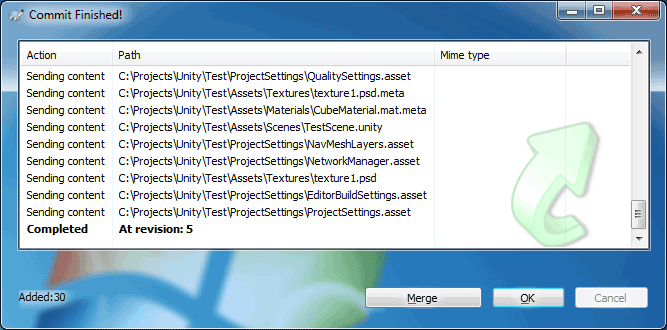
Commit Finished
Moving and Renaming Files (Very Important)
If you have read the standard Unity documentation, you may have noticed that the guys at Unity recommend that you never use Windows Explorer (or Finder on OS X) to move or rename files that are in your Unity project’s Asset folder. They recommend that you only use the Project View in the Unity editor. This is true if you are using the Unity Asset Server or not using version control at all. However, if you are using a version control system (like Subversion) then you MUST use the SVN client (in the case of Windows, this is usually TortoiseSVN) to move or rename files that are part of an SVN working copy. The most important thing to remember is that if you move a file or folder that you also move/rename the corresponding .meta file that is associated with that folder or asset.
If you don’t move/rename the corresponding .meta file for a folder or an asset in a Unity project’s Asset folder you will break the reference to that asset in every scene file it is used.
BE VERY CAREFUL WHEN MOVING/RENAMING FILES IN YOUR UNITY PROJECT!
If you accidently move/rename files in the Project View in the Unity editor, you will break the link to the file as known by the Subversion system. To resolve this, move/rename the file/folder back to it’s original name in the Project View and perform the move/rename using the SVN client instead. Make sure you also move/rename the corresponding .meta file that is associated with the file/folder you are moving/renaming.
Copying Files
If you want to make a copy an asset, do not copy the .meta file with it. The .meta file contains the GUID for that asset and if you make a copy of the .meta file, Unity will not longer know which is the correct asset for the GUID.
Conclusion
In this article, I showed you how to add your Unity project to a version control system. The most important thing to remember is to always enable Meta Files when working with a version control system such as Subversion. Failing to do this, or not committing the .meta files with the corresponding assets will break the references to those assets in the scene files.
Don’t commit the Library and the Temp folder to the version control system because Unity will automatically create these folders if they don’t already exist. You should also not commit the solution files and project files that are automatically generated by Unity when you select Assets > Sync MonoDevelop Project from the main menu in the Unity editor. These files get overwritten when Unity regenerates them and they don’t need to be put in version control.
Exercise
Practice this own your own or with your team. Make sure that you can perform a fresh checkout of your project in a new folder or on a teammates computer and confirm that all of the references to assets in the scene files are correct.
If you have turned on Meta Files, you should be able to delete the Library folder in the root of your Unity project and Unity should correctly recreate the Library files and restore all the references to the assets in the scene files.
This entry was posted in Unity by Jeremiah van Oosten. Bookmark the permalink.
4 THOUGHTS ON “USING VERSION CONTROL WITH UNITY”
-
Here’s another good suggestion for using version control with Unity.
As of Unity 4.2, they’ve made the option for text serialization of assets available to all users, not just Pro. After doing this, all asset files that were previously saved in binary format are saved in a completely readable YAML representation in a text file. Changes to scene files can actually be read, and merged if you’re careful. Very useful if you have multiple people working in a project.
-
Sigmund,
Thanks for this great tip. But be careful, large scene files with many gameobjects will still be difficult or impossible to merge correctly if you not very careful.
A better solution is to split level design into separate scene files and use Application.LoadLevelAdditive to combine several levels into one at runtime.
The best solution would be to have this concept “Additive” level design integrated into unity. UDK does this with Persistent and Streamed levels ()
-
Chufraise on January 4, 2014 at 1:34 am said:
Hi Jeremiah,
Great article, thanks! I’m having some troubles tho when checking out a project without a Library folder. All prefab and script link are broken, which means something is broken in the meta data. I’ve done everything according to the best practises before importing the project in the first place, such as enabling visible meta files. I initially imported the Assets- and the ProjectSettings folders, but when checking the project out on another computer everything’s screwed up. When checking out the original Library folder everything works fine. Do you possibly have an idea on what I’ve done wrong? I’m using Unity Free 4.3. Thanks!-
If meta files are regenerated then the references to those assets will be broken. Make sure that when you put files in the Assets folder that they have corresponding meta files and the contents of the files should not be changed after Unity imports those files (the UUID’s should not change).
The best thing to do is to use the Import Package function in Unity to import assets created in another Unity project. Doing this will maintain references to assets within the package.
-


Unity使用外部版本控制的更多相关文章
- Unity使用外部版本控制SVN
原地址:http://www.cnblogs.com/realtimepixels/p/3652146.html Using External Version Control Systems with ...
- unity 播放外部视频
摘要: Unity支持的播放视频格式有.mov..mpg..mpeg..mp4..avi和.asf.只需将对应的视频文件拖拽入Project视图即可,它会自动生成对应的MovieTexture对象. ...
- unity 读取外部exe程序控制台信息
由于需要获取显卡信息,但是unity的自带函数,只能输出1个显卡 c#倒是可以但是引用了一个下载的dll System.Management.dll 这个dll放到unity用不了,因为mono不 ...
- Unity基础-外部导入C# Dll(汇编集)
外部导入C# Dll(汇编集) 使用创建一个dll工程 添加依赖的dll 导入Unity中,放入Assets的任意文件夹中 使用代码生成的dll汇编集只要"use dll的名字"引 ...
- Unity调试外部DLL
1.更改DLL的.csproj工程配置文件,在里面添加如下属性:<PropertyGroup Condition=" '$(OS)' == 'Unix' "> ...
- Unity 3D的版本控制问题
译林军 李慧爽|2014-02-13 11:21|9231次浏览|Unity(286)移动应用(19)技术开发(9)0 Unity中的源码控制并非和其他开发环境一样简单.我们可以从开发和美术两个角度讲 ...
- unity 开启外部摄像头
在unity中建立一个image作为摄像头显示画面,然后通过命令render到image上即可. public WebCamTexture webTex; public string deviceNa ...
- Unity调用外部摄像头,全屏显示摄像头画面
有两种方法,常用的是GUI方法,代码如下: public class CameraTest : MonoBehaviour { WebCamTexture camTexture; void Start ...
- Unity的资源管理
本篇文章翻译自Unity的官方文档,原文地址:https://docs.unity3d.com/Manual/BehindtheScenes.html Unity自动导入资源的同时为你管理这些资源产生 ...
随机推荐
- Android 笔记一:线性布局
建立布局 新建项目后,在如图路径下新建xml文件可以开始编辑 weight的使用 android:layout_width="0dp",或android:layout_width= ...
- poj 3648 2-sat 输出任意一组解模板
转载地址:http://blog.csdn.net/qq172108805/article/details/7603351 /* 2-sat问题,题意:有对情侣结婚,请来n-1对夫妇,算上他们自己共n ...
- oracle将查询到的数据插入到数据库的表中
一.Oracle数据库中,把一张表的查询结果直接生成并导入一张新表中. 例如:现有只有A表,查询A表,并且把结果导入B表中.使用如下SQL语句: create table b as selec ...
- 51nod1020 逆序排列
t<=10000个问,每次问n<=1000的全排列中逆序数对为k<=10000个的有多少,mod 1e9+7. 直接dp,$f(i,j)$--i的全排列中逆序数对为j的有多少,$f( ...
- Uva - 12230 Crossing Rivers (数学期望)
你住在村庄A,每天需要过很多条河到另一个村庄B上班,B在A的右边,所有的河都在A,B之间,幸运的是每条船上都有自由移动的自动船, 因此只要到达河左岸然后等船过来,在右岸下船,上船之后船的速度不变.现在 ...
- HDU——1179 Ollivanders: Makers of Fine Wands since 382 BC.
Ollivanders: Makers of Fine Wands since 382 BC. Time Limit: 2000/1000 MS (Java/Others) Memory Lim ...
- Visual studio 2008 的语法高亮插件 WordLight
前段时间一直在使用matlab,今天需要使用vs2008,而用惯了matlab,习惯了其中一项选中变量高亮的设置,突然回来使用VS,感到各种不适应,顿时想到了一个词:矫情 呵呵,于是在网上找各种插件, ...
- 条款一:仔细区别pointers 和 reference
1.一个reference必须总代表某个对象,没有所谓的null reference.如果你有一个变量,其目的是用来指向(代表)另一个对象,但是也有可能它不指向(代表)另一个对象,那么应该使用poin ...
- Ubuntu和Win7双系统,ubuntu被删,重新启动之后显示,no such partition
准备一张windows7的系统安装盘.从光盘启动电脑,在光盘启动完毕之后.按shift+F10,调出cmd命令终端,在终端输入:bootrec/fixmbr OK.重新启动之后就搞定了
- tmux还有这种操作,我在这边的窗口上操作,你那边可以实时的看到我的操作,厉害了