SpringMVC与MyBatis整合方法
一、springmvc+mybaits的系统架构:
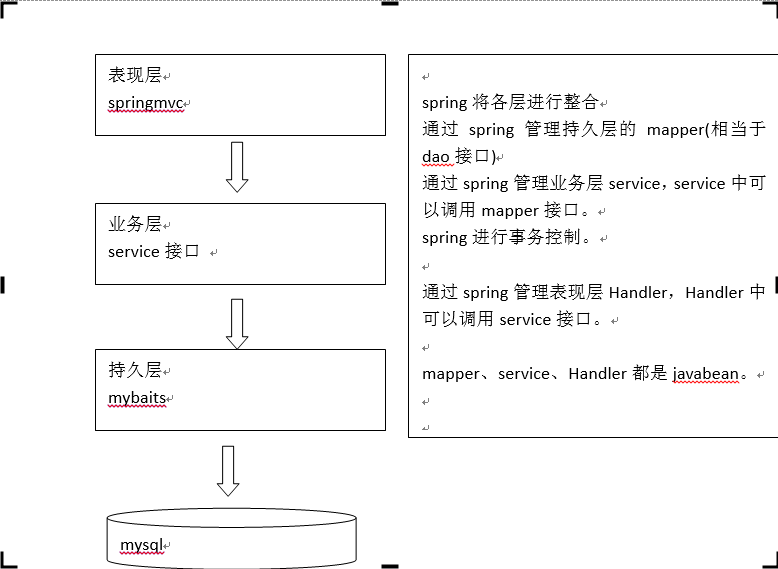
第一步:整合dao层
mybatis和spring整合,通过spring管理mapper接口。
使用mapper的扫描器自动扫描mapper接口在spring中进行注册。
第二步:整合service层
通过spring管理 service接口。
使用配置方式将service接口配置在spring配置文件中。
实现事务控制。
第三步:整合springmvc
由于springmvc是spring的模块,不需要整合。
整合步骤:
一、首先创建Mybatis自己的配置文件(例如:sqlMapConfig.xml)
<?xml version="1.0" encoding="UTF-8" ?>

<!DOCTYPE configuration

PUBLIC "-//mybatis.org//DTD Config 3.0//EN"

"http://mybatis.org/dtd/mybatis-3-config.dtd">

<configuration>

    <!-- 全局setting配置,根据需要添加 -->

    <!-- 配置别名 -->

    <typeAliases>

        <!-- 批量扫描别名 -->

        <package name="cn.itcast.ssm.po"/>

    </typeAliases>

    <!-- 配置mapper

    由于使用spring和mybatis的整合包进行mapper扫描,这里不需要配置了。

    必须遵循:mapper.xml和mapper.java文件同名且在一个目录

     -->

    <!-- <mappers>

    </mappers> -->

</configuration>
tips:使用自动扫描器时,mapper.xml文件如果和mapper.java接口在一个目录则此处不用定义mappers.
二、创建applicationContext-dao.xml文件,用以配置数据源、事务管理,配置SqlSessionFactory、mapper扫描器。
 <beans xmlns="http://www.springframework.org/schema/beans"

     xmlns:xsi="http://www.w3.org/2001/XMLSchema-instance" xmlns:mvc="http://www.springframework.org/schema/mvc"

     xmlns:context="http://www.springframework.org/schema/context"

     xmlns:aop="http://www.springframework.org/schema/aop" xmlns:tx="http://www.springframework.org/schema/tx"

     xsi:schemaLocation="http://www.springframework.org/schema/beans

         http://www.springframework.org/schema/beans/spring-beans-3.2.xsd

         http://www.springframework.org/schema/mvc

         http://www.springframework.org/schema/mvc/spring-mvc-3.2.xsd

         http://www.springframework.org/schema/context

         http://www.springframework.org/schema/context/spring-context-3.2.xsd

         http://www.springframework.org/schema/aop

         http://www.springframework.org/schema/aop/spring-aop-3.2.xsd

         http://www.springframework.org/schema/tx

         http://www.springframework.org/schema/tx/spring-tx-3.2.xsd ">

     <!-- 加载db.properties文件中的内容,db.properties文件中key命名要有一定的特殊规则 -->

     <context:property-placeholder location="classpath:db.properties" />

     <!-- 配置数据源 ,dbcp -->

     <bean id="dataSource" class="org.apache.commons.dbcp.BasicDataSource"

         destroy-method="close">

         <property name="driverClassName" value="${jdbc.driver}" />

         <property name="url" value="${jdbc.url}" />

         <property name="username" value="${jdbc.username}" />

         <property name="password" value="${jdbc.password}" />

         <property name="maxActive" value="30" />

         <property name="maxIdle" value="5" />

     </bean>

     <!-- sqlSessionFactory -->

     <bean id="sqlSessionFactory" class="org.mybatis.spring.SqlSessionFactoryBean">

         <!-- 数据库连接池 -->

         <property name="dataSource" ref="dataSource" />

         <!-- 加载mybatis的全局配置文件 -->

         <property name="configLocation" value="classpath:mybatis/sqlMapConfig.xml" />

     </bean>

     <!-- mapper扫描器 -->

     <bean class="org.mybatis.spring.mapper.MapperScannerConfigurer">

         <!-- 扫描包路径,如果需要扫描多个包,中间使用半角逗号隔开 -->

         <property name="basePackage" value="cn.itcast.ssm.mapper"></property>

         <property name="sqlSessionFactoryBeanName" value="sqlSessionFactory" />

     </bean>

 </beans>
db.properties:
jdbc.driver=com.mysql.jdbc.Driver

jdbc.url=jdbc:mysql://localhost:3306/mybatis

jdbc.username=root

jdbc.password=mysql
tips:使用逆向工程生成po类及mapper(单表增删改查)
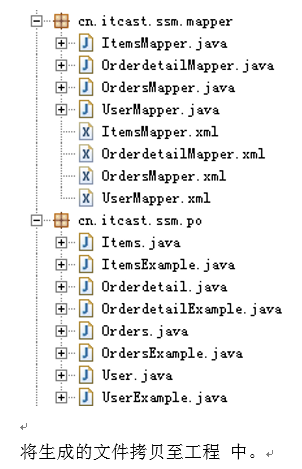
三、手动定义商品查询mapper及商品查询dao接口
ItemsMapperCustom.xml
 <?xml version="1.0" encoding="UTF-8" ?>

 <!DOCTYPE mapper PUBLIC "-//mybatis.org//DTD Mapper 3.0//EN" "http://mybatis.org/dtd/mybatis-3-mapper.dtd" >

 <mapper namespace="cn.itcast.ssm.mapper.ItemsMapperCustom" >

    <!-- 定义商品查询的sql片段,就是商品查询条件 -->

    <sql id="query_items_where">

        <!-- 使用动态sql,通过if判断,满足条件进行sql拼接 -->

        <!-- 商品查询条件通过ItemsQueryVo包装对象 中itemsCustom属性传递 -->

            <if test="itemsCustom!=null">

                <if test="itemsCustom.name!=null and itemsCustom.name!=''">

                    items.name LIKE '%${itemsCustom.name}%'

                </if>

            </if>

    </sql>

       <!-- 商品列表查询 -->

       <!-- parameterType传入包装对象(包装了查询条件)

           resultType建议使用扩展对象

        -->

       <select id="findItemsList" parameterType="cn.itcast.ssm.po.ItemsQueryVo"

            resultType="cn.itcast.ssm.po.ItemsCustom">

           SELECT items.* FROM items

           <where>

               <include refid="query_items_where"></include>

           </where>

       </select>

 </mapper
ItemsMapperCustom.java
 package cn.itcast.ssm.mapper;

 import cn.itcast.ssm.po.Items;

 import cn.itcast.ssm.po.ItemsCustom;

 import cn.itcast.ssm.po.ItemsExample;

 import cn.itcast.ssm.po.ItemsQueryVo;

 import java.util.List;

 import org.apache.ibatis.annotations.Param;

 public interface ItemsMapperCustom {

     //商品查询列表

     public List<ItemsCustom> findItemsList(ItemsQueryVo itemsQueryVo)throws Exception;

 }
四、整合service,让spring管理service接口,进行事务管理配置。
首先,定义Service接口和Service的实现类
 package cn.itcast.ssm.service;

 import java.util.List;

 import cn.itcast.ssm.po.ItemsCustom;

 import cn.itcast.ssm.po.ItemsQueryVo;

 /**

  *

  * <p>Title: ItemsService</p>

  * <p>Description:商品管理service </p>

  * <p>Company: www.itcast.com</p>

  * @author    传智.燕青

  * @date    2015-4-13下午3:48:09

  * @version 1.0

  */

 public interface ItemsService {

     //商品查询列表

     public List<ItemsCustom> findItemsList(ItemsQueryVo itemsQueryVo) throws Exception;

     //根据id查询商品信息

     /**

      *

      * <p>Title: findItemsById</p>

      * <p>Description: </p>

      * @param id 查询商品的id

      * @return

      * @throws Exception

      */

     public ItemsCustom findItemsById(Integer id) throws Exception;

     //修改商品信息

     /**

      *

      * <p>Title: updateItems</p>

      * <p>Description: </p>

      * @param id 修改商品的id

      * @param itemsCustom 修改的商品信息

      * @throws Exception

      */

     public void updateItems(Integer id,ItemsCustom itemsCustom) throws Exception;

 }
 package cn.itcast.ssm.service.impl;

 import java.util.List;

 import org.springframework.beans.BeanUtils;

 import org.springframework.beans.factory.annotation.Autowired;

 import cn.itcast.ssm.mapper.ItemsMapper;

 import cn.itcast.ssm.mapper.ItemsMapperCustom;

 import cn.itcast.ssm.po.Items;

 import cn.itcast.ssm.po.ItemsCustom;

 import cn.itcast.ssm.po.ItemsQueryVo;

 import cn.itcast.ssm.service.ItemsService;

 /**

  *

  * <p>Title: ItemsServiceImpl</p>

  * <p>Description: 商品管理</p>

  * <p>Company: www.itcast.com</p>

  * @author    传智.燕青

  * @date    2015-4-13下午3:49:54

  * @version 1.0

  */

 public class ItemsServiceImpl implements ItemsService{

     @Autowired

     private ItemsMapperCustom itemsMapperCustom;

     @Autowired

     private ItemsMapper itemsMapper;

     @Override

     public List<ItemsCustom> findItemsList(ItemsQueryVo itemsQueryVo)

             throws Exception {

         //通过ItemsMapperCustom查询数据库

         return itemsMapperCustom.findItemsList(itemsQueryVo);

     }

     @Override

     public ItemsCustom findItemsById(Integer id) throws Exception {

         Items items = itemsMapper.selectByPrimaryKey(id);

         //中间对商品信息进行业务处理

         //....

         //返回ItemsCustom

         ItemsCustom itemsCustom = new ItemsCustom();

         //将items的属性值拷贝到itemsCustom

         BeanUtils.copyProperties(items, itemsCustom);

         return itemsCustom;

     }

     @Override

     public void updateItems(Integer id, ItemsCustom itemsCustom) throws Exception {

         //添加业务校验,通常在service接口对关键参数进行校验

         //校验 id是否为空,如果为空抛出异常

         //更新商品信息使用updateByPrimaryKeyWithBLOBs根据id更新items表中所有字段,包括 大文本类型字段

         //updateByPrimaryKeyWithBLOBs要求必须转入id

         itemsCustom.setId(id);

         itemsMapper.updateByPrimaryKeyWithBLOBs(itemsCustom);

     }

 }
然后,在spring容器配置service(applicationContext-service.xml)
 <bean id="itemsService" class="cn.itcast.ssm.service.impl.ItemsServiceImpl"/>

 </beans>
配置事务控制,applicationContext-transcation.xml
 <beans xmlns="http://www.springframework.org/schema/beans"

     xmlns:xsi="http://www.w3.org/2001/XMLSchema-instance" xmlns:mvc="http://www.springframework.org/schema/mvc"

     xmlns:context="http://www.springframework.org/schema/context"

     xmlns:aop="http://www.springframework.org/schema/aop" xmlns:tx="http://www.springframework.org/schema/tx"

     xsi:schemaLocation="http://www.springframework.org/schema/beans

         http://www.springframework.org/schema/beans/spring-beans-3.2.xsd

         http://www.springframework.org/schema/mvc

         http://www.springframework.org/schema/mvc/spring-mvc-3.2.xsd

         http://www.springframework.org/schema/context

         http://www.springframework.org/schema/context/spring-context-3.2.xsd

         http://www.springframework.org/schema/aop

         http://www.springframework.org/schema/aop/spring-aop-3.2.xsd

         http://www.springframework.org/schema/tx

         http://www.springframework.org/schema/tx/spring-tx-3.2.xsd ">

 <!-- 事务管理器

     对mybatis操作数据库事务控制,spring使用jdbc的事务控制类

 -->

 <bean id="transactionManager" class="org.springframework.jdbc.datasource.DataSourceTransactionManager">

     <!-- 数据源

     dataSource在applicationContext-dao.xml中配置了

      -->

     <property name="dataSource" ref="dataSource"/>

 </bean>

 <!-- 通知 -->

 <tx:advice id="txAdvice" transaction-manager="transactionManager">

     <tx:attributes>

         <!-- 传播行为 -->

         <tx:method name="save*" propagation="REQUIRED"/>

         <tx:method name="delete*" propagation="REQUIRED"/>

         <tx:method name="insert*" propagation="REQUIRED"/>

         <tx:method name="update*" propagation="REQUIRED"/>

         <tx:method name="find*" propagation="SUPPORTS" read-only="true"/>

         <tx:method name="get*" propagation="SUPPORTS" read-only="true"/>

         <tx:method name="select*" propagation="SUPPORTS" read-only="true"/>

     </tx:attributes>

 </tx:advice>

 <!-- aop -->

 <aop:config>

     <aop:advisor advice-ref="txAdvice" pointcut="execution(* cn.itcast.ssm.service.impl.*.*(..))"/>

 </aop:config>

 </beans>
五、配置springmvc.xml文件
 <beans xmlns="http://www.springframework.org/schema/beans"

     xmlns:xsi="http://www.w3.org/2001/XMLSchema-instance" xmlns:mvc="http://www.springframework.org/schema/mvc"

     xmlns:context="http://www.springframework.org/schema/context"

     xmlns:aop="http://www.springframework.org/schema/aop" xmlns:tx="http://www.springframework.org/schema/tx"

     xsi:schemaLocation="http://www.springframework.org/schema/beans

         http://www.springframework.org/schema/beans/spring-beans-3.2.xsd

         http://www.springframework.org/schema/mvc

         http://www.springframework.org/schema/mvc/spring-mvc-3.2.xsd

         http://www.springframework.org/schema/context

         http://www.springframework.org/schema/context/spring-context-3.2.xsd

         http://www.springframework.org/schema/aop

         http://www.springframework.org/schema/aop/spring-aop-3.2.xsd

         http://www.springframework.org/schema/tx

         http://www.springframework.org/schema/tx/spring-tx-3.2.xsd ">

     <!-- 可以扫描controller、service、...

     这里让扫描controller,指定controller的包

      -->

     <context:component-scan base-package="cn.itcast.ssm.controller"></context:component-scan>

     <!--注解映射器 -->

     <!-- <bean class="org.springframework.web.servlet.mvc.method.annotation.RequestMappingHandlerMapping"/> -->

     <!--注解适配器 -->

     <!-- <bean class="org.springframework.web.servlet.mvc.method.annotation.RequestMappingHandlerAdapter"/> -->

     <!-- 使用 mvc:annotation-driven代替上边注解映射器和注解适配器配置

     mvc:annotation-driven默认加载很多的参数绑定方法,

     比如json转换解析器就默认加载了,如果使用mvc:annotation-driven不用配置上边的RequestMappingHandlerMapping和RequestMappingHandlerAdapter

     实际开发时使用mvc:annotation-driven

      -->

     <mvc:annotation-driven conversion-service="conversionService"></mvc:annotation-driven>

     <!-- 视图解析器

     解析jsp解析,默认使用jstl标签,classpath下的得有jstl的包

      -->

     <bean

         class="org.springframework.web.servlet.view.InternalResourceViewResolver">

         <!-- 配置jsp路径的前缀 -->

         <property name="prefix" value="/WEB-INF/jsp/"/>

         <!-- 配置jsp路径的后缀 -->

         <property name="suffix" value=".jsp"/>

     </bean>

     <!-- 自定义参数绑定 -->

     <bean id="conversionService" class="org.springframework.format.support.FormattingConversionServiceFactoryBean">

         <!-- 转换器 -->

         <property name="converters">

             <list>

                 <!-- 日期类型转换 -->

                 <bean class="cn.itcast.ssm.controller.converter.CustomDateConverter"/>

             </list>

         </property>

     </bean>

 </beans>
六、编写controller
 @RequestMapping("/items")

 public class ItemsController {

     @Autowired

     private ItemsService itemsService;

     // 商品查询

     @RequestMapping("/queryItems")

     public ModelAndView queryItems(HttpServletRequest request) throws Exception {

         //测试forward后request是否可以共享

         System.out.println(request.getParameter("id"));

         // 调用service查找 数据库,查询商品列表

         List<ItemsCustom> itemsList = itemsService.findItemsList(null);

         // 返回ModelAndView

         ModelAndView modelAndView = new ModelAndView();

         // 相当 于request的setAttribut,在jsp页面中通过itemsList取数据

         modelAndView.addObject("itemsList", itemsList);

         // 指定视图

         // 下边的路径,如果在视图解析器中配置jsp路径的前缀和jsp路径的后缀,修改为

         // modelAndView.setViewName("/WEB-INF/jsp/items/itemsList.jsp");

         // 上边的路径配置可以不在程序中指定jsp路径的前缀和jsp路径的后缀

         modelAndView.setViewName("items/itemsList");

         return modelAndView;

     }

 }
七、编写JSP页面(省略...)
八、加载spring容器
在web.xml文件中进行如下配置
 <?xml version="1.0" encoding="UTF-8"?>

 <web-app xmlns:xsi="http://www.w3.org/2001/XMLSchema-instance"

     xmlns="http://java.sun.com/xml/ns/javaee" xmlns:web="http://java.sun.com/xml/ns/javaee/web-app_2_5.xsd"

     xsi:schemaLocation="http://java.sun.com/xml/ns/javaee http://java.sun.com/xml/ns/javaee/web-app_2_5.xsd"

     id="WebApp_ID" version="2.5">

     <display-name>springmvc_mybatis1208</display-name>

     <!-- 加载spring容器 -->

     <context-param>

         <param-name>contextConfigLocation</param-name>

         <param-value>/WEB-INF/classes/spring/applicationContext-*.xml</param-value>

     </context-param>

     <listener>

         <listener-class>org.springframework.web.context.ContextLoaderListener</listener-class>

     </listener>

     <!-- springmvc前端控制器 -->

     <servlet>

         <servlet-name>springmvc</servlet-name>

         <servlet-class>org.springframework.web.servlet.DispatcherServlet</servlet-class>

         <!-- contextConfigLocation配置springmvc加载的配置文件(配置处理器映射器、适配器等等) 如果不配置contextConfigLocation,默认加载的是/WEB-INF/servlet名称-serlvet.xml(springmvc-servlet.xml) -->

         <init-param>

             <param-name>contextConfigLocation</param-name>

             <param-value>classpath:spring/springmvc.xml</param-value>

         </init-param>

     </servlet>

     <servlet-mapping>

         <servlet-name>springmvc</servlet-name>

         <!-- 第一种:*.action,访问以.action结尾 由DispatcherServlet进行解析 第二种:/,所以访问的地址都由DispatcherServlet进行解析,对于静态文件的解析需要配置不让DispatcherServlet进行解析

             使用此种方式可以实现 RESTful风格的url 第三种:/*,这样配置不对,使用这种配置,最终要转发到一个jsp页面时, 仍然会由DispatcherServlet解析jsp地址,不能根据jsp页面找到handler,会报错。 -->

         <url-pattern>*.action</url-pattern>

     </servlet-mapping>

     <!-- post乱码过虑器 -->

     <filter>

         <filter-name>CharacterEncodingFilter</filter-name>

         <filter-class>org.springframework.web.filter.CharacterEncodingFilter</filter-class>

         <init-param>

             <param-name>encoding</param-name>

             <param-value>utf-8</param-value>

         </init-param>

     </filter>

     <filter-mapping>

         <filter-name>CharacterEncodingFilter</filter-name>

         <url-pattern>/*</url-pattern>

     </filter-mapping>

     <welcome-file-list>

         <welcome-file>index.html</welcome-file>

         <welcome-file>index.htm</welcome-file>

         <welcome-file>index.jsp</welcome-file>

         <welcome-file>default.html</welcome-file>

         <welcome-file>default.htm</welcome-file>

         <welcome-file>default.jsp</welcome-file>

     </welcome-file-list>

 </web-app>
SpringMVC与MyBatis整合方法的更多相关文章
- 3.springMVC+spring+Mybatis整合Demo(单表的增删该查,这里主要是贴代码,不多解释了)
前面给大家讲了整合的思路和整合的过程,在这里就不在提了,直接把springMVC+spring+Mybatis整合的实例代码(单表的增删改查)贴给大家: 首先是目录结构: 仔细看看这个目录结构:我不详 ...
- SpringMVC与mybatis整合
一.逆向工程生成基础信息 <?xml version="1.0" encoding="UTF-8"?> <!DOCTYPE generator ...
- SpringMVC学习记录三——8 springmvc和mybatis整合
8 springmvc和mybatis整合 8.1 需求 使用springmvc和mybatis完成商品列表查询. 8.2 整合思路 springmvc+mybaits的 ...
- SpringMvc基础知识(二) springmvc和mybatis整合
1 springmvc和mybatis整合 1.1 需求 使用springmvc和mybatis完成商品列表查询. 1.2 整合思路 springmvc+mybaits的系统架构: 第一步:整合dao ...
- SpringMVC与MyBatis整合之日期格式转换
在上一篇博客<SpringMVC与MyBatis整合(一)——查询人员列表>中遗留了日期格式转换的问题,在这篇记录解决过程. 对于controller形参中pojo对象,如果属性中有日期类 ...
- SpringMVC+Spring+Mybatis整合
SpringMVC+Spring+Mybatis整合 导包 配置jdbc.properties.log4j.properties jdbc.driver=com.mysql.jdbc.Driver j ...
- Springmvc+Spring+Mybatis整合开发(架构搭建)
Springmvc+Spring+Mybatis整合开发(架构搭建) 0.项目结构 Springmvc:web层 Spring:对象的容器 Mybatis:数据库持久化操作 1.导入所有需要的jar包 ...
- SpringMVC和MyBatis整合
目前主流的Web MVC框架,除了Struts这个主力 外,还有Spring MVC,主要是由于Spring MVC配置比较简单,使用起来也十分明了,非常灵活,与Spring 集成较好,对RESTfu ...
- SpringMVC与MyBatis整合(一)——查询人员列表
从今天开始,一点点的记录做毕设和学习的过程. 寒假才开始接触SpringMVC和MyBatis,之前对框架的概念理解并不到位,也没学过Spring.目前学习起来思路并不很清晰,有些东西我还不能理解,只 ...
随机推荐
- 纯CSS实现移动端常见布局——高度和宽度挂钩的秘密
纯CSS实现移动端常见布局--高度和宽度挂钩的秘密 不踩坑不回头.之前我在一个项目中大量使用css3的calc计算属性.写代码的时候真心不要太爽啊-可是在项目上线之后,才让我崩溃了,原因非常easy, ...
- 放大的X(杭电2565)
/*放大的X 请你编程画一个放大的'X'. Input 输入数据第一行是一个整数T,表示有T组測试数据: 接下来有T行,每行有一个正奇数n(3 <= n <= 79).表示放大的规格. O ...
- 阿里大数据比赛sesson2_RF&GBRT(下)
-----------__-----------接上文---------__---------- 2.Xlab RF上手 2.1.训练特征表准备 训练的特征表gbrt_offline_section_ ...
- GammaRay观察Qt程序的运行状况
GammaRay是KDAB开发的Qt应用程序的软件内省工具.利用QObject内省机制,它允许您在运行时观察和操作应用程序.这既可以在工作站本地使用,也可以在嵌入式目标上远程使用. 通过扩充指令级调试 ...
- Java异常&&RuntimeException异常
Java异常可分为3种: (1)编译时异常:Java.lang.Exception (2)运行期异常:Java.lang.RuntimeException (3)错误:Java.lang.Error ...
- java线程异常处理方法
工作中常发现有些程序发生异常但却没有错误日志,原因就是一些开发线程异常处理错误,导致程序报错但异常信息打印到堆栈上,不好在生产环境中定位问题. 在java多线程程序中,所有线程都不允许抛出未捕获的ch ...
- Kernel trick----PRML读书笔记
Many linear parametric models can be re-cast into an equivalent 'dual representstion' in which the p ...
- 61.员工信息管理Extjs 页面
1.员工信息管理jsp <%@ page language="java" pageEncoding="UTF-8"%> <script typ ...
- 小HY的四元组
4.7 比赛T1,然而这题爆零了 其实很简单的...其实哈希都不用 所以首先记录每组的差值,按其sort一下再暴力找即可 #include<cstdio> #include<iost ...
- P2068 统计和
P2068 统计和 这题真的非常水了 如果不会 右转[模板]树状数组 2 基本上是一模一样的 #include <bits/stdc++.h> #define lowbit(x) x&am ...