2、Android-UI(布局待完成)
2.3、布局
实现界面的整齐摆放各种控件需要使用布局来完成
布局是一种可用于放置很多控件的容器
可以按照一定的规律调整内部的控件位置
布局的内部不仅可以放置控件还可以放置布局

1、线性布局
LinearLayout又称线性布局,是一种常常用到的布局
会将所包含的控件再线性方向上一次排列
垂直方向上排列的
之前的代码种排列都是垂直排列
是因为再android:orientation属性制指定了排列的方向上vertical
如果指定:horizontal控件就会在水平方向上进行排列
默认不指定就是水平方向horizontal
如果使用horizontal则内部的控件宽度就不能指定为match_parent单独一个控件就会占用水平方向
<?xml version="1.0" encoding="utf-8"?>

<LinearLayout xmlns:android="http://schemas.android.com/apk/res/android"

    android:orientation="horizontal"

    android:layout_width="match_parent"

    android:layout_height="match_parent">

    <Button

        android:layout_width="wrap_content"

        android:layout_height="wrap_content"

        android:id="@+id/button_first"

        android:textAllCaps="false"

        android:text="to first"/>

    <Button

        android:layout_width="wrap_content"

        android:layout_height="wrap_content"

        android:id="@+id/button_second"

        android:text="to second"/>

</LinearLayout>
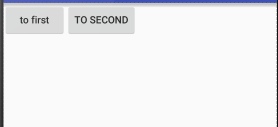
android:layout_gravity:
用于指定控件再布局中的对其方式,取值和android:gravity差不多
注意:
当LinerLayout的排列方向是horizontal是,只有垂直方向上的对齐方式才会生效,因为此水平方向上的对齐方式长度是不固定的
没添加一个控件、水平方向的长度都会改变,因而无法指定该方向上的对齐方式
即:水平---垂直生效 垂直---水平生效
<?xml version="1.0" encoding="utf-8"?>

<LinearLayout xmlns:android="http://schemas.android.com/apk/res/android"

    android:orientation="horizontal"

    android:layout_width="match_parent"

    android:layout_height="match_parent">

    <Button

        android:layout_width="wrap_content"

        android:layout_height="wrap_content"

        android:id="@+id/button_first"

        android:textAllCaps="false"

        android:text="to first"

        android:layout_gravity="top"

        />

    <Button

    android:layout_width="wrap_content"

    android:layout_height="wrap_content"

    android:id="@+id/button_second"

        android:layout_gravity="center"

    android:text="to second"/>
</LinerLayout>
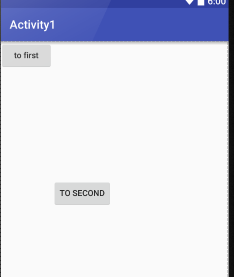
结果如下图:
LinerLayout是水平方向的
我们只能指定垂直方向上的排列方向
android:layout_weight:
允许开发者使用比列方式来指定控件的大小
再手机适配方面可以起到非常重要的作用
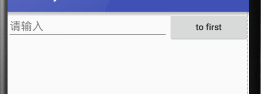
<EditText
    android:id="@+id/edit_test1"
   android:layout_weight="2"
    android:hint="请输入"
    android:layout_width="0dp"
    android:layout_height="wrap_content" />

<Button
    android:layout_width="0dp"
    android:layout_weight="1"
    android:layout_height="wrap_content"
    android:id="@+id/button_first"
    android:textAllCaps="false"
    android:text="to first"
    android:layout_gravity="top"
    />
这里的EditView和Button的宽度都设置成了0dp
再设置android:layout_weight属性,此时的控件不再由android:width指定
这里设置成0dp是一种规范化的写法
dp是Android种用于指定控件大小、间距等属性的单位
这里也会根据android:layout_weight的值来等分屏幕的宽度
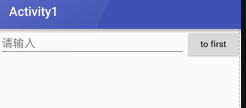
原理:
LinerLayout下所有指定的layout_wight的值相加
再根据每个控件的值进行求比例
    <EditText

        android:id="@+id/edit_test1"

       android:layout_weight="2"

        android:hint="请输入"

        android:layout_width="0dp"

        android:layout_height="wrap_content" />

    <Button

        android:layout_width="wrap_content"

        android:layout_height="wrap_content"

        android:id="@+id/button_first"

        android:textAllCaps="false"

        android:text="to first"

        android:layout_gravity="top"

        />
此时只有EditText种执行属性
Button的属性设置为刚好包裹住元素
EditText会沾满被Button使用之后的屏幕空间
2、相对布局
RelativeLayout又称为相对布局
可以通过相对定位的方式让控件出现在任何位置
新建布局文件

<?xml version="1.0" encoding="utf-8"?>

<RelativeLayout xmlns:android="http://schemas.android.com/apk/res/android"

    android:layout_width="match_parent"

    android:layout_height="match_parent">

    <Button

        android:text="btn1"

        android:layout_width="wrap_content"

        android:layout_height="wrap_content"

        android:layout_alignParentLeft="true"

        android:layout_alignParentTop="true"/>

    <Button

        android:text="btn2"

        android:layout_width="wrap_content"

        android:layout_height="wrap_content"

        android:layout_alignParentRight="true"

        android:layout_alignParentTop="true"/>

    <Button

        android:text="btn3"

        android:layout_width="wrap_content"

        android:layout_height="wrap_content"

        android:layout_centerInParent="true"/>

    <Button

        android:text="btn4"

        android:layout_width="wrap_content"

        android:layout_height="wrap_content"

        android:layout_alignParentLeft="true"

        android:layout_alignParentBottom="true"/>

    <Button

        android:text="btn5"

        android:layout_width="wrap_content"

        android:layout_height="wrap_content"

        android:layout_alignParentRight="true"

        android:layout_alignParentBottom="true"/>

</RelativeLayout>
效果:

这里使用到如下的属性进行布局设置
android:layout_alignParentLeft:和父布局的左对齐
android:layout_alignParentTop:和父布局的上对齐
android:layout_alignParentRight:和父布局的右对齐
android:layout_alignParentBottom:和父布局的下对齐
android:layout_centerInParent:和父布局的居中显示
相对于父布局来说
之前的都是相对于父布局进行定位的
还可以相对控件进行定位
将代码进行修改:
<?xml version="1.0" encoding="utf-8"?>

<RelativeLayout xmlns:android="http://schemas.android.com/apk/res/android"

    android:layout_width="match_parent"

    android:layout_height="match_parent">

    <Button

        android:text="btn1"

        android:layout_width="wrap_content"

        android:layout_height="wrap_content"

        android:layout_above="@+id/btn3"

        android:layout_toLeftOf="@+id/btn3"

        android:id="@+id/btn1"/>

    <Button

        android:text="btn2"

        android:layout_width="wrap_content"

        android:layout_height="wrap_content"

        android:layout_above="@+id/btn3"

        android:layout_toRightOf="@+id/btn3"

        android:id="@+id/btn2"/>

    <Button

        android:text="btn3"

        android:layout_width="wrap_content"

        android:layout_height="wrap_content"

        android:layout_centerInParent="true"

        android:id="@+id/btn3"/>

    <Button

        android:text="btn4"

        android:layout_width="wrap_content"

        android:layout_height="wrap_content"

        android:layout_below="@+id/btn3"

        android:layout_toLeftOf="@+id/btn3"

        android:id="@+id/btn4"/>

    <Button

        android:text="btn5"

        android:layout_width="wrap_content"

        android:layout_height="wrap_content"

        android:layout_below="@+id/btn3"

        android:layout_toRightOf="@+id/btn3"

        android:id="@+id/btn5"/>

</RelativeLayout>
效果:
这里使用到的属性:
android:layout_above:让一个控件位于一个控件的上方
android:layout_below:让一个控件位于一个控件的下方
android:layout_toLeftOf:让一个控件位于一个控件的左侧
android:layout_toRightOf:让一个控件位于一个控件的右侧
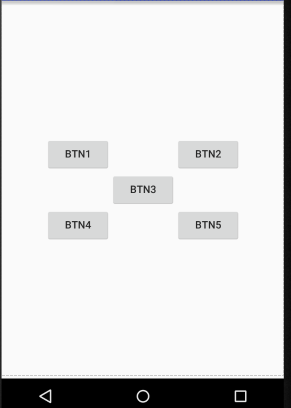
再次使用属性:
<?xml version="1.0" encoding="utf-8"?>
<RelativeLayout xmlns:android="http://schemas.android.com/apk/res/android"
    android:layout_width="match_parent"
    android:layout_height="match_parent">

    <Button
        android:text="btn1"
        android:layout_width="wrap_content"
        android:layout_height="wrap_content"
        android:layout_above="@+id/btn3"
        android:layout_alignLeft="@+id/btn3"
        android:id="@+id/btn1"/>
    <Button
        android:text="btn2"
        android:layout_width="wrap_content"
        android:layout_height="wrap_content"
        android:layout_above="@+id/btn3"
        android:layout_toRightOf="@+id/btn3"
        android:id="@+id/btn2"/>
    <Button
        android:text="btn3"
        android:layout_width="wrap_content"
        android:layout_height="wrap_content"
        android:layout_centerInParent="true"
        android:id="@+id/btn3"/>
    <Button
        android:text="btn4"
        android:layout_width="wrap_content"
        android:layout_height="wrap_content"
        android:layout_below="@+id/btn3"
        android:layout_toLeftOf="@+id/btn3"
        android:id="@+id/btn4"/>
    <Button
        android:text="btn5"
        android:layout_width="wrap_content"
        android:layout_height="wrap_content"
        android:layout_below="@+id/btn3"
        android:layout_alignRight="@+id/btn3"
        android:id="@+id/btn5"/>

</RelativeLayout>
这里使用到如下属性:
android:layout_alignLeft:让一个控件的左边缘和零一控件的左边缘对齐(该控件默认位于父布局的上边)
android:layout_alignRight让一个控件的右边缘和另一控件的右边缘对齐(该控件默认位于父布局的上边)
同时还可以使用layout_alignTop和layout_alignBottom

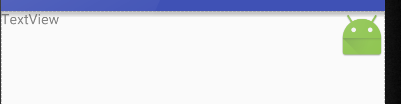
3、帧布局(FrameLayout )
FrameLayout成为帧布局
应用的场景也相对比较少
所有的控件都默认摆放在布局的左上角
都会从左上角开始进行占用空间
新建文件:

<?xml version="1.0" encoding="utf-8"?>

<FrameLayout xmlns:android="http://schemas.android.com/apk/res/android"

    android:layout_width="match_parent"

    android:layout_height="match_parent">

    <TextView

        android:text="TextView"

        android:layout_width="wrap_content"

        android:layout_height="wrap_content"

        android:id="@+id/text_view"/>

    <ImageView

        android:id="@+id/image_view"

        android:layout_width="wrap_content"

        android:layout_height="wrap_content"

        android:src="@mipmap/ic_launcher"/>

</FrameLayout>
效果:

当没有准备图片资源时,可以使用下方的代码进行引用
android:src="@mipmap/ic_launcher"
上述的使用场景比较小,但是可以使用的
效果种可以发现 :
ImageView是在TextView之后添加的
但是此时的图片压在文字的上面
还可以进行修改布局中的对齐方式使用:android:gravity属性
<?xml version="1.0" encoding="utf-8"?>

<FrameLayout xmlns:android="http://schemas.android.com/apk/res/android"

    android:layout_width="match_parent"

    android:layout_height="match_parent">

    <TextView

        android:text="TextView"

        android:layout_width="wrap_content"

        android:layout_height="wrap_content"

        android:id="@+id/text_view"

        android:layout_gravity="left"/>

    <ImageView

        android:id="@+id/image_view"

        android:layout_width="wrap_content"

        android:layout_height="wrap_content"

        android:src="@mipmap/ic_launcher"

        android:layout_gravity="right"/>

</FrameLayout>
效果:
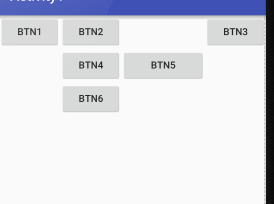
4、表格布局(TableLayout)
遇到排列整齐的情况就可以使用表格布局进行排列
可以使布局排列整齐
TableLayout的属性:
android:collapseColumns:设置需要被隐藏的列的序号
android:shrinkColumns:设置允许被收缩的列的列序号
android:stretchColumns:设置运行被拉伸的列的列序号
以上这三个属性的列号都是从0开始算的,比如shrinkColunmns = "2",对应的是第三列!
android:layout_column="2":表示的就是跳过第二个,直接显示到第三个格子处,从1开始算的!
android:layout_span="4":表示合并4个单元格,也就说这个组件占4个单元格
<?xml version="1.0" encoding="utf-8"?>

<TableLayout xmlns:android="http://schemas.android.com/apk/res/android"

    android:layout_width="match_parent"

    android:layout_height="match_parent"

    android:stretchColumns="">

    <TableRow>

        <Button

            android:layout_width="wrap_content"

            android:layout_height="wrap_content"

            android:layout_column="0"

            android:text="btn1"/>

        <Button

            android:layout_width="wrap_content"

            android:layout_height="wrap_content"

            android:layout_column="1"

            android:text="btn2"/>

        <Button

            android:layout_width="wrap_content"

            android:layout_height="wrap_content"

            android:layout_column="3"

            android:text="btn3"/>

    </TableRow>

    <TableRow>

        <Button

            android:layout_width="wrap_content"

            android:layout_height="wrap_content"

            android:layout_column="1"

            android:text="btn4"/>

        <Button

            android:layout_width="wrap_content"

            android:layout_height="wrap_content"

            android:layout_column="2"

            android:text="btn5"/>

    </TableRow>

    <TableRow>

        <Button

            android:layout_width="wrap_content"

            android:layout_height="wrap_content"

            android:layout_column="2"

            android:text="btn6"/>

    </TableRow>

</TableLayout>
效果:
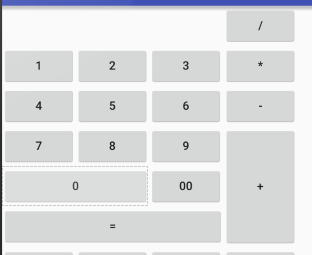
5、网格布局GridLayout
作为android 4.0 后新增的一个布局
①跟LinearLayout(线性布局)一样,他可以设置容器中组件的对齐方式
②容器中的组件可以跨多行也可以跨多列(相比TableLayout直接放组件,占一行相比较)
常用属性:
设置组件的排列方式: android:orientation=""
设置组件的对齐方式: android:layout_gravity=""
设置网格布局的行列:
设置有多少行:android:rowCount="4" //设置网格布局有4行
设置有多少列:android:columnCount="4" //设置网格布局有4列
设置控件再几行几列(都是从0开始算)
组件在第几行:android:layout_row = "2" //设置组件位于第3行
组件在第几列:android:layout_column = "2" //设置该组件位于第3列
设置组件横向/纵向占几行几列
横跨几行:android:layout_rowSpan = "2" //纵向横跨2行
横跨几列:android:layout_columnSpan = "3" //横向横跨3列
<?xml version="1.0" encoding="utf-8"?>

<GridLayout xmlns:android="http://schemas.android.com/apk/res/android"

    android:layout_width="match_parent"

    android:layout_height="match_parent"

    android:columnCount=""

    android:orientation="horizontal"

    >

    <Button

        android:layout_column=""

        android:text="/"/>

    <Button

        android:text=""/>

    <Button

        android:text=""/>

    <Button

        android:text=""/>

    <Button

        android:text="*"/>

    <Button

        android:text=""/>

    <Button

        android:text=""/>

    <Button

        android:text=""/>

    <Button

        android:text="-"

        android:id="@+id/btn_sub"/>

    <Button

        android:text=""/>

    <Button

        android:text=""/>

    <Button

        android:text=""/>

    <Button

        android:layout_rowSpan=""

        android:layout_width="wrap_content"

        android:layout_height="145dp"

        android:text="+"/>

    <Button

        android:text=""

        android:layout_gravity="fill"

        android:layout_columnSpan=""/>

    <Button

        android:text=""/>

    <Button

        android:text="="

        android:layout_columnSpan=""

        android:layout_height="wrap_content"

        android:layout_width="265dp"/>

</GridLayout>
6、绝对布局(AbsoluteLayout)
通过指定x、y的坐标来控制组件再布局种的位置
<?xml version="1.0" encoding="utf-8"?>

<AbsoluteLayout xmlns:android="http://schemas.android.com/apk/res/android"

    android:layout_width="match_parent" android:layout_height="match_parent">

    <Button

        android:text=""

        android:layout_x="40dp"

        android:layout_y="40dp"

        android:layout_width="wrap_content"

        android:layout_height="wrap_content" />

</AbsoluteLayout>

极少使用此布局
7、百分比布局
前三张布局种只有LinerLayout支持使用layout_weigh属性来指定按比例指定控件大小功能
其余两种不支持
如果使用RelativeLayout来实现两个按钮评分布局的宽度效果是比较困难的
Android引入一种百分比布局来解决这个问题
再这个布局中可以不使用warp_content、match_parent来指定控件的大小
允许直接指定控件再布局中所占的百分比实现
再FrameLayout、RalativeLayout种进行功能的扩展
提供了PercentFrameLayout、PercentRelativeLayout
待完成(............)
2、Android-UI(布局待完成)的更多相关文章
- Android UI -- 布局介绍(布局包括FrameLayout, LinearLayout, RelativeLayout, GridLayout)
首先介绍常用布局类 FrameLayout 最简单的布局管理器. 这个布局管理类有几个特性: 添加组件默认在左上角的. 如果添加多个组件会叠加到一起,并且都在左上角.(可以通过一gravity属性改变 ...
- 让我们创建屏幕- Android UI布局和控件
下载LifeCycleTest.zip - 278.9 KB 下载ViewAndLayoutLessons_-_Base.zip - 1.2 MB 下载ViewAndLayoutLessons_-_C ...
- Android UI布局之FrameLayout
一个FrameLayout对象就好比一块屏幕上提前预定好的空白区域.然后能够填充一些元素到里边.例如说一张图片等.须要注意的是,全部的元素都被放置在FrameLayout区域最左边上的区域.并且无法为 ...
- Android UI布局TableLayout
了解字面上TableLayout一个表格样式布局.这种布局将包括以行和列的形式的元件被布置.表格列的数目是列的各行中的最大数目.当然,表格里面的单元格它能够清空. 实例:LayoutDemo 执行效果 ...
- Android UI布局之RelativeLayout
RelativeLayout是一个相对布局类. 首先RelativeLayout是一个容器,它里边的元素,如Buttonbutton等的位置是依照相对位置来计算的,比如,有两个Buttonbutton ...
- Android UI布局之LinearLayout
LinearLayout是Android中最经常使用的布局之中的一个.它将自己包括的子元素依照一个方向进行排列.方向有两种,水平或者竖直.这个方向能够通过设置android:orientation=& ...
- Android -- UI布局管理,相对布局,线性布局,表格布局,绝对布局,帧布局
1. 相对布局 <RelativeLayout xmlns:android="http://schemas.android.com/apk/res/android" xmln ...
- Android UI布局之TableLayout
从字面上了解TableLayout是一种表格式的布局.这样的布局会把包括的元素以行和列的形式进行排列.表格的列数为每一行的最大列数.当然表格里边的单元格是能够为空的. 实例:LayoutDemo 执行 ...
- android UI布局
一.设置反复背景 在drawable目录下建一个mybackground.xml文件 在文件里写入: <?xml version="1.0" encoding="u ...
- AndroidのUI布局之layout weight
<?xml version="1.0" encoding="utf-8"?> <LinearLayout xmlns:android=&quo ...
随机推荐
- 使用Docker镜像部署ELK日志系统
使用Docker部署elasticsearch.logstash.kibana 指定版本:6.7.1 (建议使用同一的版本.屏蔽三个软件间的不兼容性) 下载镜像: docker pull elasti ...
- nodejs使用sequelize操作mysql实例
sequelize是node操作mysql的一款npm包,包含很多特性:数据库模型映射.事务处理.模型属性校验.关联映射等,花了两天时间学习了下基本的一些操作,特别是关联映射部分的操作,包含1:1.1 ...
- 给<input>文本框添加灰色提示文字
value="你的提示文字" onFocus="if(value==defaultValue){value='';this.style.color='#000'}&quo ...
- 传统的MapReduce框架慢在那里
为什么之前的MapReduce系统比较慢 常理上有几个理由使得MapReduce框架慢于MPP数据库: 容错所引入的昂贵数据实体化(data materialization)开销. 孱弱的数据布局(d ...
- 深入辨析jvm内存区域
Java内存区域 Java虚拟机在执行Java程序的过程中会把它所管理的内存划分为若干个不同的数据区域: 程序计数器.虚拟机栈.本地方法栈.Java堆.方法区(运行时常量池).直接内存 程序计数器 当 ...
- java web工程web.xml介绍
转载自:http://blog.csdn.net/believejava/article/details/43229361 Web.xml详解: 1.web.xml加载过程(步骤) 首先简单讲一下,w ...
- 非法关闭idea后报错,插件无法正常加载解决方法
Problems found loading plugins: Plugin "GlassFish Integration" was not loaded: required pl ...
- grpc的数据包监控
CommView是一个专门为网络管理员,安全专家,网络程序员,以及任何想要全面了解一台个人电脑或一个网段中的网络通信量的用户设计的强大的网络监控器和分析器,不过它支持Win系统. 我这里用的 Comm ...
- zoj 1048
这道题提醒了我一个问题,怎么在while(cin>>a[i])下中断 #include<iostream> #include<cmath> #include< ...
- OI中的一些模板
线性筛 #include"cstdio" #include"cstring" #include"iostream" #include&quo ...