2、Android-UI(布局待完成)
2.3、布局
实现界面的整齐摆放各种控件需要使用布局来完成
布局是一种可用于放置很多控件的容器
可以按照一定的规律调整内部的控件位置
布局的内部不仅可以放置控件还可以放置布局

1、线性布局
LinearLayout又称线性布局,是一种常常用到的布局
会将所包含的控件再线性方向上一次排列
垂直方向上排列的
之前的代码种排列都是垂直排列
是因为再android:orientation属性制指定了排列的方向上vertical
如果指定:horizontal控件就会在水平方向上进行排列
默认不指定就是水平方向horizontal
如果使用horizontal则内部的控件宽度就不能指定为match_parent单独一个控件就会占用水平方向
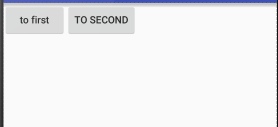
<?xml version="1.0" encoding="utf-8"?>

<LinearLayout xmlns:android="http://schemas.android.com/apk/res/android"

    android:orientation="horizontal"

    android:layout_width="match_parent"

    android:layout_height="match_parent">

    <Button

        android:layout_width="wrap_content"

        android:layout_height="wrap_content"

        android:id="@+id/button_first"

        android:textAllCaps="false"

        android:text="to first"/>

    <Button

        android:layout_width="wrap_content"

        android:layout_height="wrap_content"

        android:id="@+id/button_second"

        android:text="to second"/>

</LinearLayout>
android:layout_gravity:
用于指定控件再布局中的对其方式,取值和android:gravity差不多
注意:
当LinerLayout的排列方向是horizontal是,只有垂直方向上的对齐方式才会生效,因为此水平方向上的对齐方式长度是不固定的
没添加一个控件、水平方向的长度都会改变,因而无法指定该方向上的对齐方式
即:水平---垂直生效 垂直---水平生效
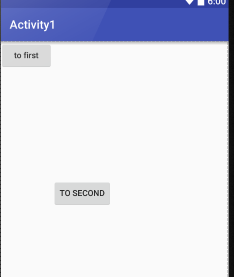
<?xml version="1.0" encoding="utf-8"?>

<LinearLayout xmlns:android="http://schemas.android.com/apk/res/android"

    android:orientation="horizontal"

    android:layout_width="match_parent"

    android:layout_height="match_parent">

    <Button

        android:layout_width="wrap_content"

        android:layout_height="wrap_content"

        android:id="@+id/button_first"

        android:textAllCaps="false"

        android:text="to first"

        android:layout_gravity="top"

        />

    <Button

    android:layout_width="wrap_content"

    android:layout_height="wrap_content"

    android:id="@+id/button_second"

        android:layout_gravity="center"

    android:text="to second"/>
</LinerLayout>
结果如下图:
LinerLayout是水平方向的
我们只能指定垂直方向上的排列方向
android:layout_weight:
允许开发者使用比列方式来指定控件的大小
再手机适配方面可以起到非常重要的作用
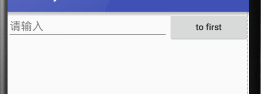
<EditText
    android:id="@+id/edit_test1"
   android:layout_weight="2"
    android:hint="请输入"
    android:layout_width="0dp"
    android:layout_height="wrap_content" />

<Button
    android:layout_width="0dp"
    android:layout_weight="1"
    android:layout_height="wrap_content"
    android:id="@+id/button_first"
    android:textAllCaps="false"
    android:text="to first"
    android:layout_gravity="top"
    />
这里的EditView和Button的宽度都设置成了0dp
再设置android:layout_weight属性,此时的控件不再由android:width指定
这里设置成0dp是一种规范化的写法
dp是Android种用于指定控件大小、间距等属性的单位
这里也会根据android:layout_weight的值来等分屏幕的宽度
原理:
LinerLayout下所有指定的layout_wight的值相加
再根据每个控件的值进行求比例
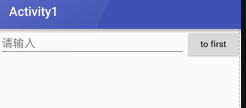
    <EditText

        android:id="@+id/edit_test1"

       android:layout_weight="2"

        android:hint="请输入"

        android:layout_width="0dp"

        android:layout_height="wrap_content" />

    <Button

        android:layout_width="wrap_content"

        android:layout_height="wrap_content"

        android:id="@+id/button_first"

        android:textAllCaps="false"

        android:text="to first"

        android:layout_gravity="top"

        />
此时只有EditText种执行属性
Button的属性设置为刚好包裹住元素
EditText会沾满被Button使用之后的屏幕空间
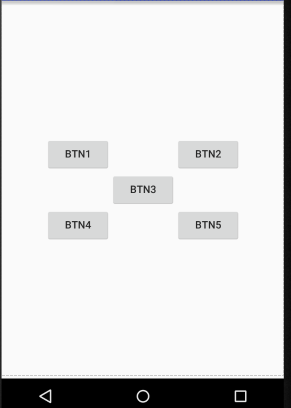
2、相对布局
RelativeLayout又称为相对布局
可以通过相对定位的方式让控件出现在任何位置
新建布局文件

<?xml version="1.0" encoding="utf-8"?>

<RelativeLayout xmlns:android="http://schemas.android.com/apk/res/android"

    android:layout_width="match_parent"

    android:layout_height="match_parent">

    <Button

        android:text="btn1"

        android:layout_width="wrap_content"

        android:layout_height="wrap_content"

        android:layout_alignParentLeft="true"

        android:layout_alignParentTop="true"/>

    <Button

        android:text="btn2"

        android:layout_width="wrap_content"

        android:layout_height="wrap_content"

        android:layout_alignParentRight="true"

        android:layout_alignParentTop="true"/>

    <Button

        android:text="btn3"

        android:layout_width="wrap_content"

        android:layout_height="wrap_content"

        android:layout_centerInParent="true"/>

    <Button

        android:text="btn4"

        android:layout_width="wrap_content"

        android:layout_height="wrap_content"

        android:layout_alignParentLeft="true"

        android:layout_alignParentBottom="true"/>

    <Button

        android:text="btn5"

        android:layout_width="wrap_content"

        android:layout_height="wrap_content"

        android:layout_alignParentRight="true"

        android:layout_alignParentBottom="true"/>

</RelativeLayout>
效果:

这里使用到如下的属性进行布局设置
android:layout_alignParentLeft:和父布局的左对齐
android:layout_alignParentTop:和父布局的上对齐
android:layout_alignParentRight:和父布局的右对齐
android:layout_alignParentBottom:和父布局的下对齐
android:layout_centerInParent:和父布局的居中显示
相对于父布局来说
之前的都是相对于父布局进行定位的
还可以相对控件进行定位
将代码进行修改:
<?xml version="1.0" encoding="utf-8"?>

<RelativeLayout xmlns:android="http://schemas.android.com/apk/res/android"

    android:layout_width="match_parent"

    android:layout_height="match_parent">

    <Button

        android:text="btn1"

        android:layout_width="wrap_content"

        android:layout_height="wrap_content"

        android:layout_above="@+id/btn3"

        android:layout_toLeftOf="@+id/btn3"

        android:id="@+id/btn1"/>

    <Button

        android:text="btn2"

        android:layout_width="wrap_content"

        android:layout_height="wrap_content"

        android:layout_above="@+id/btn3"

        android:layout_toRightOf="@+id/btn3"

        android:id="@+id/btn2"/>

    <Button

        android:text="btn3"

        android:layout_width="wrap_content"

        android:layout_height="wrap_content"

        android:layout_centerInParent="true"

        android:id="@+id/btn3"/>

    <Button

        android:text="btn4"

        android:layout_width="wrap_content"

        android:layout_height="wrap_content"

        android:layout_below="@+id/btn3"

        android:layout_toLeftOf="@+id/btn3"

        android:id="@+id/btn4"/>

    <Button

        android:text="btn5"

        android:layout_width="wrap_content"

        android:layout_height="wrap_content"

        android:layout_below="@+id/btn3"

        android:layout_toRightOf="@+id/btn3"

        android:id="@+id/btn5"/>

</RelativeLayout>
效果:
这里使用到的属性:
android:layout_above:让一个控件位于一个控件的上方
android:layout_below:让一个控件位于一个控件的下方
android:layout_toLeftOf:让一个控件位于一个控件的左侧
android:layout_toRightOf:让一个控件位于一个控件的右侧
再次使用属性:
<?xml version="1.0" encoding="utf-8"?>
<RelativeLayout xmlns:android="http://schemas.android.com/apk/res/android"
    android:layout_width="match_parent"
    android:layout_height="match_parent">

    <Button
        android:text="btn1"
        android:layout_width="wrap_content"
        android:layout_height="wrap_content"
        android:layout_above="@+id/btn3"
        android:layout_alignLeft="@+id/btn3"
        android:id="@+id/btn1"/>
    <Button
        android:text="btn2"
        android:layout_width="wrap_content"
        android:layout_height="wrap_content"
        android:layout_above="@+id/btn3"
        android:layout_toRightOf="@+id/btn3"
        android:id="@+id/btn2"/>
    <Button
        android:text="btn3"
        android:layout_width="wrap_content"
        android:layout_height="wrap_content"
        android:layout_centerInParent="true"
        android:id="@+id/btn3"/>
    <Button
        android:text="btn4"
        android:layout_width="wrap_content"
        android:layout_height="wrap_content"
        android:layout_below="@+id/btn3"
        android:layout_toLeftOf="@+id/btn3"
        android:id="@+id/btn4"/>
    <Button
        android:text="btn5"
        android:layout_width="wrap_content"
        android:layout_height="wrap_content"
        android:layout_below="@+id/btn3"
        android:layout_alignRight="@+id/btn3"
        android:id="@+id/btn5"/>

</RelativeLayout>
这里使用到如下属性:
android:layout_alignLeft:让一个控件的左边缘和零一控件的左边缘对齐(该控件默认位于父布局的上边)
android:layout_alignRight让一个控件的右边缘和另一控件的右边缘对齐(该控件默认位于父布局的上边)
同时还可以使用layout_alignTop和layout_alignBottom

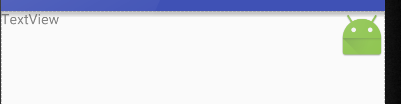
3、帧布局(FrameLayout )
FrameLayout成为帧布局
应用的场景也相对比较少
所有的控件都默认摆放在布局的左上角
都会从左上角开始进行占用空间
新建文件:

<?xml version="1.0" encoding="utf-8"?>

<FrameLayout xmlns:android="http://schemas.android.com/apk/res/android"

    android:layout_width="match_parent"

    android:layout_height="match_parent">

    <TextView

        android:text="TextView"

        android:layout_width="wrap_content"

        android:layout_height="wrap_content"

        android:id="@+id/text_view"/>

    <ImageView

        android:id="@+id/image_view"

        android:layout_width="wrap_content"

        android:layout_height="wrap_content"

        android:src="@mipmap/ic_launcher"/>

</FrameLayout>
效果:

当没有准备图片资源时,可以使用下方的代码进行引用
android:src="@mipmap/ic_launcher"
上述的使用场景比较小,但是可以使用的
效果种可以发现 :
ImageView是在TextView之后添加的
但是此时的图片压在文字的上面
还可以进行修改布局中的对齐方式使用:android:gravity属性
<?xml version="1.0" encoding="utf-8"?>

<FrameLayout xmlns:android="http://schemas.android.com/apk/res/android"

    android:layout_width="match_parent"

    android:layout_height="match_parent">

    <TextView

        android:text="TextView"

        android:layout_width="wrap_content"

        android:layout_height="wrap_content"

        android:id="@+id/text_view"

        android:layout_gravity="left"/>

    <ImageView

        android:id="@+id/image_view"

        android:layout_width="wrap_content"

        android:layout_height="wrap_content"

        android:src="@mipmap/ic_launcher"

        android:layout_gravity="right"/>

</FrameLayout>
效果:
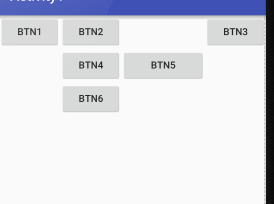
4、表格布局(TableLayout)
遇到排列整齐的情况就可以使用表格布局进行排列
可以使布局排列整齐
TableLayout的属性:
android:collapseColumns:设置需要被隐藏的列的序号
android:shrinkColumns:设置允许被收缩的列的列序号
android:stretchColumns:设置运行被拉伸的列的列序号
以上这三个属性的列号都是从0开始算的,比如shrinkColunmns = "2",对应的是第三列!
android:layout_column="2":表示的就是跳过第二个,直接显示到第三个格子处,从1开始算的!
android:layout_span="4":表示合并4个单元格,也就说这个组件占4个单元格
<?xml version="1.0" encoding="utf-8"?>

<TableLayout xmlns:android="http://schemas.android.com/apk/res/android"

    android:layout_width="match_parent"

    android:layout_height="match_parent"

    android:stretchColumns="">

    <TableRow>

        <Button

            android:layout_width="wrap_content"

            android:layout_height="wrap_content"

            android:layout_column="0"

            android:text="btn1"/>

        <Button

            android:layout_width="wrap_content"

            android:layout_height="wrap_content"

            android:layout_column="1"

            android:text="btn2"/>

        <Button

            android:layout_width="wrap_content"

            android:layout_height="wrap_content"

            android:layout_column="3"

            android:text="btn3"/>

    </TableRow>

    <TableRow>

        <Button

            android:layout_width="wrap_content"

            android:layout_height="wrap_content"

            android:layout_column="1"

            android:text="btn4"/>

        <Button

            android:layout_width="wrap_content"

            android:layout_height="wrap_content"

            android:layout_column="2"

            android:text="btn5"/>

    </TableRow>

    <TableRow>

        <Button

            android:layout_width="wrap_content"

            android:layout_height="wrap_content"

            android:layout_column="2"

            android:text="btn6"/>

    </TableRow>

</TableLayout>
效果:
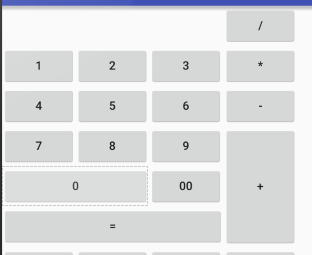
5、网格布局GridLayout
作为android 4.0 后新增的一个布局
①跟LinearLayout(线性布局)一样,他可以设置容器中组件的对齐方式
②容器中的组件可以跨多行也可以跨多列(相比TableLayout直接放组件,占一行相比较)
常用属性:
设置组件的排列方式: android:orientation=""
设置组件的对齐方式: android:layout_gravity=""
设置网格布局的行列:
设置有多少行:android:rowCount="4" //设置网格布局有4行
设置有多少列:android:columnCount="4" //设置网格布局有4列
设置控件再几行几列(都是从0开始算)
组件在第几行:android:layout_row = "2" //设置组件位于第3行
组件在第几列:android:layout_column = "2" //设置该组件位于第3列
设置组件横向/纵向占几行几列
横跨几行:android:layout_rowSpan = "2" //纵向横跨2行
横跨几列:android:layout_columnSpan = "3" //横向横跨3列
<?xml version="1.0" encoding="utf-8"?>

<GridLayout xmlns:android="http://schemas.android.com/apk/res/android"

    android:layout_width="match_parent"

    android:layout_height="match_parent"

    android:columnCount=""

    android:orientation="horizontal"

    >

    <Button

        android:layout_column=""

        android:text="/"/>

    <Button

        android:text=""/>

    <Button

        android:text=""/>

    <Button

        android:text=""/>

    <Button

        android:text="*"/>

    <Button

        android:text=""/>

    <Button

        android:text=""/>

    <Button

        android:text=""/>

    <Button

        android:text="-"

        android:id="@+id/btn_sub"/>

    <Button

        android:text=""/>

    <Button

        android:text=""/>

    <Button

        android:text=""/>

    <Button

        android:layout_rowSpan=""

        android:layout_width="wrap_content"

        android:layout_height="145dp"

        android:text="+"/>

    <Button

        android:text=""

        android:layout_gravity="fill"

        android:layout_columnSpan=""/>

    <Button

        android:text=""/>

    <Button

        android:text="="

        android:layout_columnSpan=""

        android:layout_height="wrap_content"

        android:layout_width="265dp"/>

</GridLayout>
6、绝对布局(AbsoluteLayout)
通过指定x、y的坐标来控制组件再布局种的位置
<?xml version="1.0" encoding="utf-8"?>

<AbsoluteLayout xmlns:android="http://schemas.android.com/apk/res/android"

    android:layout_width="match_parent" android:layout_height="match_parent">

    <Button

        android:text=""

        android:layout_x="40dp"

        android:layout_y="40dp"

        android:layout_width="wrap_content"

        android:layout_height="wrap_content" />

</AbsoluteLayout>

极少使用此布局
7、百分比布局
前三张布局种只有LinerLayout支持使用layout_weigh属性来指定按比例指定控件大小功能
其余两种不支持
如果使用RelativeLayout来实现两个按钮评分布局的宽度效果是比较困难的
Android引入一种百分比布局来解决这个问题
再这个布局中可以不使用warp_content、match_parent来指定控件的大小
允许直接指定控件再布局中所占的百分比实现
再FrameLayout、RalativeLayout种进行功能的扩展
提供了PercentFrameLayout、PercentRelativeLayout
待完成(............)
2、Android-UI(布局待完成)的更多相关文章
- Android UI -- 布局介绍(布局包括FrameLayout, LinearLayout, RelativeLayout, GridLayout)
首先介绍常用布局类 FrameLayout 最简单的布局管理器. 这个布局管理类有几个特性: 添加组件默认在左上角的. 如果添加多个组件会叠加到一起,并且都在左上角.(可以通过一gravity属性改变 ...
- 让我们创建屏幕- Android UI布局和控件
下载LifeCycleTest.zip - 278.9 KB 下载ViewAndLayoutLessons_-_Base.zip - 1.2 MB 下载ViewAndLayoutLessons_-_C ...
- Android UI布局之FrameLayout
一个FrameLayout对象就好比一块屏幕上提前预定好的空白区域.然后能够填充一些元素到里边.例如说一张图片等.须要注意的是,全部的元素都被放置在FrameLayout区域最左边上的区域.并且无法为 ...
- Android UI布局TableLayout
了解字面上TableLayout一个表格样式布局.这种布局将包括以行和列的形式的元件被布置.表格列的数目是列的各行中的最大数目.当然,表格里面的单元格它能够清空. 实例:LayoutDemo 执行效果 ...
- Android UI布局之RelativeLayout
RelativeLayout是一个相对布局类. 首先RelativeLayout是一个容器,它里边的元素,如Buttonbutton等的位置是依照相对位置来计算的,比如,有两个Buttonbutton ...
- Android UI布局之LinearLayout
LinearLayout是Android中最经常使用的布局之中的一个.它将自己包括的子元素依照一个方向进行排列.方向有两种,水平或者竖直.这个方向能够通过设置android:orientation=& ...
- Android -- UI布局管理,相对布局,线性布局,表格布局,绝对布局,帧布局
1. 相对布局 <RelativeLayout xmlns:android="http://schemas.android.com/apk/res/android" xmln ...
- Android UI布局之TableLayout
从字面上了解TableLayout是一种表格式的布局.这样的布局会把包括的元素以行和列的形式进行排列.表格的列数为每一行的最大列数.当然表格里边的单元格是能够为空的. 实例:LayoutDemo 执行 ...
- android UI布局
一.设置反复背景 在drawable目录下建一个mybackground.xml文件 在文件里写入: <?xml version="1.0" encoding="u ...
- AndroidのUI布局之layout weight
<?xml version="1.0" encoding="utf-8"?> <LinearLayout xmlns:android=&quo ...
随机推荐
- Groovy中String转换Gstring用于动态插值
知识点是Groovy中的模板引擎 GStringTemplateEngine 第一个例子: def binding = [ firstname : "Grace", lastnam ...
- SecureCRT远程连接Linux下的sqlplus中退格键不能使用之解决方法
^H不是H键的意思,是backspace 主要是当你的终端backspace有问题的时候才需要设置 在linux环境下使用sqlplus,在回删(backspace)时往往会出现 一串的乱码.出现 ...
- Oracle SQL developer 连接 MySQL 数据库安装配置
1. 下载 JDBC driver for MySQL 下载链接: https://dev.mysql.com/downloads/connector/j/ 下载成功后,解压缩,得到 mysql jd ...
- eslint规则记录
"off"或者0 //关闭规则关闭 "warn"或者1 //在打开的规则作为警告(不影响退出代码) "error"或者2 //把规则作为一个 ...
- js中的正则表达式的运用
正则表达式是一个拆分字符串并查询相关信息的过程:是现代开发中很重要的一环.作为一个web开发人员必须牢牢掌握这项技能,才能尽情得在js中驰骋. 1.创建正则表达式: 正则表达式(regular exp ...
- [算法练习]String to Integer (atoi)
题目说明: Implement atoi to convert a string to an integer. Hint: Carefully consider all possible input ...
- 修改UIView的backedlayer为CAShapeLayer
修改UIView的backedlayer为CAShapeLayer 什么叫backedlayer呢?backedlayer指的是一个View在创建好的时候就已经帮你创建好了一个与View大小一致的CA ...
- 浅析Linux操作系统是如何工作的(思维导图)
SA***189 多任务计算机运转机制如下思维导图所示: 小结: Linux操作系统是一个在时钟的节拍下,各个模块紧密协作.密不可分的整体,而整个Linux系统都是建立在存储程序的基础之上,正是有了程 ...
- netstat 常用方法
netstat简介 netstat是一个监控TCP/IP网络的非常有用的工具,它可以显示路由表,实际的网络连接以及每一个网络接口设备的状态信息,netstat用于显示与IP,TCP,UDP和ICMP协 ...
- Mysql进阶-day3
多实例介绍: mysql多实例就是一台服务器开启多个不同的服务端口(3306,3307),运行多个MySQL服务进程,这些服务进程通过不同的socket监听不同的服务端口来提供各自的服务端口. 这些m ...