
Cookie (设置与读取、超时设置、指定路径、显示用户上次登录时间)
Cooike简介
Cookie规范
- Cookie大小上限为4KB;
- 一个服务器最多在客户端浏览器上保存20个Cookie;
- 一个浏览器最多保存300个Cookie;
上面的数据只是HTTP的Cookie规范,但在浏览器大战的今天,一些浏览器为了打败对手,为了展现自己的能力起见,可能对Cookie规范“扩展”了一些,例如每个Cookie的大小为8KB,最多可保存500个Cookie等!但也不会出现把你硬盘占满的可能!
注意,不同浏览器之间是不共享Cookie的。也就是说在你使用IE访问服务器时,服务器会把Cookie发给IE,然后由IE保存起来,当你在使用FireFox访问服务器时,不可能把IE保存的Cookie发送给服务器。
Cookie与HTTP头
Cookie是通过HTTP请求和响应头在客户端和服务器端传递的:
- Cookie:请求头,客户端发送给服务器端;
- 格式:Cookie: a=A; b=B; c=C。即多个Cookie用分号离开; Set-Cookie:响应头,服务器端发送给客户端;
- 一个Cookie对象一个Set-Cookie: Set-Cookie: a=A Set-Cookie: b=B Set-Cookie: c=C
Cookie的覆盖
如果服务器端发送重复的Cookie那么会覆盖原有的Cookie,例如客户端的第一个请求服务器端发送的Cookie是:Set-Cookie: a=A;第二请求服务器端发送的是:Set-Cookie: a=AA,那么客户端只留下一个Cookie,即:a=AA。
Cookie相关设置属性
'''

class HttpResponseBase:

        def set_cookie(self, key,                 键

                     value='',            值

                     max_age=None,        超长时间

                              cookie需要延续的时间(以秒为单位)

                              如果参数是\ None`` ,这个cookie会延续到浏览器关闭为止。

                     expires=None,        超长时间

                                 expires默认None ,cookie失效的实际日期/时间。


                     path='/',           Cookie生效的路径,

                                                 浏览器只会把cookie回传给带有该路径的页面,这样可以避免将

                                                 cookie传给站点中的其他的应用。

                                                 / 表示根路径,特殊的:根路径的cookie可以被任何url的页面访问


                             domain=None,         Cookie生效的域名

                                                  你可用这个参数来构造一个跨站cookie。

                                                  如, domain=".example.com"

                                                  所构造的cookie对下面这些站点都是可读的:

                                                  www.example.com 、 www2.example.com

                                 和an.other.sub.domain.example.com 。

                                                  如果该参数设置为 None ,cookie只能由设置它的站点读取。

                     secure=False,        如果设置为 True ,浏览器将通过HTTPS来回传cookie。

                     httponly=False       只能http协议传输,无法被JavaScript获取

                                                 (不是绝对,底层抓包可以获取到也可以被覆盖)

                  ): pass

'''
设置Cookie
response.set_cookie('is_login',True)

cookie 的值为 key value形式
获取Cookie
request.COOKIES.get('is_login')
删除Cookie
response.delete_cookie("cookie_key",path="/",domain=name)
利用Cooke做一个简单的登录
路由
from  app01 import views

urlpatterns = [

    path('admin/', admin.site.urls),

    path('login/',views.login),

    path('index/',views.index)

]
orm
from django.db import models

# Create your models here.

class User(models.Model):

    user = models.CharField(max_length=24)

    pwd = models.CharField(max_length=24)
视图
from django.shortcuts import render,HttpResponse,redirect

# Create your views here.

from app01.models import  User

def login(request):

    if request.method =='POST':

        user = request.POST.get('user')

        pwd = request.POST.get('pwd')

        user_info =User.objects.filter(user=user,pwd=pwd).first()

        if user_info:

            response = HttpResponse('登录成功')

            response.set_cookie('is_login',True)

            response.set_cookie('username',user)

            return response

    return render(request,'login.html')

def index(request):

    print(request.COOKIES)

    if_login =request.COOKIES.get('is_login')

    username = request.COOKIES.get('username')

    if if_login:

        return render(request,'index.html',locals())

    return HttpResponse('未登录')
login.html
<!DOCTYPE html>

<html lang="en">

<head>

    <meta charset="UTF-8">

    <title>Title</title>

</head>

<body>

<form action=""method="post">

    {% csrf_token %}

    用户名<input type="text" name="user">

    密码 <input type="password"name="pwd">

    <input type="submit">

</form>

</body>

</html>
index.html
<!DOCTYPE html>

<html lang="en">

<head>

    <meta charset="UTF-8">

    <title>Title</title>

</head>

<body>

<h3>index</h3>

<span>{{ username }}您好</span>

</body>

</html>
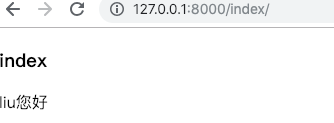
整体流程、
用户访问 》登录成功》获取Cookie》访问index 页面》显示 username 您好
用户访问》登录失败》未获取Cookie》访问index页面 》显示 未登录
访问超时
from django.shortcuts import render,HttpResponse,redirect

# Create your views here.

from app01.models import  User

def login(request):

    if request.method =='POST':

        user = request.POST.get('user')

        pwd = request.POST.get('pwd')

        user_info =User.objects.filter(user=user,pwd=pwd).first()

        if user_info:

            response = HttpResponse('登录成功')

            #从上次访问开始过期时间,不支持ie

            # response.set_cookie('is_login',True,max_age=10)

            import datetime

            times=datetime.datetime(year=2018,month=12,day=21,hour=8,minute=40,second=10)

            #expires 固定过期时间

            response.set_cookie('is_login',expires=times)

            response.set_cookie('username',user)

            return response

    return render(request,'login.html')

def index(request):

    print(request.COOKIES)

    if_login =request.COOKIES.get('is_login')

    if if_login:

        username = request.COOKIES.get('username')

        return render(request,'index.html',locals())

    else:

        return redirect('/login/')

    return HttpResponse('未登录')
指定路径
默认情况下,Cookie 是对根路径下所有的视图函数共享的,但是个别时候不想让个别视图函数使用Cookie,就需要设置Cookie生效的路径
视图
from django.shortcuts import render,HttpResponse,redirect

# Create your views here.

from app01.models import  User

def login(request):

    if request.method =='POST':

        user = request.POST.get('user')

        pwd = request.POST.get('pwd')

        user_info =User.objects.filter(user=user,pwd=pwd).first()

        if user_info:

            response = HttpResponse('登录成功')

            #从上次访问开始过期时间,不支持ie

            # response.set_cookie('is_login',True,max_age=10)

            import datetime

            # times=datetime.datetime(year=2018,month=12,day=21,hour=8,minute=40,second=10)

            #expires 固定过期时间

            # response.set_cookie('is_login',expires=times)

            response.set_cookie('is_login', True)

            #指定可以使用Cookie的路径,如果不设置根路径下的所有视图函数都可以取到。

            response.set_cookie('username',user,path='/index/')

            return response

    return render(request,'login.html')

def index(request):

    print(request.COOKIES)

    if_login =request.COOKIES.get('is_login')

    if if_login:

        username = request.COOKIES.get('username')

        return render(request,'index.html',locals())

    else:

        return redirect('/login/')

def tests(request):

    print('tests------------',request.COOKIES)

    return  HttpResponse('ok')
输出
{'username': 'liu ', 'is_login': 'True'}
tests------------ {'is_login': 'True'}
只有访问 ‘/index/’ 才可以拿到 username 的Cookie 的值,访问tests 无法拿到 Cookie
显示用户上次登录时间
视图
def index(request):

    print(request.COOKIES)

    if_login =request.COOKIES.get('is_login')

    if if_login:

        import  datetime

        now = datetime.datetime.now().strftime('%Y-%m-%d %H:%M:%S')

        last_time =request.COOKIES.get('last_login','')

        username = request.COOKIES.get('username')

        response = render(request,'index.html',locals())

        response.set_cookie('last_login',now)

        return response

    else:

        return redirect('/login/')
流程
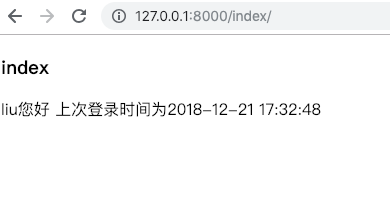
用户登录成功后,先保存当前时间到Cookie中,下次用户登录到时候获取Cookie值,在前端模版进行显示。
Cookie (设置与读取、超时设置、指定路径、显示用户上次登录时间)的更多相关文章
- 使用Cookie实现显示用户上次访问时间
一. 常用Cookie API介绍 1. 获取cookie request.getCookies(); // 返回Cookie[] 2. 创建cookie Cookie(String key, St ...
- Servlet—Cookie(显示用户上次访问时间、显示商品浏览历史)
1 . 什么是会话? 会话可简单理解为:用户开一个浏览器,点击多个超链接,访问服务器多个web资源,然后关闭浏览器,整个过程称之为一个会话. 1.1 会话过程中要解决的一些问题? 每个用户在使用浏览器 ...
- HttpClient代理IP及设置连接读取超时
1.不废话,上代码: public static void main(String[] args) throws Exception { CloseableHttpClient httpClient ...
- cookie案例-显示用户上次访问网站的时间
package cn.itcast.cookie; import java.io.IOException; import java.io.PrintWriter; import java.util.D ...
- Cookie实现--用户上次访问时间
用户上次访问时间
- golang网络通信超时设置
网络通信中,为了防止长时间无响应的情况,经常会用到网络连接超时.读写超时的设置. 本文结合例子简介golang的连接超时和读写超时设置. 1.超时设置 1.1 连接超时 func DialTimeou ...
- org.apache.http.client.HttpClient; HttpClient 4.3超时设置
可用的code import org.apache.commons.lang.StringUtils;import org.apache.http.HttpEntity;import org.apac ...
- HttpClient 3.X 4.3 4.x超时设置
HttpClient 4.3.HttpClient这货和Lucene一样,每个版本的API都变化很大,这有点让人头疼.就好比创建一个HttpClient对象吧,每一个版本的都不一样, 3.X是这样的 ...
- 设置全局context变量 (显示用户登录名)
比如在每个页面的最上面部分需要显示用户的登录名称,如果不登录则显示为Guest.这部分内容在每个页面都会出现,所以可将该部分内容作为一个公共模板(如userauth.html),如然后在其他模板中进行 ...
随机推荐
- linux零基础之--常用命令
linux: 用户命令 linux 目录切换命令 linux文件命令 linux : vi编辑器 linux:打包压缩
- gcc/g++命令参数
在windows环境下,我们运行一程序,只需要在VS中点击运行按键即可,VS帮我们做完了程序的预处理.编译.汇编.链接阶段 但是在linux环境下,我们只能借助gcc/g++完成这一系列的操作 -o参 ...
- golang unsafe.Pointer与uintptr
原文地址:https://blog.fanscore.cn/p/33/ 先说结论 uintptr 是一个地址数值,它不是指针,与地址上的对象没有引用关系,垃圾回收器不会因为有一个uintptr类型的值 ...
- Eclipse 使用svn时出现 “Previous operation has not finished; run 'cleanup' if it was interrupted“问题
在执行svn操作的时候出现了下面的问题 commit -m "" E:/eclipse/workplace/BRobotAPP/blockly/googleDemo/blockly ...
- CentOS 7 网卡注释
TYPE=Ethernet # 网络类型为:EthernetPROXY_METHOD=none # 代理方式:关闭状态BROWSER_ONLY=no # 只是浏览器:否BOOTPROTO=static ...
- unity 卡牌聚拢算法
unity 卡牌聚拢算法 前言 代码 前言 笔者在做项目时遇到了一个要聚拢手牌,像三国杀里的手牌聚拢的效果 大概效果图: 代码 public Dictionary<int, int> le ...
- 【C++】《C++ Primer 》第四章
第四章 表达式 一.基础 重载运算符:当运算符作用在类类型的运算对象时,用户可以自行定义其含义. 左值和右值: C中:左值可以在表达式左边,右值不能. C++中:当一个对象被用作右值的时候,用的是对象 ...
- LeetCode394 字符串解码
给定一个经过编码的字符串,返回它解码后的字符串. 编码规则为: k[encoded_string],表示其中方括号内部的 encoded_string 正好重复 k 次.注意 k 保证为正整数. 你可 ...
- python 2.7.11 环境安装
0 安装依赖: yum install zlib zlib-devel readline-devel sqlite-devel bzip2-devel openssl-devel gdbm-deve ...
- 如何构建一个多人(.io) Web 游戏,第 1 部分
原文:How to Build a Multiplayer (.io) Web Game, Part 1 GitHub: https://github.com/vzhou842/example-.io ...