pepperoni-app-kit
哭唧唧,在github上面找react-native学习,多么贫瘠的英文知识哇这个就是我
我甚至不知道这个项目运行出来了的意义,不过一个一个学习哇
不积跬步无以至千里,加油哇~~
在浏览器中,我们找到这个项目
https://github.com/futurice/pepperoni-app-kit
使用下面方式运行
git clone https://github.com/futurice/pepperoni-app-kit.git

cd pepperoni-app-kit

yarn install

react-native run-ios/react-native run-android
我们首先可以看项目的效果
看Index.js我们可以看到有使用redux和react-react-native
import {Provider} from 'react-redux';

import store from './src/redux/store';

import AppViewContainer from './src/modules/AppViewContainer';

import React, {Component} from 'react';

import {AppRegistry} from 'react-native';

class PepperoniAppTemplate extends Component {

  render() {

    return (

      <Provider store={store}>

        <AppViewContainer />

      </Provider>

    );

  }

}

AppRegistry.registerComponent('PepperoniAppTemplate', () => PepperoniAppTemplate);
打开文件,我们可以看到项目的目录
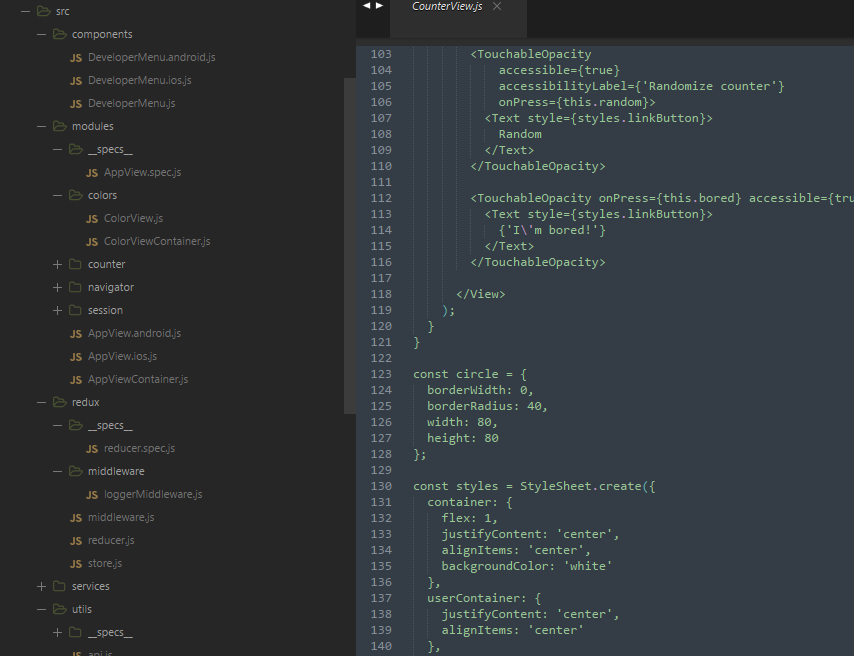
接下来我们一步一步分析
//navigator.js
import {Platform} from 'react-native';
import {TabNavigator, StackNavigator} from 'react-navigation';
import CounterViewContainer from '../counter/CounterViewContainer';
import ColorViewContainer from '../colors/ColorViewContainer';
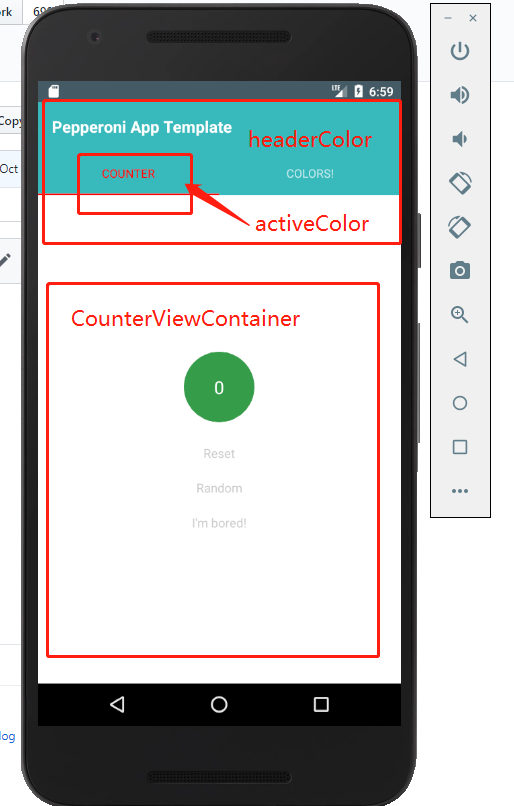
// headerColor控制的是背景色
// activeColor控制的是选中的颜色
const headerColor = '#39babd';
const activeColor = 'red';
// TabNavigator is nested inside StackNavigator
// 从组件react-navigation中取得 TabNavigator
export const MainScreenNavigator = TabNavigator({
//定义两个组件counter和color组件
Counter: {screen: CounterViewContainer},
Color: {screen: ColorViewContainer}
}, {
tabBarOptions: {
...Platform.select({
android: {
activeTintColor: activeColor,
indicatorStyle: {backgroundColor: activeColor},
style: {backgroundColor: headerColor}
}
})
}
});
MainScreenNavigator.navigationOptions = {
title: 'Pepperoni App Template',
headerTitleStyle: {color: 'white'},
headerStyle: {
backgroundColor: headerColor,
elevation: 0 // disable header elevation when TabNavigator visible
}
};
// Root navigator is a StackNavigator
//定义初始化的页面为MainScreenNavigator
const AppNavigator = StackNavigator({
Home: {screen: MainScreenNavigator},
InfiniteColorStack: {screen: ColorViewContainer}
});
export default AppNavigator;
页面如下:
与redux交互
//NavigatorViewContainer.js

import {connect} from 'react-redux';

import NavigatorView from './NavigatorView';

export default connect(

  state => ({

    navigatorState: state.get('navigatorState').toJS()

  })

)(NavigatorView);
//NavigatorView.js

import React, {Component} from 'react';

import PropTypes from 'prop-types';

import {addNavigationHelpers} from 'react-navigation';

import AppNavigator from './Navigator';

class NavigatorView extends Component {

  static displayName = 'NavigationView';

  static propTypes = {

    dispatch: PropTypes.func.isRequired,

    navigatorState: PropTypes.shape({

      index: PropTypes.number.isRequired,

      routes: PropTypes.arrayOf(PropTypes.shape({

        key: PropTypes.string.isRequired,

        routeName: PropTypes.string.isRequired

      }))

    }).isRequired

  };

  render() {

    return (

      <AppNavigator

        navigation={

          addNavigationHelpers({

            dispatch: this.props.dispatch,

            state: this.props.navigatorState

          })

        }

      />

    );

  }

}

export default NavigatorView;
我们来看
//CounterView.js

import React, {Component} from 'react';

import PropTypes from 'prop-types';

import {

  StyleSheet,

  TouchableOpacity,

  Image,

  Text,

  View

} from 'react-native';

import Icon from 'react-native-vector-icons/MaterialIcons';

class CounterView extends Component {

  //定义静态组件

  static displayName = 'CounterView';

  static navigationOptions = {

    title: 'Counter',

    tabBarIcon: (props) => (

        <Icon name='plus-one' size={24} color={props.tintColor} />

      )

  }

  //静态属性

  static propTypes = {

    counter: PropTypes.number.isRequired,

    userName: PropTypes.string,

    userProfilePhoto: PropTypes.string,

    loading: PropTypes.bool.isRequired,

    counterStateActions: PropTypes.shape({

      increment: PropTypes.func.isRequired,

      reset: PropTypes.func.isRequired,

      random: PropTypes.func.isRequired

    }).isRequired,

    navigate: PropTypes.func.isRequired

  };

  // 点击增加的方法

  increment = () => {

    this.props.counterStateActions.increment();

  };

  // 清除

  reset = () => {

    this.props.counterStateActions.reset();

  };

  // 随机数

  random = () => {

    this.props.counterStateActions.random();

  };

  //跳转到另一个页面

  bored = () => {

    this.props.navigate({routeName: 'Color'});

  };

  renderUserInfo = () => {

    if (!this.props.userName) {

      return null;

    }

    return (

      <View style={styles.userContainer}>

        <Image

          style={styles.userProfilePhoto}

          source={{

            uri: this.props.userProfilePhoto,

            width: 80,

            height: 80

          }}

          />

        <Text style={styles.linkButton}>

          Welcome, {this.props.userName}!

        </Text>

      </View>

    );

  };

  render() {

    //点击随机数的那个背景色会loading变红色

    const loadingStyle = this.props.loading

      ? {backgroundColor: 'red'}

      : null;

    return (

      <View style={styles.container}>

        {this.renderUserInfo()}

        <TouchableOpacity

          accessible={true}

          accessibilityLabel={'Increment counter'}

          onPress={this.increment}

          style={[styles.counterButton, loadingStyle]}>

          <Text style={styles.counter}>

            {this.props.counter}

          </Text>

        </TouchableOpacity>

        <TouchableOpacity

            accessible={true}

            accessibilityLabel={'Reset counter'}

            onPress={this.reset}>

          <Text style={styles.linkButton}>

            Reset

          </Text>

        </TouchableOpacity>

        <TouchableOpacity

            accessible={true}

            accessibilityLabel={'Randomize counter'}

            onPress={this.random}>

          <Text style={styles.linkButton}>

            Random

          </Text>

        </TouchableOpacity>

        <TouchableOpacity onPress={this.bored} accessible={true}>

          <Text style={styles.linkButton}>

            {'I\'m bored!'}

          </Text>

        </TouchableOpacity>

      </View>

    );

  }

}

//一种新式写法,定义一个circle

const circle = {

  borderWidth: 0,

  borderRadius: 40,

  width: 80,

  height: 80

};

const styles = StyleSheet.create({

  container: {

    flex: 1,

    justifyContent: 'center',

    alignItems: 'center',

    backgroundColor: 'white'

  },

  userContainer: {

    justifyContent: 'center',

    alignItems: 'center'

  },

  //这里的是...circle扩展这个属性,厉害的写法哇

  userProfilePhoto: {

    ...circle,

    alignSelf: 'center'

  },

  counterButton: {

    ...circle,

    backgroundColor: '#349d4a',

    alignItems: 'center',

    justifyContent: 'center',

    margin: 20

  },

  counter: {

    color: 'white',

    fontSize: 20,

    textAlign: 'center'

  },

  welcome: {

    textAlign: 'center',

    color: 'black',

    marginBottom: 5,

    padding: 5

  },

  linkButton: {

    textAlign: 'center',

    color: '#CCCCCC',

    marginBottom: 10,

    padding: 5

  }

});

export default CounterView;
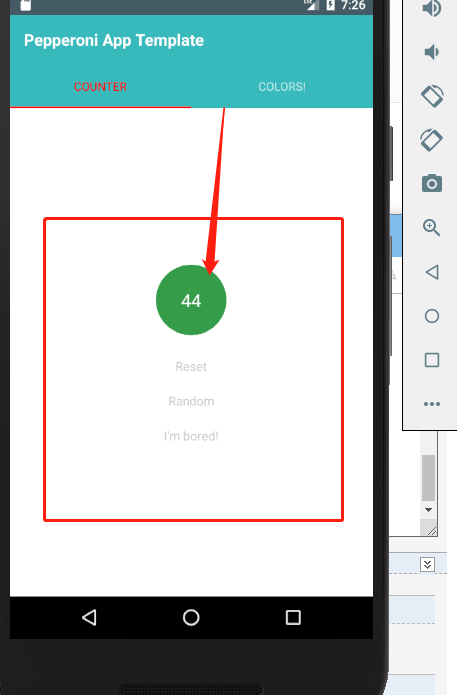
页面效果为
//CounterState.js

//里面定义的是state状态

import {Map} from 'immutable';

import {loop, Effects} from 'redux-loop-symbol-ponyfill';

import {generateRandomNumber} from '../../services/randomNumberService';

// Initial state

const initialState = Map({

  value: 0,

  loading: false

});

// Actions

const INCREMENT = 'CounterState/INCREMENT';

const RESET = 'CounterState/RESET';

const RANDOM_REQUEST = 'CounterState/RANDOM_REQUEST';

const RANDOM_RESPONSE = 'CounterState/RANDOM_RESPONSE';

// Action creators

export function increment() {

  return {type: INCREMENT};

}

export function reset() {

  return {type: RESET};

}

export function random() {

  return {

    type: RANDOM_REQUEST

  };

}

export async function requestRandomNumber() {

  return {

    type: RANDOM_RESPONSE,

    payload: await generateRandomNumber()

  };

}

// Reducer

export default function CounterStateReducer(state = initialState, action = {}) {

  switch (action.type) {

    case INCREMENT:

      return state.update('value', value => value + 1);

    case RESET:

      return initialState;

    case RANDOM_REQUEST:

      return loop(

        state.set('loading', true),

        Effects.promise(requestRandomNumber)

      );

    case RANDOM_RESPONSE:

      return state

        .set('loading', false)

        .set('value', action.payload);

    default:

      return state;

  }

}
//CounterViewContainer.js

这个里面是dispatch方法,改变state的状态

import {connect} from 'react-redux';

import {bindActionCreators} from 'redux';

//引入UI组件

import CounterView from './CounterView';

import {NavigationActions} from 'react-navigation';

//引入action

import * as CounterStateActions from '../counter/CounterState';

export default connect(

  state => ({

    counter: state.getIn(['counter', 'value']),

    loading: state.getIn(['counter', 'loading'])

  }),

  dispatch => {

    return {

      navigate: bindActionCreators(NavigationActions.navigate, dispatch),

      counterStateActions: bindActionCreators(CounterStateActions, dispatch)

    };

  }

)(CounterView);
//ColorView.js

import React, {Component} from 'react';

import PropTypes from 'prop-types';

import {

  Button,

  View,

  StyleSheet

} from 'react-native';

import Icon from 'react-native-vector-icons/MaterialIcons';

const color = () => Math.floor(255 * Math.random());

/**

 * Sample view to demonstrate StackNavigator

 * @TODO remove this module in a live application.

 */

class ColorView extends Component {

  static displayName = 'ColorView';

  static navigationOptions = {

    title: 'Colors!',

    tabBarIcon: (props) => (

        <Icon name='color-lens' size={24} color={props.tintColor} />

      ),

    // TODO: move this into global config?

    headerTintColor: 'white',

    headerStyle: {

      backgroundColor: '#39babd'

    }

  }

  static propTypes = {

    navigate: PropTypes.func.isRequired

  };

  constructor(props) {

    super(props);

    //初始化的背景色

    this.state = {

      background: `rgba(${color()},${color()},${color()}, 1)`

    };

  }

  //点击open进入新的页面

  open = () => {

    this.props.navigate({routeName: 'InfiniteColorStack'});

  };

  //点击colors,页面进入就显示这个

  render() {

    const buttonText = 'Open in Stack Navigator';

    return (

      <View style={[styles.container, {backgroundColor: this.state.background}]}>

        <Button color='#ee7f06' title={buttonText} onPress={this.open}/>

      </View>

    );

  }

}

const styles = StyleSheet.create({

  container: {

    flex: 1,

    justifyContent: 'center',

    alignItems: 'center'

  }

});

export default ColorView;
项目运行效果为
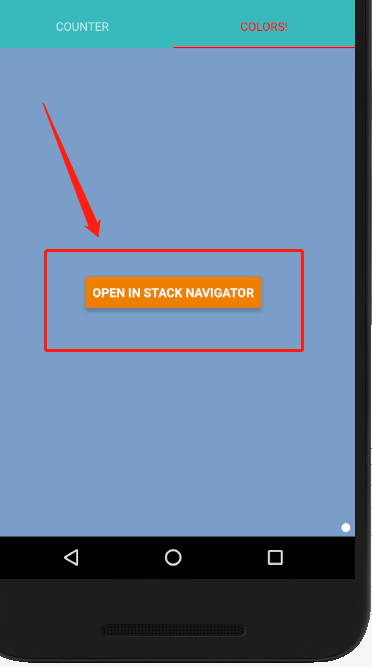
当进行多次点击颜色的时候,会将状态存储起来
//ColorViewContainer.js

import {connect} from 'react-redux';

import {bindActionCreators} from 'redux';

import {NavigationActions} from 'react-navigation';

import ColorView from './ColorView';

export default connect(

   null,

   dispatch => {

     return {

       navigate: bindActionCreators(NavigationActions.navigate, dispatch)

     };

   }

)(ColorView);

by我理解的十分浅显,但是会继续找项目与大家一起进步的
pepperoni-app-kit的更多相关文章
- 基于iCamera App Kit 测试oV5640 500w分辨率 摄像头 总结
基于iCamera App Kit 测试oV5640 摄像头 总结 iCamera App Kit 下载地址 http://pan.baidu.com/s/1kUMIwB1 可以参考下载链接的说明手册 ...
- isensor app kit 之 CF5642V2 OV5642 测试总结
. 总结; 使用官哥的cf5642c-v2时,需要将isensor app kit 上的iic上拉电阻去掉,否则可能导致寄存器初始化不成功,去掉即可,使用柴草电子的模组则不需要.
- iSensor App Kit 测试之 MT9V111 MT9M111 MT9D111
iSensor App Kit 可以调试测试一切常规的sensor,对于ccusb20底板,可以直接兼容官哥所有的dvp接口的摄像头,分辨率从30w到1400w均没问题. 今天又测试了三款sensor ...
- iCamera App Kit 使用说明
一.概述 1.前言 iCamera是层层惊涛设计室推出的一款轻量级的摄像头开发调试工具,该工具可以用于市面上绝大多数摄像头的配置.调试.图像采集. iCamera主要作为摄像头开发调试工具,暂时不针对 ...
- iSensor APP 之 摄像头调试 OV5642
iSensor APP 之 摄像头调试 OV5642 iSensor app 非常适合调试各种摄像头,已测试通过的sensor有: l OV7670.OV7725.OV9650.OV9655.OV ...
- 2014Ember带来怎样的变化?
每隔几个月的时间,Ember的核心团队就会聚在一起讨论目前遇到的各种问题,并决定下一季度需要优先处理的各种事务. 这一次,在俄勒冈州的波特兰,大家聚在一起,商讨2014年的发展方向. 开发工具 &am ...
- OC和Java的比较
1.Cocoa是什么?Cocoa是使用OC语言编写的工具包,里面有大量的类库.结构体,说白了其实就相当于java中的标准API.C++中的标准库.OC中没有命名空间的概念,所以使用加前缀来防止命名冲突 ...
- java与OC比较
转自:http://blog.sina.com.cn/s/blog_93742d0d010165qi.html 1.Cocoa是什么?Cocoa是使用OC语言编写的工具包,里面有大量的类库.结构体,说 ...
- 你学会UI设计了吗?
你学会UI设计了吗? UI设计师如何前驱? 关于产品 作为一个UI设计师,我们还在干巴巴的等着产品经理甚至交互提供的需求和原型再开始动手吗?这样被动的工作是永远无法提升自己的,当然你也永远只能拿到几千 ...
随机推荐
- 在linux命令下访问url
1.elinks - lynx-like替代角色模式WWW的浏览器 例如: elinks --dump http://www.baidu.com 2.wget 这个会将访问的首页下载到本地 [root ...
- Django 2.11 静态页面404 解决
在settings中配置 STATIC_URL = '/static/' STATICFILES_DIRS = ( os.path.join(BASE_DIR,"static"), ...
- Kettle转换工具Windows版安装
一.简介 Kettle是一款国外开源的ETL工具,纯java编写,可以在Window.Linux.Unix上运行,绿色无需安装,数据抽取高效稳定. Kettle 中文名称叫水壶,该项目的主程序员MAT ...
- 996.ICU
996.ICU https://github.com/996icu/996.ICU https://www.zhihu.com/question/317722302 LICENSE https://g ...
- python numpy笔记(重要)
1.np.array 的shape (2,)与(2,1)含义 ndarray.shape:数组的维度.为一个表示数组在每个维度上大小的整数元组.例如二维数组中,表示数组的“行数”和“列数”. ndar ...
- 用MyEclipse自带工具生成WebService客户端代码
本文章主要是介绍如何利用已经发布了的Webservice的wsdl来自动生成java的客户端代码.注意:本方法需要你采用的java版本是1.5或者以上的版本,采用MyEclipse来自动生成代码. w ...
- Windows Server 2012 Hyper-V 快照
快照 Hyper-V 可提供擷取執行中虛擬機器快照的能力,因此可輕易地回復至前一狀態,對於測試環境相當有幫助. 快照的功用雖然很不錯,不過每次建立快照時都是會消耗相當的硬碟資源,尤其目前的快照點和上一 ...
- hdu-3374(kmp+最小表示法)
题意:给你一个字符串,这个字符串我们可以把把他变成n个字符串按照以下规则:将当前字符串第一个放到字符串最后一位,字符串的下标依次向前推一位,比如:s[1] s[2 ]s[3] s[4]->s[2 ...
- 【数学建模】day02-整数规划
基本类似于中学讲的整数规划--线性规划中变量约束为整数的情形. 目前通用的解法适合整数线性规划.不管是完全整数规划(变量全部约束为整数),还是混合整数规划(变量既有整数又有实数),MATLAB都提供了 ...
- 数据库管理 trove openstack
Trove是数据库即服务的OpenStack.它旨在完全基于OpenStack运行,其目标是允许用户快速轻松地利用关系数据库的功能,而无需处理复杂的管理任务.云用户和数据库管理员可以根据需要配置和管理 ...