
Spring 源码(7)Spring的注解是如何解析的?
上一篇 https://www.cnblogs.com/redwinter/p/16196359.html 介绍了BeanFactoryPostProcessor的执行过程,这篇文章介绍Spring中配置的注解是如何通过ConfigurationClassPostProcessor解析的,另外分析下Spring Boot自动装配是如何处理的。
ConfigurationClassPostProcessor 解析了哪些注解?
在上一篇文章https://www.cnblogs.com/redwinter/p/16196359.html 我们知道ConfigurationClassPostProcessor实际上是BeanFactoryPostProcessor的一个实现类,他特殊的地方是他还实现了BeanDefinitionRegisterPostProcessor接口,所以ConfigurationClassPostProcessor 既要实现BeanFactoryPostProcessor的接口方法postProcessBeanFactory也要实现BeanDefinitionRegisterPostProcessor的接口方法postProcessBeanDefinitionRegistry,并且在解析的时候先执行了postProcessBeanDefinitionRegistry方法,再执行了postProcessBeanDefinitionRegistry方法。
接下来我们看看postProcessBeanDefinitionRegistry做了什么?
上源码:
@Override

public void postProcessBeanDefinitionRegistry(BeanDefinitionRegistry registry) {

  int registryId = System.identityHashCode(registry);

  if (this.registriesPostProcessed.contains(registryId)) {

    throw new IllegalStateException(

      "postProcessBeanDefinitionRegistry already called on this post-processor against " + registry);

  }

  if (this.factoriesPostProcessed.contains(registryId)) {

    throw new IllegalStateException(

      "postProcessBeanFactory already called on this post-processor against " + registry);

  }

  this.registriesPostProcessed.add(registryId);

  // 处理配置的BeanDefinition

  processConfigBeanDefinitions(registry);

}
整个方法核心是执行了processConfigBeanDefinitions方法,这个方法非常的长并且逻辑也复杂,代码我就不贴了,说一下大概的流程(较详细):
- 先进行合格的
beanDefinition的检查- 获取到注解的元数据信息
- 判断是包含
@Configuration注解,包含则合格,否则判断是否包含了@Component、@ComponentScan、@Import、@ImportResource注解,包含则合格,如果都不包含则不合格
- 对合格的
BeanDefinition排序 - 创建一个解析
@Configuration注解的解析器 - 对合格的
BeanDefinition集合进行解析- 循环解析,最终调用
processConfigurationClass方法 - 判断是否跳过解析,比如配置了
@Conditional注解的 - 调用
doProcessConfigurationClass方法开始解析(下面的解析中可能会存在递归调用)- 解析
@Component注解- 判断是否包含内部类标记了
@Component,比如在标有@Component注解的类里面创建一个内部类也标记了@Component注解,如果有就会进行递归调用processConfigurationClass方法
- 判断是否包含内部类标记了
- 解析
@PropertySources和@PropertySource注解- 比如标记
@PropertySource("classpath:jdbc.properties"),这样就会把这个属性的值全部解析到环境信息的propertySources属性中
- 比如标记
- 解析
@ComponetScans和@ComponentScan注解- 比如配置了扫描的包,那么就会扫描出合格的
BeanDefinition,然后递归解析
- 比如配置了扫描的包,那么就会扫描出合格的
- 解析
@Import注解(Spring Boot自动装配的实现)- 递归解析出标记了
@Import注解的类放在imports属性中 - 解析
ImportSelector接口的实现类 - 调用
ImportSelector#selectImports方法解析需要注册的类 - 递归调用
processImports方法,然后将需要注册的类注册到importBeanDefinitionRegistrars(这里会在后面进行loadBeanDefinition)
- 递归解析出标记了
- 解析
@ImportResource注解- 比如解析配置的
Spring的xml配置文件,最终放到importedResources属性中(后面会进行loadBeanDefinition)
- 比如解析配置的
- 解析
@Bean注解- 比如解析当前类标记了
@Bean的方法 - 然后放在
beanMethods属性中(后面会进行loadBeanDefinition)
- 比如解析当前类标记了
- 解析
- 加载
BeanDefinition从上面解析出来的类中- 循环遍历加载
BeanDefinition - 判断是否跳过,比如实现了
Condition接口的类 - 加载标有
@Bean的BeanDefinition - 加载从
ImportResource中解析的BeanDefinition - 加载从
ImportSelector中配置的解析的BeanDefinition
- 循环遍历加载
- 循环解析,最终调用
整个过程非常复杂,而且存在递归操作,读者可以按照我写的步骤进行debug调试,当然可能会出现到处跳转不知所措的情况,多调几遍就好了,只要知道大致的流程,应该还是不难的。
总的来说就是解析了这些注解:@Component、@PropertySource、@PropertySources、@ComponentScan、@ComponentScans、@Import、@ImportResource、@Bean,然后将标有这些注解的解析成BeanDefinition,如果加上了@Conditionnal注解,那么按照条件进行解析。

自定义自动装配
现在开发都是用SpringBoot,原因在于他非常的方便,引入即可使用,那么他是做到的呢?众所周知Spring Boot有几个注解非常重要,比如:@SpringBootApplication、@EnableAutoConfiguration、@SpringBootConfiguration,其中最重要的是@EnableAutoConfiguration,这个注解里面标记了@Import(AutoConfigurationImportSelector.class),当然还标记了其他的,我们现在只关心这个@Import,里面放入了一个AutoConfigurationImportSelector类。
AutoConfigurationImportSelector类实现了DeferredImportSelector接口,这个DeferredImportSelector接口是ImportSelector的子接口,表示延迟导入的意思。在上面的分析中,其实最主要的是实现他的接口selectImports,直接源码:
@Override

public String[] selectImports(AnnotationMetadata annotationMetadata) {

  if (!isEnabled(annotationMetadata)) {

    return NO_IMPORTS;

  }

  // 获取自动装配的实体

  AutoConfigurationEntry autoConfigurationEntry = getAutoConfigurationEntry(annotationMetadata);

  return StringUtils.toStringArray(autoConfigurationEntry.getConfigurations());

}

protected AutoConfigurationEntry getAutoConfigurationEntry(AnnotationMetadata annotationMetadata) {

  if (!isEnabled(annotationMetadata)) {

    return EMPTY_ENTRY;

  }

  AnnotationAttributes attributes = getAttributes(annotationMetadata);

  // 获取合格(候选)的配置

  List<String> configurations = getCandidateConfigurations(annotationMetadata, attributes);

  configurations = removeDuplicates(configurations);

  Set<String> exclusions = getExclusions(annotationMetadata, attributes);

  checkExcludedClasses(configurations, exclusions);

  configurations.removeAll(exclusions);

  configurations = getConfigurationClassFilter().filter(configurations);

  fireAutoConfigurationImportEvents(configurations, exclusions);

  return new AutoConfigurationEntry(configurations, exclusions);

}

protected List<String> getCandidateConfigurations(AnnotationMetadata metadata, AnnotationAttributes attributes) {

  // 加载配置,根据factoryType,这里的FactoryType就是@EnableAutoConfiguration注解

  List<String> configurations = SpringFactoriesLoader.loadFactoryNames(getSpringFactoriesLoaderFactoryClass(),

                                                                       getBeanClassLoader());

  Assert.notEmpty(configurations, "No auto configuration classes found in META-INF/spring.factories. If you "

                  + "are using a custom packaging, make sure that file is correct.");

  return configurations;

}

protected Class<?> getSpringFactoriesLoaderFactoryClass() {

  // 直接返回@EnableAutoConfiguration 注解

  return EnableAutoConfiguration.class;

}

public static List<String> loadFactoryNames(Class<?> factoryType, @Nullable ClassLoader classLoader) {

  String factoryTypeName = factoryType.getName();

  // 加载spring.factories文件并解析

  return loadSpringFactories(classLoader).getOrDefault(factoryTypeName, Collections.emptyList());

}

private static Map<String, List<String>> loadSpringFactories(@Nullable ClassLoader classLoader) {

  MultiValueMap<String, String> result = cache.get(classLoader);

  if (result != null) {

    return result;

  }

  try

    // 这里获取的url就是:

    // public static final String FACTORIES_RESOURCE_LOCATION = "META-INF/spring.factories";

    Enumeration<URL> urls = (classLoader != null ?

                             classLoader.getResources(FACTORIES_RESOURCE_LOCATION) :

                             ClassLoader.getSystemResources(FACTORIES_RESOURCE_LOCATION));

    result = new LinkedMultiValueMap<>();

    while (urls.hasMoreElements()) {

      URL url = urls.nextElement();

      UrlResource resource = new UrlResource(url);

      // 读取属性文件,获取到key为EnableAutoConfiguration,value为需要加载的类

      Properties properties = PropertiesLoaderUtils.loadProperties(resource);

      for (Map.Entry<?, ?> entry : properties.entrySet()) {

        String factoryTypeName = ((String) entry.getKey()).trim();

        for (String factoryImplementationName : StringUtils.commaDelimitedListToStringArray((String) entry.getValue())) {

          result.add(factoryTypeName, factoryImplementationName.trim());

        }

      }

    }

    cache.put(classLoader, result);

    return result;

  }

  catch (IOException ex) {

    throw new IllegalArgumentException("Unable to load factories from location [" +

                                       FACTORIES_RESOURCE_LOCATION + "]", ex);

  }

}
所以我们也可以自己写一个进行自动装配,接下来实现一个简单的自动装配。
定义自动装配注解
/**

 * @author <a href="https://www.cnblogs.com/redwinter/">redwinter</a>

 * @since 1.0

 **/

@Target(ElementType.TYPE)

@Retention(RetentionPolicy.RUNTIME)

@Import(MyImportSelector.class)

public @interface EnableRedwinterAutoConfiguration {

}
创建MyInportSelector类
/**

 * @author <a href="https://www.cnblogs.com/redwinter/">redwinter</a>

 * @since 1.0

 **/

public class MyImportSelector implements DeferredImportSelector {

  @Override

  public String[] selectImports(AnnotationMetadata importingClassMetadata) {

    ClassLoader classLoader = this.getClass().getClassLoader();

    // 加载需要装配的类

    List<String> configurations = SpringFactoriesLoader.loadFactoryNames(getFactoryTypeClass(), classLoader);

    return configurations.toArray(new String[configurations.size()]);

  }

  private Class<?> getFactoryTypeClass() {

    return EnableRedwinterAutoConfiguration.class;

  }

}
创建启动类
/**

 * @author <a href="https://www.cnblogs.com/redwinter/">redwinter</a>

 * @since 1.0

 **/

@Configuration

@EnableRedwinterAutoConfiguration

public class RedwinterApplication {

  	public static void main(String[] args) {

		AnnotationConfigApplicationContext context = new AnnotationConfigApplicationContext();

		context.scan("com.redwinter.test.config");

		context.refresh();

	}

}
创建需要装配的类
/**

 * @author <a href=""https://www.cnblogs.com/redwinter/">redwinter</a>

 * @since 1.0

 **/

@Configuration

public class MyConfiguration {

	@Bean

	@Conditional(RedwinterStrCondition.class)

	public String myStr() {

		return "redwinter";

	}

	public static class RedwinterStrCondition implements ConfigurationCondition {

		@Override

		public ConfigurationPhase getConfigurationPhase() {

			return ConfigurationPhase.REGISTER_BEAN;

		}

		@Override

		public boolean matches(ConditionContext context, AnnotatedTypeMetadata metadata) {

			System.out.println("开始匹配。。。");

			return true;

		}

	}

}
创建spring.factories文件
com.redwinter.test.config.EnableRedwinterAutoConfiguration=\

  com.redwinter.test.config.MyConfiguration
启动验证
debug断点:
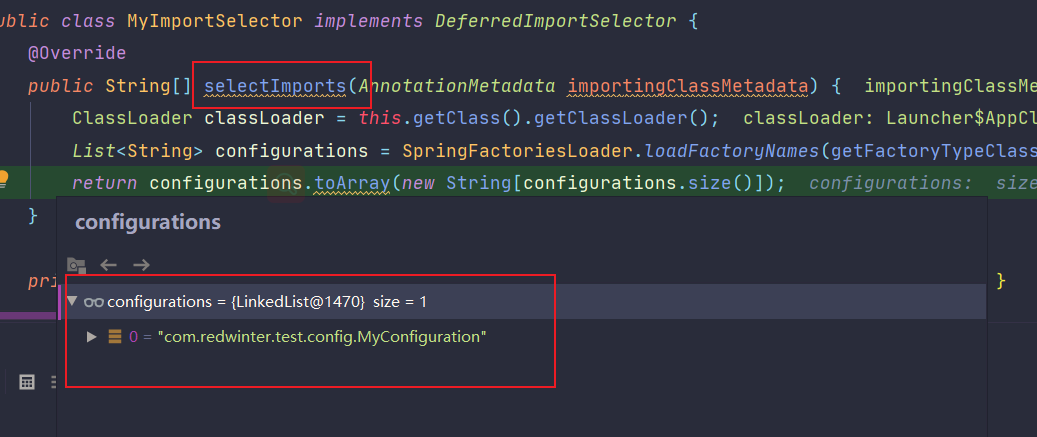
这就是Spring Boot自动装配的简化版,总得来说我们完成了Spring 对BeanFactoryPostProcessor的执行过程的解析,包括Spring是如何进行注解解析的,其实就是Spring在对BeanDefinition在正式初始化为Bean的前置处理,所以我们可以这个阶段进行很多扩展,比如占位符的处理PropertySourcesPlaceholderConfigurer等。
接下来接续解读AbstractApplicationContext#refresh方法对BeanPostProcessor的注册。
Spring 源码(7)Spring的注解是如何解析的?的更多相关文章
- Spring源码情操陶冶-PropertyPlaceholderBeanDefinitionParser注解配置解析器
本文针对spring配置的context:property-placeholder作下简单的分析,承接前文Spring源码情操陶冶-自定义节点的解析 spring配置文件应用 <context: ...
- Spring源码情操陶冶-AnnotationConfigBeanDefinitionParser注解配置解析器
本文承接前文Spring源码情操陶冶-自定义节点的解析,分析spring中的context:annotation-config节点如何被解析 源码概览 对BeanDefinitionParser接口的 ...
- Spring源码分析-从@ComponentScan注解配置包扫描路径到IoC容器中的BeanDefinition,经历了什么(一)?
阅前提醒 全文较长,建议沉下心来慢慢阅读,最好是打开Idea,点开Spring源码,跟着下文一步一步阅读,更加便于理解.由于笔者水平优先,编写时间仓促,文中难免会出现一些错误或者不准确的地方,恳请各位 ...
- Spring源码解读Spring IOC原理
一.什么是Ioc/DI? IoC 容器:最主要是完成了完成对象的创建和依赖的管理注入等等. 先从我们自己设计这样一个视角来考虑: 所谓控制反转,就是把原先我们代码里面需要实现的对象创建.依赖的代码,反 ...
- 初探Spring源码之Spring Bean的生命周期
写在前面的话: 学无止境,写博客纯粹是一种乐趣而已,把自己理解的东西分享出去,不意味全是对的,欢迎指正! Spring 容器初始化过程做了什么? AnnotationConfigApplication ...
- Spring源码阅读-spring启动
web.xml web.xml中的spring容器配置 <listener> <listener-class>org.springframework.web.context.C ...
- spring源码系列(一)sring源码编译 spring源码下载 spring源码阅读
想对spring框架进行深入的学习一下,看看源代码,提升和沉淀下自己,工欲善其事必先利其器,还是先搭建环境吧. 环境搭建 sping源码之前是svn管理,现在已经迁移到了github中了,新版本基于g ...
- Spring源码:Spring IoC容器加载过程(2)
Spring源码版本:4.3.23.RELEASE 一.加载XML配置 通过XML配置创建Spring,创建入口是使用org.springframework.context.support.Class ...
- Spring源码:Spring IoC容器加载过程(1)
Spring源码版本:4.3.23.RELEASE 一.加载过程概览 Spring容器加载过程可以在org.springframework.context.support.AbstractApplic ...
- 【Spring 源码】Spring 加载资源并装配对象的过程(XmlBeanDefinitionReader)
Spring 加载资源并装配对象过程 在Spring中对XML配置文件的解析从3.1版本开始不再推荐使用XmlBeanFactory而是使用XmlBeanDefinitionReader. Class ...
随机推荐
- redis整理:常用命令,雪崩击穿穿透原因及方案,分布式锁实现思路,分布式锁redission(更新中)
redis个人整理笔记 reids常见数据结构 基本类型 String: 普通key-value Hash: 类似hashMap List: 双向链表 Set: 不可重复 SortedSet: 不可重 ...
- spring-boot-关于配置文件
------------恢复内容开始------------ spring-boot 的配置文件有四个地方: 项目更目录下的config目you录下(自己建) 项目根目录下 resource 目录下的 ...
- Spring Bean生命周期回调方法
参阅官方文档:https://docs.spring.io/spring/docs/current/spring-framework-reference/core.html#beans-factory ...
- 解决Project出来的问题
问题显现: 解决办法: 恢复默认布局
- 视觉SLAM十四讲:从理论到实践 两版 PDF和源码
视觉SLAM十四讲:从理论到实践 第一版电子版PDF 链接:https://pan.baidu.com/s/1SuuSpavo_fj7xqTYtgHBfw提取码:lr4t 源码github链接:htt ...
- IE中input标签密码框与文本框宽度不一样问题
前言 在项目登录界面中有账户和密码的输入框,在Chrome中显示是正常的(本人使用的是Chrome浏览器,平时不用IE).等部署到客户的服务器上,访问时发现一个问题,在IE浏览器中文本框与密码框的宽度 ...
- API的自动化测试
传统的测试工具在测试一个API的时候,必须手动填写这个API所需要接收的所有信息,比如一个查询航班动态的API,他接收两个输入字段,一个叫flight, 一个叫date,那么测试这个API的用户,需要 ...
- 后端渲染神器!Dust
Dust一个适用于浏览器与node的异步模板框架. 先上实例 后端模板: {@inject api="http://api.myserver.com/get_message"} & ...
- audio小记
写H5活动页的需要音频,图标旋转停止保持当时的旋转角度,这样视觉体验效果好: 之前写法是点击pause()就直接停止动画,后来发现了animation有个比较好的属性animation-play-st ...
- uni-app开发的h5 访问url自动添加 #的问题
在manifest.json配置文件修改h5的内容,添加router部分 "h5" : { "title" : "xxx", "d ...