getGlobalVisibleRect和getLocalVisibleRect
在看android官网的demo的时候遇到这两个api,开始不是很明白这两个方法的作用。
通过多次的调试和测试之后慢慢开始有了点眉目,为了防止以后忘记,以此博文为记。
作为测试的目的,我写了这样一个布局
<RelativeLayout xmlns:android="http://schemas.android.com/apk/res/android"

                xmlns:tools="http://schemas.android.com/tools"

                android:layout_width="match_parent"

                android:layout_height="match_parent"

                android:id="@+id/container"

                tools:context=".MainActivity"

                android:paddingLeft="10px">

    <LinearLayout

        android:layout_width="fill_parent"

        android:layout_height="fill_parent"

        android:orientation="vertical"

        android:id="@+id/innerL"

        android:paddingLeft="20px">
        <ImageView

            android:id="@+id/expandedImage"

            android:layout_width="wrap_content"

            android:src="@drawable/thumb1"

            android:layout_height="wrap_content"/>

    </LinearLayout>

</RelativeLayout>
另外为了方便测试,我将虚拟机设置为1dp=1px,大小等于320x480
因为这两个方法在View对象里面,所以基本上继承自View的对象都可以使用。
也是为了方便自己,我使用ImageView作为测试对象,图片大小为160x120px
下面是我自己的一个测试过程:
因为getLocalVisibleRect只有一个参数,所以我从这个方法入手
代码如下
@Override

    protected void onCreate(Bundle savedInstanceState)

    {

        super.onCreate(savedInstanceState);

        setContentView(R.layout.activity_main);

        final ImageView imageView = (ImageView) findViewById(R.id.expandedImage);

        imageView.setOnClickListener(new View.OnClickListener()

        {

            @Override

            public void onClick(View v)

            {

                Rect localRect = new Rect();

                imageView.getLocalVisibleRect(localRect);

                System.out.println("local" + localRect);

            }

        });

    }
程序执行后Logcat输出:
localRect(0, 0 - 160, 120)
很明显localRect变量中的right和bottom正是图片的长和宽。
目前的结论是:getLocalVisibleRect(Rect r)方法可以把视图的长和宽映射到一个Rect对象上。
这里我们先放下这个方法,把注意力集中到getGlobalVisibleRect方法中。
将代码改为:
@Override

    protected void onCreate(Bundle savedInstanceState)

    {

        super.onCreate(savedInstanceState);

        setContentView(R.layout.activity_main);

        final ImageView imageView = (ImageView) findViewById(R.id.expandedImage);

        imageView.setOnClickListener(new View.OnClickListener()

        {

            @Override

            public void onClick(View v)

            {

                Rect globalRect = new Rect();

                imageView.getGlobalVisibleRect(globalRect);

                System.out.println("global" + globalRect);

            }

        });

    }
Logcat输出:
globalRect(30, 81 - 190, 201)
除了30和190可以猜测出是什么(即left和right),其他的基本上没有什么线索,只知道是top和bottom。
30是paddingLeft,即图片向右偏移了30px,因此right很自然就多了30px
top和bottom要知道是什么,我用了最笨的办法,就是用尺子量。

可见,这81像素就是状态栏加上ActionBar的高度,所以Bottom120加上81就是201
目前的结论是:getGlobalVisibleRect方法的作用是获取视图在屏幕坐标系中的偏移量
那么,我的结论真的是正确的吗,其实我也不知道,继续测试下去。
把原先的布局文件改成下面这样的,现在我们重点对LinearLayout进行测试
<RelativeLayout xmlns:android="http://schemas.android.com/apk/res/android"

                xmlns:tools="http://schemas.android.com/tools"

                android:layout_width="match_parent"

                android:layout_height="match_parent"

                android:id="@+id/container"

                tools:context=".MainActivity">

    <LinearLayout

        android:layout_width="320dp"

        android:layout_height="480dp"

        android:orientation="vertical"

        android:id="@+id/innerL"

        android:background="#550000ff"

        android:layout_marginLeft="-50px"

        android:layout_marginTop="30px">

    </LinearLayout>

</RelativeLayout>
布局效果如下:这种布局的目的是让这个View超出屏幕区域

java代码如下:
@Override

    protected void onCreate(Bundle savedInstanceState)

    {

        super.onCreate(savedInstanceState);

        setContentView(R.layout.activity_main);

        final LinearLayout ll = (LinearLayout) findViewById(R.id.innerL);

        ll.setOnClickListener(new View.OnClickListener()

        {

            @Override

            public void onClick(View v)

            {

                Rect localRect = new Rect();

                ll.getLocalVisibleRect(localRect);

                Rect globalRect = new Rect();

                ll.getGlobalVisibleRect(globalRect);

                System.out.println("global" + globalRect);

                System.out.println("local" + localRect);

            }

        });

    }
现在我们可以点击蓝色的这个布局获取数据,这次我们同时获取这两个方法返回的数据
Logcat数据:
globalRect(0, 111 - 271, 480)
localRect(49, 0 - 320, 369)
先来画图分析globalRect中的数据,在前面我们知道globalRect是基于屏幕坐标系的
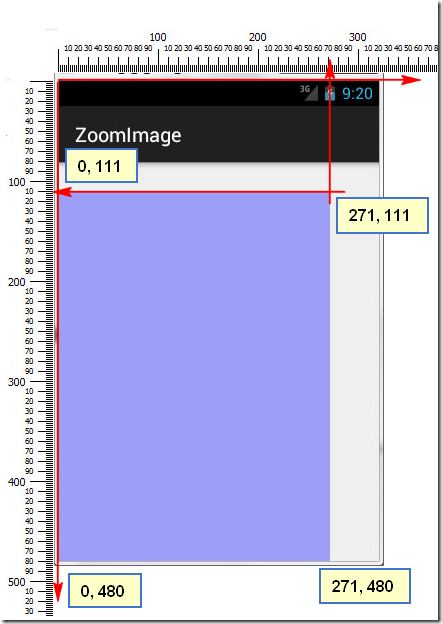
从上图可以看出,蓝色区域的四个点的坐标实际上是LinearLayout在屏幕坐标系的可见区域
结论:
getGlobalVisibleRect方法的作用是获取视图在屏幕坐标中的可视区域
另外需要说的是,getGlobalVisibleRect还可以接受第二个Point类型的参数:
targetView.getGlobalVisibleRect(Rect r, Point gobalOffset)
调用完毕后,globalOffset的值就是targetView原点偏离屏幕坐标原点的距离。
现在来看localRect(49, 0 - 320, 369),初步猜测它是基于视图本身的坐标,
只要该视图没有被遮挡,targetView.getLocalVisibleRect()的坐标总是等于:
(0, 0, targetView.getwidth(), targetView.getheight())
从布局不难看出,我们让它向左偏移了50个像素,因此它本身的坐标也跟着向左移动50像素,
至于为什么是49,这个我也不太清楚。因为视图的top和right在该布局中总是可见,所以是0和320,
而bottom已经超出了屏幕, 所以480(屏幕的高度)-111(ActionBar+statusBar+marginTop)=369.
结论是:
getLocalVisibleRect的作用是获取视图本身可见的坐标区域,坐标以自己的左上角为原点(0,0)
最后测试图:

布局文件代码:
<RelativeLayout xmlns:android="http://schemas.android.com/apk/res/android"

                xmlns:tools="http://schemas.android.com/tools"

                android:layout_width="match_parent"

                android:layout_height="match_parent"

                android:id="@+id/container"

                tools:context=".MainActivity">

    <LinearLayout

        android:layout_width="fill_parent"

        android:layout_height="fill_parent"

        android:orientation="vertical"

        android:id="@+id/innerL">

        <ImageView

            android:id="@+id/img"

            android:layout_width="wrap_content"

            android:layout_height="wrap_content"

            android:src="@drawable/thumb1"/>

    </LinearLayout>

    <TextView

        android:id="@+id/local"

        android:layout_width="wrap_content"

        android:layout_height="wrap_content"

        android:layout_centerHorizontal="true"

        android:layout_centerVertical="true"/>

    <TextView

        android:id="@+id/global"

        android:layout_width="wrap_content"

        android:layout_height="wrap_content"

        android:layout_alignLeft="@id/local"

        android:layout_below="@id/local"/>

    <TextView

        android:id="@+id/offset"

        android:layout_width="wrap_content"

        android:layout_height="wrap_content"

        android:layout_alignLeft="@id/local"

        android:layout_below="@id/global"/>

</RelativeLayout>
程序逻辑:
package com.whathecode.zoomimage;

import android.graphics.Point;

import android.graphics.Rect;

import android.os.Bundle;

import android.support.v7.app.ActionBarActivity;

import android.view.MotionEvent;

import android.view.View;

import android.widget.ImageView;

import android.widget.TextView;

public class MainActivity extends ActionBarActivity

{

    private int lastX = 0;

    private int lastY = 0;

    @Override

    protected void onCreate(Bundle savedInstanceState)

    {

        super.onCreate(savedInstanceState);

        setContentView(R.layout.activity_main);

        ImageView imageView = (ImageView) findViewById(R.id.img);

        imageView.setOnTouchListener(new View.OnTouchListener()

        {

            @Override

            public boolean onTouch(View v, MotionEvent event)

            {

                switch (event.getAction())

                {

                    case MotionEvent.ACTION_DOWN:

                        lastX = (int) event.getRawX();

                        lastY = (int) event.getRawY();

                        break;

                    case MotionEvent.ACTION_MOVE:

                        int dx = (int) event.getRawX() - lastX;

                        int dy = (int) event.getRawY() - lastY;

                        int left = v.getLeft() + dx;

                        int top = v.getTop() + dy;

                        int right = v.getRight() + dx;

                        int bottom = v.getBottom() + dy;

                        v.layout(left, top, right, bottom);

                        lastX = (int) event.getRawX();

                        lastY = (int) event.getRawY();

                        Rect localRect = new Rect();

                        v.getLocalVisibleRect(localRect);

                        ((TextView) findViewById(R.id.local))

                                .setText("local" + localRect.toString());

                        Rect globalRect = new Rect();

                        Point globalOffset = new Point();

                        v.getGlobalVisibleRect(globalRect, globalOffset);

                        ((TextView) findViewById(R.id.global))

                                .setText("global" + globalRect.toString());

                        ((TextView) findViewById(R.id.offset))

                                .setText("globalOffset:" + globalOffset.x + "," + globalOffset.y);

                        break;

                    case MotionEvent.ACTION_UP:

                        break;

                }

                return true;

            }

        });

    }

}
getGlobalVisibleRect和getLocalVisibleRect的更多相关文章
- AnimationsDemo中的ZoomActivity代码分析
AnimationsDemo是android官网的一个动画使用示例. ZoomActivity是demo中的图像缩放动画,因为这种效果比较常见,所以研究了一下代码. 下面是效果图: 毫无疑问这是一个组 ...
- Android 判断一个 View 是否可见 getLocalVisibleRect(rect) 与 getGlobalVisibleRect(rect)
Android 判断一个 View 是否可见 getLocalVisibleRect(rect) 与 getGlobalVisibleRect(rect) [TOC] 这两个方法的区别 View.ge ...
- View的个得区域函数getHitRect,getDrawingRect,getLocalVisibleRect,getGlobalVisibleRect(*)
注意: OnCreate()函数中 调用下面函数,结果全为0,要等UI控件都加载完了才能得到绘制时的值. getHitRect 以父控件的左上为原点,计算当前view在父控件的区域,不管父控件在屏幕的 ...
- getDrawingRect,getHitRect,getLocalVisibleRect,getGlobalVisibleRect
本文主要大体讲下getHitRect().getDrawingRect().getLocalVisibleRect().getGlobalVisibleRect. getLocationOnScree ...
- Android View各种尺寸位置相关的方法探究
Android View各种尺寸位置相关的方法探究 本来想做一个View间的碰撞检测之类的. 动手做了才发现不是想象的那么简单. 首先,写好了碰撞检测的工具类如下: package com.mengd ...
- Android坐标系统
1 背景 去年有很多人私信告诉我让说说自定义控件,其实通观网络上的很多博客都在讲各种自定义控件,但是大多数都是授之以鱼,却很少有较为系统性授之于渔的文章,同时由于自己也迟迟没有时间规划这一系列文章, ...
- view坐标_ _ Android应用坐标系统全面详解
转:http://blog.csdn.net/yanbober/article/details/50419117 1 背景 去年有很多人私信告诉我让说说自定义控件,其实通观网络上的很多博客都在讲各种自 ...
- android应用程序中获取view 的位置
1. 相对位置: getLeft() , getRight(), getTop(), getBottom() 在Android中可以把left相当于X轴值, top相当于Y轴值, 通过这两个值Andr ...
- android坐标
说来说去都不如 画图示意 简单易懂啊!!!真是的! 来吧~~先上张图~~! (一)首先明确一下 android 中的坐标系统 : 屏幕的左上角是坐标系统原点(0,0) 原点向右延伸 ...
随机推荐
- childViewController 小计
设置childViewcontroller Unbalanced calls to begin/end appearance transitions for 以上报错 需要添加 transitionF ...
- IOS开发基础知识--碎片19
1:键盘事件顺序 UIKeyboardWillShowNotification // 键盘显示之前 UIKeyboardDidShowNotification // 键盘显示完成后 UIKeyboar ...
- Linux常用命令:sed
本文记录的是自己在学习<Linux私房菜>中正则表达式的笔记. 关于行尾符$ 如果文件本身没有内容,比如使用touch新建的文件,那么$将会没有意义.例如下面操作: 先使用touch新建了 ...
- 【代码笔记】iOS-网络嗅探
一,效果图. 二,工程图. 三,代码. AppDelegate.h #import <UIKit/UIKit.h> #import "Reachability.h" @ ...
- Windows平台分布式架构实践 - 负载均衡 上
概述 最近.NET的世界开始闹腾了,微软官方终于加入到了对.NET跨平台的支持,并且在不久的将来,我们在VS里面写的代码可能就可以通过Mono直接在Linux和Mac上运行.那么大家(开发者和企业)为 ...
- Play Framework 完整实现一个APP(六)
需要为Blog添加 查看和发表评论的功能 1.创建查看功能 Application.java中添加 show() 方法 public static void show(Long id) { Post ...
- html经验汇总
1.点击radio的文字时,自动选中.可以在input里放置label,然后for属性关联input的id <input type="radio" id="male ...
- Oracle system identifier(SID) "xxx" alread exits. Specify another SID
案例环境: 操作系统 :Oracle Linux Server release 5.7 64 bit 数据库版本:Oracle Database 10g Release 10.2.0.4.0 - ...
- Linux系统检查查看桌面环境
Linux的桌面系统系统多达十几种,像gnome.kde.mate.cinnamon.lxde.xfce.jwm等.比较常用的一般是gnome.kde.xfce等.那么如何判断Linux系统安装了哪种 ...
- java实现基于activeMQ的消息推送
一. 准备工作 1. 点击此下载相关的第三方jar包,并在工程中引用 二. spring配置文件:application.xml <?xml version="1.0" en ...