CentOS 8.x 编译安装LNMP(Linux + Nginx + MySQL + PHP)架构部署动态网站环境
LNMP动态网站部署架构是一套由Linux + Nginx + MySQL + PHP组成的动态网站系统解决方案,具有免费、高效、扩展性强且资源消耗低等优良特性,目前正在被广泛使用。
前传:
1、CentOS 8.x系统安装配置图解教程
https://www.osyunwei.com/archives/11499.html
2、CentOS服务器初始化设置
http://www.osyunwei.com/archives/9034.html
准备篇
一、防火墙配置
CentOS 8.x默认使用的是firewall作为防火墙,这里改为iptables防火墙。
1、关闭firewall:
systemctl stop firewalld.service #停止firewall
systemctl disable firewalld.service #禁止firewall开机启动
systemctl mask firewalld
systemctl stop firewalld
yum remove firewalld
2、安装iptables防火墙
yum install iptables-services #安装
vi /etc/sysconfig/iptables #编辑防火墙配置文件
# sample configuration for iptables service
# you can edit this manually or use system-config-firewall
# please do not ask us to add additional ports/services to this default configuration
*filter
:INPUT ACCEPT [0:0]
:FORWARD ACCEPT [0:0]
:OUTPUT ACCEPT [0:0]
-A INPUT -m state --state RELATED,ESTABLISHED -j ACCEPT
-A INPUT -p icmp -j ACCEPT
-A INPUT -i lo -j ACCEPT
-A INPUT -p tcp -m state --state NEW -m tcp --dport 22 -j ACCEPT
-A INPUT -p tcp -m state --state NEW -m tcp --dport 80 -j ACCEPT
-A INPUT -p tcp -m state --state NEW -m tcp --dport 443 -j ACCEPT
-A INPUT -p tcp -m state --state NEW -m tcp --dport 3306 -j ACCEPT
-A INPUT -j REJECT --reject-with icmp-host-prohibited
-A FORWARD -j REJECT --reject-with icmp-host-prohibited
COMMIT
:wq! #保存退出
systemctl restart iptables.service #最后重启防火墙使配置生效
systemctl enable iptables.service #设置防火墙开机启动
/usr/libexec/iptables/iptables.init restart #重启防火墙
二、关闭SELINUX
vi /etc/selinux/config
#SELINUX=enforcing #注释掉
#SELINUXTYPE=targeted #注释掉
SELINUX=disabled #增加
:wq! #保存退出
setenforce 0 #使配置立即生效
三 、系统约定
软件源代码包存放位置:/usr/local/src
源码包编译安装位置:/usr/local/软件名字
四、下载软件包
1、下载nginx
http://nginx.org/download/nginx-1.16.1.tar.gz
2、下载MySQL
http://mirrors.sohu.com/mysql/MySQL-8.0/mysql-8.0.19.tar.gz
3、下载php
http://mirrors.sohu.com/php/php-7.4.4.tar.gz
http://mirrors.sohu.com/php/php-7.3.16.tar.gz
http://mirrors.sohu.com/php/php-7.2.29.tar.gz
http://mirrors.sohu.com/php/php-7.1.33.tar.gz
http://mirrors.sohu.com/php/php-7.0.33.tar.gz
http://mirrors.sohu.com/php/php-5.6.40.tar.gz
http://mirrors.sohu.com/php/php-5.5.38.tar.gz
http://mirrors.sohu.com/php/php-5.4.45.tar.gz
http://mirrors.sohu.com/php/php-5.3.29.tar.gz
http://museum.php.net/php5/php-5.2.17.tar.gz
http://php-fpm.org/downloads/php-5.2.17-fpm-0.5.14.diff.gz
4、下载cmake(MySQL编译工具)
https://github.com/Kitware/CMake/releases/download/v3.15.4/cmake-3.15.4.tar.gz
5、下载pcre (支持nginx伪静态)
http://ftp.pcre.org/pub/pcre/pcre-8.44.tar.gz
6、下载openssl(nginx扩展)
6.1下载最新稳定版本,适用于nginx扩展https
https://www.openssl.org/source/openssl-1.1.1e.tar.gz
6.2下载旧版本,适用于php5.6.x及其以下版本编译安装openssl扩展
https://www.openssl.org/source/old/1.0.2/openssl-1.0.2k.tar.gz
7、下载zlib(nginx扩展)
http://www.zlib.net/zlib-1.2.11.tar.gz
8、下载libmcrypt(php扩展)
https://nchc.dl.sourceforge.net/project/mcrypt/Libmcrypt/2.5.8/libmcrypt-2.5.8.tar.gz
9、下载yasm(php扩展)
http://www.tortall.net/projects/yasm/releases/yasm-1.3.0.tar.gz
10、t1lib(php扩展)
http://download.freenas.org/distfiles/t1lib-5.1.2.tar.gz
11、下载gd库安装包
11.1适用于php 5.4.x及其以上版本
https://github.com/libgd/libgd/releases/download/gd-2.3.0/libgd-2.3.0.tar.gz
11.2适用于 php 5.3.x 5.2.x版本
https://jaist.dl.sourceforge.net/project/gd2/gd-2.0.35.tar.gz
12、libvpx(gd库需要)
https://github.com/webmproject/libvpx/archive/v1.8.2/libvpx-1.8.2.tar.gz
13、tiff(gd库需要)
http://download.osgeo.org/libtiff/tiff-4.0.7.tar.gz
14、libpng(gd库需要)
ftp://ftp.simplesystems.org/pub/libpng/png/src/libpng16/libpng-1.6.37.tar.gz
15、freetype(gd库需要)
https://download.savannah.gnu.org/releases/freetype/freetype-2.10.1.tar.gz
16、jpegsrc(gd库需要)
http://distfiles.macports.org/jpeg/jpegsrc.v9d.tar.gz
17、Boost(编译mysql需要)
https://dl.bintray.com/boostorg/release/1.70.0/source/boost_1_70_0.tar.gz
18、libzip(编译php需要)
https://libzip.org/download/libzip-1.2.0.tar.gz
19、rpcsvc-proto(编译MySQL需要)
https://github.com/thkukuk/rpcsvc-proto/releases/download/v1.4/rpcsvc-proto-1.4.tar.gz
20、oniguruma(编译安装php7.4.x需要)
https://github.com/kkos/oniguruma/archive/v6.9.4.tar.gz -O oniguruma-6.9.4.tar.gz
21、curl库(编译php需要)
https://curl.haxx.se/download/curl-7.29.0.tar.gz
五、安装编译工具及库文件(使用yum命令安装)
yum install apr* autoconf automake bison bzip2 bzip2* cpp curl curl-devel fontconfig fontconfig-devel freetype-devel git gcc gcc-c++ gd gd-devel gettext gettext-devel glibc kernel kernel-headers keyutils keyutils-libs-devel krb5-devel libcom_err-devel libpng libpng-devel libjpeg* libsepol-devel libselinux-devel libstdc++-devel libtool* libgomp libxml2 libxml2-devel libXpm* libxml* libXaw-devel libXmu-devel libtiff libtiff* make openssl openssl-devel patch pcre-devel perl php-common php-gd policycoreutils telnet wget zlib-devel ncurses-devel libtirpc-devel gtk* ntpstat bison* sqlite-devel oniguruma libzip-devel
安装篇
以下是用putty工具远程登录到服务器,在命令行下面操作的
一、安装MySQL
1、安装rpcsvc-proto
cd /usr/local/src
tar zxvf rpcsvc-proto-1.4.tar.gz
cd rpcsvc-proto-1.4
./configure
make
make install
2、安装cmake
cd /usr/local/src
tar zxvf cmake-3.15.4.tar.gz
cd cmake-3.15.4
./configure
make
make install
3、安装MySQL
cd /usr/local/src
mkdir -p /usr/local/boost
cp boost_1_70_0.tar.gz /usr/local/boost
groupadd mysql #添加mysql组
useradd -g mysql mysql -s /bin/false #创建用户mysql并加入到mysql组,不允许mysql用户直接登录系统
mkdir -p /data/mysql #创建MySQL数据库存放目录
chown -R mysql:mysql /data/mysql #设置MySQL数据库存放目录权限
mkdir -p /usr/local/mysql #创建MySQL安装目录
cd /usr/local/src #进入软件包存放目录
tar zxvf mysql-8.0.19.tar.gz #解压
cd mysql-8.0.19 #进入目录
cmake . -DCMAKE_INSTALL_PREFIX=/usr/local/mysql -DINSTALL_DATADIR=/data/mysql -DMYSQL_USER=mysql -DMYSQL_UNIX_ADDR=/tmp/mysqld.sock -DDEFAULT_CHARSET=utf8 -DDEFAULT_COLLATION=utf8_general_ci -DWITH_INNOBASE_STORAGE_ENGINE=1 -DWITH_EMBEDDED_SERVER=1 -DFORCE_INSOURCE_BUILD=1 -DWITH_MYISAM_STORAGE_ENGINE=1 -DENABLED_LOCAL_INFILE=1 -DEXTRA_CHARSETS=all -DDOWNLOAD_BOOST=1 -DWITH_BOOST=/usr/local/boost -DCMAKE_C_COMPILER=/usr/bin/gcc -DCMAKE_CXX_COMPILER=/usr/bin/g++
make #编译
make install #安装
编译出错, 重新编译前要删除编译失败的文件,重新编译时,需要清除旧的对象文件和缓存信息。
make clean
rm -f CMakeCache.txt
rm -rf /etc/my.cnf #删除系统默认的配置文件(如果默认没有就不用删除)
cd /usr/local/mysql #进入MySQL安装目录
./bin/mysqld --user=mysql --initialize --basedir=/usr/local/mysql --datadir=/data/mysql #生成mysql系统数据库
--initialize表示默认生成密码, --initialize-insecure 表示不生成密码, 密码为空。
看到这一行[Note] [MY-010454] [Server] A temporary password is generated for root@localhost: LZrRpp40AG*-
记录下自动生成的mysql管理员root账号登录密码LZrRpp40AG*-
vi /usr/local/mysql/my.cnf #mysql 8.0.x默认没有配置文件,我们自己创建一个。
[client]
port=3306
socket=/tmp/mysql.sock
[mysqld]
port=3306
user = mysql
socket=/tmp/mysql.sock
tmpdir = /tmp
key_buffer_size=16M
max_allowed_packet=128M
default_authentication_plugin=mysql_native_password #设置加密方式为mysql_native_password,MySQL 8.0.x默认使用caching_sha2_password加密。
open_files_limit = 60000
explicit_defaults_for_timestamp
server-id = 1
character-set-server = utf8
federated
max_connections = 1000
max_connect_errors = 100000
interactive_timeout = 86400
wait_timeout = 86400
sync_binlog=0
back_log=100
default-storage-engine = InnoDB
log_slave_updates = 1
[mysqldump]
quick
[client]
# The following password will be sent to all standard MySQL clients
password="my password"
[mysqld-8.0]
sql_mode=TRADITIONAL
[mysqladmin]
force
[mysqld]
key_buffer_size=16M
:wq! #保存退出
ln -s /usr/local/mysql/my.cnf /etc/my.cnf #添加到/etc目录的软连接
cp /usr/local/mysql/support-files/mysql.server /etc/rc.d/init.d/mysqld #把Mysql加入系统启动
chmod 755 /etc/init.d/mysqld #增加执行权限
chkconfig mysqld on #加入开机启动
vi /etc/rc.d/init.d/mysqld #编辑
basedir=/usr/local/mysql #MySQL程序安装路径
datadir=/data/mysql #MySQl数据库存放目录
:wq! #保存退出
service mysqld start #启动
vi /etc/profile #把mysql服务加入系统环境变量:在最后添加下面这一行
export PATH=$PATH:/usr/local/mysql/bin
:wq! #保存退出
source /etc/profile #使配置立刻生效
下面这两行把myslq的库文件链接到系统默认的位置,这样你在编译类似PHP等软件时可以不用指定mysql的库文件地址。
ln -s /usr/local/mysql/lib/mysql /usr/lib/mysql
ln -s /usr/local/mysql/include/mysql /usr/include/mysql
mkdir /var/lib/mysql #创建目录
ln -s /tmp/mysql.sock /var/lib/mysql/mysql.sock #添加软链接
mysql -u root -p #输入之前生成的密码LZrRpp40AG*-回车
ALTER USER 'root'@'localhost' IDENTIFIED BY '123456' PASSWORD EXPIRE NEVER; #修改密码,NEVER表示密码永不过期
ALTER USER 'root'@'localhost' IDENTIFIED WITH mysql_native_password BY '123456' PASSWORD EXPIRE NEVER; #使用WITH mysql_native_password加密
#MySQL 8.0.x加密方式从mysql_native_password 更改为 caching_sha2_password,mysql8.0.x之前的客户端远程连接可能报错:authentication plugin caching_sha2
flush privileges; #刷新系统授权表
exit #退出mysql控制台
4、创建MySQL数据库、添加用户并授权
数据库名称:www.osyunwei.com
数据库用户名:osyunwei.com
数据库密码:osyunwei
授权osyunwei.com用户对www.osyunwei.com具有全部操作权限
继续在mysql控制台操作
mysql -u root -p #输入刚刚修改过的密码123456,回车
4.1、Create DATABASE IF NOT EXISTS 'www.osyunwei.com' default charset utf8 COLLATE utf8_general_ci; #创建数据库
4.2、CREATE USER 'osyunwei.com'@'localhost' IDENTIFIED BY 'osyunwei'; #创建用户
CREATE USER 'osyunwei.com'@'127.0.0.1' IDENTIFIED WITH mysql_native_password BY 'osyunwei'; #加密方式为mysql_native_password
4.3、grant all privileges on 'www.osyunwei.com'.* to 'osyunwei.com'@'localhost'; #授权用户osyunwei.com对数据库www.osyunwei.com具有全部操作权限
grant all privileges on www.osyunwei.com.* to 'osyunwei.com'@'127.0.0.1'; #授权用户
GRANT ALL PRIVILEGES ON *.* TO 'root'@'localhost' WITH GRANT OPTION; #授权root用户具有全部数据库本地权限
4.4、MySQL5.7版本后要授权用户对所有数据库有SUPER权限,否则上一步对用户的授权只能连接但无任何操作权限。
grant SUPER on *.* to 'osyunwei.com'@'localhost' ; #授予用户对所有数据库有SUPER权限,否则只能连接无任何操作权限。
grant SUPER on *.* to 'osyunwei.com'@'127.0.0.1' ;
flush privileges; #刷新系统授权表
exit #退出mysql控制台
service mysqld restart #重启mysql数据库
二、安装Nginx
1、安装pcre
cd /usr/local/src
mkdir /usr/local/pcre
tar zxvf pcre-8.44.tar.gz
cd pcre-8.44
./configure --prefix=/usr/local/pcre
make
make install
2、安装openssl
cd /usr/local/src
mkdir /usr/local/openssl
tar zxvf openssl-1.1.1e.tar.gz
cd openssl-1.1.1e
./config -fPIC shared zlib --prefix=/usr/local/openssl
make
make install
3、安装zlib
cd /usr/local/src
mkdir /usr/local/zlib
tar zxvf zlib-1.2.11.tar.gz
cd zlib-1.2.11
./configure --prefix=/usr/local/zlib
make
make install
4、安装Nginx
groupadd www
useradd -g www www -s /bin/false
cd /usr/local/src
tar zxvf nginx-1.16.1.tar.gz
cd nginx-1.16.1
./configure --prefix=/usr/local/nginx --without-http_memcached_module --user=www --group=www --with-http_stub_status_module --with-http_ssl_module --with-http_gzip_static_module --with-openssl=/usr/local/src/openssl-1.1.1e --with-zlib=/usr/local/src/zlib-1.2.11 --with-pcre=/usr/local/src/pcre-8.44
注意:--with-openssl=/usr/local/src/openssl-1.1.1e --with-zlib=/usr/local/src/zlib-1.2.11 --with-pcre=/usr/local/src/pcre-8.44指向的是源码包解压的路径,而不是安装的路径,否则会报错
make
make install
/usr/local/nginx/sbin/nginx #启动Nginx
设置nginx开机启动
vi /lib/systemd/system/nginx.service #添加以下代码
[Unit]
Description=The NGINX HTTP and reverse proxy server
After=syslog.target network.target remote-fs.target nss-lookup.target
[Service]
Type=forking
PIDFile=/usr/local/nginx/logs/nginx.pid
ExecStartPre=/usr/local/nginx/sbin/nginx -t
ExecStart=/usr/local/nginx/sbin/nginx
ExecReload=/usr/local/nginx/sbin/nginx -s reload
ExecStop=/bin/kill -s QUIT $MAINPID
ExecStartPost=/bin/sleep 0.1
PrivateTmp=true
[Install]
WantedBy=multi-user.target
:wq! #保存退出
/usr/local/nginx/sbin/nginx -s stop #停止
systemctl enable nginx.service #设置开机自启动
systemctl start nginx.service #启动
systemctl stop nginx.service #关闭
systemctl restart nginx.service #重启
systemctl reload nginx.service #重新加载配置文件
扩展阅读:
Nginx配置txt、pdf、doc、xls等文件直接下载的方法
在nginx配置文件中添加以下代码
location / {
if ($request_filename ~* ^.*?\.(txt|pdf|doc|xls)$){
add_header Content-Disposition: 'attachment;';
}
}
三、安装php
(一):安装php依赖包
1、安装yasm
cd /usr/local/src
tar zxvf yasm-1.3.0.tar.gz
cd yasm-1.3.0
./configure
make
make install
2、安装libmcrypt
cd /usr/local/src
tar zxvf libmcrypt-2.5.8.tar.gz
cd libmcrypt-2.5.8
./configure
make
make install
3、安装libvpx
cd /usr/local/src
tar zxvf libvpx-1.8.2.tar.gz
cd libvpx-1.8.2
./configure --prefix=/usr/local/libvpx --enable-shared --enable-vp9
make
make install
4、安装tiff
cd /usr/local/src
tar zxvf tiff-4.0.7.tar.gz
cd tiff-4.0.7
./configure --prefix=/usr/local/tiff --enable-shared
make
make install
5、安装libpng
cd /usr/local/src
tar zxvf libpng-1.6.37.tar.gz #解压
xz -d libpng-1.6.37.tar.xz #先解压xz
tar xvf libpng-1.6.37.tar #再解压tar
或者
tar xvJf libpng-1.6.37.tar.xz #直接解压
cd libpng-1.6.37
./configure --prefix=/usr/local/libpng --enable-shared
make
make install
6、安装freetype
cd /usr/local/src
tar zxvf freetype-2.10.1.tar.gz
cd freetype-2.10.1
./configure --prefix=/usr/local/freetype --enable-shared
make
make install
7、安装jpeg
cd /usr/local/src
tar zxvf jpegsrc.v9d.tar.gz
cd jpeg-9d
./configure --prefix=/usr/local/jpeg --enable-shared
make
make install
8、安装GD库
8.1安装新版本libgd,适用于php5.4.x及其以上版本
cd /usr/local/src
tar zxvf libgd-2.3.0.tar.gz
cd libgd-2.3.0
./configure --prefix=/usr/local/libgd --enable-shared --with-jpeg=/usr/local/jpeg --with-png=/usr/local/libpng --with-freetype=/usr/local/freetype --with-fontconfig=/usr/local/freetype --with-xpm=/usr/lib64 --with-tiff=/usr/local/tiff
make
make install
8.2安装旧版本gd库,适用于php5.3x及其以下版本
cd /usr/local/src
tar zxvf gd-2.0.35.tar.gz
cd gd-2.0.35
./configure --prefix=/usr/local/gd --enable-shared --with-jpeg=/usr/local/jpeg --with-png=/usr/local/libpng --with-freetype=/usr/local/freetype --with-fontconfig=/usr/local/freetype --with-xpm=/usr/lib64 --with-tiff=/usr/local/tiff --with-vpx=/usr/local/libvpx
make
make install
9、安装t1lib
cd /usr/local/src
tar zxvf t1lib-5.1.2.tar.gz
cd t1lib-5.1.2
./configure --prefix=/usr/local/t1lib --enable-shared
make without_doc
make install
10、安装libzip
cd /usr/local/src
tar -zxvf libzip-1.2.0.tar.gz
cd libzip-1.2.0
./configure
make
make install
cp /usr/local/lib/libzip/include/zipconf.h /usr/local/include/zipconf.h
#拷贝文件,否则安装php可能会报错 /usr/local/include/zip.h:59:21: fatal error: zipconf.h: No such file or dire
11、安装oniguruma #编译安装php7.4.x需要
cd /usr/local/src
tar -zxf oniguruma-6.9.4.tar.gz
cd oniguruma-6.9.4
./autogen.sh
./configure --prefix=/usr
make
make install
12、安装低版本openssl #适用于编译php7.3.x及其以下版本
CentOS 8.x默认的openssl版本太高,与php 7.3.x及其以下版本不兼容,需要降低openssl版本才能编译成功
which openssl #查询openssl目录,如/usr/include/openssl
openssl version #查看openssl版本
cd /usr/local/src
mkdir /usr/local/ssl
tar zxvf openssl-1.0.2k.tar.gz
cd openssl-1.0.2k
./config -fPIC shared zlib --prefix=/usr/local/ssl
make
make install
mv /usr/bin/openssl /usr/bin/openssl.old
mv /usr/include/openssl /usr/include/openssl.old
mv /usr/lib64/libssl.so /usr/lib64/libssl.so.old
ln -s /usr/local/ssl/bin/openssl /usr/bin/openssl
ln -s /usr/local/ssl/include/openssl /usr/include/openssl
ln -s /usr/local/ssl/lib/libssl.so /usr/lib64/libssl.so
echo "/usr/local/ssl/lib" >> /etc/ld.so.conf
ldconfig -v #建立动态链接
openssl version
注意:带shared参数才能生成libssl.so动态链接库文件,安装curl时, --with-ssl=/usr/local/ssl 才能找到动态链接库,curl才能开启ssl模块
13、安装curl模块
cd /usr/local/src
mkdir /usr/local/curl
tar zxvf curl-7.29.0.tar.gz
cd curl-7.29.0
./configure --without-nss --prefix=/usr/local/curl --with-ssl=/usr/local/ssl
make
make install
(二):编译安装php
注意:如果系统是64位,请执行以下两条命令,否则安装php会出错。
\cp -frp /usr/lib64/libltdl.so* /usr/lib/
\cp -frp /usr/lib64/libXpm.so* /usr/lib/
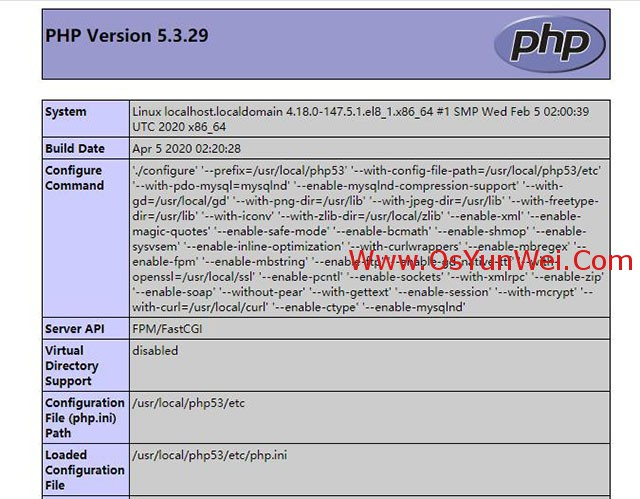
2.53、安装php5.3.x
cd /usr/local/src
tar -zvxf php-5.3.29.tar.gz
cd php-5.3.29
./configure --prefix=/usr/local/php53 --with-config-file-path=/usr/local/php53/etc --with-pdo-mysql=mysqlnd --enable-mysqlnd-compression-support --with-gd=/usr/local/gd --with-png-dir=/usr/lib --with-jpeg-dir=/usr/lib --with-freetype-dir=/usr/lib --with-iconv --with-zlib-dir=/usr/local/zlib --enable-xml --enable-magic-quotes --enable-safe-mode --enable-bcmath --enable-shmop --enable-sysvsem --enable-inline-optimization --with-curlwrappers --enable-mbregex --enable-fpm --enable-mbstring --enable-ftp --enable-gd-native-ttf --with-openssl=/usr/local/ssl --enable-pcntl --enable-sockets --with-xmlrpc --enable-zip --enable-soap --without-pear --with-gettext --enable-session --with-mcrypt --with-curl=/usr/local/curl --enable-ctype --enable-mysqlnd
make #编译
make install #安装
cp php.ini-production /usr/local/php53/etc/php.ini #复制php配置文件到安装目录
#rm -rf /etc/php.ini #删除系统自带配置文件
#ln -s /usr/local/php53/etc/php.ini /etc/php.ini #添加软链接
cp /usr/local/php53/etc/php-fpm.conf.default /usr/local/php53/etc/php-fpm.conf #拷贝模板文件为php-fpm配置文件
vi /usr/local/php53/etc/php-fpm.conf #编辑
user = www #设置php-fpm运行账号为www
group = www #设置php-fpm运行组为www
pid = run/php-fpm.pid #取消前面的分号
listen = 127.0.0.1:9053
:wq! #保存退出
设置 php-fpm开机启动
cp /usr/local/src/php-5.3.29/sapi/fpm/init.d.php-fpm /etc/rc.d/init.d/php53-fpm #拷贝php-fpm到启动目录
chmod +x /etc/rc.d/init.d/php53-fpm #添加执行权限
chkconfig php53-fpm on #设置开机启动
vi /etc/rc.d/init.d/php53-fpm
prefix=/usr/local/php53
php_fpm_BIN=${exec_prefix}/sbin/php53-fpm
:wq! #保存退出
mv /usr/local/php53/sbin/php-fpm /usr/local/php53/sbin/php53-fpm
service php53-fpm start #启动
vi /usr/local/php53/etc/php.ini #编辑配置文件
找到:disable_functions =
修改为:disable_functions = passthru,exec,system,chroot,scandir,chgrp,chown,shell_exec,proc_open,proc_get_status,ini_alter,ini_alter,ini_restore,dl,openlog,syslog,readlink,symlink,popepassthru,stream_socket_server,escapeshellcmd,dll,popen,disk_free_space,checkdnsrr,checkdnsrr,getservbyname,getservbyport,disk_total_space,posix_ctermid,posix_get_last_error,posix_getcwd, posix_getegid,posix_geteuid,posix_getgid, posix_getgrgid,posix_getgrnam,posix_getgroups,posix_getlogin,posix_getpgid,posix_getpgrp,posix_getpid, posix_getppid,posix_getpwnam,posix_getpwuid, posix_getrlimit, posix_getsid,posix_getuid,posix_isatty, posix_kill,posix_mkfifo,posix_setegid,posix_seteuid,posix_setgid, posix_setpgid,posix_setsid,posix_setuid,posix_strerror,posix_times,posix_ttyname,posix_uname
#列出PHP可以禁用的函数,如果某些程序需要用到这个函数,可以删除,取消禁用
找到:;date.timezone =
修改为:date.timezone = PRC #设置时区
找到:expose_php = On
修改为:expose_php = OFF #禁止显示php版本的信息
找到:short_open_tag = Off
修改为:short_open_tag = ON #支持php短标签
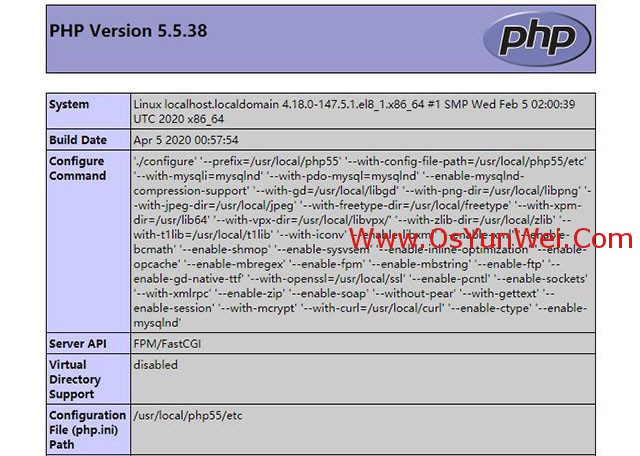
2.55、安装php5.5.x
cd /usr/local/src
tar -zvxf php-5.5.38.tar.gz
cd php-5.5.38
export LD_LIBRARY_PATH=/usr/local/libgd/lib
./configure --prefix=/usr/local/php55 --with-config-file-path=/usr/local/php55/etc --with-mysqli=mysqlnd --with-pdo-mysql=mysqlnd --enable-mysqlnd-compression-support --with-gd=/usr/local/libgd --with-png-dir=/usr/local/libpng --with-jpeg-dir=/usr/local/jpeg --with-freetype-dir=/usr/local/freetype --with-xpm-dir=/usr/lib64 --with-vpx-dir=/usr/local/libvpx/ --with-zlib-dir=/usr/local/zlib --with-t1lib=/usr/local/t1lib --with-iconv --enable-libxml --enable-xml --enable-bcmath --enable-shmop --enable-sysvsem --enable-inline-optimization --enable-opcache --enable-mbregex --enable-fpm --enable-mbstring --enable-ftp --enable-gd-native-ttf --with-openssl=/usr/local/ssl --enable-pcntl --enable-sockets --with-xmlrpc --enable-zip --enable-soap --without-pear --with-gettext --enable-session --with-mcrypt --with-curl=/usr/local/curl --enable-ctype --enable-mysqlnd
make #编译
make install #安装
cp php.ini-production /usr/local/php55/etc/php.ini #复制php配置文件到安装目录
#rm -rf /etc/php.ini #删除系统自带配置文件
#ln -s /usr/local/php55/etc/php.ini /etc/php.ini #添加软链接到 /etc目录
cp /usr/local/php55/etc/php-fpm.conf.default /usr/local/php55/etc/php-fpm.conf #拷贝模板文件为php-fpm配置文件
#ln -s /usr/local/php/etc/php-fpm.conf /etc/php-fpm.conf #添加软连接到 /etc目录
vi /usr/local/php55/etc/php-fpm.conf #编辑
user = www #设置php-fpm运行账号为www
group = www #设置php-fpm运行组为www
pid = run/php-fpm.pid #取消前面的分号
listen = 127.0.0.1:9055
:wq! #保存退出
设置 php-fpm开机启动
cp /usr/local/src/php-5.5.38/sapi/fpm/init.d.php-fpm /etc/rc.d/init.d/php55-fpm #拷贝php-fpm到启动目录
chmod +x /etc/rc.d/init.d/php55-fpm #添加执行权限
chkconfig php55-fpm on #设置开机启动
vi /etc/rc.d/init.d/php55-fpm
prefix=/usr/local/php55
php_fpm_BIN=${exec_prefix}/sbin/php55-fpm
:wq! #保存退出
mv /usr/local/php55/sbin/php-fpm /usr/local/php55/sbin/php55-fpm
vi /usr/local/php55/etc/php.ini #编辑配置文件
找到:disable_functions =
修改为:disable_functions = passthru,exec,system,chroot,scandir,chgrp,chown,shell_exec,proc_open,proc_get_status,ini_alter,ini_alter,ini_restore,dl,openlog,syslog,readlink,symlink,popepassthru,stream_socket_server,escapeshellcmd,dll,popen,disk_free_space,checkdnsrr,checkdnsrr,getservbyname,getservbyport,disk_total_space,posix_ctermid,posix_get_last_error,posix_getcwd, posix_getegid,posix_geteuid,posix_getgid, posix_getgrgid,posix_getgrnam,posix_getgroups,posix_getlogin,posix_getpgid,posix_getpgrp,posix_getpid, posix_getppid,posix_getpwnam,posix_getpwuid, posix_getrlimit, posix_getsid,posix_getuid,posix_isatty, posix_kill,posix_mkfifo,posix_setegid,posix_seteuid,posix_setgid, posix_setpgid,posix_setsid,posix_setuid,posix_strerror,posix_times,posix_ttyname,posix_uname
#列出PHP可以禁用的函数,如果某些程序需要用到这个函数,可以删除,取消禁用。
找到:;date.timezone =
修改为:date.timezone = PRC #设置时区
找到:expose_php = On
修改为:expose_php = Off #禁止显示php版本的信息
找到:short_open_tag = Off
修改为:short_open_tag = ON #支持php短标签
找到opcache.enable=0
修改为opcache.enable=1 #php支持opcode缓存
找到:opcache.enable_cli=1 #php支持opcode缓存
修改为:opcache.enable_cli=0
在最后一行添加:zend_extension=opcache.so #开启opcode缓存功能
:wq! #保存退出
2.56、安装php5.6.x
cd /usr/local/src
tar -zvxf php-5.6.40.tar.gz
cd php-5.6.40
export LD_LIBRARY_PATH=/usr/local/libgd/lib
./configure --prefix=/usr/local/php56 --with-config-file-path=/usr/local/php56/etc --with-mysqli=mysqlnd --with-pdo-mysql=mysqlnd --enable-mysqlnd-compression-support --with-gd=/usr/local/libgd --with-png-dir=/usr/local/libpng --with-jpeg-dir=/usr/local/jpeg --with-freetype-dir=/usr/local/freetype --with-xpm-dir=/usr/lib64 --with-vpx-dir=/usr/local/libvpx/ --with-zlib-dir=/usr/local/zlib --with-t1lib=/usr/local/t1lib --with-iconv --enable-libxml --enable-xml --enable-bcmath --enable-shmop --enable-sysvsem --enable-inline-optimization --enable-opcache --enable-mbregex --enable-fpm --enable-mbstring --enable-ftp --enable-gd-native-ttf --with-openssl=/usr/local/ssl --enable-pcntl --enable-sockets --with-xmlrpc --enable-zip --enable-soap --without-pear --with-gettext --enable-session --with-mcrypt --with-curl=/usr/local/curl --enable-ctype --enable-mysqlnd
make
make install
如果编译错误,可以清理后在编译一次
make clean #清理
make #编译
cp php.ini-production /usr/local/php56/etc/php.ini #复制php配置文件到安装目录
#rm -rf /etc/php.ini #删除系统自带配置文件
#ln -s /usr/local/php56/etc/php.ini /etc/php.ini #添加软链接到 /etc目录
cp /usr/local/php56/etc/php-fpm.conf.default /usr/local/php56/etc/php-fpm.conf #拷贝模板文件为php-fpm配置文件
#ln -s /usr/local/php56/etc/php-fpm.conf /etc/php-fpm.conf #添加软连接到 /etc目录
vi /usr/local/php56/etc/php-fpm.conf #编辑
user = www #设置php-fpm运行账号为www
group = www #设置php-fpm运行组为www
pid = run/php-fpm.pid #取消前面的分号
listen = 127.0.0.1:9056
:wq! #保存退出
设置 php-fpm开机启动
cp /usr/local/src/php-5.6.40/sapi/fpm/init.d.php-fpm /etc/rc.d/init.d/php56-fpm #拷贝php-fpm到启动目录
chmod +x /etc/rc.d/init.d/php56-fpm #添加执行权限
chkconfig php56-fpm on #设置开机启动
vi /etc/rc.d/init.d/php56-fpm
prefix=/usr/local/php56
php_fpm_BIN=${exec_prefix}/sbin/php56-fpm
:wq! #保存退出
mv /usr/local/php56/sbin/php-fpm /usr/local/php56/sbin/php56-fpm
vi /usr/local/php56/etc/php.ini #编辑配置文件
找到:disable_functions =
修改为:disable_functions = passthru,exec,system,chroot,scandir,chgrp,chown,shell_exec,proc_open,proc_get_status,ini_alter,ini_alter,ini_restore,dl,openlog,syslog,readlink,symlink,popepassthru,stream_socket_server,escapeshellcmd,dll,popen,disk_free_space,checkdnsrr,checkdnsrr,getservbyname,getservbyport,disk_total_space,posix_ctermid,posix_get_last_error,posix_getcwd, posix_getegid,posix_geteuid,posix_getgid, posix_getgrgid,posix_getgrnam,posix_getgroups,posix_getlogin,posix_getpgid,posix_getpgrp,posix_getpid, posix_getppid,posix_getpwnam,posix_getpwuid, posix_getrlimit, posix_getsid,posix_getuid,posix_isatty, posix_kill,posix_mkfifo,posix_setegid,posix_seteuid,posix_setgid, posix_setpgid,posix_setsid,posix_setuid,posix_strerror,posix_times,posix_ttyname,posix_uname
#列出PHP可以禁用的函数,如果某些程序需要用到这个函数,可以删除,取消禁用。
找到:;date.timezone =
修改为:date.timezone = PRC #设置时区
找到:expose_php = On
修改为:expose_php = Off #禁止显示php版本的信息
找到:short_open_tag = Off
修改为:short_open_tag = ON #支持php短标签
找到opcache.enable=0
修改为opcache.enable=1 #php支持opcode缓存
找到:;opcache.enable_cli=1 #php支持opcode缓存
修改为:opcache.enable_cli=0
在最后一行添加:zend_extension=opcache.so #开启opcode缓存功能
:wq! #保存退出
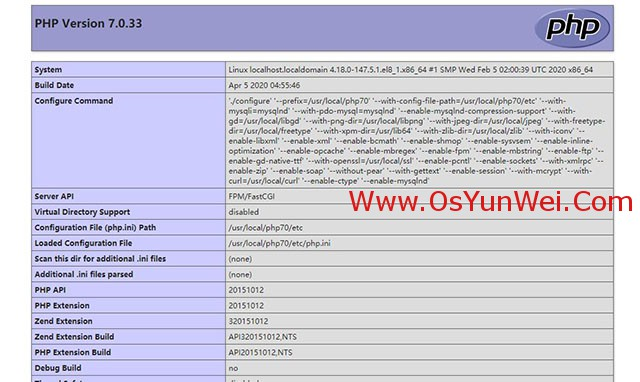
2.70、安装php7.0.x
cd /usr/local/src
tar -zvxf php-7.0.33.tar.gz
cd php-7.0.33
export LD_LIBRARY_PATH=/usr/local/libgd/lib
./configure --prefix=/usr/local/php70 --with-config-file-path=/usr/local/php70/etc --with-mysqli=mysqlnd --with-pdo-mysql=mysqlnd --enable-mysqlnd-compression-support --with-gd=/usr/local/libgd --with-png-dir=/usr/local/libpng --with-jpeg-dir=/usr/local/jpeg --with-freetype-dir=/usr/local/freetype --with-xpm-dir=/usr/lib64 --with-zlib-dir=/usr/local/zlib --with-iconv --enable-libxml --enable-xml --enable-bcmath --enable-shmop --enable-sysvsem --enable-inline-optimization --enable-opcache --enable-mbregex --enable-fpm --enable-mbstring --enable-ftp --enable-gd-native-ttf --with-openssl=/usr/local/ssl --enable-pcntl --enable-sockets --with-xmlrpc --enable-zip --enable-soap --without-pear --with-gettext --enable-session --with-mcrypt --with-curl=/usr/local/curl --enable-ctype --enable-mysqlnd
make #编译
make install #安装
cp php.ini-production /usr/local/php70/etc/php.ini #复制php配置文件到安装目录
#rm -rf /etc/php.ini #删除系统自带配置文件
#ln -s /usr/local/php70/etc/php.ini /etc/php.ini #添加软链接到 /etc目录
cp /usr/local/php70/etc/php-fpm.conf.default /usr/local/php70/etc/php-fpm.conf #拷贝模板文件为php-fpm配置文件
#ln -s /usr/local/php70/etc/php-fpm.conf /etc/php-fpm.conf #添加软连接到 /etc目录
vi /usr/local/php70/etc/php-fpm.conf #编辑
pid = run/php-fpm.pid #取消前面的分号
include=/usr/local/php70/etc/php-fpm.d/*.conf
:wq! #保存退出
cp /usr/local/php70/etc/php-fpm.d/www.conf.default /usr/local/php70/etc/php-fpm.d/www.conf
vi /usr/local/php70/etc/php-fpm.d/www.conf #编辑
user = www #设置php-fpm运行账号为www
group = www #设置php-fpm运行组为www
listen = 127.0.0.1:9070
:wq! #保存退出
设置 php-fpm开机启动
cp /usr/local/src/php-7.0.33/sapi/fpm/init.d.php-fpm /etc/rc.d/init.d/php70-fpm #拷贝php-fpm到启动目录
chmod +x /etc/rc.d/init.d/php70-fpm #添加执行权限
chkconfig php70-fpm on #设置开机启动
vi /etc/rc.d/init.d/php70-fpm
prefix=/usr/local/php70
php_fpm_BIN=${exec_prefix}/sbin/php70-fpm
:wq! #保存退出
mv /usr/local/php70/sbin/php-fpm /usr/local/php70/sbin/php70-fpm
vi /usr/local/php70/etc/php.ini #编辑配置文件
找到:disable_functions =
修改为:disable_functions = passthru,exec,system,chroot,scandir,chgrp,chown,shell_exec,proc_open,proc_get_status,ini_alter,ini_alter,ini_restore,dl,openlog,syslog,readlink,symlink,popepassthru,stream_socket_server,escapeshellcmd,dll,popen,disk_free_space,checkdnsrr,checkdnsrr,getservbyname,getservbyport,disk_total_space,posix_ctermid,posix_get_last_error,posix_getcwd, posix_getegid,posix_geteuid,posix_getgid, posix_getgrgid,posix_getgrnam,posix_getgroups,posix_getlogin,posix_getpgid,posix_getpgrp,posix_getpid, posix_getppid,posix_getpwnam,posix_getpwuid, posix_getrlimit, posix_getsid,posix_getuid,posix_isatty, posix_kill,posix_mkfifo,posix_setegid,posix_seteuid,posix_setgid, posix_setpgid,posix_setsid,posix_setuid,posix_strerror,posix_times,posix_ttyname,posix_uname
#列出PHP可以禁用的函数,如果某些程序需要用到这个函数,可以删除,取消禁用。
找到:;date.timezone =
修改为:date.timezone = PRC #设置时区
找到:expose_php = On
修改为:expose_php = Off #禁止显示php版本的信息
找到:short_open_tag = Off
修改为:short_open_tag = ON #支持php短标签
找到opcache.enable=0
修改为opcache.enable=1 #php支持opcode缓存
找到:;opcache.enable_cli=1 #php支持opcode缓存
修改为:opcache.enable_cli=0
在最后一行添加:zend_extension=opcache.so #开启opcode缓存功能
:wq! #保存退出
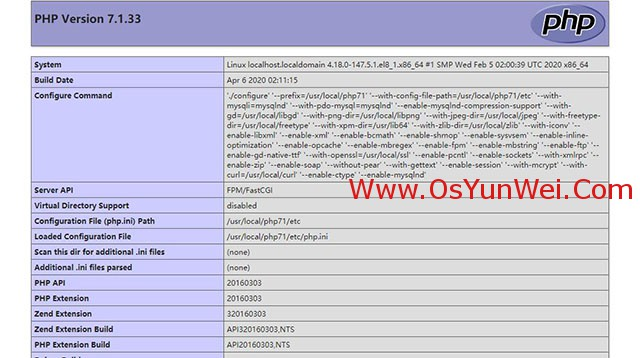
2.71、安装php7.1.x
cd /usr/local/src
tar -zvxf php-7.1.33.tar.gz
cd php-7.1.33
export LD_LIBRARY_PATH=/usr/local/libgd/lib
./configure --prefix=/usr/local/php71 --with-config-file-path=/usr/local/php71/etc --with-mysqli=mysqlnd --with-pdo-mysql=mysqlnd --enable-mysqlnd-compression-support --with-gd=/usr/local/libgd --with-png-dir=/usr/local/libpng --with-jpeg-dir=/usr/local/jpeg --with-freetype-dir=/usr/local/freetype --with-xpm-dir=/usr/lib64 --with-zlib-dir=/usr/local/zlib --with-iconv --enable-libxml --enable-xml --enable-bcmath --enable-shmop --enable-sysvsem --enable-inline-optimization --enable-opcache --enable-mbregex --enable-fpm --enable-mbstring --enable-ftp --enable-gd-native-ttf --with-openssl=/usr/local/ssl --enable-pcntl --enable-sockets --with-xmlrpc --enable-zip --enable-soap --without-pear --with-gettext --enable-session --with-mcrypt --with-curl=/usr/local/curl --enable-ctype --enable-mysqlnd
make #编译
make install #安装
cp php.ini-production /usr/local/php71/etc/php.ini #复制php配置文件到安装目录
rm -rf /etc/php.ini #删除系统自带配置文件
ln -s /usr/local/php71/etc/php.ini /etc/php.ini #添加软链接到 /etc目录
cp /usr/local/php71/etc/php-fpm.conf.default /usr/local/php71/etc/php-fpm.conf #拷贝模板文件为php-fpm配置文件
ln -s /usr/local/php71/etc/php-fpm.conf /etc/php-fpm.conf #添加软连接到 /etc目录
vi /usr/local/php71/etc/php-fpm.conf #编辑
pid = run/php-fpm.pid #取消前面的分号
include=/usr/local/php71/etc/php-fpm.d/*.conf
:wq! #保存退出
cp /usr/local/php71/etc/php-fpm.d/www.conf.default /usr/local/php71/etc/php-fpm.d/www.conf
vi /usr/local/php71/etc/php-fpm.d/www.conf #编辑
user = www #设置php-fpm运行账号为www
group = www #设置php-fpm运行组为www
listen = 127.0.0.1:9071
:wq! #保存退出
设置 php-fpm开机启动
cp /usr/local/src/php-7.1.33/sapi/fpm/init.d.php-fpm /etc/rc.d/init.d/php71-fpm #拷贝php-fpm到启动目录
chmod +x /etc/rc.d/init.d/php71-fpm #添加执行权限
chkconfig php71-fpm on #设置开机启动
vi /etc/rc.d/init.d/php71-fpm
prefix=/usr/local/php71
php_fpm_BIN=${exec_prefix}/sbin/php71-fpm
:wq! #保存退出
mv /usr/local/php71/sbin/php-fpm /usr/local/php71/sbin/php71-fpm
vi /usr/local/php71/etc/php.ini #编辑配置文件
找到:disable_functions =
修改为:disable_functions = passthru,exec,system,chroot,scandir,chgrp,chown,shell_exec,proc_open,proc_get_status,ini_alter,ini_alter,ini_restore,dl,openlog,syslog,readlink,symlink,popepassthru,stream_socket_server,escapeshellcmd,dll,popen,disk_free_space,checkdnsrr,checkdnsrr,getservbyname,getservbyport,disk_total_space,posix_ctermid,posix_get_last_error,posix_getcwd, posix_getegid,posix_geteuid,posix_getgid, posix_getgrgid,posix_getgrnam,posix_getgroups,posix_getlogin,posix_getpgid,posix_getpgrp,posix_getpid, posix_getppid,posix_getpwnam,posix_getpwuid, posix_getrlimit, posix_getsid,posix_getuid,posix_isatty, posix_kill,posix_mkfifo,posix_setegid,posix_seteuid,posix_setgid, posix_setpgid,posix_setsid,posix_setuid,posix_strerror,posix_times,posix_ttyname,posix_uname
#列出PHP可以禁用的函数,如果某些程序需要用到这个函数,可以删除,取消禁用。
找到:;date.timezone =
修改为:date.timezone = PRC #设置时区
找到:expose_php = On
修改为:expose_php = Off #禁止显示php版本的信息
找到:short_open_tag = Off
修改为:short_open_tag = ON #支持php短标签
找到opcache.enable=0
修改为opcache.enable=1 #php支持opcode缓存
找到:;opcache.enable_cli=1 #php支持opcode缓存
修改为:opcache.enable_cli=0
在最后一行添加:zend_extension=opcache.so #开启opcode缓存功能
:wq! #保存退出
2.72、安装php7.2.x
cd /usr/local/src
tar -zvxf php-7.2.29.tar.gz
cd php-7.2.29
export LD_LIBRARY_PATH=/usr/local/libgd/lib
./configure --prefix=/usr/local/php72 --with-config-file-path=/usr/local/php72/etc --with-mysqli=mysqlnd --with-pdo-mysql=mysqlnd --enable-mysqlnd-compression-support --with-gd=/usr/local/libgd --with-png-dir=/usr/local/libpng --with-jpeg-dir=/usr/local/jpeg --with-freetype-dir=/usr/local/freetype --with-xpm-dir=/usr/lib64 --with-zlib-dir=/usr/local/zlib --with-iconv --enable-libxml --enable-xml --enable-bcmath --enable-shmop --enable-sysvsem --enable-inline-optimization --enable-opcache --enable-mbregex --enable-fpm --enable-mbstring --enable-ftp --with-openssl=/usr/local/ssl --enable-pcntl --enable-sockets --with-xmlrpc --enable-zip --enable-soap --without-pear --with-gettext --enable-session --with-curl=/usr/local/curl --enable-ctype --enable-mysqlnd
make #编译
make install #安装
cp php.ini-production /usr/local/php72/etc/php.ini #复制php配置文件到安装目录
rm -rf /etc/php.ini #删除系统自带配置文件
ln -s /usr/local/php72/etc/php.ini /etc/php.ini #添加软链接到 /etc目录
cp /usr/local/php72/etc/php-fpm.conf.default /usr/local/php72/etc/php-fpm.conf #拷贝模板文件为php-fpm配置文件
ln -s /usr/local/php72/etc/php-fpm.conf /etc/php-fpm.conf #添加软连接到 /etc目录
vi /usr/local/php72/etc/php-fpm.conf #编辑
pid = run/php-fpm.pid #取消前面的分号
include=/usr/local/php72/etc/php-fpm.d/*.conf
:wq! #保存退出
cp /usr/local/php72/etc/php-fpm.d/www.conf.default /usr/local/php72/etc/php-fpm.d/www.conf
vi /usr/local/php72/etc/php-fpm.d/www.conf #编辑
user = www #设置php-fpm运行账号为www
group = www #设置php-fpm运行组为www
listen = 127.0.0.1:9072
:wq! #保存退出
设置 php-fpm开机启动
cp /usr/local/src/php-7.2.29/sapi/fpm/init.d.php-fpm /etc/rc.d/init.d/php72-fpm #拷贝php-fpm到启动目录
chmod +x /etc/rc.d/init.d/php72-fpm #添加执行权限
chkconfig php72-fpm on #设置开机启动
vi /etc/rc.d/init.d/php72-fpm
prefix=/usr/local/php72
php_fpm_BIN=${exec_prefix}/sbin/php72-fpm
:wq! #保存退出
mv /usr/local/php72/sbin/php-fpm /usr/local/php72/sbin/php72-fpm
vi /usr/local/php72/etc/php.ini #编辑配置文件
找到:disable_functions =
修改为:disable_functions = passthru,exec,system,chroot,scandir,chgrp,chown,shell_exec,proc_open,proc_get_status,ini_alter,ini_alter,ini_restore,dl,openlog,syslog,readlink,symlink,popepassthru,stream_socket_server,escapeshellcmd,dll,popen,disk_free_space,checkdnsrr,checkdnsrr,getservbyname,getservbyport,disk_total_space,posix_ctermid,posix_get_last_error,posix_getcwd, posix_getegid,posix_geteuid,posix_getgid, posix_getgrgid,posix_getgrnam,posix_getgroups,posix_getlogin,posix_getpgid,posix_getpgrp,posix_getpid, posix_getppid,posix_getpwnam,posix_getpwuid, posix_getrlimit, posix_getsid,posix_getuid,posix_isatty, posix_kill,posix_mkfifo,posix_setegid,posix_seteuid,posix_setgid, posix_setpgid,posix_setsid,posix_setuid,posix_strerror,posix_times,posix_ttyname,posix_uname
#列出PHP可以禁用的函数,如果某些程序需要用到这个函数,可以删除,取消禁用。
找到:;date.timezone =
修改为:date.timezone = PRC #设置时区
找到:expose_php = On
修改为:expose_php = Off #禁止显示php版本的信息
找到:short_open_tag = Off
修改为:short_open_tag = ON #支持php短标签
找到opcache.enable=0
修改为opcache.enable=1 #php支持opcode缓存
找到:;opcache.enable_cli=1 #php支持opcode缓存
修改为:opcache.enable_cli=0
在最后一行添加:zend_extension=opcache.so #开启opcode缓存功能
:wq! #保存退出
2.73、安装php7.3.x
2.73.1
cd /usr/local/src
tar -zvxf php-7.3.16.tar.gz
cd php-7.3.16
export LD_LIBRARY_PATH=/usr/local/libgd/lib
export PKG_CONFIG_PATH="/usr/local/lib/pkgconfig/" #libzip库安装位置,否则安装php可能会报错
./configure --prefix=/usr/local/php73 --with-config-file-path=/usr/local/php73/etc --with-mysqli=mysqlnd --with-pdo-mysql=mysqlnd --enable-mysqlnd-compression-support --with-gd=/usr/local/libgd --with-png-dir=/usr/local/libpng --with-jpeg-dir=/usr/local/jpeg --with-freetype-dir=/usr/local/freetype --with-xpm-dir=/usr/lib64 --with-zlib-dir=/usr/local/zlib --with-iconv --enable-libxml --enable-xml --enable-bcmath --enable-shmop --enable-sysvsem --enable-inline-optimization --enable-opcache --enable-mbregex --enable-fpm --enable-mbstring --enable-ftp --with-openssl=/usr/local/ssl --enable-pcntl --enable-sockets --with-xmlrpc --enable-zip --enable-soap --without-pear --with-gettext --enable-session --with-curl=/usr/local/curl --enable-ctype --enable-mysqlnd --enable-pdo
make #编译
make install #安装
cp php.ini-production /usr/local/php73/etc/php.ini #复制php配置文件到安装目录
rm -rf /etc/php.ini #删除系统自带配置文件
ln -s /usr/local/php73/etc/php.ini /etc/php.ini #添加软链接到 /etc目录
cp /usr/local/php73/etc/php-fpm.conf.default /usr/local/php73/etc/php-fpm.conf #拷贝模板文件为php-fpm配置文件
ln -s /usr/local/php73/etc/php-fpm.conf /etc/php-fpm.conf #添加软连接到 /etc目录
vi /usr/local/php73/etc/php-fpm.conf #编辑
pid = run/php-fpm.pid #取消前面的分号
include=/usr/local/php73/etc/php-fpm.d/*.conf
:wq! #保存退出
cp /usr/local/php73/etc/php-fpm.d/www.conf.default /usr/local/php73/etc/php-fpm.d/www.conf
vi /usr/local/php73/etc/php-fpm.d/www.conf #编辑
user = www #设置php-fpm运行账号为www
group = www #设置php-fpm运行组为www
listen = 127.0.0.1:9073
:wq! #保存退出
1.73.2、设置 php-fpm开机启动(有两种设置方法,选择一种即可)
2.73.2.1 #chkconfig方式
cp /usr/local/src/php-7.3.16/sapi/fpm/init.d.php-fpm /etc/rc.d/init.d/php73-fpm #拷贝php-fpm到启动目录
chmod +x /etc/rc.d/init.d/php73-fpm #添加执行权限
chkconfig php73-fpm on #设置开机启动
vi /etc/rc.d/init.d/php73-fpm
prefix=/usr/local/php73
php_fpm_BIN=${exec_prefix}/sbin/php73-fpm
:wq! #保存退出
mv /usr/local/php73/sbin/php-fpm /usr/local/php73/sbin/php73-fpm
service php73-fpm start #启动php71-fpm
service php73-fpm stop #停止php71-fpm
2.73.2.2 #systemctl方式
vi /usr/lib/systemd/system/php73-fpm.service #编辑添加以下代码
[Unit]
Description=The PHP FastCGI Process Manager
After=syslog.target network.target
[Service]
Type=simple
PIDFile=/run/php-fpm.pid
ExecStart=/usr/local/php73/sbin/php73-fpm --nodaemonize --fpm-config /usr/local/php73/etc/php-fpm.conf
ExecReload=/bin/kill -USR2 $MAINPID
ExecStop=/bin/kill -SIGINT $MAINPID
[Install]
WantedBy=multi-user.target
:wq! #保存退出
mv /usr/local/php73/sbin/php-fpm /usr/local/php73/sbin/php73-fpm
systemctl enable php73-fpm.service #设置开机自启动
systemctl daemon-reload #重新加载systemctll
systemctl start php73-fpm.service #启动
systemctl stop php73-fpm.service #停止
systemctl restart php73-fpm.service #重启
2.73.3 配置php配置文件
vi /usr/local/php73/etc/php.ini #编辑配置文件
找到:disable_functions =
修改为:disable_functions = passthru,exec,system,chroot,scandir,chgrp,chown,shell_exec,proc_open,proc_get_status,ini_alter,ini_alter,ini_restore,dl,openlog,syslog,readlink,symlink,popepassthru,stream_socket_server,escapeshellcmd,dll,popen,disk_free_space,checkdnsrr,checkdnsrr,getservbyname,getservbyport,disk_total_space,posix_ctermid,posix_get_last_error,posix_getcwd, posix_getegid,posix_geteuid,posix_getgid, posix_getgrgid,posix_getgrnam,posix_getgroups,posix_getlogin,posix_getpgid,posix_getpgrp,posix_getpid, posix_getppid,posix_getpwnam,posix_getpwuid, posix_getrlimit, posix_getsid,posix_getuid,posix_isatty, posix_kill,posix_mkfifo,posix_setegid,posix_seteuid,posix_setgid, posix_setpgid,posix_setsid,posix_setuid,posix_strerror,posix_times,posix_ttyname,posix_uname
#列出PHP可以禁用的函数,如果某些程序需要用到这个函数,可以删除,取消禁用。
找到:;date.timezone =
修改为:date.timezone = PRC #设置时区
找到:expose_php = On
修改为:expose_php = Off #禁止显示php版本的信息
找到:short_open_tag = Off
修改为:short_open_tag = ON #支持php短标签
找到opcache.enable=0
修改为opcache.enable=1 #php支持opcode缓存
找到:;opcache.enable_cli=1
修改为:opcache.enable_cli=0 #php支持opcode缓存
在最后一行添加:zend_extension=opcache.so #开启opcode缓存功能
:wq! #保存退出
2.74、安装php7.4.x
#恢复CentOS 8.x自带的openssl和curl默认高版本
#php7.4.x中这2个库需要使用CentOS 8.x自带的高版本进行编译--with-openssl --with-curl
rm -rf /usr/lib64/libssl.so
mv /usr/lib64/libssl.so.old /usr/lib64/libssl.so
rm -rf /usr/include/openssl
mv /usr/include/openssl.old /usr/include/openssl
rm -rf /usr/bin/openssl
mv /usr/bin/openssl.old /usr/bin/openssl
cd /usr/local/src
tar -zvxf php-7.4.4.tar.gz
cd php-7.4.4
export LD_LIBRARY_PATH=/usr/local/libgd/lib #设置libgd库环境变量
export PKG_CONFIG_PATH="/usr/local/lib/pkgconfig/" #设置libzip环境变量
./configure --prefix=/usr/local/php74 --with-config-file-path=/usr/local/php74/etc --with-mysqli=mysqlnd --with-pdo-mysql=mysqlnd --enable-gd --with-jpeg=/usr/local/jpeg --with-freetype=/usr/local/freetype --with-xpm=/usr/lib64 --with-zlib-dir=/usr/local/zlib --with-iconv --with-libxml --enable-xml --enable-bcmath --enable-shmop --enable-sysvsem --enable-inline-optimization --enable-opcache --enable-mbregex --enable-fpm --enable-mbstring --enable-ftp --with-openssl --enable-pcntl --enable-sockets --with-xmlrpc --with-zip --enable-soap --without-pear --with-gettext --enable-session --with-curl --enable-ctype --enable-mysqlnd --enable-pdo
make #编译
make install #安装
./configure --help #可以查看编译参数的写法
cp php.ini-production /usr/local/php74/etc/php.ini #复制php配置文件到安装目录
rm -rf /etc/php.ini #删除系统自带配置文件
ln -s /usr/local/php74/etc/php.ini /etc/php.ini #添加软链接到 /etc目录
cp /usr/local/php74/etc/php-fpm.conf.default /usr/local/php74/etc/php-fpm.conf #拷贝模板文件为php-fpm配置文件
ln -s /usr/local/php74/etc/php-fpm.conf /etc/php-fpm.conf #添加软连接到 /etc目录
vi /usr/local/php74/etc/php-fpm.conf #编辑
pid = run/php-fpm.pid #取消前面的分号
include=/usr/local/php74/etc/php-fpm.d/*.conf
:wq! #保存退出
cp /usr/local/php74/etc/php-fpm.d/www.conf.default /usr/local/php74/etc/php-fpm.d/www.conf
vi /usr/local/php74/etc/php-fpm.d/www.conf #编辑
user = www #设置php-fpm运行账号为www
group = www #设置php-fpm运行组为www
listen = 127.0.0.1:9074
:wq! #保存退出
设置 php-fpm开机启动
cp /usr/local/src/php-7.4.4/sapi/fpm/init.d.php-fpm /etc/rc.d/init.d/php74-fpm #拷贝php-fpm到启动目录
chmod +x /etc/rc.d/init.d/php74-fpm #添加执行权限
chkconfig php74-fpm on #设置开机启动
vi /etc/rc.d/init.d/php74-fpm
prefix=/usr/local/php74
php_fpm_BIN=${exec_prefix}/sbin/php74-fpm
:wq! #保存退出
mv /usr/local/php74/sbin/php-fpm /usr/local/php74/sbin/php74-fpm
vi /usr/local/php74/etc/php.ini #编辑配置文件
找到:disable_functions =
修改为:disable_functions = passthru,exec,system,chroot,scandir,chgrp,chown,shell_exec,proc_open,proc_get_status,ini_alter,ini_alter,ini_restore,dl,openlog,syslog,readlink,symlink,popepassthru,stream_socket_server,escapeshellcmd,dll,popen,disk_free_space,checkdnsrr,checkdnsrr,getservbyname,getservbyport,disk_total_space,posix_ctermid,posix_get_last_error,posix_getcwd, posix_getegid,posix_geteuid,posix_getgid, posix_getgrgid,posix_getgrnam,posix_getgroups,posix_getlogin,posix_getpgid,posix_getpgrp,posix_getpid, posix_getppid,posix_getpwnam,posix_getpwuid, posix_getrlimit, posix_getsid,posix_getuid,posix_isatty, posix_kill,posix_mkfifo,posix_setegid,posix_seteuid,posix_setgid, posix_setpgid,posix_setsid,posix_setuid,posix_strerror,posix_times,posix_ttyname,posix_uname
#列出PHP可以禁用的函数,如果某些程序需要用到这个函数,可以删除,取消禁用。
找到:;date.timezone =
修改为:date.timezone = PRC #设置时区
找到:expose_php = On
修改为:expose_php = Off #禁止显示php版本的信息
找到:short_open_tag = Off
修改为:short_open_tag = ON #支持php短标签
找到opcache.enable=0
修改为opcache.enable=1 #php支持opcode缓存
找到:;opcache.enable_cli=1
修改为:opcache.enable_cli=0 #php支持opcode缓存
在最后一行添加:zend_extension=opcache.so #开启opcode缓存功能
:wq! #保存退出
#恢复openssl安装版本
mv /usr/bin/openssl /usr/bin/openssl.old
mv /usr/include/openssl /usr/include/openssl.old
mv /usr/lib64/libssl.so /usr/lib64/libssl.so.old
ln -s /usr/local/ssl/bin/openssl /usr/bin/openssl
ln -s /usr/local/ssl/include/openssl /usr/include/openssl
ln -s /usr/local/ssl/lib/libssl.so /usr/lib64/libssl.so
ldconfig -v #建立动态链接
openssl version
四、配置nginx支持php
vi /usr/local/nginx/conf/nginx.conf
#修改/usr/local/nginx/conf/nginx.conf 配置文件,需做如下修改
user www www; #首行user去掉注释,修改Nginx运行组为www www;必须与/usr/local/php/etc/php-fpm.conf中的user,group配置相同,否则php运行出错
index index.html index.htm index.php; #添加index.php
# pass the PHP scripts to FastCGI server listening on 127.0.0.1:9000
#
location ~ \.php$ {
root html;
fastcgi_pass 127.0.0.1:9053;
fastcgi_index index.php;
fastcgi_param SCRIPT_FILENAME $document_root$fastcgi_script_name;
include fastcgi_params;
}
#取消FastCGI server部分location的注释,注意fastcgi_param行的参数,改为$document_root$fastcgi_script_name,或者使用绝对路径
systemctl restart nginx.service #启动#重启nginx
service php71-fpm start #启动php71-fpm
说明:
fastcgi_pass 127.0.0.1:9000;中使用端口号来区分php版本,需要使用哪个php版本就修改为相应的端口。
9074对应的php版本是php7.4.x
9073对应的php版本是php7.3.x
9072对应的php版本是php7.2.x
9071对应的php版本是php7.1.x
9070对应的php版本是php7.0.x
9056对应的php版本是php5.6.x
9055对应的php版本是php5.5.x
9053对应的php版本是php5.3.x
五、多版本php共存总结
1、规划php安装路径
/usr/local/php53
/usr/local/php55
/usr/local/php56
/usr/local/php70
/usr/local/php71
/usr/local/php72
/usr/local/php73
/usr/local/php74
2、编译php参数
./configure --prefix=/usr/local/php53 --with-config-file-path=/usr/local/php53/etc --with-pdo-mysql=mysqlnd --enable-mysqlnd-compression-support --with-gd=/usr/local/gd --with-png-dir=/usr/lib --with-jpeg-dir=/usr/lib --with-freetype-dir=/usr/lib --with-iconv --with-zlib-dir=/usr/local/zlib --enable-xml --enable-magic-quotes --enable-safe-mode --enable-bcmath --enable-shmop --enable-sysvsem --enable-inline-optimization --with-curlwrappers --enable-mbregex --enable-fpm --enable-mbstring --enable-ftp --enable-gd-native-ttf --with-openssl=/usr/local/ssl --enable-pcntl --enable-sockets --with-xmlrpc --enable-zip --enable-soap --without-pear --with-gettext --enable-session --with-mcrypt --with-curl=/usr/local/curl --enable-ctype --enable-mysqlnd
./configure --prefix=/usr/local/php55 --with-config-file-path=/usr/local/php55/etc --with-mysqli=mysqlnd --with-pdo-mysql=mysqlnd --enable-mysqlnd-compression-support --with-gd=/usr/local/libgd --with-png-dir=/usr/local/libpng --with-jpeg-dir=/usr/local/jpeg --with-freetype-dir=/usr/local/freetype --with-xpm-dir=/usr/lib64 --with-vpx-dir=/usr/local/libvpx/ --with-zlib-dir=/usr/local/zlib --with-t1lib=/usr/local/t1lib --with-iconv --enable-libxml --enable-xml --enable-bcmath --enable-shmop --enable-sysvsem --enable-inline-optimization --enable-opcache --enable-mbregex --enable-fpm --enable-mbstring --enable-ftp --enable-gd-native-ttf --with-openssl=/usr/local/ssl --enable-pcntl --enable-sockets --with-xmlrpc --enable-zip --enable-soap --without-pear --with-gettext --enable-session --with-mcrypt --with-curl=/usr/local/curl --enable-ctype --enable-mysqlnd
./configure --prefix=/usr/local/php56 --with-config-file-path=/usr/local/php56/etc --with-mysqli=mysqlnd --with-pdo-mysql=mysqlnd --enable-mysqlnd-compression-support --with-gd=/usr/local/libgd --with-png-dir=/usr/local/libpng --with-jpeg-dir=/usr/local/jpeg --with-freetype-dir=/usr/local/freetype --with-xpm-dir=/usr/lib64 --with-vpx-dir=/usr/local/libvpx/ --with-zlib-dir=/usr/local/zlib --with-t1lib=/usr/local/t1lib --with-iconv --enable-libxml --enable-xml --enable-bcmath --enable-shmop --enable-sysvsem --enable-inline-optimization --enable-opcache --enable-mbregex --enable-fpm --enable-mbstring --enable-ftp --enable-gd-native-ttf --with-openssl=/usr/local/ssl --enable-pcntl --enable-sockets --with-xmlrpc --enable-zip --enable-soap --without-pear --with-gettext --enable-session --with-mcrypt --with-curl=/usr/local/curl --enable-ctype --enable-mysqlnd
./configure --prefix=/usr/local/php70 --with-config-file-path=/usr/local/php70/etc --with-mysqli=mysqlnd --with-pdo-mysql=mysqlnd --enable-mysqlnd-compression-support --with-gd=/usr/local/libgd --with-png-dir=/usr/local/libpng --with-jpeg-dir=/usr/local/jpeg --with-freetype-dir=/usr/local/freetype --with-xpm-dir=/usr/lib64 --with-zlib-dir=/usr/local/zlib --with-iconv --enable-libxml --enable-xml --enable-bcmath --enable-shmop --enable-sysvsem --enable-inline-optimization --enable-opcache --enable-mbregex --enable-fpm --enable-mbstring --enable-ftp --enable-gd-native-ttf --with-openssl=/usr/local/ssl --enable-pcntl --enable-sockets --with-xmlrpc --enable-zip --enable-soap --without-pear --with-gettext --enable-session --with-mcrypt --with-curl=/usr/local/curl --enable-ctype --enable-mysqlnd
./configure --prefix=/usr/local/php71 --with-config-file-path=/usr/local/php71/etc --with-mysqli=mysqlnd --with-pdo-mysql=mysqlnd --enable-mysqlnd-compression-support --with-gd=/usr/local/libgd --with-png-dir=/usr/local/libpng --with-jpeg-dir=/usr/local/jpeg --with-freetype-dir=/usr/local/freetype --with-xpm-dir=/usr/lib64 --with-zlib-dir=/usr/local/zlib --with-iconv --enable-libxml --enable-xml --enable-bcmath --enable-shmop --enable-sysvsem --enable-inline-optimization --enable-opcache --enable-mbregex --enable-fpm --enable-mbstring --enable-ftp --enable-gd-native-ttf --with-openssl=/usr/local/ssl --enable-pcntl --enable-sockets --with-xmlrpc --enable-zip --enable-soap --without-pear --with-gettext --enable-session --with-mcrypt --with-curl=/usr/local/curl --enable-ctype --enable-mysqlnd
./configure --prefix=/usr/local/php72 --with-config-file-path=/usr/local/php72/etc --with-mysqli=mysqlnd --with-pdo-mysql=mysqlnd --enable-mysqlnd-compression-support --with-gd=/usr/local/libgd --with-png-dir=/usr/local/libpng --with-jpeg-dir=/usr/local/jpeg --with-freetype-dir=/usr/local/freetype --with-xpm-dir=/usr/lib64 --with-zlib-dir=/usr/local/zlib --with-iconv --enable-libxml --enable-xml --enable-bcmath --enable-shmop --enable-sysvsem --enable-inline-optimization --enable-opcache --enable-mbregex --enable-fpm --enable-mbstring --enable-ftp --with-openssl=/usr/local/ssl --enable-pcntl --enable-sockets --with-xmlrpc --enable-zip --enable-soap --without-pear --with-gettext --enable-session --with-curl=/usr/local/curl --enable-ctype --enable-mysqlnd
./configure --prefix=/usr/local/php73 --with-config-file-path=/usr/local/php73/etc --with-mysqli=mysqlnd --with-pdo-mysql=mysqlnd --enable-mysqlnd-compression-support --with-gd=/usr/local/libgd --with-png-dir=/usr/local/libpng --with-jpeg-dir=/usr/local/jpeg --with-freetype-dir=/usr/local/freetype --with-xpm-dir=/usr/lib64 --with-zlib-dir=/usr/local/zlib --with-iconv --enable-libxml --enable-xml --enable-bcmath --enable-shmop --enable-sysvsem --enable-inline-optimization --enable-opcache --enable-mbregex --enable-fpm --enable-mbstring --enable-ftp --with-openssl=/usr/local/ssl --enable-pcntl --enable-sockets --with-xmlrpc --enable-zip --enable-soap --without-pear --with-gettext --enable-session --with-curl=/usr/local/curl --enable-ctype --enable-mysqlnd --enable-pdo
./configure --prefix=/usr/local/php74 --with-config-file-path=/usr/local/php74/etc --with-mysqli=mysqlnd --with-pdo-mysql=mysqlnd --enable-gd --with-jpeg=/usr/local/jpeg --with-freetype=/usr/local/freetype --with-xpm=/usr/lib64 --with-zlib-dir=/usr/local/zlib --with-iconv --with-libxml --enable-xml --enable-bcmath --enable-shmop --enable-sysvsem --enable-inline-optimization --enable-opcache --enable-mbregex --enable-fpm --enable-mbstring --enable-ftp --with-openssl --enable-pcntl --enable-sockets --with-xmlrpc --with-zip --enable-soap --without-pear --with-gettext --enable-session --with-curl --enable-ctype --enable-mysqlnd --enable-pdo
3、php开机启动设置
cp /usr/local/src/php-5.3.29/sapi/fpm/init.d.php-fpm /etc/rc.d/init.d/php53-fpm
vi /etc/rc.d/init.d/php53-fpm
prefix=/usr/local/php53
php_fpm_BIN=${exec_prefix}/sbin/php53-fpm
mv /usr/local/php53/sbin/php-fpm /usr/local/php53/sbin/php53-fpm
4、php监听端口设置
vi /usr/local/php53/etc/php-fpm.conf #编辑
user = www #设置php-fpm运行账号为www
group = www #设置php-fpm运行组为www
pid = run/php-fpm.pid #取消前面的分号
listen = 127.0.0.1:9053
5、nginx结合php
修改nginx站点配置文件
/usr/local/nginx/conf/nginx.conf
fastcgi_pass 127.0.0.1:9053;
根据之前php的设置,选择相应的端口,例如9053对应的php版本是php5.3.x
那么此站点的php版本就为php5.3.x
fastcgi_pass 127.0.0.1:9055;
根据之前php的设置,选择相应的端口,例如9055对应的php版本是php5.5.x
那么此站点的php版本就为php5.5.x
测试篇
cd /usr/local/nginx/html/ #进入nginx默认网站根目录
rm -rf /usr/local/nginx/html/* #删除默认测试页
vi index.php #新建index.php文件
<?php
phpinfo();
?>
:wq! #保存退出
chown www.www /usr/local/nginx/html/ -R #设置目录所有者
chmod 700 /usr/local/nginx/html/ -R #设置目录权限
在浏览器中打开服务器IP地址,会看到下面的界面

总结:
CentOS 8.x + MySQL8.0.x + php 7.4组合建议使用系统自带的GD库进行编译,php驱动只有mysqli和mysqlnd驱动。
CentOS 8.x + MySQL8.0.x + php 7.3/7.2/7.1/7.0/5.6/5.5组合建议使用libgd-2.3.0进行编译,php驱动包括mysqli和mysqlnd
CentOS 8.x + MySQL8.0.x + php 5.3组合建议使用gd-2.0.35进行编译,php驱动只有mysqlnd
CentOS 8.x + MySQL8.0.x + php 5.4/5.2此组合目前编译安装php存在问题,MySQL8.0.x默认没有php5.2驱动,php5.4存在void (*data);的bug,需要修改gd文件,不推荐。
推荐:CentOS 8.x + MySQL8.0.x使用php 7.3/7.2/7.1/7.0/5.6/5.5组合最佳。
php各个小版本的安装过程相同,如php 7.3.10和php 7.3.16安装过程一样。
至此,CentOS 8.x编译安装Nginx1.16.x+MySQL8.0.x+PHP7.4.x 7.3.x 7.2.x 7.1.x 7.0.x 5.6.x 5.5.x 5.3.x 多版本全能环境教程完成。
以上纯用于个人笔记用,原文转载于系统运维网,原文链接:https://www.osyunwei.com/archives/10549.html
CentOS 8.x 编译安装LNMP(Linux + Nginx + MySQL + PHP)架构部署动态网站环境的更多相关文章
- centos7安装Lnmp(Linux+Nginx+MySql+Php+phpMyAdmin+Apache)
centos7安装Lnmp(Linux+Nginx+MySql+Php)及Apache Nginx是俄罗斯人编写的十分轻量级的HTTP服务器,Nginx是一个高性能的HTTP和反向代理服务器,Ng ...
- 《Linux就该这么学》培训笔记_ch20使用LNMP架构部署动态网站环境
<Linux就该这么学>培训笔记_ch20使用LNMP架构部署动态网站环境 文章最后会post上书本的笔记照片. 文章主要内容: 源码包程序 LNMP动态网站架构 配置Mysql服务 配置 ...
- 第20章 使用LNMP架构部署动态网站环境
章节概述: 本章节将从Linux系统的软件安装方式讲起,带领读者分辨RPM软件包与源码安装的区别.并能够理解它们的优缺点. Nginx是一款相当优秀的用于部署动态网站的服务程序,Nginx具有不错的稳 ...
- CentOS 7 下编译安装lnmp之nginx篇详解
一.安装环境 宿主机=> win7,虚拟机 centos => 系统版本:CentOS Linux release 7.5.1804 (Core),ip地址 192.168.1.168 ...
- centos6服务器YUM安装LNMP(LINUX+NGINX+MYSQL+PHP)
之前都用的lamp,这次配置一个lnmp来看看,试试Nginx是不是好用 关闭SELINUXvi /etc/selinux/config#SELINUX=enforcing #注释掉#SELINUXT ...
- Lnmp架构部署动态网站环境.2019-7-2-1.1
一.Mysql简介 Mysql数据库: 1.社区版 2.商业版 3.cluster集群 Mysql安装方式 1.编译安装 2.yum/rpm 3.二进制包,直接解压,无需编译 二.Mysql安装部署 ...
- Lnmp架构部署动态网站环境.2019-7-3-1.3
Php安装 一.安装准备 1.Php依赖包 [root@Lnmp tools]# yum install -y zlib libxml libjpeg freetype libpng gd curl ...
- Lnmp架构部署动态网站环境.2019-7-3-1.2
Nginx安装 一.安装准备 Pcre(Perl Compatible Regular Expressions,兼容正则表达式)安装pcre库是为了使Nginx支持HTTP Rewrite模块. 安装 ...
- centos 6.5 安装lnmp(linux+nginx+mysql+php)
参考:http://www.cnblogs.com/AloneSword/archive/2013/03/18/2966750.html (总结并简要) 一安装cmake wget -c http:/ ...
- 安装lnmp(linux nginx mysql php)
下载或者在云盘里找lnmp1.2-full.tar.gz 用 tar -zxvf lnmp1.2-full.tar.gz解压 进入 ,运行./install.sh安装.根据提示. 如果出现yum锁定, ...
随机推荐
- Adobe Acrobat PDF Reader DC软件下载
安装包下载 https://get.adobe.com/en/reader/enterprise/ ftp下载,按日期排序 ftp://ftp.adobe.com/pub/adobe/reader/w ...
- 【踩坑】lua加载模块但找不到模块最蠢的原因
这个问题比较蠢,我用MinGW编译的lua去加载了MSVC编译的lua模块导致找不到符号,然后花了几个小时找为什么我VS项目使用函数导出接口了但是函数依然没有导出(使用dumpbin和nm都能看到导出 ...
- 浏览器中通过js获取用户语言环境方法
用户语言环境存在navigator对象中,不同浏览器分别通过如下方法获取用户浏览器语言.操作系统语言. IE6 IE7 IE8 Firefox Chrome Safari Opera naviga ...
- pySpark RDD基本用法
pySpark RDD基本用法 RDD的全称是:Resilient Distributed Dataset (弹性分布式数据集),它有几个关键的特性: RDD是只读的,表示它的不可变性. 可以并行的操 ...
- Uri转绝对路径工具类
/** * 反射从 provider uri中获取 文件绝对路径 * @param context * @param uri * @return */ private static String ge ...
- linux命令添加至环境变量
vim /etc/profile 最后一行添加 /usr/local/nginx/sbin/ 命令目录 export PATH="/usr/local/nginx/sbin/:$PATH& ...
- Dynamics 365 incident原生实体特点
有以下特点: customerid字段必填,而且该字段类型是"客户".可以关联多种数据类型. 更新服务用户的姓名,会更新所有关联SR的customeridName. 关闭SR会产生 ...
- Python学习笔记文件读写之遍历目录树
随笔记录方便自己和同路人查阅. #------------------------------------------------我是可耻的分割线--------------------------- ...
- .net基础—委托和事件
委托 委托是一种引用类型,表示对具有特定参数列表和返回类型的方法的引用. 在实例化委托时,可以将其实例与任何具有兼容签名和返回类型的方法相关联. 可以通过委托实例调用方法.可以将任何可访问类或结构中与 ...
- .NET在单台Windows2008下百万TCP连接测试
测试客户端: 客户端程序建立TCP连接,发送一条几个字节的数据. 虚拟机8台,PC机8台,服务器1台. 设置MaxUserPort=60000,有一台机没有设置约在1.5万左右.最后因为差一点到100 ...