java 并发编程——Thread 源码重新学习
Java 并发编程系列文章
Java 并发编程——Callable+Future+FutureTask
java并发编程——通过ReentrantLock,Condition实现银行存取款
对于程序员来说 Thread应该都不会陌生,这里再深入的去学习一下里面的很多借口
Thread的声明如下:
class Thread implements Runnable
Runnable 接口是个什么鬼?
public

interface Runnable {

    /**

     * When an object implementing interface <code>Runnable</code> is used

     * to create a thread, starting the thread causes the object's

     * <code>run</code> method to be called in that separately executing

     * thread.

     * <p>

     * The general contract of the method <code>run</code> is that it may

     * take any action whatsoever.

     *

     * @see     java.lang.Thread#run()

     */

    public abstract void run();

}
当开启一个线程的时候,run()方法就会被执行在新开启的线程。
ThreadGroup
在了解Thread之前先了解一下ThreadGroup,结构其实很简单如下图(就是一个线程组,同时可以包含其它线程组。对于线程租的操作都是对里面线程和子线程组的操作,而子线程组需要进行递归的操作):
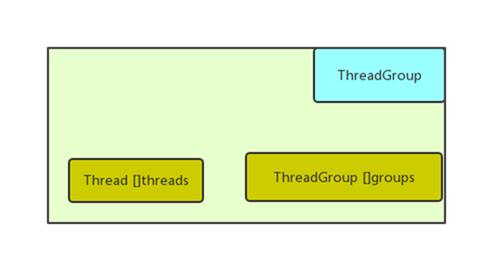
当创建了好几个线程的时候,很多线程的工作任务是类似或者一致的,这样我们就可以使用ThreadGroup来管理它。
优点:方便统一管理,线程组可以进行复制,快速定位到一个线程,统一进行异常设置等。
大概看了里面的接口设计,里面的操作有一个特点:在同步块中将子线程组拷贝到临时变量中然后再在同步块之外进行递归的操作。(这样设计的优点和目的:读写分离,防止多线程操作导致崩溃,类似于CopyOnWriteArrayList)
  public void list() {

    list(System.out, 0);

}

void list(PrintStream out, int indent) {

    int ngroupsSnapshot;

    ThreadGroup[] groupsSnapshot;

    synchronized (this) {

        for (int j = 0 ; j < indent ; j++) {

            out.print("");

        }

        out.println(this);

        indent += 4;

        for (int i = 0 ; i < nthreads ; i++) {

            for (int j = 0 ; j < indent ; j++) {

                out.print("");

            }

            out.println(threads[i]);

        }

        ngroupsSnapshot = ngroups;

        if (groups != null) {
groupsSnapshot = Arrays.copyOf(groups, ngroupsSnapshot);
        } else {

            groupsSnapshot = null;

        }

    }
//同步块中将 groups数组拷贝到临时变量 groupsSnapshot中,再在同步块之外对其进行递归操作。
    for (int i = 0 ; i < ngroupsSnapshot ; i++) {

        groupsSnapshot[i].list(out, indent);

    }

}
Thread的构造函数
基本属性
- name:线程名称,可以重复,若没有指定会自动生成。
- id:线程ID,一个正long值,创建线程时指定,终生不变,线程终结时ID可以复用。
- priority:线程优先级,取值为1到10,线程优先级越高,执行的可能越大,若运行环境不支持优先级分10级,如只支持5级,那么设置5和设置6有可能是一样的。
- state:线程状态,Thread.State枚举类型,有NEW、RUNNABLE、BLOCKED、WAITING、TIMED_WAITING、TERMINATED 5种。
- ThreadGroup:所属线程组,一个线程必然有所属线程组。 RUNNABLE
- UncaughtEThreadGroupxceptionHandler:未捕获异常时的处理器,默认没有,线程出现错误后会立即终止当前线程运行,并打印错误。
无参构造函数
 public Thread() {

        init(null, null, "Thread-" + nextThreadNum(), 0);

    }
设置Thread的name的构造函数
public Thread(String name) {

        init(null, null, name, 0);

    }
通过Runnable接口初始化一个Thread
public Thread(Runnable target) {

        init(null, target, "Thread-" + nextThreadNum(), 0);

    }
上面几种Thread的初始化方式我们应该并不陌生,下面介绍用ThreadGroup(创建的线程的同时,将其添加到某个线程组)来初始化一个Thread:
public Thread(ThreadGroup group, Runnable target) {

        init(group, target, "Thread-" + nextThreadNum(), 0);

    }
public Thread(ThreadGroup group, String name) {

        init(group, null, name, 0);

    }
线程的状态及其切换过程

Thread源码中其实只有上图中的六种,因为合并了Running和Runnable状态,统称为Runnable。调用yield()函数的时候,其实就是由Running变为Runnable状态,而此时在Thread源码中都是Runnable状态。
sleep()
对外提供两个重载版本:
//参数为毫秒
public static void sleep(long millis) throws InterruptedException
//第一参数为毫秒,第二个参数为纳秒
public static void sleep(long millis, int nanos) throws InterruptedException
sleep相当于让线程睡眠,交出CPU,让CPU去执行其他的任务。
但是有一点要非常注意,sleep方法不会释放锁,也就是说如果当前线程持有对某个对象的锁,则即使调用sleep方法,其他线程也无法访问这个对象。看下面这个例子就清楚了:
public class Test {

    private int i = 10;

    private Object object = new Object();

    public static void main(String[] args) throws IOException  {

        Test test = new Test();

        MyThread thread1 = test.new MyThread();

        MyThread thread2 = test.new MyThread();

        thread1.start();

        thread2.start();

    }

    class MyThread extends Thread{

        @Override

        public void run() {

            synchronized (object) {

                i++;

                System.out.println("i:"+i);

                try {

                    System.out.println("线程"+Thread.currentThread().getName()+"进入睡眠状态");

                    Thread.currentThread().sleep(10000);

                } catch (InterruptedException e) {

                    // TODO: handle exception

                }

                System.out.println("线程"+Thread.currentThread().getName()+"睡眠结束");

                i++;

                System.out.println("i:"+i);

            }

        }

    }

}
执行结果如下:
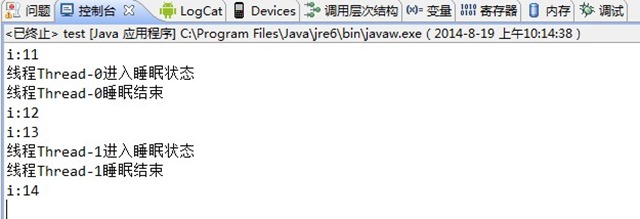
从上面输出结果可以看出,当Thread-0进入睡眠状态之后,Thread-1并没有去执行具体的任务。只有当Thread-0执行完之后,此时Thread-0释放了对象锁,Thread-1才开始执行。
注意,如果调用了sleep方法,必须捕获InterruptedException异常或者将该异常向上层抛出。当线程睡眠时间满后,不一定会立即得到执行,因为此时可能CPU正在执行其他的任务。所以说调用sleep方法相当于让线程进入阻塞状态。
在thread1睡眠过程中获取thread1/thread2状态结果:thread1.state=TIMED_WAITING thread2.state=BLOCKED
下面这段代码是Thread源码中的实现,前面部分是 参数异常检查,如果参数有异常会抛出IllegalArgumentException异常。后面一部分主要是通过while循环控制sleep的结束(其实还是调用native的sleep方法)。
代码里面 获取当前线程的lock,并在 sleep时不能让其它线程访问。(原因不是很清楚)
Object lock = currentThread().lock;
public static void sleep(long millis, int nanos)

    throws InterruptedException {

        if (millis < 0) {

            throw new IllegalArgumentException("millis < 0: " + millis);

        }

        if (nanos < 0) {

            throw new IllegalArgumentException("nanos < 0: " + nanos);

        }

        if (nanos > 999999) {

            throw new IllegalArgumentException("nanos > 999999: " + nanos);

        }

        // The JLS 3rd edition, section 17.9 says: "...sleep for zero

        // time...need not have observable effects."

        if (millis == 0 && nanos == 0) {

            // ...but we still have to handle being interrupted.

            if (Thread.interrupted()) {

              throw new InterruptedException();

            }

            return;

        }

        long start = System.nanoTime();

        long duration = (millis * NANOS_PER_MILLI) + nanos;  // NANOS_PER_MILLI 值为 1000

        Object lock = currentThread().lock;

        // Wait may return early, so loop until sleep duration passes.

        synchronized (lock) {

            while (true) {

                sleep(lock, millis, nanos);  // 调用底层native sleep方法

                long now = System.nanoTime();

                long elapsed = now - start;

								// 当 sleep time 没有达到指定的时间间隔时继续调用 native 的sleep方法,

                if (elapsed >= duration) {

                    break;                   // sleep 中断的条件

                }

                duration -= elapsed;

                start = now;

                millis = duration / NANOS_PER_MILLI;

                nanos = (int) (duration % NANOS_PER_MILLI);

            }

        }

    }
yield()
将Cpu让给其它线程优先执行,自己进入等待执行(Runnable)状态。yield函数没有设置等待执行的时间,一切听从cpu的调度,当没有其它线程抢占cpu时,当前线程又会被cpu调度进入Running状态。它跟sleep方法类似,同样不会释放锁
当增加yield()执行下面这段代码和没有yield()时的区别在于:当增加yield()函数后循环执行到149时将cpu的使用权让给了另一个线程执行,知道另一个线程执行完毕再从149自增打印输出。
public class SelfTest {

    public static class ReadThread extends Thread {

        int i = 0;

        public void run() {

            while(i<300 ){

                System. out.println("*******  "+Thread.currentThread().getId()+“    **********: "+i++);

                if(150==i){

                    Thread. yield();

                }

            }

            System. out.println(number+"   currentThread: "+Thread.currentThread());

        }

    }

    public static void main(String [] args) {

        new ReadThread().start();

        new ReadThread().start();

        try {

            Thread.sleep(1000);

        } catch (InterruptedException e) {

            e.printStackTrace();

        }

    }

}
Thread源码中并没有看到六种状态切换的代码,相必都在c/c++层去做了。
currentThread()
public static native Thread currentThread();
该方法是用来获取当前线程,实现都是在native层做的,无法看到代码。
interrupt()
interrupt,顾名思义,即中断的意思。单独调用interrupt方法可以使得处于阻塞状态的线程抛出一个异常,也就说,它可以用来中断一个正处于阻塞状态的线程;另外,通过interrupt方法和isInterrupted()方法来停止正在运行的线程。
下面看一个例子:
public class Test {

    public static void main(String[] args) throws IOException  {

        Test test = new Test();

        MyThread thread = test.new MyThread();

        thread.start();

        try {

            Thread.currentThread().sleep(2000);

        } catch (InterruptedException e) {

        }

        thread.interrupt();

    }

    class MyThread extends Thread{

        @Override

        public void run() {

            try {

                System.out.println("进入睡眠状态");

                Thread.currentThread().sleep(10000);

                System.out.println("睡眠完毕");

            } catch (InterruptedException e) {

                System.out.println("得到中断异常");

            }

            System.out.println("run方法执行完毕");

        }

    }

}
输出结果:

从这里可以看出,通过interrupt方法可以中断处于阻塞状态的线程。那么能不能中断处于非阻塞状态的线程呢?看下面这个例子:
public class Test {

    public static void main(String[] args) throws IOException  {

        Test test = new Test();

        MyThread thread = test.new MyThread();

        thread.start();

        try {

            Thread.currentThread().sleep(2000);

        } catch (InterruptedException e) {

        }

        thread.interrupt();

    }

    class MyThread extends Thread{

        @Override

        public void run() {

            int i = 0;

            while(i<Integer.MAX_VALUE){

                System.out.println(i+" while循环");

                i++;

            }

        }

    }

}
运行该程序会发现,while循环会一直运行直到变量i的值超出Integer.MAX_VALUE。所以说直接调用interrupt方法不能中断正在运行中的线程。
但是如果配合isInterrupted()能够中断正在运行的线程,因为调用interrupt方法相当于将中断标志位置为true,那么可以通过调用isInterrupted()判断中断标志是否被置位来中断线程的执行。比如下面这段代码:
public class Test {

    public static void main(String[] args) throws IOException  {

        Test test = new Test();

        MyThread thread = test.new MyThread();

        thread.start();

        try {

            Thread.currentThread().sleep(2000);

        } catch (InterruptedException e) {

        }

        thread.interrupt();

    }

    class MyThread extends Thread{

        @Override

        public void run() {

            int i = 0;

            while(!isInterrupted() && i<Integer.MAX_VALUE){

                System.out.println(i+" while循环");

                i++;

            }

        }

    }

}
运行会发现,打印若干个值之后,while循环就停止打印了。
但是一般情况下不建议通过这种方式来中断线程,一般会在MyThread类中增加一个属性 isStop来标志是否结束while循环,然后再在while循环中判断isStop的值。
class MyThread extends Thread{

        private volatile boolean isStop = false;

        @Override

        public void run() {

            int i = 0;

            while(!isStop){

                i++;

            }

        }

        public void setStop(boolean stop){

            this.isStop = stop;

        }

    }
那么就可以在外面通过调用setStop方法来终止while循环。
wait()/notify()
public class WaitNotifyCase {

    public static void main(String[] args) {

        final Object lock = new Object();

        new Thread(new Runnable() {

            @Override

            public void run() {

                System.out.println("thread A is waiting to get lock");

                synchronized (lock) {

                    try {

                        System.out.println("thread A get lock");

                        TimeUnit.SECONDS.sleep(1);

                        System.out.println("thread A do wait method");

                        lock.wait();

                        System.out.println("wait end");

                    } catch (InterruptedException e) {

                        e.printStackTrace();

                    }

                }

            }

        }).start();

        try {

            Thread.sleep(1000);

        } catch (InterruptedException e) {

            e.printStackTrace();

        }

        new Thread(new Runnable() {

            @Override

            public void run() {

                System.out.println("thread B is waiting to get lock");

                synchronized (lock) {

                    System.out.println("thread B get lock");

                    try {

                        TimeUnit.SECONDS.sleep(5);

                    } catch (InterruptedException e) {

                        e.printStackTrace();

                    }

                    lock.notify();

                    try {

                        Thread.sleep(1000);

                    } catch (InterruptedException e) {

                        e.printStackTrace();

                    }

                    System.out.println("thread B do notify method");

                }

            }

        }).start();

    }

}
执行结果:
thread A get lock

thread A do wait method

thread B is waiting to get lock

thread B get lock

thread B do notify method

wait end
多线程共享资源时,通过共享资源的 wait()和notify()进行通信,上例子中
1、 A线程首先持有了资源lock,并进入了Synchronized同步块
2、A 调用 共享资源的wait()方法,当前线程状态进入TIMED_WAITING状态,同时释放资源锁。wait()后面的代码只有当该线程被唤醒的时候才回去执行(notify())
3、B线程获取到资源锁,进入同步块,并调用了资源额notify()方法,唤醒了A线程(注意:此时线程B并没有停止执行,而去执行A线程,而是等B线程执行完之后A线程才能被真正唤醒)
疑问: 问什么调用wait() 和 notify()方法之前必须 将资源放在Synchronized块中?
参看 Object源码注释或者其它资料就会发现,这两个方法执行之前必须获取到资源(实例中的lock对象)的monitor。将资源方到同步块中可以保证当前线程获取到资源的monitor
当调用资源的wait方法时,将该线程放到资源的等待集合中,并放弃资源的同步请求(放弃同步锁)
This method causes the current thread (call it <var>T</var>) to

* place itself in the wait set for this object and then to relinquish

* any and all synchronization claims on this object.
notify()方法调用时,会去 wait set中任意选择一个线程进行唤醒
Wakes up a single thread that is waiting on this object's monitor. If any threads are waiting on this object, one of them is chosen to be awakened. The choice is arbitrary and occurs at the discretion of the implementation
当调用notifyAll()方法时则会唤醒wait set中的所有线程
备注: 当thread A调用lock.wait()时,线程进入到WAITING状态而不是blocked状态。
join()
很多情况下 当 A线程需要等待B线程执行完之后才能去执行,对于这种场景我们就可以用到 join()函数了。
class BThread extends Thread {

    public BThread() {

        super("[BThread] Thread");

    };

    public void run() {

        String threadName = Thread.currentThread().getName();

        System.out.println(threadName + " start.");

        try {

            for (int i = 0; i < 5; i++) {

                System.out.println(threadName + " loop at " + i);

                Thread.sleep(1000);

            }

            System.out.println(threadName + " end.");

        } catch (Exception e) {

            System.out.println("Exception from " + threadName + ".run");

        }

    }

}

class AThread extends Thread {

    BThread bt;

    public AThread(BThread bt) {

        super("[AThread] Thread");

        this.bt = bt;

    }

    public void run() {

        String threadName = Thread.currentThread().getName();

        System.out.println(threadName + " start.");

        try {

            bt.join();

            System.out.println(threadName + " end.");

        } catch (Exception e) {

            System.out.println("Exception from " + threadName + ".run");

        }

    }

}

public class TestDemo {

    public static void main(String[] args) {

        String threadName = Thread.currentThread().getName();

        System.out.println(threadName + " start.");

        BThread bt = new BThread();

        AThread at = new AThread(bt);

        try {

            bt.start();

            Thread.sleep(2000);

            at.start();

            at.join();

        } catch (Exception e) {

            System.out.println("Exception from main");

        }

        System.out.println(threadName + " end!");

    }

}
执行结果如下:
main start.    //主线程起动,因为调用了at.join(),要等到at结束了,此线程才能向下执行。

[BThread] Thread start.

[BThread] Thread loop at 0

[BThread] Thread loop at 1

[AThread] Thread start.    //线程at启动,因为调用bt.join(),等到bt结束了才向下执行。

[BThread] Thread loop at 2

[BThread] Thread loop at 3

[BThread] Thread loop at 4

[BThread] Thread end.

[AThread] Thread end.    // 线程AThread在bt.join();阻塞处起动,向下继续执行的结果

main end!      //线程AThread结束,此线程在at.join();阻塞处起动,向下继续执行的结果。
线程B先执行,当A执行后,调用B线程的join()方法,表示等待B的run()方法执行结束之后才会继续往下执行。
suspend()/stop()/resume()是已经过时的方法,这里就不再介绍,可能是因为他们容易造成死锁,所以不建议使用。
Thread 里面的 contextClassLoader 还没有搞懂,参考https://blog.csdn.net/zhoudaxia/article/details/35897057
一篇里面去讲整个Thread实在是太紧凑,很多深一点东西没有深入了解,后续再补充吧。
参考:
http://www.cnblogs.com/dolphin0520/p/3920357.html
https://blog.csdn.net/evankaka/article/details/51627380
https://blog.csdn.net/zhangzeyuaaa/article/details/53718734
wait()/notify() 详解: https://www.jianshu.com/p/f4454164c017
join() 方法详解: https://blog.csdn.net/sinat_29384657/article/details/52228578
java 并发编程——Thread 源码重新学习的更多相关文章
- Java并发编程-ReentrantLock源码分析
一.前言 在分析了 AbstractQueuedSynchronier 源码后,接着分析ReentrantLock源码,其实在 AbstractQueuedSynchronizer 的分析中,已经提到 ...
- Java并发编程 ReentrantLock 源码分析
ReentrantLock 一个可重入的互斥锁 Lock,它具有与使用 synchronized 方法和语句所访问的隐式监视器锁相同的一些基本行为和语义,但功能更强大. 这个类主要基于AQS(Abst ...
- Java并发编程-AbstractQueuedSynchronizer源码分析
简介 提供了一个基于FIFO队列,可以用于构建锁或者其他相关同步装置的基础框架.该同步器(以下简称同步器)利用了一个int来表示状态,期望它能够成为实现大部分同步需求的基础.使用的方法是继承,子类通过 ...
- Java并发编程 LockSupport源码分析
这个类比较简单,是一个静态类,不需要实例化直接使用,底层是通过java未开源的Unsafe直接调用底层操作系统来完成对线程的阻塞. package java.util.concurrent.locks ...
- 并发编程—— FutureTask 源码分析
1. 前言 当我们在 Java 中使用异步编程的时候,大部分时候,我们都会使用 Future,并且使用线程池的 submit 方法提交一个 Callable 对象.然后调用 Future 的 get ...
- Java并发编程-Thread类的使用
在前面2篇文章分别讲到了线程和进程的由来.以及如何在Java中怎么创建线程和进程.今天我们来学习一下Thread类,在学习Thread类之前,先介绍与线程相关知识:线程的几种状态.上下文切换,然后接着 ...
- Java异步编程——深入源码分析FutureTask
Java的异步编程是一项非常常用的多线程技术. 之前通过源码详细分析了ThreadPoolExecutor<你真的懂ThreadPoolExecutor线程池技术吗?看了源码你会有全新的认识&g ...
- java并发系列(四)-----源码角度彻底理解ReentrantLock(重入锁)
1.前言 ReentrantLock可以有公平锁和非公平锁的不同实现,只要在构造它的时候传入不同的布尔值,继续跟进下源码我们就能发现,关键在于实例化内部变量sync的方式不同,如下所示: /** * ...
- Java并发——结合CountDownLatch源码、Semaphore源码及ReentrantLock源码来看AQS原理
前言: 如果说J.U.C包下的核心是什么?那我想答案只有一个就是AQS.那么AQS是什么呢?接下来让我们一起揭开AQS的神秘面纱 AQS是什么? AQS是AbstractQueuedSynchroni ...
随机推荐
- 续安装好composer和workerman之后;TP5运行workerman的操作
TP5想要实现时时通讯:首先先安装好composer和workerman,我之前有写一篇安装的方法,在cmd里面安装:tp5手册上面有写cmd命令的代码:接下来是安装好后如何运行的: 首先在项目中建立 ...
- SpringMVC源码解析 - HandlerAdapter - @SessionAttributes注解处理
使用SpringMVC开发时,可以使用@SessionAttributes注解缓存信息.这样业务开发时,就不需要一次次手动操作session保存,读数据. @Controller @RequestMa ...
- ios10适配
1: 去除打印多余的log信息: xcode-->Product-->Scheme-->edite Scheme 中在Ecvironment Variables 中添加OS_ACTI ...
- 8.使用Exists监控ZNode的三大Change事件
一. zookeeper是一个分布式的协调程序(所有程序都是通过订阅它来相互感知) 1. tcp(长链接) + watcher server ->client client ->ser ...
- 原创:MVC 5 实例教程(MvcMovieStore 新概念版:mvc5.0,EF6.01) - 2、数据框架 和 功能预览
说明:MvcMovieStore项目已经发布上线,想了解最新版本功能请登录 MVC 影视(MvcMovie.cn) 进行查阅.如需转载,请注明出处:http://www.cnblogs.com/Dod ...
- mono+jexus 部署之CompilationException
使用 HelpPage 组件 CompilationException 好不容易在ubuntu上搭建了mono+jexus,欣喜若狂的部署上发布的网站,急忙打开,成功运行. 但是别高兴的太早,当我打开 ...
- C#用 catch 捕获异类的常用类型
C#用 catch 捕获异类的常用类型 最近在书上刚刚学到了try和catch用法,然后网上找了下常用的,自己存在这里方便自己查找 Exception 类 描述 SystemException 其他 ...
- jquery点击页面其他位置隐藏div
$("#btnAdd").on('click', function (e) { $("#setUp").toggle(); $(document).one('c ...
- 腾讯云服务器部署 django项目整个流程
CentOS7下部署Django项目详细操作步骤 前记:购买腾讯云服务器,配置自选,当然新用户免费体验半个月,我选择的系统是centos7系统版本, 接下来我们来看整个配置项目流程. 部署是基于:ce ...
- setInterval(),setTimeout(),location.reload(true)
1,setInterval() setInterval()方法可以按照指定的周期来调用函数或表达式,他会不停地调用函数,直到调用clearInterval()方法或窗口关闭.由setInterval( ...