Json.Net学习笔记(十) 保持对象引用
更多内容见这里:http://www.cnblogs.com/wuyifu/archive/2013/09/03/3299784.html
默认情况下,Json.Net将通过对象的值来序列化它遇到的所有对象。如果工个list包含两个Person引用,这两个引用都指向同一个对象,Json序列化器将输出每一个引用的所有名称和值。
定义类:
public class Person
{
public DateTime BirthDate { get; set; }
public DateTime LastModified { get; set; }
public string Name { get; set; }
}
测试:
Person p = new Person()
{
BirthDate = new DateTime(1985, 11, 27, 0, 0, 0, DateTimeKind.Utc),
LastModified = new DateTime(2010, 12, 20, 0, 0, 0, DateTimeKind.Utc),
Name = "James"
};
List<Person> people = new List<Person>();
people.Add(p);
people.Add(p);
string json = JsonConvert.SerializeObject(people, Formatting.Indented);
Console.WriteLine(json);
输出结果:
[
{
"BirthDate": "\/Date(501897600000)\/",
"LastModified": "\/Date(1292803200000)\/",
"Name": "James"
},
{
"BirthDate": "\/Date(501897600000)\/",
"LastModified": "\/Date(1292803200000)\/",
"Name": "James"
}
]
在大多数情况下这是期望的结果,但是在某些场景下,将list中的第二项作为第一项的一个引用来输出会是一个更好的解决方案。如果上面的Json现在被反序列化,返回的list会包含两个完全分离的对象,它们具有相同的值。通过值来输出引用也会在对象上导致循环引用的发生。
>PreserveReferencesHandling
string json2 = JsonConvert.SerializeObject(people, Formatting.Indented,
new JsonSerializerSettings() { PreserveReferencesHandling = PreserveReferencesHandling.Objects });
Console.WriteLine(json2);
输出结果:
[
{
"$id": "1",
"BirthDate": "\/Date(501897600000)\/",
"LastModified": "\/Date(1292803200000)\/",
"Name": "James"
},
{
"$ref": "1"
}
]
List<Person> deserializedPeople = JsonConvert.DeserializeObject<List<Person>>(json2,
new JsonSerializerSettings { PreserveReferencesHandling = PreserveReferencesHandling.Objects });
Console.WriteLine(deserializedPeople.Count);// 2
Person p1 = deserializedPeople[0];
Person p2 = deserializedPeople[1];
Console.WriteLine(p1.Name);// James
Console.WriteLine(p2.Name);// James
bool equal = Object.ReferenceEquals(p1, p2);// true
在list中的第一个Person被序列化时增加了一个额外的对象Id,现在第二个Person对象仅仅是第一个的引用。
现在使用PreserveReferencesHandling后,在序列化时只创建了一个Person对象,list中包含它的两个引用,原来我们叫作反射(mirroring) 。
>IsReference on JsonObjectAttribute, JsonArrayAttribute and JsonPropertyAttribute
在对象序列化器上设置PreserveReferencesHandling,将会改变所有对象被序列化和反序列化的方式。为了更加细致地控制对象和成员被序列化为一个引用,可以在JsonObjectAttribute, JsonArrayAttribute 和 JsonPropertyAttribute上使用IsReference 属性.
在JsonObjectAttribute, JsonArrayAttribute 上设置IsReference 为true,意味着Json序列化器总是会序列这个类型为一个引用。在JsonPropertyAttribute上设置IsReference为true将只序列化这个属性为一个引用。
[JsonObject(IsReference = true)]

    public class EmployeeReference

    {

        public string Name { get; set; }

        public EmployeeReference Manager { get; set; }

    }
测试:
static void Main(string[] args)

        {

            List<EmployeeReference> empList = new List<EmployeeReference>();

            var empRef = new EmployeeReference

            {

                Name = "d1",

                Manager = new EmployeeReference

                {

                    Name="d2",

                    Manager  = new EmployeeReference

                    {

                        Name = "d3",

                        Manager = null

                    }

                }

            };

            empList.Add(empRef);

            empList.Add(empRef);

            string empRefJson = JsonConvert.SerializeObject(empList, Formatting.Indented);

            Console.WriteLine(empRefJson);

            Console.ReadLine();

        }
输出结果:
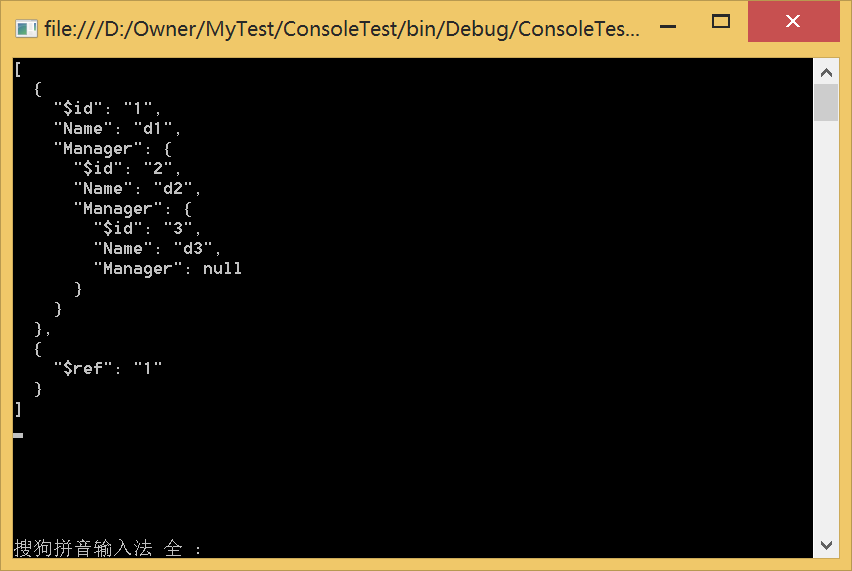
如果去掉 [JsonObject(IsReference = true)],那么输出如下:

>IReferenceResolver
要想定制引用的生成方式,可以继承自IReferenceResolver接口来使用Json序列化器。
Json.Net学习笔记(十) 保持对象引用的更多相关文章
- python3.4学习笔记(十四) 网络爬虫实例代码,抓取新浪爱彩双色球开奖数据实例
python3.4学习笔记(十四) 网络爬虫实例代码,抓取新浪爱彩双色球开奖数据实例 新浪爱彩双色球开奖数据URL:http://zst.aicai.com/ssq/openInfo/ 最终输出结果格 ...
- Json.Net学习笔记
http://www.cnblogs.com/xiaojinhe2/archive/2011/10/28/2227789.html Newtonsoft.Json(Json.Net)学习笔记 http ...
- Learning ROS for Robotics Programming Second Edition学习笔记(十) indigo Gazebo rviz slam navigation
中文译著已经出版,详情请参考:http://blog.csdn.net/ZhangRelay/article/category/6506865 moveit是书的最后一章,由于对机械臂完全不知,看不懂 ...
- python3.4学习笔记(十八) pycharm 安装使用、注册码、显示行号和字体大小等常用设置
python3.4学习笔记(十八) pycharm 安装使用.注册码.显示行号和字体大小等常用设置Download JetBrains Python IDE :: PyCharmhttp://www. ...
- python3.4学习笔记(十九) 同一台机器同时安装 python2.7 和 python3.4的解决方法
python3.4学习笔记(十九) 同一台机器同时安装 python2.7 和 python3.4的解决方法 同一台机器同时安装 python2.7 和 python3.4不会冲突.安装在不同目录,然 ...
- python3.4学习笔记(十六) windows下面安装easy_install和pip教程
python3.4学习笔记(十六) windows下面安装easy_install和pip教程 easy_install和pip都是用来下载安装Python一个公共资源库PyPI的相关资源包的 首先安 ...
- python3.4学习笔记(十五) 字符串操作(string替换、删除、截取、复制、连接、比较、查找、包含、大小写转换、分割等)
python3.4学习笔记(十五) 字符串操作(string替换.删除.截取.复制.连接.比较.查找.包含.大小写转换.分割等) python print 不换行(在后面加上,end=''),prin ...
- python3.4学习笔记(十二) python正则表达式的使用,使用pyspider匹配输出带.html结尾的URL
python3.4学习笔记(十二) python正则表达式的使用,使用pyspider匹配输出带.html结尾的URL实战例子:使用pyspider匹配输出带.html结尾的URL:@config(a ...
- python3.4学习笔记(十) 常用操作符,条件分支和循环实例
python3.4学习笔记(十) 常用操作符,条件分支和循环实例 #Pyhon常用操作符 c = d = 10 d /= 8 #3.x真正的除法 print(d) #1.25 c //= 8 #用两个 ...
随机推荐
- Css3 常见鼠标滑过效果集合
1.演示地址: http://yaochuxia.github.io/hover/#
- android 简单的开机自启
今天我们主要来探讨android怎么让一个service开机自动启动功能的实现.Android手机在启动的过程中会触发一个Standard Broadcast Action,名字叫android.in ...
- Elasticsearch学习2--Elasticsearch数据类型简介
1.Elasticsearch 是 面向文档型数据库,这意味着它存储的是整个对象或者 文档,它不但会存储它们,还会为他们建立索引,这样你就可以搜索他们了.你可以在 Elasticsearch 中索引. ...
- 序列数据挖掘[ZZ]
一.时间序列数据挖掘 时间序列是数据存在的特殊形式,序列的过去值会影响到将来值,这种影响的大小以及影响的方式可由时间序列中的趋势周期及非平稳等行为来刻画.一般来讲,时间序列数据都具有躁声.不稳定.随机 ...
- 浅谈 trie树 及其实现
定义:又称字典树,单词查找树或者前缀树,是一种用于快速检索的多叉树结构, 如英文字母的字典树是一个26叉树,数字的字典树是一个10叉树. 核心思想:是空间换时间.利用字符串的公共前缀来降低查询时间的开 ...
- 第八篇、SVN在Mac上使用
Mac自带svn软件 1.创建目录 svn-repository/source-code 2.svnadmin create /Users/liaokailin/svn-repository/sour ...
- Winform控件Enable=false显示优化
在B/S开发中(ASP.NET),往往可以css样式表来让页面控件更加美观,但是在C/S中(Winform)里面,我们则需要通过其他取巧的 方式来实现.例如:当你因为某个需求需要将控件设置为Reado ...
- TatukGIS - GisDefs - ColorToHSL 过程
过程名称 ColorToHSL 所在单元 GisDefs 过程原型 procedure ColorToHSL(const _color: TColor; var _h: Rea ...
- STM32学习笔记——SPI串行通讯(向原子哥学习)
一.SPI 简介 SPI是 Serial Peripheral interface 的缩写,就是串行外围设备接口.SPI 接口主要应用在 EEPROM, FLASH,实时时钟,AD 转换器,还有数 ...
- vim代码折叠功能
问题:怎样在vim中实现代码折叠功能? 解决方法:直接使用vim自带的快捷键和命令,便可以实现功能强大的折叠 小试折叠: 1 :set fdm=marker 在vim中执行该命令 2 5G 将 ...