SpringBoot集成RabbitMQ
官方说明:http://www.rabbitmq.com/getstarted.html
什么是MQ?
MQ全称为Message Queue, 消息队列(MQ)是一种应用程序对应用程序的通信方法。MQ是消费-生产者模型的一个典型的代表,一端往消息队列中不断写入消息,而另一端则可以读取队列中的消息。
RabbitMQ是MQ的一种。下面详细介绍一下RabbitMQ的基本概念。
1、队列、生产者、消费者
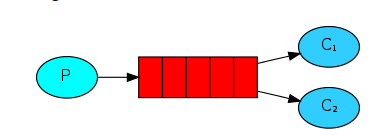
队列是RabbitMQ的内部对象,用于存储消息。生产者(下图中的P)生产消息并投递到队列中,消费者(下图中的C)可以从队列中获取消息并消费。

多个消费者可以订阅同一个队列,这时队列中的消息会被平均分摊给多个消费者进行处理,而不是每个消费者都收到所有的消息并处理。
2、Publish/Subscribe,订阅发布模式,每个通道都会收到消息

3、Exchange、Binding
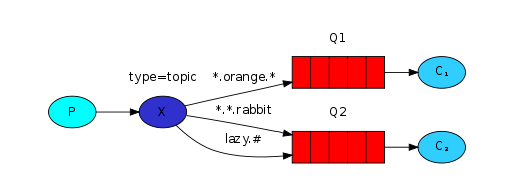
刚才我们看到生产者将消息投递到队列中,实际上这在RabbitMQ中这种事情永远都不会发生。实际的情况是,生产者将消息发送到Exchange(交换器,下图中的X),再通过Binding将Exchange与Queue关联起来。
a.Direct exchange,一个exchange和多个queue绑定,会根据绑定的不同routingKey,发送到不同的Queue中

b.Topic exchange,按模式匹配路由键。模式符号 "#" 表示一个或多个单词,"*" 仅匹配一个单词。
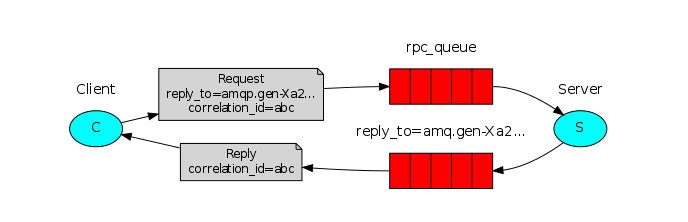
c.RPC
4、Exchange Type、Bingding key、routing key
在绑定(Binding)Exchange与Queue的同时,一般会指定一个binding key。在绑定多个Queue到同一个Exchange的时候,这些Binding允许使用相同的binding key。
生产者在将消息发送给Exchange的时候,一般会指定一个routing key,来指定这个消息的路由规则,生产者就可以在发送消息给Exchange时,通过指定routing key来决定消息流向哪里。
RabbitMQ常用的Exchange Type有三种:fanout、direct、topic。
fanout:把所有发送到该Exchange的消息投递到所有与它绑定的队列中。
direct:把消息投递到那些binding key与routing key完全匹配的队列中。
topic:将消息路由到binding key与routing key模式匹配的队列中。
附上一张RabbitMQ的结构图:

最后来具体解析一下几个问题:
1、可以自动创建队列,也可以手动创建队列,如果自动创建队列,那么是谁负责创建队列呢?是生产者?还是消费者?
如果队列不存在,当然消费者不会收到任何的消息。但是如果队列不存在,那么生产者发送的消息就会丢失。所以,为了数据不丢失,消费者和生产者都可以创建队列。那么如果创建一个已经存在的队列呢?那么不会有任何的影响。需要注意的是没有任何的影响,也就是说第二次创建如果参数和第一次不一样,那么该操作虽然成功,但是队列属性并不会改变。
队列对于负载均衡的处理是完美的。对于多个消费者来说,RabbitMQ使用轮询的方式均衡的发送给不同的消费者。
2、RabbitMQ的消息确认机制
默认情况下,如果消息已经被某个消费者正确的接收到了,那么该消息就会被从队列中移除。当然也可以让同一个消息发送到很多的消费者。
如果一个队列没有消费者,那么,如果这个队列有数据到达,那么这个数据会被缓存,不会被丢弃。当有消费者时,这个数据会被立即发送到这个消费者,这个数据被消费者正确收到时,这个数据就被从队列中删除。
那么什么是正确收到呢?通过ack。每个消息都要被acknowledged(确认,ack)。我们可以显示的在程序中去ack,也可以自动的ack。如果有数据没有被ack,那么:
RabbitMQ Server会把这个信息发送到下一个消费者。
如果这个app有bug,忘记了ack,那么RabbitMQServer不会再发送数据给它,因为Server认为这个消费者处理能力有限。
而且ack的机制可以起到限流的作用(Benefitto throttling):在消费者处理完成数据后发送ack,甚至在额外的延时后发送ack,将有效的均衡消费者的负载。
使用springboot调用RabbitMQ例子
环境:
apache-tomcat-8.5.15
jdk1.8.0_172
IDEA
搭建好RabbitMQ服务器环境,这点就不在叙述了。
使用RabbitTemplate的convertAndSend发送自定义的类消息的时候要统一类的包路径,不然在序列化的时候要报错,
通过IDEA创建springboot的WEB项目,引入了freemarker和和rabbitmq
创建完后的pom.xml文件为:
<?xml version="1.0" encoding="UTF-8"?>

<project xmlns="http://maven.apache.org/POM/4.0.0" xmlns:xsi="http://www.w3.org/2001/XMLSchema-instance"

    xsi:schemaLocation="http://maven.apache.org/POM/4.0.0 http://maven.apache.org/xsd/maven-4.0.0.xsd">

    <modelVersion>4.0.</modelVersion>

    <groupId>com.xuan</groupId>

    <artifactId>springrabbitmq</artifactId>

    <version>0.0.-SNAPSHOT</version>

    <packaging>jar</packaging>

    <name>springrabbitmq</name>

    <description>Demo project for Spring Boot</description>

    <parent>

        <groupId>org.springframework.boot</groupId>

        <artifactId>spring-boot-starter-parent</artifactId>

        <version>2.0..RELEASE</version>

        <relativePath/> <!-- lookup parent from repository -->

    </parent>

    <properties>

        <project.build.sourceEncoding>UTF-</project.build.sourceEncoding>

        <project.reporting.outputEncoding>UTF-</project.reporting.outputEncoding>

        <java.version>1.8</java.version>

    </properties>

    <dependencies>

        <dependency>

            <groupId>org.springframework.boot</groupId>

            <artifactId>spring-boot-starter-amqp</artifactId>

        </dependency>

        <dependency>

            <groupId>org.springframework.boot</groupId>

            <artifactId>spring-boot-starter-web</artifactId>

        </dependency>

        <dependency>

            <groupId>org.springframework.boot</groupId>

            <artifactId>spring-boot-starter-freemarker</artifactId>

        </dependency>

        <dependency>

            <groupId>org.springframework.boot</groupId>

            <artifactId>spring-boot-starter-test</artifactId>

            <scope>test</scope>

        </dependency>

    </dependencies>

    <build>

        <plugins>

            <plugin>

                <groupId>org.springframework.boot</groupId>

                <artifactId>spring-boot-maven-plugin</artifactId>

            </plugin>

        </plugins>

    </build>

</project>
配置运行环境
修改application.yml文件,配置freemarker和rabbitmq的相关参数:
# Tomcat

server:

    tomcat:

        uri-encoding: UTF-

        max-threads:

        min-spare-threads:

    port:

    servlet:

        context-path: /rabbitmq

spring:

    servlet:

        multipart:

            max-file-size: 100MB

            max-request-size: 100MB

            enabled: true

    freemarker:

      suffix: .html

    rabbitmq:

      host: localhost

      port:

      username: admin

      password:

      virtual-host: /testmq

      listener:

        simple:

          #acknowledge-mode: manual #设置确认模式手工确认

          concurrency: 3 #消费者最小数量

          max-concurrency: 10 # 消费者最大数量
如果配置acknowledge-mode为manual则需要在消费消费的地方调用channel.basicAck(message.getMessageProperties().getDeliveryTag(), false);进行确认,不然消息会一直保存在通道中,指定concurrency最小的消费者数量和max-concurrency最大的消费者数量后,是多线程消费消息
这点的rabbitmq配置也可以通过RabbitConfig.java类来配置:
package com.xuan.springrabbitmq.config;

import org.springframework.amqp.core.AcknowledgeMode;

import org.springframework.amqp.core.AmqpAdmin;

import org.springframework.amqp.rabbit.annotation.EnableRabbit;

import org.springframework.amqp.rabbit.config.SimpleRabbitListenerContainerFactory;

import org.springframework.amqp.rabbit.connection.CachingConnectionFactory;

import org.springframework.amqp.rabbit.connection.ConnectionFactory;

import org.springframework.amqp.rabbit.core.RabbitAdmin;

import org.springframework.amqp.rabbit.core.RabbitTemplate;

import org.springframework.context.annotation.Bean;

import org.springframework.context.annotation.Configuration;

//连接rabbitMQ的基本配置

@Configuration

@EnableRabbit

public class RabbitConfig {

         @Bean

        public ConnectionFactory connectionFactory() {

             CachingConnectionFactory connectionFactory = new CachingConnectionFactory("localhost");

             connectionFactory.setUsername("admin");

             connectionFactory.setPassword("123456");

             connectionFactory.setPort(5672);

            connectionFactory.setVirtualHost("/testmq");

             return connectionFactory;

        }

        @Bean

        public AmqpAdmin amqpAdmin() {

            return new RabbitAdmin(connectionFactory());

        }

        @Bean

        public RabbitTemplate rabbitTemplate() {

            return new RabbitTemplate(connectionFactory());

        }

        //配置消费者监听的容器

        @Bean

        public SimpleRabbitListenerContainerFactory rabbitListenerContainerFactory() {

            SimpleRabbitListenerContainerFactory factory = new SimpleRabbitListenerContainerFactory();

            factory.setConnectionFactory(connectionFactory());

            factory.setConcurrentConsumers(3);

            factory.setMaxConcurrentConsumers(10);

            //factory.setAcknowledgeMode(AcknowledgeMode.MANUAL);//设置确认模式手工确认

            return factory;

        }

}
配置路由和通道
配置最简单的生产者消费者模式ProducerConsumerConfig.java
package com.xuan.springrabbitmq.config;

import org.springframework.amqp.core.Queue;

import org.springframework.context.annotation.Bean;

import org.springframework.context.annotation.Configuration;

//生产者消费者模式的配置,包括一个队列和两个对应的消费者

@Configuration

public class ProducerConsumerConfig {

    @Bean

    public Queue myQueue() {

        Queue queue = new Queue("myqueue");

        return queue;

    }

}
配置订阅发布模式PublishSubscribeConfig.java
package com.xuan.springrabbitmq.config;

import org.springframework.amqp.core.Binding;

import org.springframework.amqp.core.BindingBuilder;

import org.springframework.amqp.core.FanoutExchange;

import org.springframework.amqp.core.Queue;

import org.springframework.beans.factory.annotation.Autowired;

import org.springframework.context.annotation.Bean;

import org.springframework.context.annotation.Configuration;

//发布订阅模式的配置,包括两个队列和对应的订阅者,发布者的交换机类型使用fanout(子网广播),两根网线binding用来绑定队列到交换机

@Configuration

public class PublishSubscribeConfig {

    @Bean

    public Queue myQueue1() {

        Queue queue = new Queue("queue1");

        return queue;

    }

    @Bean

    public Queue myQueue2() {

        Queue queue = new Queue("queue2");

        return queue;

    }

    @Bean

    public FanoutExchange fanoutExchange() {

        FanoutExchange fanoutExchange = new FanoutExchange("fanout");

        return fanoutExchange;

    }

    @Bean

    public Binding binding1() {

        Binding binding = BindingBuilder.bind(myQueue1()).to(fanoutExchange());

        return binding;

    }

    @Bean

    public Binding binding2() {

        Binding binding = BindingBuilder.bind(myQueue2()).to(fanoutExchange());

        return binding;

    }

}
配置direct直连模式DirectExchangeConfig.java
package com.xuan.springrabbitmq.config;

import org.springframework.amqp.core.Binding;

import org.springframework.amqp.core.BindingBuilder;

import org.springframework.amqp.core.DirectExchange;

import org.springframework.amqp.core.Queue;

import org.springframework.context.annotation.Bean;

import org.springframework.context.annotation.Configuration;

//direct直连模式的交换机配置,包括一个direct交换机,两个队列,三根网线binding

@Configuration

public class DirectExchangeConfig {

    @Bean

    public DirectExchange directExchange() {

        DirectExchange directExchange = new DirectExchange("direct");

        return directExchange;

    }

    @Bean

    public Queue directQueue1() {

        Queue queue = new Queue("directqueue1");

        return queue;

    }

    @Bean

    public Queue directQueue2() {

        Queue queue = new Queue("directqueue2");

        return queue;

    }

    //3个binding将交换机和相应队列连起来

    @Bean

    public Binding bindingorange() {

        Binding binding = BindingBuilder.bind(directQueue1()).to(directExchange()).with("orange");

        return binding;

    }

    @Bean

    public Binding bindingblack() {

        Binding binding = BindingBuilder.bind(directQueue2()).to(directExchange()).with("black");

        return binding;

    }

    @Bean

    public Binding bindinggreen() {

        Binding binding = BindingBuilder.bind(directQueue2()).to(directExchange()).with("green");

        return binding;

    }

}
配置topic交换机模型TopicExchangeConfig.java
package com.xuan.springrabbitmq.config;

import org.springframework.amqp.core.Binding;

import org.springframework.amqp.core.BindingBuilder;

import org.springframework.amqp.core.Queue;

import org.springframework.amqp.core.TopicExchange;

import org.springframework.context.annotation.Bean;

import org.springframework.context.annotation.Configuration;

//topic交换机模型,需要一个topic交换机,两个队列和三个binding

@Configuration

public class TopicExchangeConfig {

    @Bean

     public TopicExchange topicExchange(){

        TopicExchange topicExchange=new TopicExchange("mytopic");

         return topicExchange;

     }

    @Bean

    public Queue topicQueue1() {

       Queue queue=new Queue("topicqueue1");

       return queue;

    }

     @Bean

    public Queue topicQueue2() {

       Queue queue=new Queue("topicqueue2");

       return queue;

    }

     //3个binding将交换机和相应队列连起来

     @Bean

     public Binding bindingtopic1(){

         Binding binding= BindingBuilder.bind(topicQueue1()).to(topicExchange()).with("*.orange.*");//binding key

         return binding;

     }

     @Bean

     public Binding bindingtopic2(){

         Binding binding= BindingBuilder.bind(topicQueue2()).to(topicExchange()).with("*.*.rabbit");

         return binding;

     }

     @Bean

     public Binding bindingtopic3(){

         Binding binding= BindingBuilder.bind(topicQueue2()).to(topicExchange()).with("lazy.#");//#表示0个或若干个关键字,*表示一个关键字

         return binding;

     }

}
定义发送的消息Mail.java
package po;

import java.io.Serializable;

public class Mail implements Serializable {

    private static final long serialVersionUID = -8140693840257585779L;

    private String mailId;

    private String country;

    private Double weight;

    public Mail() {

    }

    public Mail(String mailId, String country, double weight) {

        this.mailId = mailId;

        this.country = country;

        this.weight = weight;

    }

    public String getMailId() {

        return mailId;

    }

    public void setMailId(String mailId) {

        this.mailId = mailId;

    }

    public String getCountry() {

        return country;

    }

    public void setCountry(String country) {

        this.country = country;

    }

    public double getWeight() {

        return weight;

    }

    public void setWeight(double weight) {

        this.weight = weight;

    }

    @Override

    public String toString() {

        return "Mail [mailId=" + mailId + ", country=" + country + ", weight="

                + weight + "]";

    }

}
继承的消息TopicMail.java
package po;

public class TopicMail extends Mail {

    String routingkey;

    public String getRoutingkey() {

        return routingkey;

    }

    public void setRoutingkey(String routingkey) {

        this.routingkey = routingkey;

    }

    @Override

    public String toString() {

        return "TopicMail [routingkey=" + routingkey + "]";

    }

}
定义发送接口的实现ProducerImpl.java
package com.xuan.springrabbitmq.service.impl;

import com.xuan.springrabbitmq.service.Producer;

import org.springframework.amqp.rabbit.core.RabbitTemplate;

import org.springframework.beans.factory.annotation.Autowired;

import org.springframework.stereotype.Service;

import org.springframework.transaction.annotation.Transactional;

import po.Mail;

@Transactional

@Service("producer")

public class ProducerImpl implements Producer {

    @Autowired

    RabbitTemplate rabbitTemplate;

    public void sendMail(String queue, Mail mail) {

        rabbitTemplate.setQueue(queue);

        rabbitTemplate.convertAndSend(queue,mail);

    }

}
订阅发布时的发送消息实现PublisherImpl.java
package com.xuan.springrabbitmq.service.impl;

import po.Mail;

import com.xuan.springrabbitmq.service.Publisher;

import org.springframework.amqp.rabbit.core.RabbitTemplate;

import org.springframework.beans.factory.annotation.Autowired;

import org.springframework.stereotype.Service;

@Service("publisher")

public class PublisherImpl implements Publisher {

    @Autowired

    RabbitTemplate rabbitTemplate;

    public void publishMail(Mail mail) {

        rabbitTemplate.convertAndSend("fanout", "", mail);

    }

    public void senddirectMail(Mail mail, String routingkey) {

        rabbitTemplate.convertAndSend("direct", routingkey, mail);

    }

    public void sendtopicMail(Mail mail, String routingkey) {

        rabbitTemplate.convertAndSend("mytopic", routingkey, mail);

    }

}
消费者的实现代码QueueListener1.java
package com.xuan.springrabbitmq.listener;

import com.rabbitmq.client.Channel;

import org.springframework.amqp.core.Message;

import org.springframework.amqp.rabbit.annotation.RabbitHandler;

import org.springframework.amqp.rabbit.annotation.RabbitListener;

import org.springframework.stereotype.Component;

import po.Mail;

@Component

@RabbitListener(queues = "myqueue")

public class QueueListener1 {

    @RabbitHandler

    public void displayMail(Mail mail, Channel channel, Message message) throws Exception {

        System.out.println("队列监听器1号收到消息" + mail.toString());

        //channel.basicAck(message.getMessageProperties().getDeliveryTag(), false);//如果需要确认的要调用

    }

}
或者QueueListener2.java
package com.xuan.springrabbitmq.listener;

import org.springframework.amqp.rabbit.annotation.RabbitListener;

import org.springframework.stereotype.Component;

import po.Mail;

@Component

public class QueueListener2 {

    @RabbitListener(queues = "myqueue")

    public void displayMail(Mail mail) throws Exception {

        System.out.println("队列监听器2号收到消息"+mail.toString());

    }

}
其它模式的消费者也是类似的,指定queues 的名称就可以了。
源码位置:https://gitee.com/xuantest/SpringBoot-RabbitMQ
SpringBoot集成RabbitMQ的更多相关文章
- SpringBoot集成rabbitmq(二)
前言 在使用rabbitmq时,我们可以通过消息持久化来解决服务器因异常崩溃而造成的消息丢失.除此之外,我们还会遇到一个问题,当消息生产者发消息发送出去后,消息到底有没有正确到达服务器呢?如果不进行特 ...
- SpringBoot集成RabbitMQ消息队列搭建与ACK消息确认入门
1.RabbitMQ介绍 RabbitMQ是实现AMQP(高级消息队列协议)的消息中间件的一种,最初起源于金融系统,用于在分布式系统中存储转发消息,在易用性.扩展性.高可用性等方面表现不俗.Rabbi ...
- springboot集成rabbitmq(实战)
RabbitMQ简介RabbitMQ使用Erlang语言开发的开源消息队列系统,基于AMQP协议来实现(AMQP的主要特征是面向消息.队列.路由.可靠性.安全).支持多种客户端,如:Python.Ru ...
- SpringBoot集成rabbitmq(一)
前言 Rabbitmq是一个开源的消息代理软件,是AMQP协议的实现.核心作用就是创建消息队列,异步发送和接收消息.通常用来在高并发中处理削峰填谷.延迟处理.解耦系统之间的强耦合.处理秒杀订单. 入 ...
- Java SpringBoot集成RabbitMq实战和总结
目录 交换器.队列.绑定的声明 关于消息序列化 同一个队列多消费类型 注解将消息和消息头注入消费者方法 关于消费者确认 关于发送者确认模式 消费消息.死信队列和RetryTemplate RPC模式的 ...
- SpringBoot集成RabbitMQ并实现消息确认机制
原文:https://blog.csdn.net/ctwy291314/article/details/80534604 RabbitMQ安装请参照RabbitMQ应用 不啰嗦直接上代码 目录结构如下 ...
- springboot集成rabbitmq并手动注册容器实现单个queue的ack模式
原文:https://blog.csdn.net/qq_38439885/article/details/88982373 进入正题,本文会介绍两种实现rabbitmq的ack模式的方法,分别为: 一 ...
- Springboot集成RabbitMQ之MessageConvert源码解析
问题 最近在使用RabbitMq时遇到了一个问题,明明是转换成json发送到mq中的数据,消费者接收到的却是一串数字也就是byte数组,但是使用mq可视化页面查看数据却是正常的,之前在使用过程中从未遇 ...
- SpringBoot集成RabbitMQ 从零到一,学会MQ异步和解耦--
RabbitMQ 概念 RabbitMQ 即一个消息队列,_主要是用来实现应用程序的异步和解耦,同时也能起到消息缓冲,消息分发的作用._RabbitMQ使用的是AMQP协议,它是一种二进制协议.默认启 ...
随机推荐
- Linux关闭透明大页配置
一.为何要关闭透明大页 A--MOS获取 . #翻译 由于透明超大页面已知会导致意外的节点重新启动并导致RAC出现性能问题,因此Oracle强烈建议禁用透明超大页面. 另外,即使在单实例数据库环境 ...
- shutil模块(高级的文件、文件夹、压缩包处理模块)
shutil 模块 高级的 文件.文件夹.压缩包 处理模块 shutil.copyfileobj(fsrc, fdst[, length])将文件内容拷贝到另一个文件中 import shutil s ...
- Thinkphp的知识内容
详细的介绍内容:https://baike.so.com/doc/5504725-5740469.html
- python使用dns轮循检测web服务器是否异常
我使用的是python2.7,我本来另装了一个python3.6,发现无法安装dnspython,于是只能换回来了 import dns.resolver #这个需要另外下载并安装(下载地址www.d ...
- /dev/null简单入门
2>&1 /dev/null 将标准输入输出全部丢弃(表示2的输出重定向等同于1) 2>filename 把错误信息保存到filename 2>/dev/null >/ ...
- Autofac学习之三种生命周期:InstancePerLifetimeScope、SingleInstance、InstancePerDependency 【转载】
InstancePerLifetimeScope:同一个Lifetime生成的对象是同一个实例 SingleInstance:单例模式,每次调用,都会使用同一个实例化的对象:每次都用同一个对象: In ...
- 嵌入式LINUX设置时间
date -s "2018-12-15 08:55:00" 安装NTP从网络获取时间 基于Linux的嵌入式开发,需要用到本地的时间,但是网上找了很多修改时间的命令,但大多是Lin ...
- day 30 1.操作系统原理 2. Process 模块学习
进程: 起源:进程的概念起源于操作系统,是操作系统最核心的概念,也是操作系统提供的最古老也是最重要的抽象概念之一.操作系统的其他所有内容都是围绕进程的概念展开的.所以想要真正了解进程,必须事先了解操作 ...
- windows下尝试编写node模块
1,首先参考http://www.cnblogs.com/yupeng/p/3469444.html写了一个模块 2,按照指引运行 F:\Program Files\nodejs\mymodule&g ...
- docker save/load、export/import 区别
区别: save的对象是image,产生的文件需要用load来生成image: export的对象是container,产生的文件需要用import来生成image. save Save one or ...