11. SpringCloud Alibaba Seata 分布式事务处理的详细使用以及详细剖析
11. SpringCloud Alibaba Seata 分布式事务处理的详细使用以及详细剖析
先看一个问题,引出 Seata
单机单库(多表)处理事务示意图

分布式微服务架构下的数据库事务示意图:

图示解释说明:
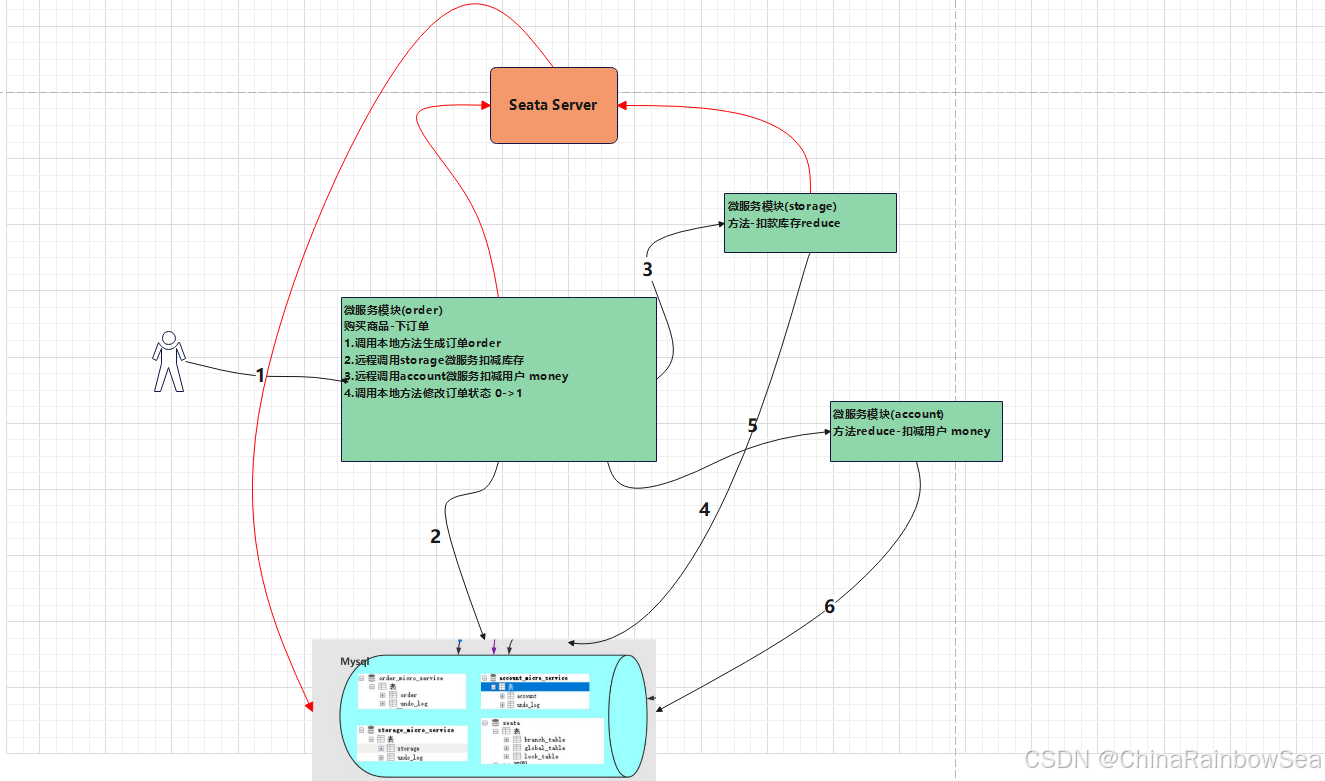
- 用户购买商品的业务逻辑。整个业务逻辑由3个微服务提供支持∶
- 仓储服务∶对给定的商品扣除仓库/商品数量
- 订单服务;根据采购需求创建订单
- 帐户服务∶从用户帐户中扣除余额
问题分析:
- 单体应用被拆分成微服务应用,原来的三个模块被拆分成三个独立的应用,分别使用 三个独立的数据源
- 业务操作需要调用三个服务来完成。此时每个服务内部的数据一致性由本地事务来保 证
- 但是全局的数据 致性问题没法保证
- 简单的说: 一次业务操作需要跨多个数据源或需要跨多个系统进行远程调用,就会产生分布式事务问题 ——>
seata
1. 概述
分布式事务问题&解决方案:
分布式微服务架构下的全局数据一致性问题 [即: 分布式事务问题]——> 解决方案: Seata
SpringCloud Alibaba Seata 官方地址:http://seata.io/zh-cn/

SpringCloud Alibaba Seata 官方使用手册: https://seata.io/zh-cn/docs/overview/what-is-seata.html

Seata 是什么?
Seata 是一款开源的分布式事务解决方案,致力于提供高性能和简单易用的分布式事务服务。Seata 将为用户提供了 AT、TCC、SAGA 和 XA 事务模式,为用户打造一站式的分布式解决方案。

一句话: Seata 是一款开源的分布式事务解决方案,致力于在微服务架构下提供高性能和简单易用 的分布式事务服务
2. SpringCloud Alibaba Seata 安装和运行
SpringCloud Alibaba Seata 官方下载地址:https://github.com/seata/seata/releases/tag/v0.9.0

- 将 seata-server-0.9.0.zip 解压到 指定目录,比如我这里是:g:\dev

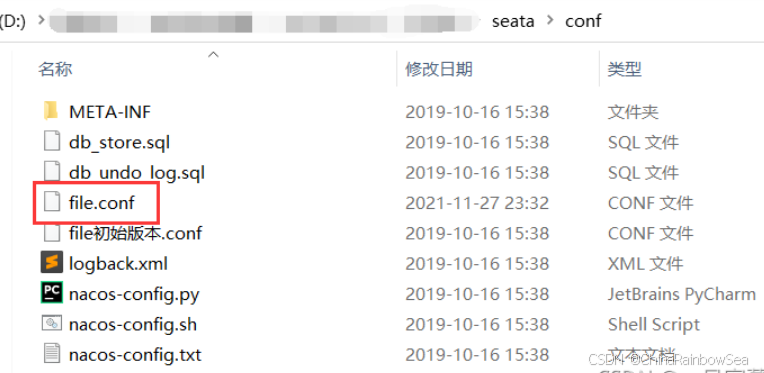
打开文件:seata-server-0.9.0,修改 conf\file.conf 文件 如图


transport {

  # tcp udt unix-domain-socket

  type = "TCP"

  #NIO NATIVE

  server = "NIO"

  #enable heartbeat

  heartbeat = true

  #thread factory for netty

  thread-factory {

    boss-thread-prefix = "NettyBoss"

    worker-thread-prefix = "NettyServerNIOWorker"

    server-executor-thread-prefix = "NettyServerBizHandler"

    share-boss-worker = false

    client-selector-thread-prefix = "NettyClientSelector"

    client-selector-thread-size = 1

    client-worker-thread-prefix = "NettyClientWorkerThread"

    # netty boss thread size,will not be used for UDT

    boss-thread-size = 1

    #auto default pin or 8

    worker-thread-size = 8

  }

  shutdown {

    # when destroy server, wait seconds

    wait = 3

  }

  serialization = "seata"

  compressor = "none"

}

service {

  #vgroup->rgroup

  #vgroup_mapping.my_test_tx_group = "default"

  vgroup_mapping.my_test_tx_group = "hspedu_order_tx_group"

  #only support single node

  default.grouplist = "127.0.0.1:8091"

  #degrade current not support

  enableDegrade = false

  #disable

  disable = false

  #unit ms,s,m,h,d represents milliseconds, seconds, minutes, hours, days, default permanent

  max.commit.retry.timeout = "-1"

  max.rollback.retry.timeout = "-1"

}

client {

  async.commit.buffer.limit = 10000

  lock {

    retry.internal = 10

    retry.times = 30

  }

  report.retry.count = 5

  tm.commit.retry.count = 1

  tm.rollback.retry.count = 1

}

## transaction log store

store {

  ## store mode: file、db

  ## mode = "file"

  mode = "db"

  ## file store

  file {

    dir = "sessionStore"

    # branch session size , if exceeded first try compress lockkey, still exceeded throws exceptions

    max-branch-session-size = 16384

    # globe session size , if exceeded throws exceptions

    max-global-session-size = 512

    # file buffer size , if exceeded allocate new buffer

    file-write-buffer-cache-size = 16384

    # when recover batch read size

    session.reload.read_size = 100

    # async, sync

    flush-disk-mode = async

  }

  ## database store

  db {

    ## the implement of javax.sql.DataSource, such as DruidDataSource(druid)/BasicDataSource(dbcp) etc.

    datasource = "dbcp"

    ## mysql/oracle/h2/oceanbase etc.

    db-type = "mysql"

    ## driver-class-name = "com.mysql.jdbc.Driver"

    driver-class-name = "com.mysql.cj.jdbc.Driver"

    ## url = "jdbc:mysql://127.0.0.1:3306/seata"

    url = "jdbc:mysql://127.0.0.1:3306/seata?characterEncoding=utf8&useSSL=false&serverTimezone=UTC&rewriteBatchedStatements=true"

    ## user = "mysql"

    user = "root"

    ## password = "mysql"

    password = "MySQL123"

    min-conn = 1

    max-conn = 3

    global.table = "global_table"

    branch.table = "branch_table"

    lock-table = "lock_table"

    query-limit = 100

  }

}

lock {

  ## the lock store mode: local、remote

  mode = "remote"

  local {

    ## store locks in user's database

  }

  remote {

    ## store locks in the seata's server

  }

}

recovery {

  #schedule committing retry period in milliseconds

  committing-retry-period = 1000

  #schedule asyn committing retry period in milliseconds

  asyn-committing-retry-period = 1000

  #schedule rollbacking retry period in milliseconds

  rollbacking-retry-period = 1000

  #schedule timeout retry period in milliseconds

  timeout-retry-period = 1000

}

transaction {

  undo.data.validation = true

  undo.log.serialization = "jackson"

  undo.log.save.days = 7

  #schedule delete expired undo_log in milliseconds

  undo.log.delete.period = 86400000

  undo.log.table = "undo_log"

}

## metrics settings

metrics {

  enabled = false

  registry-type = "compact"

  # multi exporters use comma divided

  exporter-list = "prometheus"

  exporter-prometheus-port = 9898

}

support {

  ## spring

  spring {

    # auto proxy the DataSource bean

    datasource.autoproxy = false

  }

}
3. 补充: SpringCloud Alibaba Seata0.9 连接MySQL8.0 的注意事项
首先如果你是Mysql8.0以上的版本,启动seata-server.bat会出现诡异的画面,报错:Cannot create PoolableConnectionFactory (Could not create connection to database server.)
反正类似于数据库连接的错误,这个坑是由于你的Mysql驱动版本导致的!
解决方案:
注:千万别把Mysql删了重装!!!
首先查看你的mysql的版本
通过命令mysql --version查看自己安装的mysql版本

下载对应的mysql驱动java包。地址如下:https://downloads.mysql.com/archives/c-j/

下载完成以后解压,将里面的 jar包拷贝到seata 的依赖 lib文件下面

注意:这里一定要把原来的驱动删除,这是个大坑!!!一定要删除原来的
mysql-connector-java-5.1.30.jar
修改配置文件conf\file.conf
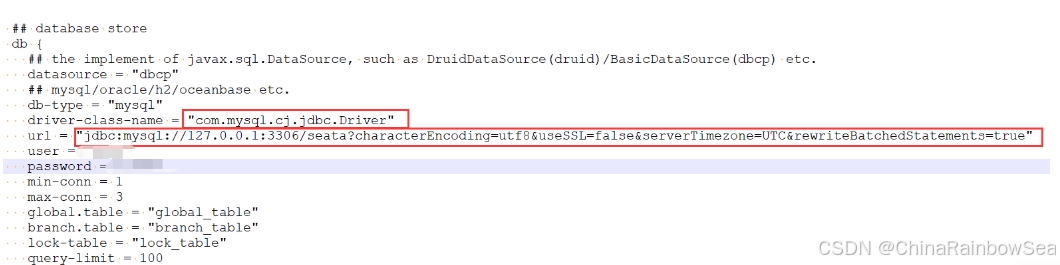
驱动的名称:com.mysql.cj.jdbc.Driver

url地址:“jdbc:mysql://127.0.0.1:3306/seata?characterEncoding=utf8&useSSL=false&serverTimezone=UTC&rewriteBatchedStatements=true”
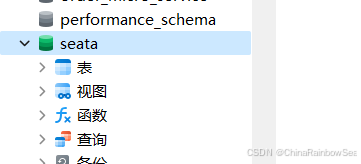
在 mysql8.0 创建 seata 数据库
创建 seata 数据库
CREATE DATABASE seata

USE seata
在 seata 数 据 库 下, 创 建 表 , 使 用 seata 提 供 的 sql 脚 本 即 可 , 在 seata 的 \conf\db_store.sql

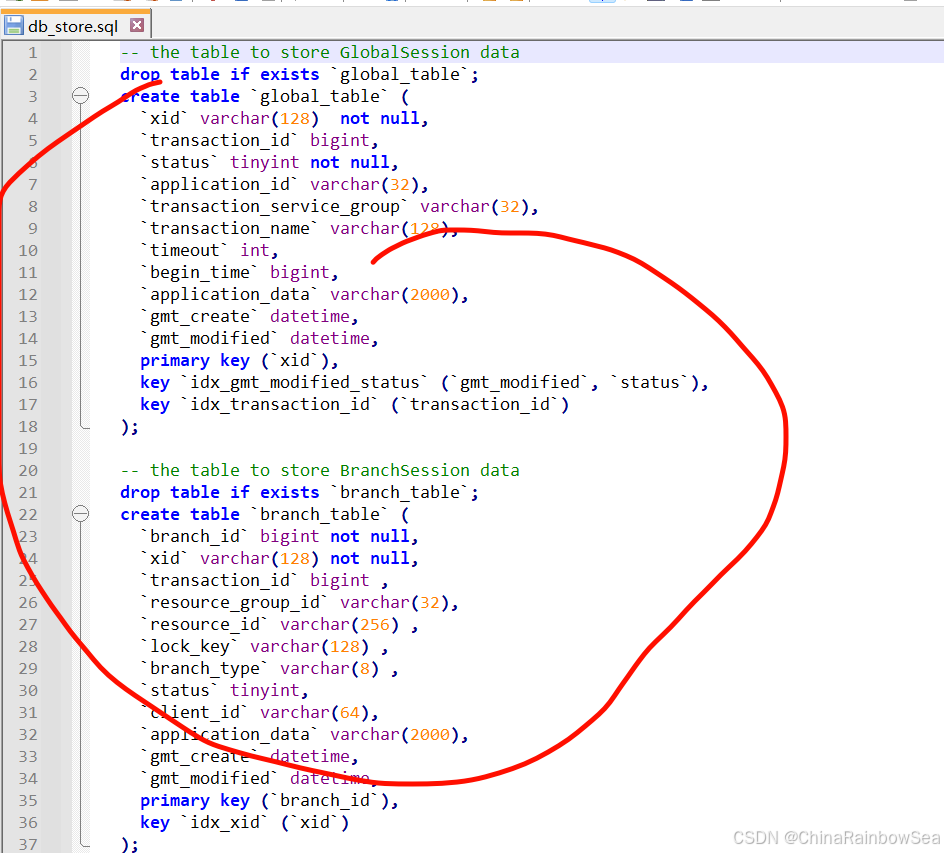
-- the table to store GlobalSession data

drop table if exists `global_table`;

create table `global_table` (

  `xid` varchar(128)  not null,

  `transaction_id` bigint,

  `status` tinyint not null,

  `application_id` varchar(32),

  `transaction_service_group` varchar(32),

  `transaction_name` varchar(128),

  `timeout` int,

  `begin_time` bigint,

  `application_data` varchar(2000),

  `gmt_create` datetime,

  `gmt_modified` datetime,

  primary key (`xid`),

  key `idx_gmt_modified_status` (`gmt_modified`, `status`),

  key `idx_transaction_id` (`transaction_id`)

);

-- the table to store BranchSession data

drop table if exists `branch_table`;

create table `branch_table` (

  `branch_id` bigint not null,

  `xid` varchar(128) not null,

  `transaction_id` bigint ,

  `resource_group_id` varchar(32),

  `resource_id` varchar(256) ,

  `lock_key` varchar(128) ,

  `branch_type` varchar(8) ,

  `status` tinyint,

  `client_id` varchar(64),

  `application_data` varchar(2000),

  `gmt_create` datetime,

  `gmt_modified` datetime,

  primary key (`branch_id`),

  key `idx_xid` (`xid`)

);

-- the table to store lock data

drop table if exists `lock_table`;

create table `lock_table` (

  `row_key` varchar(128) not null,

  `xid` varchar(96),

  `transaction_id` long ,

  `branch_id` long,

  `resource_id` varchar(256) ,

  `table_name` varchar(32) ,

  `pk` varchar(36) ,

  `gmt_create` datetime ,

  `gmt_modified` datetime,

  primary key(`row_key`)

);
修改 seata 的 \conf\registry.conf , 配置注册中心 nacos server


registry {

  # file 、nacos 、eureka、redis、zk、consul、etcd3、sofa

  # type = "file"

  type = "nacos"

  nacos {

    # serverAddr = "localhost"

    serverAddr = "localhost:8848"

    namespace = ""

    cluster = "default"

  }
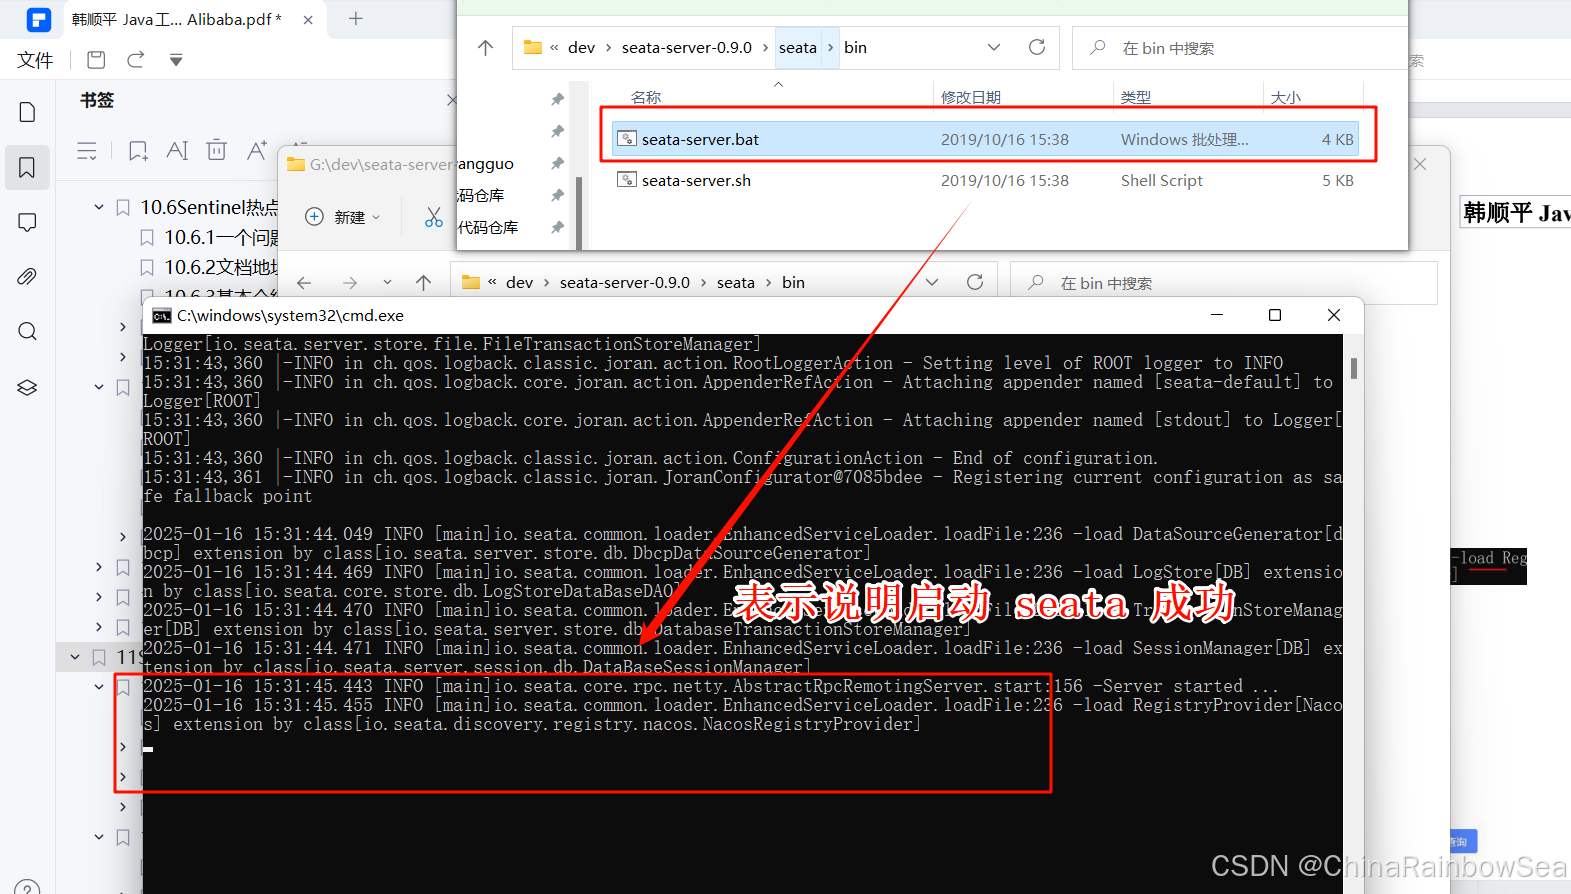
先启动:启动 Nacos Server 8848,再启动,双击 Seata 的\bin\seata-server.bat , 启动 Seata Server

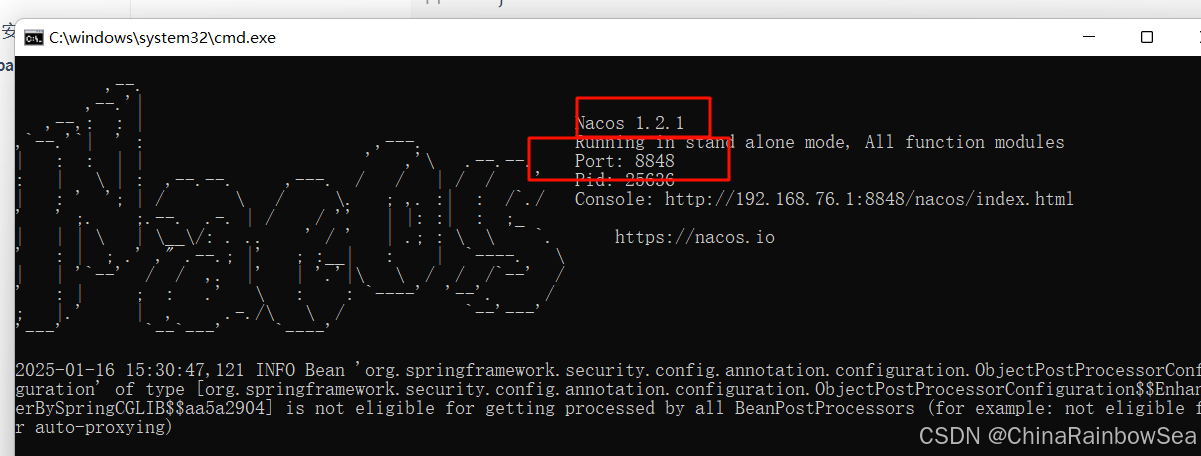
启动 seata-server.bat , 看到如下界面说明成功:
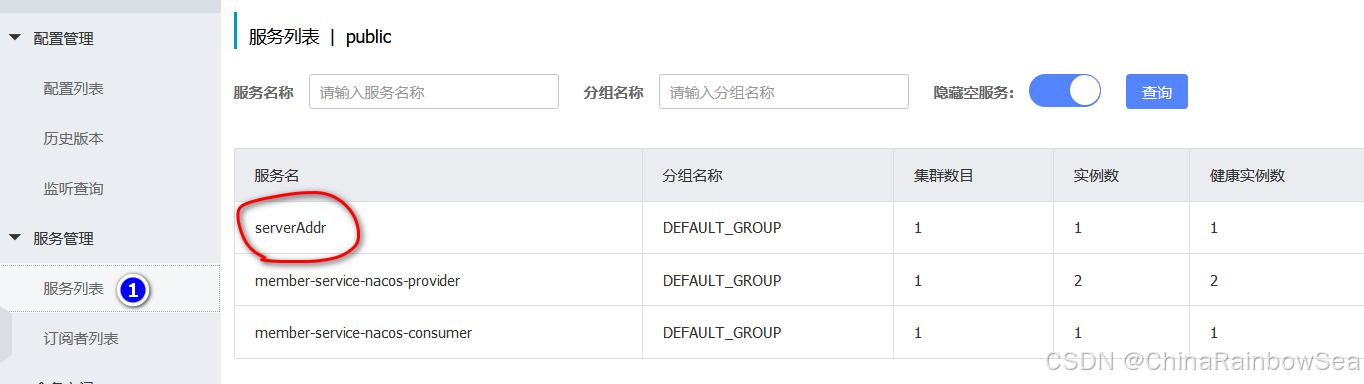
登录 Nacos Server, 查看 Seata Server 是否注册成功
4. Seata 分布式事务-应用实例
4.1 需求分析/图解
需求:完成下订单功能,由三个微服务模块协同完成, 涉及到多数据库, 多张表

- 创建三个对应的数据库,以及数据表:如下图所示:
--  订单微服务的数据库

CREATE DATABASE order_micro_service

USE order_micro_service

CREATE TABLE `order`(

id BIGINT NOT NULL AUTO_INCREMENT PRIMARY KEY,

user_id BIGINT DEFAULT NULL ,

product_id BIGINT DEFAULT NULL ,

nums INT DEFAULT NULL ,

money INT DEFAULT NULL,

`status` INT DEFAULT NULL COMMENT '0:创建中; 1:已完结' );

SELECT * FROM `order`

-- 库存微服务的数据库`storage``order`

CREATE DATABASE storage_micro_service

USE storage_micro_service

CREATE TABLE `storage`(

id BIGINT NOT NULL AUTO_INCREMENT PRIMARY KEY,

product_id BIGINT DEFAULT NULL ,

amount INT DEFAULT NULL COMMENT '库存量' );

--  初始化库存表

INSERT INTO `storage`

VALUES(NULL, 1, 10);

SELECT * FROM `storage`

--  账号微服务的数据库

CREATE DATABASE account_micro_service

USE account_micro_service

CREATE TABLE `account`(

id BIGINT NOT NULL AUTO_INCREMENT PRIMARY KEY ,

user_id BIGINT DEFAULT NULL ,

money INT DEFAULT NULL COMMENT '账户金额' );

--  初始化账户表

INSERT INTO `account` VALUES(NULL, 666, 10000);

SELECT * from `account`

重点:分 别 为 3 库 创 建 对 应 的 回 滚 日 志 表 , 说 明 回 滚 日 志 表 在 seata 的 \conf\db_undo_log.sql。这些日志表,就是为了,让 Seata 可以进行回滚操作的重要记录信息的表
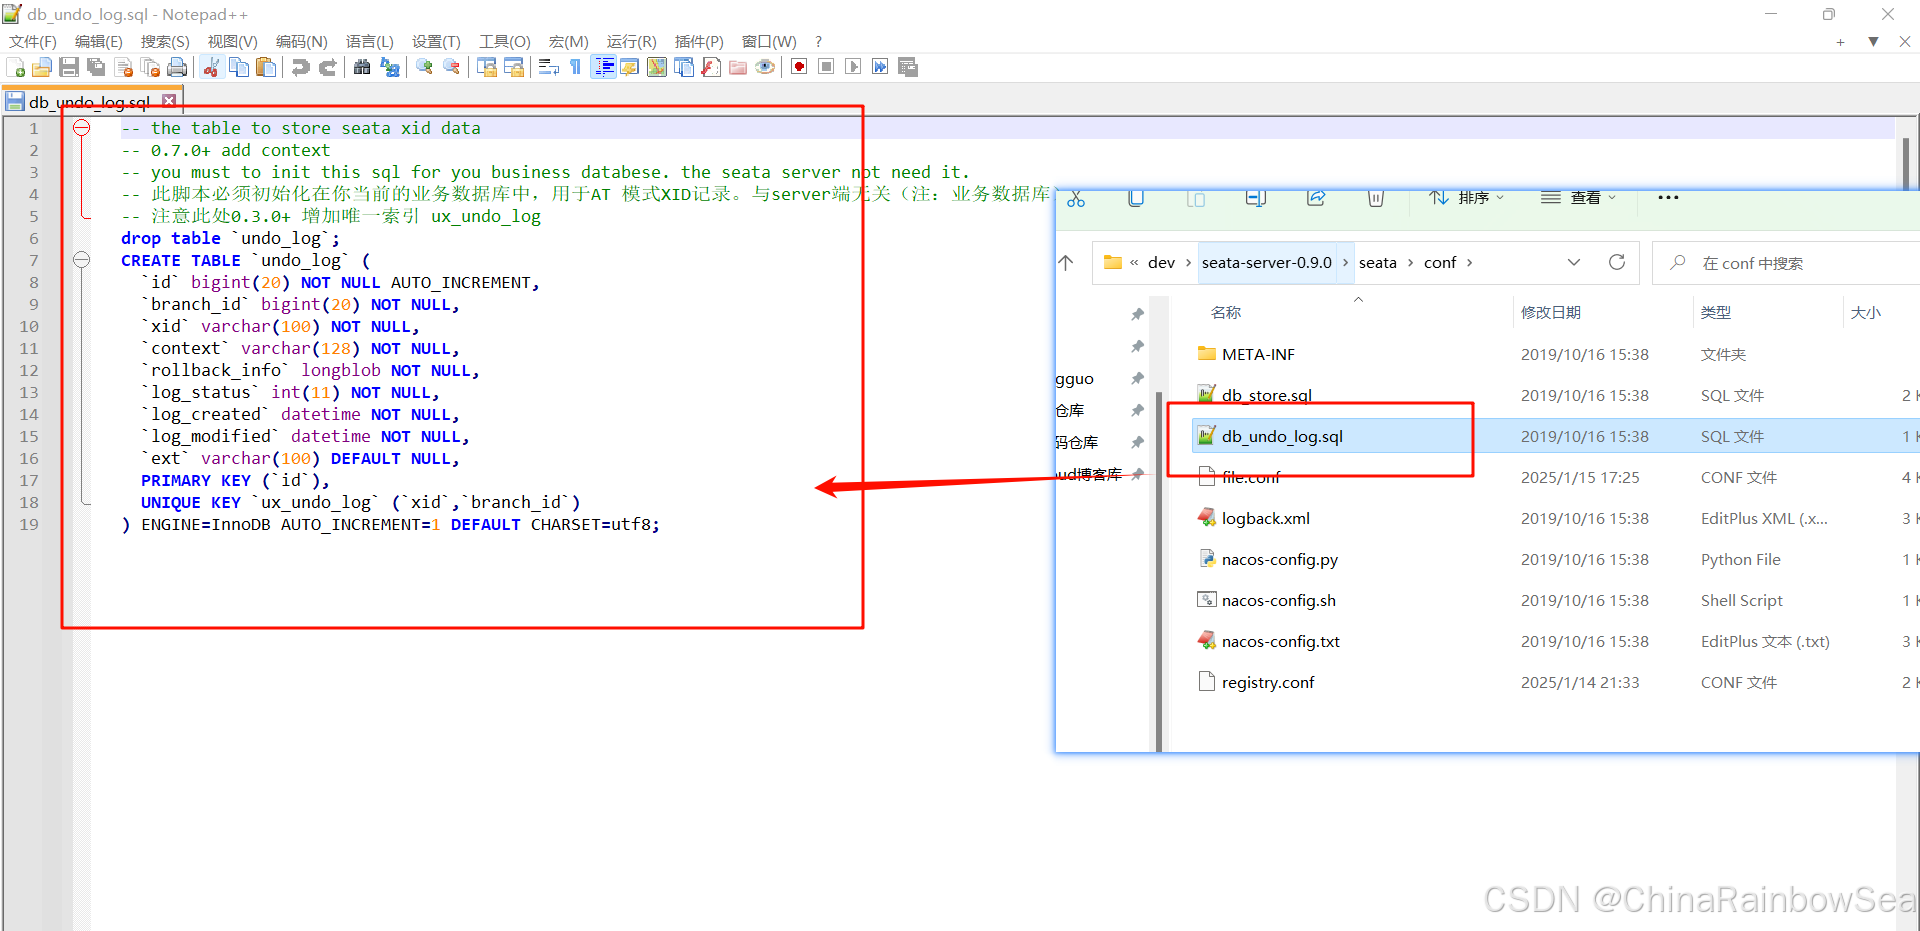
注意:一定一定一定是在,这三个数据库的数据表当中各种都有(创建时候,注意切换到对应的数据库当中,再执行sql进行创建该日志表),都要创建该日志信息表。
-- the table to store seata xid data

-- 0.7.0+ add context

-- you must to init this sql for you business databese. the seata server not need it.

-- 此脚本必须初始化在你当前的业务数据库中,用于AT 模式XID记录。与server端无关(注:业务数据库)

-- 注意此处0.3.0+ 增加唯一索引 ux_undo_log

drop table `undo_log`;

CREATE TABLE `undo_log` (

  `id` bigint(20) NOT NULL AUTO_INCREMENT,

  `branch_id` bigint(20) NOT NULL,

  `xid` varchar(100) NOT NULL,

  `context` varchar(128) NOT NULL,

  `rollback_info` longblob NOT NULL,

  `log_status` int(11) NOT NULL,

  `log_created` datetime NOT NULL,

  `log_modified` datetime NOT NULL,

  `ext` varchar(100) DEFAULT NULL,

  PRIMARY KEY (`id`),

  UNIQUE KEY `ux_undo_log` (`xid`,`branch_id`)

) ENGINE=InnoDB AUTO_INCREMENT=1 DEFAULT CHARSET=utf8;

```

```

sql

use order_micro_service

CREATE TABLE `undo_log` (

  `id` bigint(20) NOT NULL AUTO_INCREMENT,

  `branch_id` bigint(20) NOT NULL,

  `xid` varchar(100) NOT NULL,

  `context` varchar(128) NOT NULL,

  `rollback_info` longblob NOT NULL,

  `log_status` int(11) NOT NULL,

  `log_created` datetime NOT NULL,

  `log_modified` datetime NOT NULL,

  `ext` varchar(100) DEFAULT NULL,

  PRIMARY KEY (`id`),

  UNIQUE KEY `ux_undo_log` (`xid`,`branch_id`)

) ENGINE=InnoDB AUTO_INCREMENT=1 DEFAULT CHARSET=utf8;

use storage_micro_service

CREATE TABLE `undo_log` (

  `id` bigint(20) NOT NULL AUTO_INCREMENT,

  `branch_id` bigint(20) NOT NULL,

  `xid` varchar(100) NOT NULL,

  `context` varchar(128) NOT NULL,

  `rollback_info` longblob NOT NULL,

  `log_status` int(11) NOT NULL,

  `log_created` datetime NOT NULL,

  `log_modified` datetime NOT NULL,

  `ext` varchar(100) DEFAULT NULL,

  PRIMARY KEY (`id`),

  UNIQUE KEY `ux_undo_log` (`xid`,`branch_id`)

) ENGINE=InnoDB AUTO_INCREMENT=1 DEFAULT CHARSET=utf8;

use account_micro_service

CREATE TABLE `undo_log` (

  `id` bigint(20) NOT NULL AUTO_INCREMENT,

  `branch_id` bigint(20) NOT NULL,

  `xid` varchar(100) NOT NULL,

  `context` varchar(128) NOT NULL,

  `rollback_info` longblob NOT NULL,

  `log_status` int(11) NOT NULL,

  `log_created` datetime NOT NULL,

  `log_modified` datetime NOT NULL,

  `ext` varchar(100) DEFAULT NULL,

  PRIMARY KEY (`id`),

  UNIQUE KEY `ux_undo_log` (`xid`,`branch_id`)

) ENGINE=InnoDB AUTO_INCREMENT=1 DEFAULT CHARSET=utf8;
开发 seata_storage_micro_service-10010 微服务
修改 pom.xml, 添加相关的 jar 依赖
<?xml version="1.0" encoding="UTF-8"?>
<project xmlns="http://maven.apache.org/POM/4.0.0"
xmlns:xsi="http://www.w3.org/2001/XMLSchema-instance"
xsi:schemaLocation="http://maven.apache.org/POM/4.0.0 http://maven.apache.org/xsd/maven-4.0.0.xsd">
<parent>
<artifactId>e-commerce-center</artifactId>
<groupId>com.rainbowsea</groupId>
<version>1.0-SNAPSHOT</version>
</parent>
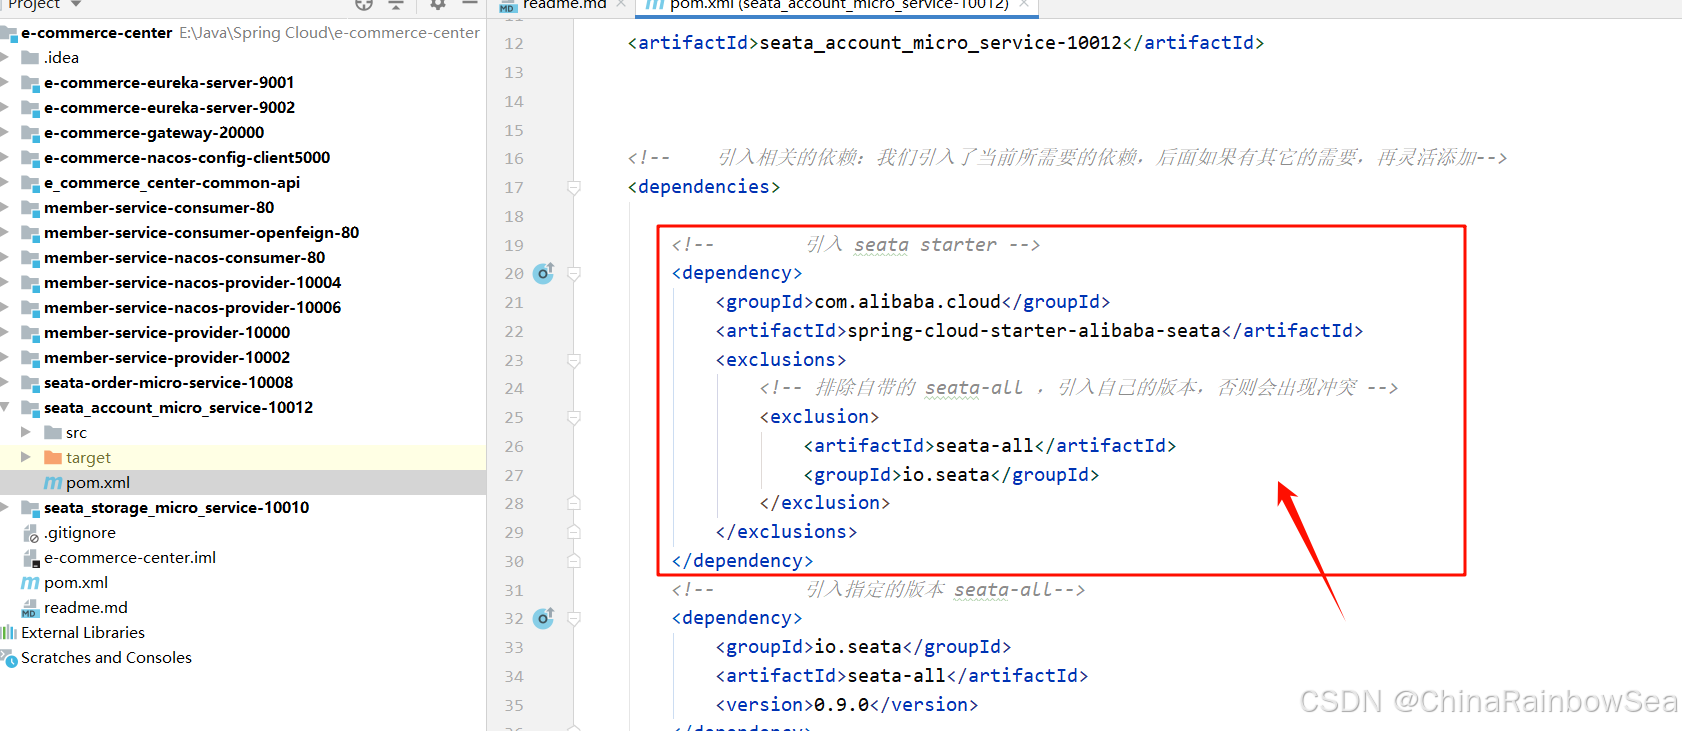
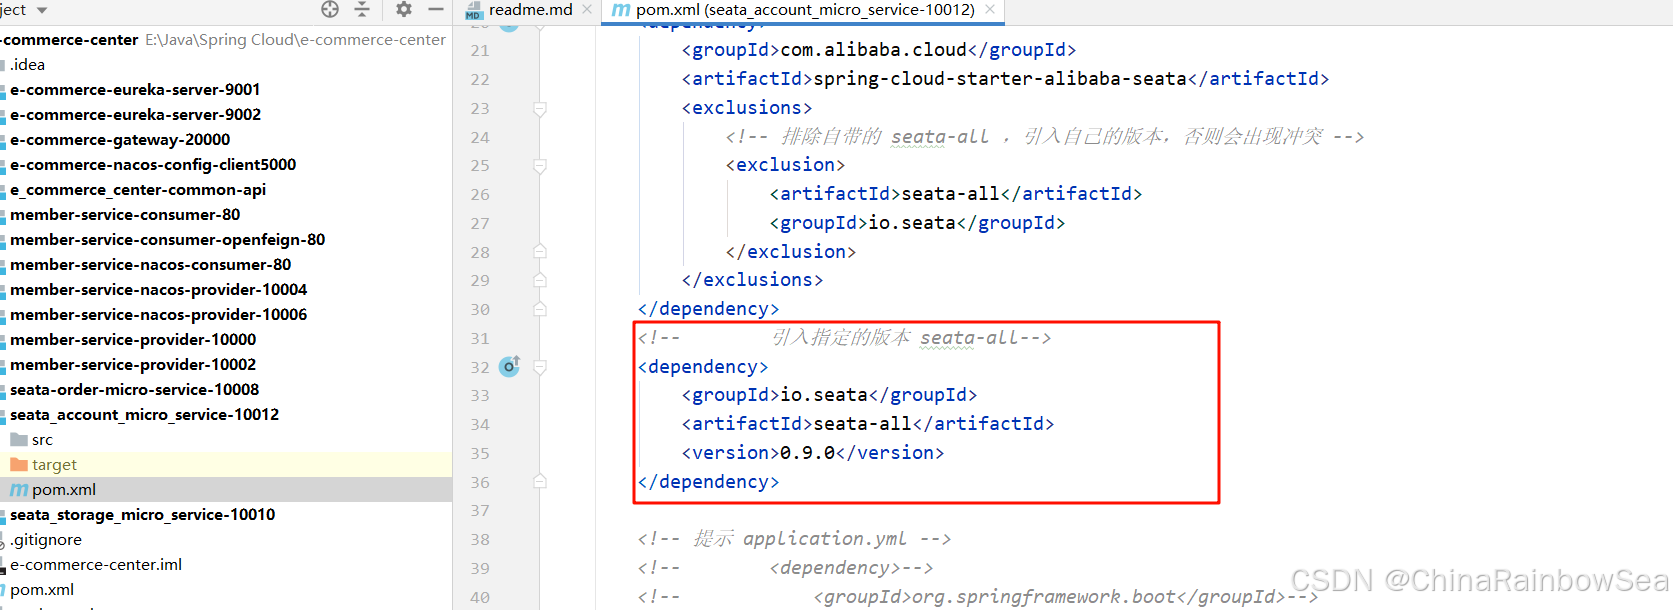
<modelVersion>4.0.0</modelVersion> <artifactId>seata_account_micro_service-10012</artifactId> <!-- 引入相关的依赖:我们引入了当前所需要的依赖,后面如果有其它的需要,再灵活添加-->
<dependencies> <!-- 引入 seata starter -->
<dependency>
<groupId>com.alibaba.cloud</groupId>
<artifactId>spring-cloud-starter-alibaba-seata</artifactId>
<exclusions>
<!-- 排除自带的 seata-all ,引入自己的版本,否则会出现冲突 -->
<exclusion>
<artifactId>seata-all</artifactId>
<groupId>io.seata</groupId>
</exclusion>
</exclusions>
</dependency>
<!-- 引入指定的版本 seata-all-->
<dependency>
<groupId>io.seata</groupId>
<artifactId>seata-all</artifactId>
<version>0.9.0</version>
</dependency> <!-- 提示 application.yml -->
<!-- <dependency>-->
<!-- <groupId>org.springframework.boot</groupId>-->
<!-- <artifactId>spring-boot-configuration-processor</artifactId>-->
<!-- <optional>true</optional>-->
<!-- </dependency>--> <!-- 整合Openfeign -->
<!-- 引入 openfeign starter 即场景启动器 starter-->
<dependency>
<groupId>org.springframework.cloud</groupId>
<artifactId>spring-cloud-starter-openfeign</artifactId>
</dependency> <!--引入 alibaba-nacos -discovery -->
<dependency>
<groupId>com.alibaba.cloud</groupId>
<artifactId>spring-cloud-starter-alibaba-nacos-discovery</artifactId>
</dependency> <!-- 引入 web-starter 说明:我们使用版本仲裁(从父项目继承了版本)-->
<dependency>
<groupId>org.springframework.boot</groupId>
<artifactId>spring-boot-starter-web</artifactId>
</dependency> <!--1. starter-actuator 是sprng boot 程序的监控系统,可以实现健康检查,info 信息等
2. 访问http://localhost:10000/actuator 可以看到相关链接,还可以做相关配置-->
<dependency>
<groupId>org.springframework.boot</groupId>
<artifactId>spring-boot-starter-actuator</artifactId>
</dependency> <!-- lombok 引入-->
<dependency>
<groupId>org.projectlombok</groupId>
<artifactId>lombok</artifactId>
<optional>true</optional>
</dependency> <!-- 引入 test-starter -->
<dependency>
<groupId>org.springframework.boot</groupId>
<artifactId>spring-boot-starter-test</artifactId>
<scope>test</scope>
</dependency> <!-- 引入我们自己对 bean 封装成 api 的模块内容-->
<dependency>
<groupId>com.rainbowsea</groupId>
<artifactId>e_commerce_center-common-api</artifactId>
<version>${project.version}</version>
</dependency> <!-- 引入 mybatis -->
<dependency>
<groupId>org.mybatis.spring.boot</groupId>
<artifactId>mybatis-spring-boot-starter</artifactId>
</dependency> <!-- 引入 mysql-->
<dependency>
<groupId>mysql</groupId>
<artifactId>mysql-connector-java</artifactId>
</dependency> <!-- 引入 jdbc -->
<dependency>
<groupId>org.springframework.boot</groupId>
<artifactId>spring-boot-starter-jdbc</artifactId>
</dependency> <!-- druid 数据库连接池 -->
<dependency>
<groupId>com.alibaba</groupId>
<artifactId>druid-spring-boot-starter</artifactId>
<!-- 这里我们重新指定一下 version -->
<version>1.1.13</version>
</dependency> </dependencies> </project>
创建 application.yml, 进行相关的配置

server:
port: 10012
spring:
application:
name: seata-account-micro-service
cloud:
alibaba:
seata:
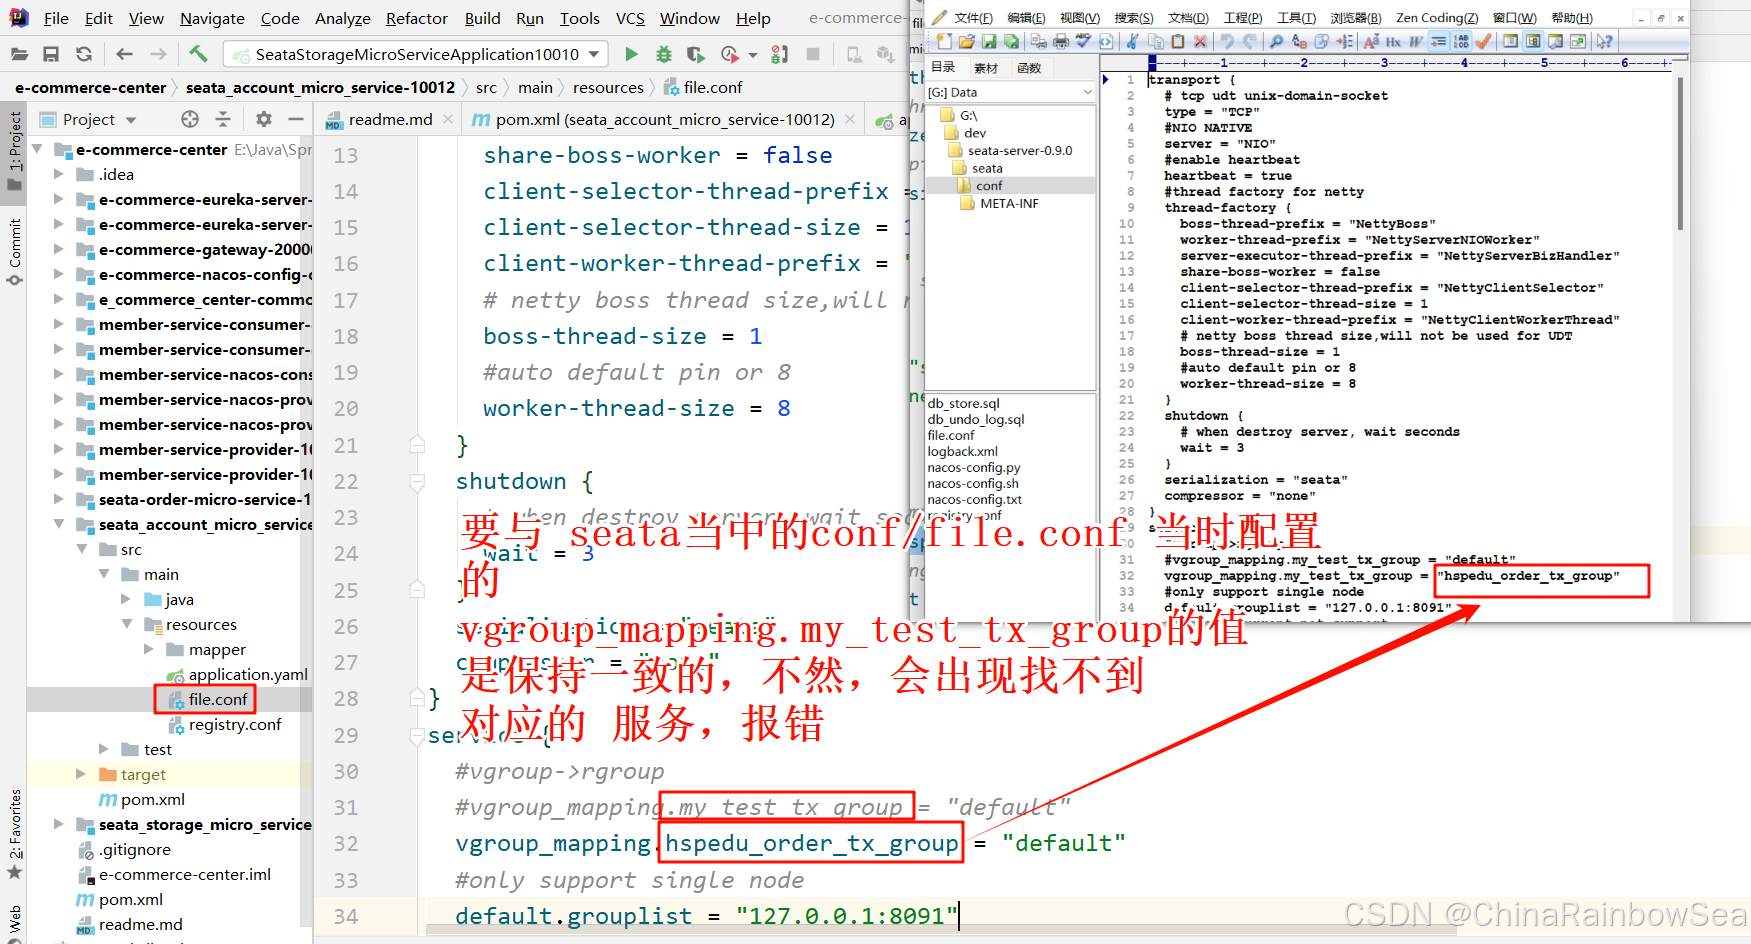
# 指定事务组名,需要和 seata-server中的对应 /conf/file.conf 当中的匹配
# vgroup_mapping.my_test_tx_group = "hspedu_order_tx_group"
tx-service-group: hspedu_order_tx_group
nacos:
discovery:
server-addr: localhost:8848 # 指定 nacos server 地址
datasource:
driver-class-name: com.mysql.cj.jdbc.Driver # 注意: 这里我们配置的是 mysql8.0版本的
url: jdbc:mysql://localhost:3306/account_micro_service?characterEncoding=utf8&useSSL=false&serverTimezone=UTC&rewriteBatchedStatements=true
username: root
password: MySQL123
# 配置 seata日志输出
logging:
level:
io:
seata: info
mybatis:
mapperLocations: classpath:mapper/*.xml
创建 file.conf, 进行相关的配置 说明:该文件从 seata 的\conf\file.conf 拷贝,进行修 改即可
transport {

  # tcp udt unix-domain-socket

  type = "TCP"

  #NIO NATIVE

  server = "NIO"

  #enable heartbeat

  heartbeat = true

  #thread factory for netty

  thread-factory {

    boss-thread-prefix = "NettyBoss"

    worker-thread-prefix = "NettyServerNIOWorker"

    server-executor-thread-prefix = "NettyServerBizHandler"

    share-boss-worker = false

    client-selector-thread-prefix = "NettyClientSelector"

    client-selector-thread-size = 1

    client-worker-thread-prefix = "NettyClientWorkerThread"

    # netty boss thread size,will not be used for UDT

    boss-thread-size = 1

    #auto default pin or 8

    worker-thread-size = 8

  }

  shutdown {

    # when destroy server, wait seconds

    wait = 3

  }

  serialization = "seata"

  compressor = "none"

}

service {

  #vgroup->rgroup

  #vgroup_mapping.my_test_tx_group = "default"

  vgroup_mapping.hspedu_order_tx_group = "default"

  #only support single node

  default.grouplist = "127.0.0.1:8091"

  #degrade current not support

  enableDegrade = false

  #disable

  disable = false

  #unit ms,s,m,h,d represents milliseconds, seconds, minutes, hours, days, default permanent

  max.commit.retry.timeout = "-1"

  max.rollback.retry.timeout = "-1"

}

client {

  async.commit.buffer.limit = 10000

  lock {

    retry.internal = 10

    retry.times = 30

  }

  report.retry.count = 5

  tm.commit.retry.count = 1

  tm.rollback.retry.count = 1

}

## transaction log store

store {

  ## store mode: file、db

  ## mode = "file"

  mode = "db"

  ## file store

  file {

    dir = "sessionStore"

    # branch session size , if exceeded first try compress lockkey, still exceeded throws exceptions

    max-branch-session-size = 16384

    # globe session size , if exceeded throws exceptions

    max-global-session-size = 512

    # file buffer size , if exceeded allocate new buffer

    file-write-buffer-cache-size = 16384

    # when recover batch read size

    session.reload.read_size = 100

    # async, sync

    flush-disk-mode = async

  }

  ## database store

  db {

    ## the implement of javax.sql.DataSource, such as DruidDataSource(druid)/BasicDataSource(dbcp) etc.

    datasource = "dbcp"

    ## mysql/oracle/h2/oceanbase etc.

    db-type = "mysql"

    ## driver-class-name = "com.mysql.jdbc.Driver"

    driver-class-name = "com.mysql.cj.jdbc.Driver"

    ## url = "jdbc:mysql://127.0.0.1:3306/seata"

    url = "jdbc:mysql://127.0.0.1:3306/seata?characterEncoding=utf8&useSSL=false&serverTimezone=UTC&rewriteBatchedStatements=true"

    ## user = "mysql"

    user = "root"

    ## password = "mysql"

    password = "MySQL123"

    min-conn = 1

    max-conn = 3

    global.table = "global_table"

    branch.table = "branch_table"

    lock-table = "lock_table"

    query-limit = 100

  }

}

lock {

  ## the lock store mode: local、remote

  mode = "remote"

  local {

    ## store locks in user's database

  }

  remote {

    ## store locks in the seata's server

  }

}

recovery {

  #schedule committing retry period in milliseconds

  committing-retry-period = 1000

  #schedule asyn committing retry period in milliseconds

  asyn-committing-retry-period = 1000

  #schedule rollbacking retry period in milliseconds

  rollbacking-retry-period = 1000

  #schedule timeout retry period in milliseconds

  timeout-retry-period = 1000

}

transaction {

  undo.data.validation = true

  undo.log.serialization = "jackson"

  undo.log.save.days = 7

  #schedule delete expired undo_log in milliseconds

  undo.log.delete.period = 86400000

  undo.log.table = "undo_log"

}

## metrics settings

metrics {

  enabled = false

  registry-type = "compact"

  # multi exporters use comma divided

  exporter-list = "prometheus"

  exporter-prometheus-port = 9898

}

support {

  ## spring

  spring {

    # auto proxy the DataSource bean

    datasource.autoproxy = false

  }

}
创建 registry.conf, 进行相关的配置 说明:该文件从 seata 的\conf\registry.conf 拷贝, ,
进行修改即可
registry {

  # file 、nacos 、eureka、redis、zk、consul、etcd3、sofa

  # type = "file"

  type = "nacos"

  nacos {

    # serverAddr = "localhost"

    serverAddr = "localhost:8848"

    namespace = ""

    cluster = "default"

  }

  eureka {

    serviceUrl = "http://localhost:8761/eureka"

    application = "default"

    weight = "1"

  }

  redis {

    serverAddr = "localhost:6379"

    db = "0"

  }

  zk {

    cluster = "default"

    serverAddr = "127.0.0.1:2181"

    session.timeout = 6000

    connect.timeout = 2000

  }

  consul {

    cluster = "default"

    serverAddr = "127.0.0.1:8500"

  }

  etcd3 {

    cluster = "default"

    serverAddr = "http://localhost:2379"

  }

  sofa {

    serverAddr = "127.0.0.1:9603"

    application = "default"

    region = "DEFAULT_ZONE"

    datacenter = "DefaultDataCenter"

    cluster = "default"

    group = "SEATA_GROUP"

    addressWaitTime = "3000"

  }

  file {

    name = "file.conf"

  }

}

config {

  # file、nacos 、apollo、zk、consul、etcd3

  type = "file"

  nacos {

    serverAddr = "localhost"

    namespace = ""

  }

  consul {

    serverAddr = "127.0.0.1:8500"

  }

  apollo {

    app.id = "seata-server"

    apollo.meta = "http://192.168.1.204:8801"

  }

  zk {

    serverAddr = "127.0.0.1:2181"

    session.timeout = 6000

    connect.timeout = 2000

  }

  etcd3 {

    serverAddr = "http://localhost:2379"

  }

  file {

    name = "file.conf"

  }

}
创建 com/rainbowsea/springcloud/config/MyBatisConfig.java: 常规配置:MyBatis 和 dao 关联
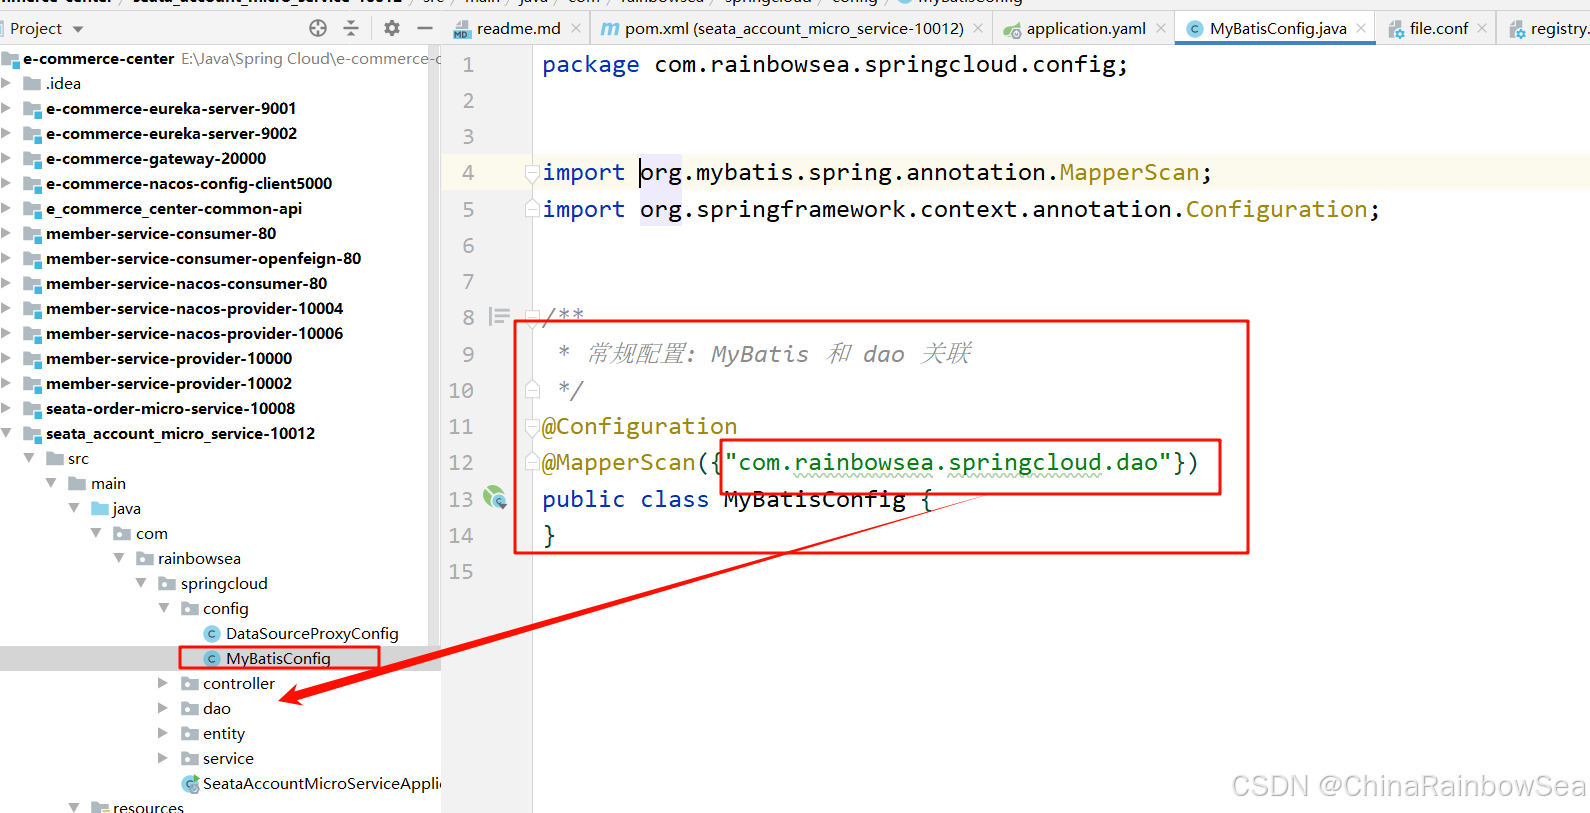
package com.rainbowsea.springcloud.config;

import org.mybatis.spring.annotation.MapperScan;

import org.springframework.context.annotation.Configuration;

/**

 * 常规配置: MyBatis 和 dao 关联

 */

@Configuration

@MapperScan({"com.rainbowsea.springcloud.dao"})

public class MyBatisConfig {

}
创 建 com/rainbowsea/springcloud/config/DataSourceProxyConfig.java , 常 规 配 置 ( 拿 来 使 用即可)
这里很重要(!!): 配置数据源的代理是 seata, 也就是使用 seata 对数据源进行代理 * 大家看引入的包:
io.seata.rm.datasource.DataSourceProxy
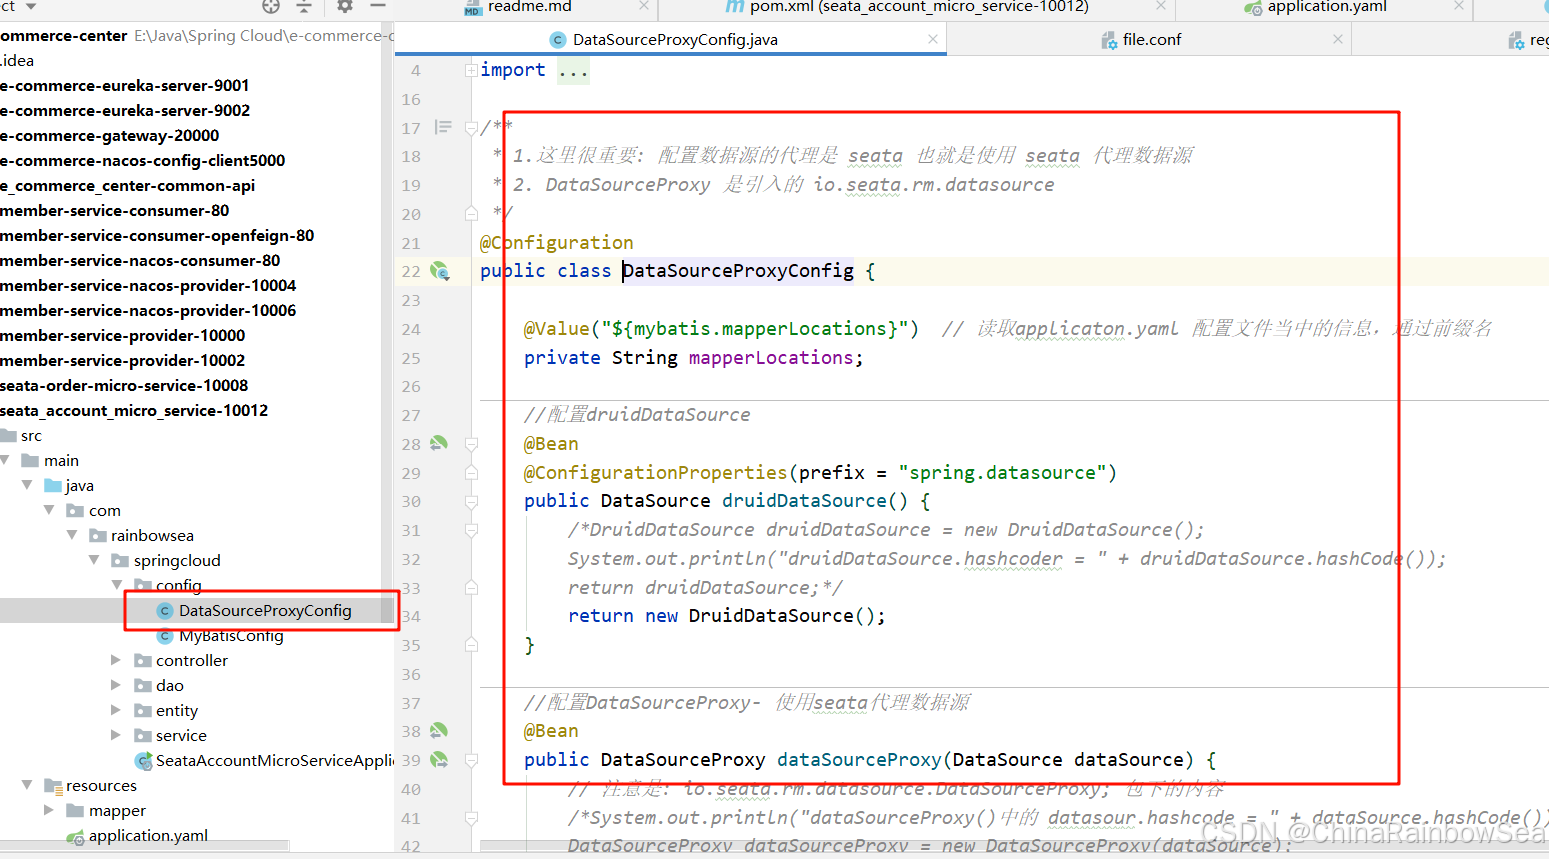
package com.rainbowsea.springcloud.config;

import com.alibaba.druid.pool.DruidDataSource;

import io.seata.rm.datasource.DataSourceProxy;

import org.apache.ibatis.session.SqlSessionFactory;

import org.mybatis.spring.SqlSessionFactoryBean;

import org.mybatis.spring.transaction.SpringManagedTransactionFactory;

import org.springframework.beans.factory.annotation.Value;

import org.springframework.boot.context.properties.ConfigurationProperties;

import org.springframework.context.annotation.Bean;

import org.springframework.context.annotation.Configuration;

import org.springframework.core.io.support.PathMatchingResourcePatternResolver;

import javax.sql.DataSource;

/**

 * 1.这里很重要: 配置数据源的代理是 seata 也就是使用 seata 代理数据源

 * 2. DataSourceProxy 是引入的 io.seata.rm.datasource

 */

@Configuration

public class DataSourceProxyConfig {

    @Value("${mybatis.mapperLocations}")  // 读取applicaton.yaml 配置文件当中的信息,通过前缀名

    private String mapperLocations;

    //配置druidDataSource

    @Bean

    @ConfigurationProperties(prefix = "spring.datasource")

    public DataSource druidDataSource() {

        /*DruidDataSource druidDataSource = new DruidDataSource();

        System.out.println("druidDataSource.hashcoder = " + druidDataSource.hashCode());

        return druidDataSource;*/

        return new DruidDataSource();

    }

    //配置DataSourceProxy- 使用seata代理数据源

    @Bean

    public DataSourceProxy dataSourceProxy(DataSource dataSource) {

        // 注意是: io.seata.rm.datasource.DataSourceProxy; 包下的内容

        /*System.out.println("dataSourceProxy()中的 datasour.hashcode = " + dataSource.hashCode());

        DataSourceProxy dataSourceProxy = new DataSourceProxy(dataSource);

        System.out.println("dataSourceProxy()中的dataSourceProxy。hashcode= " + dataSourceProxy.hashCode());

        return dataSourceProxy;*/

        return new DataSourceProxy(dataSource);

    }

    //配置SqlSessionFactory-常规写法

    @Bean

    public SqlSessionFactory sqlSessionFactoryBean(DataSourceProxy dataSourceProxy)

            throws Exception {

        //System.out.println("sqlSessionFactoryBean 中的 dataSourceProxy.hashcode = " + dataSourceProxy.hashCode());

        SqlSessionFactoryBean sqlSessionFactoryBean =

                new SqlSessionFactoryBean();

        sqlSessionFactoryBean.setDataSource(dataSourceProxy);

        sqlSessionFactoryBean.setMapperLocations

                (new PathMatchingResourcePatternResolver().getResources(mapperLocations));

        sqlSessionFactoryBean.setTransactionFactory

                (new SpringManagedTransactionFactory());

        return sqlSessionFactoryBean.getObject();

    }

}
创建主启动类:com/rianbowsea/springcloud/SeataStorageMicroServiceApplication10010.java
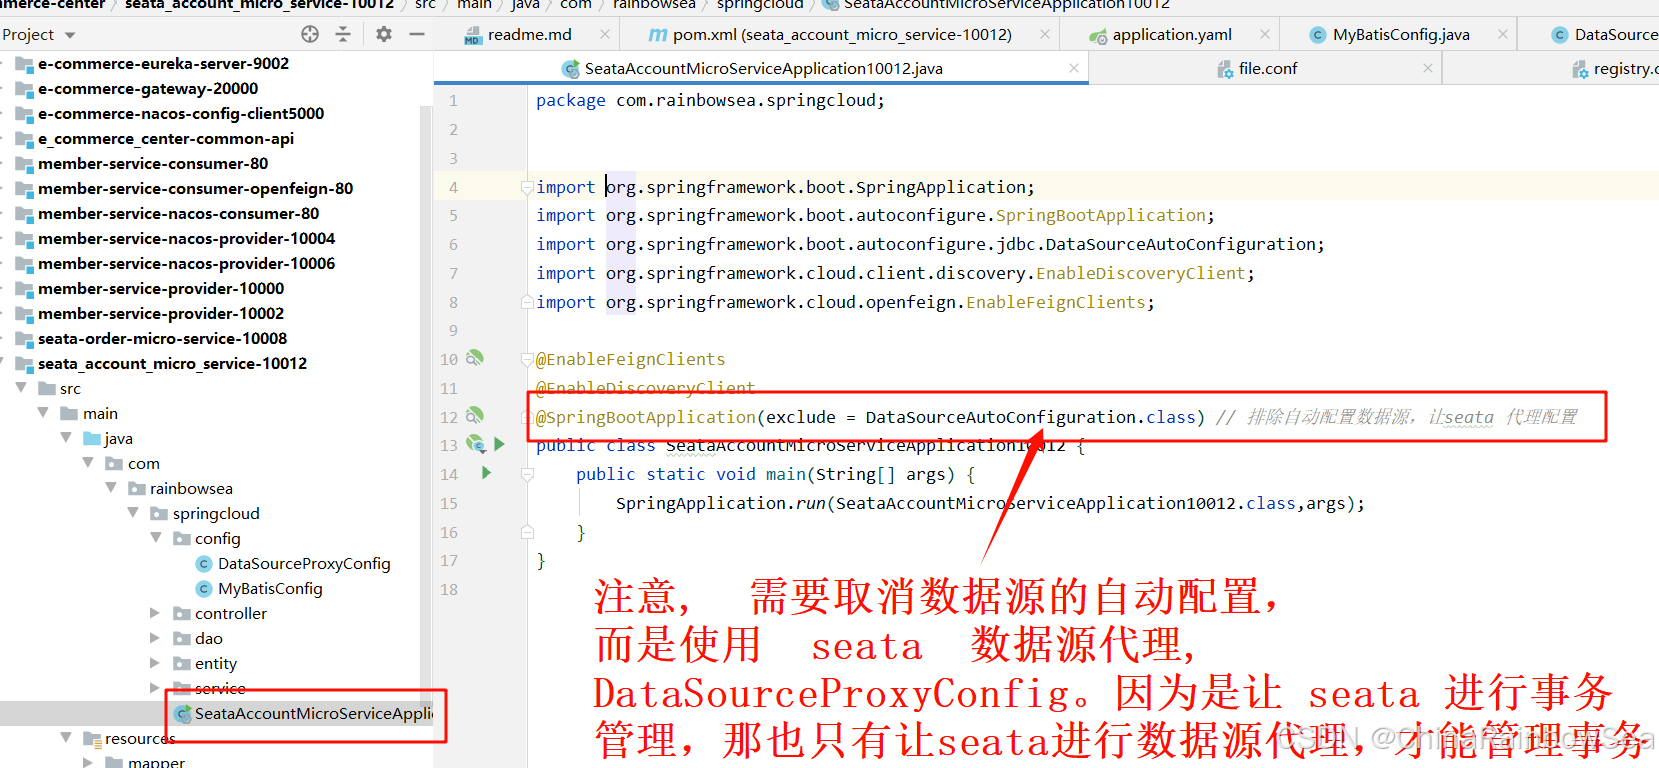
注意, 需要取消数据源的自动配置, 而是使用 seata 数据源代理, DataSourceProxyConfig。因为是让 seata 进行事务 管理,那也只有让seata进行数据源代理,才能管理事务
package com.rainbowsea.springcloud;

import org.springframework.boot.SpringApplication;

import org.springframework.boot.autoconfigure.SpringBootApplication;

import org.springframework.boot.autoconfigure.jdbc.DataSourceAutoConfiguration;

import org.springframework.cloud.client.discovery.EnableDiscoveryClient;

import org.springframework.cloud.openfeign.EnableFeignClients;

@EnableFeignClients

@EnableDiscoveryClient

@SpringBootApplication(exclude = DataSourceAutoConfiguration.class) // 排除自动配置数据源,让seata 代理配置

public class SeataAccountMicroServiceApplication10012 {

    public static void main(String[] args) {

        SpringApplication.run(SeataAccountMicroServiceApplication10012.class,args);

    }

}
测试
seata_storage_micro_service-10010 微服务
启动 Nacos Server 8848
双击 Seata 的\bin\seata-server.bat , 启动 Seata Server
启动 seata_storage_micro_service-10010
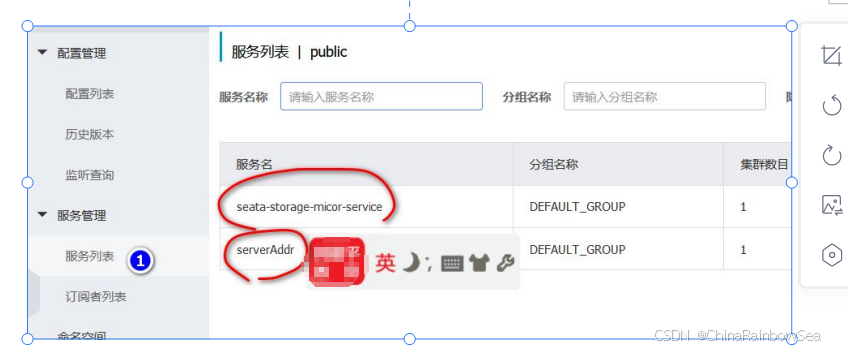
登录 Nacos Server , 查看 10010 微服务是否注册成功
- 登录 Nacos Server, 查看 10010 是否注册成功
补充:使用openfiegn 接口方式远程调用 seata-storage-micor-service 服务的 /storage/reduce api 接口

package com.rainbowsea.springcloud.service;

import com.rainbowsea.springcloud.entity.Result;

import org.springframework.cloud.openfeign.FeignClient;

import org.springframework.web.bind.annotation.PostMapping;

import org.springframework.web.bind.annotation.RequestParam;

@FeignClient(value = "seata-storage-micro-service")  // 表示使用opFeign与分布式多个微服务通信

// value 是配置在 nacos 当中显示的 服务名(也是配置在 对应微服务applicaton 当中的 name 服务名),不可随便写

public interface StorageService {

    /**

     * 1.远程调用方式是post

     * 2. 远程调用的 url 为 : http://@FeignClient(value = "seata_storage_micro_service")/storage/reduce(@PostMapping("/storage/reduce"))

     * 3. seata_storage_micro_service 是 nacos 注册中心服务名

     * 4. openfeign 会根据负载均衡算法来决定调用的是 : 10004/10006,默认是轮询算法

     * 5. openfeign 是通过接口方式调用服务

     * 6. 特别注意: 该方法要和对应微服务模块当中的 controller 的方法一致(参数,post,方法名,返回类型等)

     *

     * @param productId

     * @param nums

     * @return

     */

    // 扣减库存

    @PostMapping("/storage/reduce")

    Result reduce(@RequestParam("productId") Long productId, @RequestParam("nums") Integer nums);

}
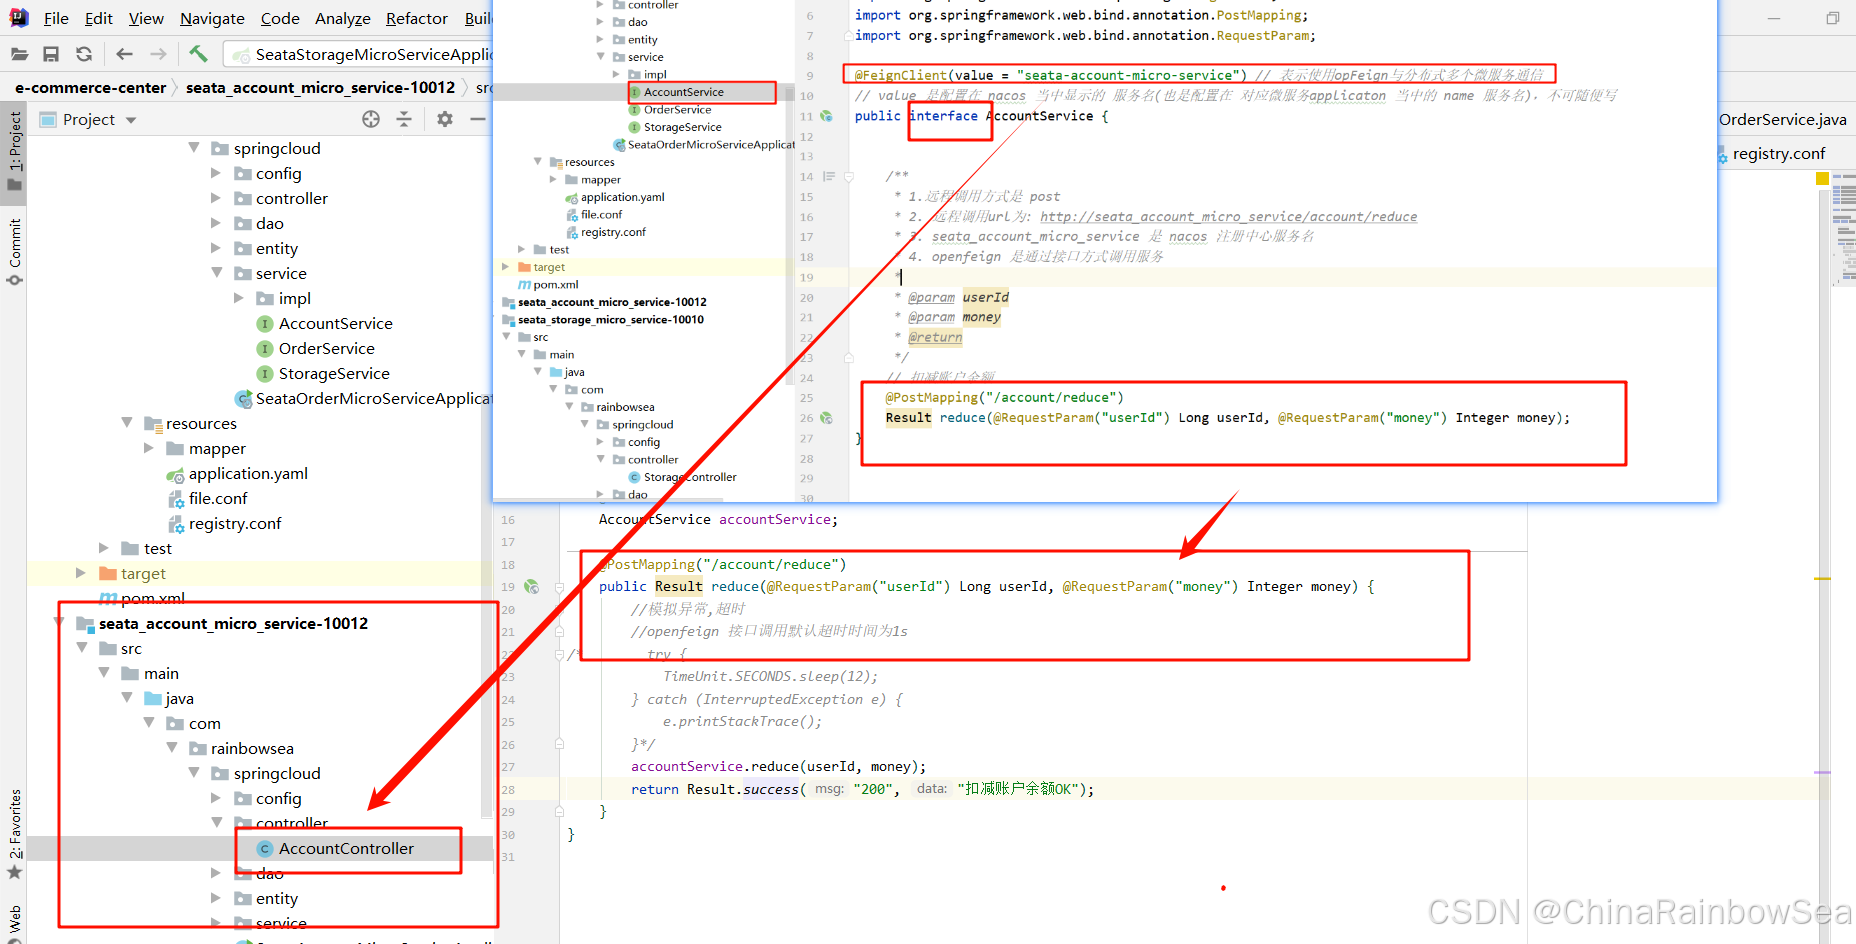
package com.rainbowsea.springcloud.controller;

import com.rainbowsea.springcloud.entity.Result;

import com.rainbowsea.springcloud.service.AccountService;

import org.springframework.web.bind.annotation.PostMapping;

import org.springframework.web.bind.annotation.RequestParam;

import org.springframework.web.bind.annotation.RestController;

import javax.annotation.Resource;

@RestController

public class AccountController {

    @Resource

    AccountService accountService;

    @PostMapping("/account/reduce")

    public Result reduce(@RequestParam("userId") Long userId, @RequestParam("money") Integer money) {

        //模拟异常,超时

        //openfeign 接口调用默认超时时间为1s

/*        try {

            TimeUnit.SECONDS.sleep(12);

        } catch (InterruptedException e) {

            e.printStackTrace();

        }*/

        accountService.reduce(userId, money);

        return Result.success("200", "扣减账户余额OK");

    }

}
完整代码的地址如下:
- Gtiee:e-commerce-center11 · 彩虹海/ Spring Cloud - 码云 - 开源中国
- Github:China-Rainbow-sea/Spring-Cloud-: 个人对于 Spring Cloud 内容知识上的学习总结
集成测试(1)
三个微服务协同完成-正常下单
启动 Nacos Server 8848
双击 Seata 的\bin\seata-server.bat , 启动 Seata Server
启动 seata-order-micro-service-10010 /10012/10008 三个微服务
浏览器 : http://localhost:10008/order/save?userId=666&productId=1&nums=1&money=100

查看数据库 表的情况是否正常 结论:如果没有异常出现,正常下单,数据库三张表,数据一致性是 OK 的
4.2 注意事项和细节
- MySQL 出现 too many connections(1040)错误解决方法
在 my.ini 设置
在 my.ini 设置

max_connections=1000
- 如果出现: service id not legal hostname
报错 Service id not legal hostname 的原因是服务名称不能带有下划线,可以使用中划线, springcloud 无法识别下划线,把下划线改成中划线就好。

- 如果数据库/表使用到关键字,需要使用反引号
举例说明: 比如mapper/OrderMapper.xml , 这里的 order 就要使用``, 否则会报错
<insert id="save">

  insert into `order` (id,user_id,product_id,nums,money,status) values (null,#   {userId},#{productId},#{nums},#{money},0);

</insert>

<update id="update">

  update `order` set status = 1 where user_id=#{userId} and status = #{status};

</update>
- openfeign 在远程调用 api 接口时, 默认超时时间为 1s
5. @GlobalTransactional 控制分布式事务,保证数据一致性
修改seata_account_micro_service-10012的com/rainbowsea/springcloud/controller/AccountController.java, 模拟异常出现.

浏览器:http://localhost:10008/order/save?userId=666&productId=1&nums=1&money=100

查看数据库 表的情况是否正常 结论:这时数据库 表,出现数据不一致现象 订单是未支付,但是库存减少了,账号钱也扣了(提示: 等休眠时间完成后,再查看 account 表, 会看到数据不一致.)
集成测试(3) 三个微服务协同完成-使用@GlobalTransactional 完成分布式事务控制 (出现异常,也能保证数据一致性)
修改 seata-order-micro-service-1000的 com/rianbowsea/springcloud/service/impl/OrderServiceImpl.java
使用@GlobalTransactional 控制分布式事务,保证数据一致性

@Override

    /**

     * 解读

     * 1. @GlobalTransactional : 分布式全局事务控制  io.seata.spring.annotation包

     * 2. name = "hspedu-save-order" 名称,程序员自己指定,保证唯一即可

     * 3. rollbackFor = Exception.class 指定发送什么异常就回滚, 这里我们指定的是Exception.class

     *    即 只要发生了异常就回滚

     */

    @GlobalTransactional(name = "hspedu-save-order", rollbackFor = Exception.class)

    public void save(Orders order) {

        //后面我们如果需要打印日志

        log.info("====创建订单 start=====");

        log.info("====本地生成订单 start===");

        orderDao.save(order);//调用本地方法生成订单order

        log.info("====本地生成订单 end===");

        log.info("====扣减库存 start===");

        //远程调用storage微服务扣减库存

        storageService.reduce(order.getProductId(), order.getNums());

        log.info("====扣减库存 end===");

        log.info("====扣减用户余额 start===");

        //远程调用account微服务扣减用户money

        accountService.reduce(order.getUserId(), order.getMoney());

        log.info("====扣减用户余额 end===");

        log.info("====本地修改订单状态 start===");

        //调用本地方法修改订单状态0->1

        orderDao.update(order.getUserId(), 0);

        log.info("====本地修改订单状态 end===");

        log.info("====创建订单 end=====");

    }
package com.rainbowsea.springcloud.service.impl;

import com.rainbowsea.springcloud.dao.OrderDao;

import com.rainbowsea.springcloud.entity.Orders;

import com.rainbowsea.springcloud.service.AccountService;

import com.rainbowsea.springcloud.service.OrderService;

import com.rainbowsea.springcloud.service.StorageService;

import io.seata.spring.annotation.GlobalTransactional;

import lombok.extern.slf4j.Slf4j;

import org.springframework.stereotype.Service;

import javax.annotation.Resource;

@Slf4j

@Service

public class OrderServiceImpl implements OrderService {

    @Resource

    private OrderDao orderDao;

    @Resource

    private StorageService storageService;

    @Resource

    private AccountService accountService;

    @Override

    /**

     * 解读

     * 1. @GlobalTransactional : 分布式全局事务控制  io.seata.spring.annotation包

     * 2. name = "hspedu-save-order" 名称,程序员自己指定,保证唯一即可

     * 3. rollbackFor = Exception.class 指定发送什么异常就回滚, 这里我们指定的是Exception.class

     *    即 只要发生了异常就回滚

     */

    @GlobalTransactional(name = "hspedu-save-order", rollbackFor = Exception.class)

    public void save(Orders order) {

        //后面我们如果需要打印日志

        log.info("====创建订单 start=====");

        log.info("====本地生成订单 start===");

        orderDao.save(order);//调用本地方法生成订单order

        log.info("====本地生成订单 end===");

        log.info("====扣减库存 start===");

        //远程调用storage微服务扣减库存

        storageService.reduce(order.getProductId(), order.getNums());

        log.info("====扣减库存 end===");

        log.info("====扣减用户余额 start===");

        //远程调用account微服务扣减用户money

        accountService.reduce(order.getUserId(), order.getMoney());

        log.info("====扣减用户余额 end===");

        log.info("====本地修改订单状态 start===");

        //调用本地方法修改订单状态0->1

        orderDao.update(order.getUserId(), 0);

        log.info("====本地修改订单状态 end===");

        log.info("====创建订单 end=====");

    }

/*

    @Override

    *//**

     * 解读:

     * 1. @GlobalTransactional : 分布式全局事务控制  io.seata.spring.annotation.GlobalTransactional

     * 2. name = "rainbowsea-save-order" 名称,程序员自己指定,保证唯一即可

     * 3. rollbackFor=Exception.class 指定发生什么异常就回滚,这里我们指定的是,只要发生了异常就回滚

     *//*

    // //下面这句话是做全局事务控制的,  如果没有,则没有分布式全局事务控制

    @GlobalTransactional(name = "hspedu_order_tx_group", rollbackFor = Exception.class)

    public void save(Orders order) {

        //后面我们如果需要打印日志

        log.info("====创建订单 start=====");

        log.info("====本地生成订单 start===");

        orderDao.save(order);//调用本地方法生成订单order

        log.info("====本地生成订单 end===");

        log.info("====扣减库存 start===");

        //远程调用storage微服务扣减库存

        storageService.reduce(order.getProductId(), order.getNums());

        log.info("====扣减库存 end===");

        log.info("====扣减用户余额 start===");

        //远程调用account微服务扣减用户money

        accountService.reduce(order.getUserId(), order.getMoney());

        log.info("====扣减用户余额 end===");

        log.info("====本地修改订单状态 start===");

        //调用本地方法修改订单状态0->1

        orderDao.update(order.getUserId(), 0);

        log.info("====本地修改订单状态 end===");

        log.info("====创建订单 end=====");

    }*/

}
浏览器:http://localhost:10008/order/save?userId=666&productId=1&nums=1&money=100

查看数据库/表的情况是否正常, 结论:这时数据库/表,数据不一致性得到保证。
发生超时异常了,但是 Seata 进行了一个事务上的回滚处理,并没有导致数据库当中的数据丢失,保证了数据的一致性。
重点:
无论是否发生异常,中间是否中断,发生错误,Seata 会都将对应的
各数据库当中的undo_log以及本身 seata 数据当中的branch_table, global_table, lock_table三个数据表清空

- 分析成功了,为什么清空上述说的
日志数据表:Seata 认为既然你事务上没有问题,没有发生异常,不需要回滚事务,那么就不需要,记录日志了,日志数据表记录的信息时为了发生错误,进行一个 回滚操作,保证事务数据上的一致性,既然你没有回滚的必要,那么也就不需要记录了这些回滚信息了,也就清空了。- 分析失败了,为什么清空上述说的
日志数据表:因为你发生了错误,异常。所以 Seata 就根据在各个数据库当中记录的日志数据表记录的信息,一一将其回滚到,发生异常,错误之前的数据了,保证数据的一致性。当然,回滚的同时,也会将日志数据表当中记录的信息也一并回滚到初始状态了,导致了 日志数据表当中没有数据了(这是最后一步所有数据都按照原先记录信息,都回滚回去了,最后才回滚日志数据表当中的信息的)- 所以综上所述:无论是否发生异常,中间是否中断,发生错误,Seata 会都将对应的
各数据库当中的undo_log以及本身 seata 数据当中的branch_table, global_table, lock_table三个数据表清空
6. Seata 工作机制
Seata 分布式事务处理过程-ID+三组件模型


专业术语解释:

- Transaction ID XID: 全局唯一的事务ID
- Transaction Coordinator(TC) : 事务协调器,维护全局事务的运行状态,负责协调并驱动 全局事务的提交或回滚
- Transaction Manager(TM) : 控制全局事务的边界,负责开启一个全局事务,并最终发 起全局提交或全局回滚的决议;
- Resource Manager(RM) : 控制分支事务,负责分支注册,状态汇报,并接收事务协调 器的指令,驱动分支(本地)事务的提交和回滚
执行过程:
- TM向 TC申请开启一个全局事务,全局事务创建成功并生成一个全局唯一的 XID
- XID在微服务调用链路的上下文中传播;
- RM 向 TC注册分支事务,将其纳入 XID 对应全局事务的管辖
- TM 向 TC 发起针对 XID 的全局提交或回滚决议
- TC 调度 XID下管辖的全部分支事务完成提交或回滚请求。
6.1 Seata 事务模式

6.1.1 AT(默认模式)
- TCC
- SAGA
- XA
AT 无侵入模式:https://seata.apache.org/zh-cn/docs/overview/what-is-seata/
两阶段提交协议的演变:
- 一阶段:业务数据和回滚日志记录在同一个本地事务中提交,释放本地锁和连接资源。
- 二阶段:
- 提交异步化,非常快速地完成。
- 回滚通过一阶段的回滚日志进行反向补偿。
一阶段加载:
在一阶段,Seata 会拦截"业务 SQL"


- 解析 SQL 语义,找到"业务 SQL"要更新的业务数据,在业务数据被更新前,将其保存成"before image" (前置镜像)
- 执行"业务 SQL"更新业务数据,在业务数据更新之后, 其保存成"after image"/后置镜像
- 最后生成行锁
- 以上操作全部在一个数据库事务内完成,这样保证了一阶段操作的原子性
二阶段提交

- 二阶段如果是顺利提交
- 因为"业务 SQL"在一阶段已经提交至数据库,所以 Seata 框架只需将一阶段保存的快 照数据和行锁删掉,完成数据清理即可
二阶段回滚:

- 二阶段如果是回滚的话,Seata 就需要回滚一阶段已经执行的"业务 SQL",还原业务 数据。
- 回滚方式便是用"before image"还原业务数据;但在还原前要首先要校验脏写,对比"数 据库当前业务数据"和"after image 如果两份数据完全一致就说明没有脏写,可以还原业 务数据
- 如果不一致就说明有脏写,出现脏写就需要转人工处理。

7. 最后:
“在这个最后的篇章中,我要表达我对每一位读者的感激之情。你们的关注和回复是我创作的动力源泉,我从你们身上吸取了无尽的灵感与勇气。我会将你们的鼓励留在心底,继续在其他的领域奋斗。感谢你们,我们总会在某个时刻再次相遇。”

相应引用博客,感谢分享
11. SpringCloud Alibaba Seata 分布式事务处理的详细使用以及详细剖析的更多相关文章
- 11.SpringCloud Alibaba
SpringCloud的几大痛点 SpringCloud部分组件停止维护和更新,给开发带来不便 SpringCloud部分环境搭建复杂,没有完善的可视化界面,我们需要大量的二次开发和定制 Spring ...
- 开源的分布式事务框架 springcloud Alibaba Seata 的搭建使用 一次把坑踩完。。。
seata的使用 1. Seata 概述 Seata 是 Simple Extensible Autonomous Transaction Architecture 的简写,由 feascar 改名而 ...
- 微服务架构 | 11.1 整合 Seata AT 模式实现分布式事务
目录 前言 1. Seata 基础知识 1.1 Seata 的 AT 模式 1.2 Seata AT 模式的工作流程 1.3 Seata 服务端的存储模式 1.4 Seata 与 Spring Clo ...
- SpringCloud微服务实战——搭建企业级开发框架(二十七):集成多数据源+Seata分布式事务+读写分离+分库分表
读写分离:为了确保数据库产品的稳定性,很多数据库拥有双机热备功能.也就是,第一台数据库服务器,是对外提供增删改业务的生产服务器:第二台数据库服务器,主要进行读的操作. 目前有多种方式实现读写分离,一种 ...
- SpringCloud Alibaba实战(11:引入服务网关Gateway)
源码地址:https://gitee.com/fighter3/eshop-project.git 持续更新中-- 大家好,我是三分恶. 在前面的章节中,我们已经完成了服务间的调用.统一配置等等,在这 ...
- Seata分布式事务
使用Seata版本:1.6.1(2023/2/6最新版)该版本存在很多坑,相较于1.0版本,配置上存在很多差别,如果你的版本不同,请不要参考本文. 1.6.1配置存在许多问题,比较难找,如果你使用1. ...
- 十一. SpringCloud Alibaba
1. SpringCloud Alibaba简介 1.1 为什么会出现SpringCloud Alibaba Spring Cloud Netflix项目进入到维护模式 什么是维护模式?=> 将 ...
- SpringCloud Alibaba (三):Sentinel 流量控制组件
SpringCloud Alibaba (三):Sentinel 流量控制组件 Sentinel 是什么 随着微服务的流行,服务和服务之间的稳定性变得越来越重要.Sentinel 是面向分布式服务架构 ...
- SpringCloud Alibaba实战(3:存储设计与基础架构设计)
1.存储设计 在上一章中,我们已经完成了基本业务流程的梳理和服务模块的划分,接下来,开始设计数据存储. 虽然在微服务的理论中,没有对数据库定强制性的规范,但一般,服务拆分之后,数据库也会对应的拆分. ...
- Seata–分布式事务
10.1 分布式事务基础 10.1.1 事务 事务指的就是一个操作单元,在这个操作单元中的所有操作最终要保持一致的行为,要么所有操作都成功,要么所有的操作都被撤销.简单地说,事务提供一种"要 ...
随机推荐
- Windows11 常用软件/环境安装记录
Windows 编程 - The Tools I use 软件安装和管理 将软件装到统一一个地方,路径简短,不含空格和中文. WinGet 官方 Windows 软件包管理器 WinGet 在安装命令 ...
- python之模拟数据Faker
Faker,它解决的问题是python模拟(随机)数据!不知道大家在工作中没有用到过假数据,特别前后端开发的人员,应该经常用到,前端人员页面展示,效果展示.后端人员数据库数据模拟.今天给大家介绍的这个 ...
- PLC编程—基本知识
1. OB.FB.FC功能 OB(组织块):用于执行特定的任务(CPU启动.循环扫描.时间中断.硬件中断等),每个OB块均有一个特定的功能和优先级(特定事件发生时被触发). FB(功能块):具有内部存 ...
- WinForm 开源组件 Realtiizor
Realtiizor 的优势 现代美观的界面设计 Realtiizor 为 WinForm 应用带来了现代感十足的界面风格.它采用了流行的设计理念,如 Material Design 的元素融入,使得 ...
- 物联网CC2530按键单双击分别控制两灯
(1)确定思路单击和双击的效果分别是怎样的(此文章采用简单的延时函数不涉及中断).首先可以定义一个普通延时delay和一个标志位count变量,这里需有个延时阈值咱们直接可以宏定义B值(这里需要注意宏 ...
- AO SDK安装问题
ao sdk for .net安装时,需要进行验证.net框架,没装vs的时候会提示 arcobjects SDK for the Microsoft.NT Framework requires a ...
- Terraform Aliyun 创建ecs, kubernetes 实例
Terraform Aliyun 创建ecs, kubernetes 实例 terraform demo for aliyun 创建vpc, 网关, EIP, ecs, kubernetes, Ser ...
- 【原创】xenomai环境下开源实时数控系统LinuxCNC编译安装
linuxcnc 在xenomai下的构建简单记录,参考链接https://www.linuxcnc.org/docs/devel/html/code/building-linuxcnc.html 1 ...
- Gmssl编译问题: error while loading shared libraries: libssl.so.1.1: cannot open shared object file
在Centos7上编译安装Gmssl后,运行gmssl version出现如下错误: gmssl: error while loading shared libraries: libssl.so.1. ...
- Solon v3.0.5 发布!(Spring 生态可以退休了吗?)
Solon 框架! 新一代,面向全场景的 Java 应用开发框架.从零开始构建(非 java-ee 架构),有灵活的接口规范与开放生态. 追求: 更快.更小.更简单 提倡: 克制.高效.开放.生态 有 ...