Python系列之——利用Python实现微博监控
0x00 前言:
前几个星期在写一个微博监控系统 可谓是一波三折啊 获取到微博后因为一些字符编码问题 导致心态爆炸开发中断 但是就在昨天发现了另外一个微博的接口
一个手机微博的接口https://m.weibo.cn/经过一番测试后认为这个接口满足我的要求 就继续完成未完成的使命吧
0x01 分析:
这个接口直接访问的话会有一个302跳转到一个登陆界面

也就是说这里需要先模拟登陆一下才可以访问到微博
抓个包分析了一下
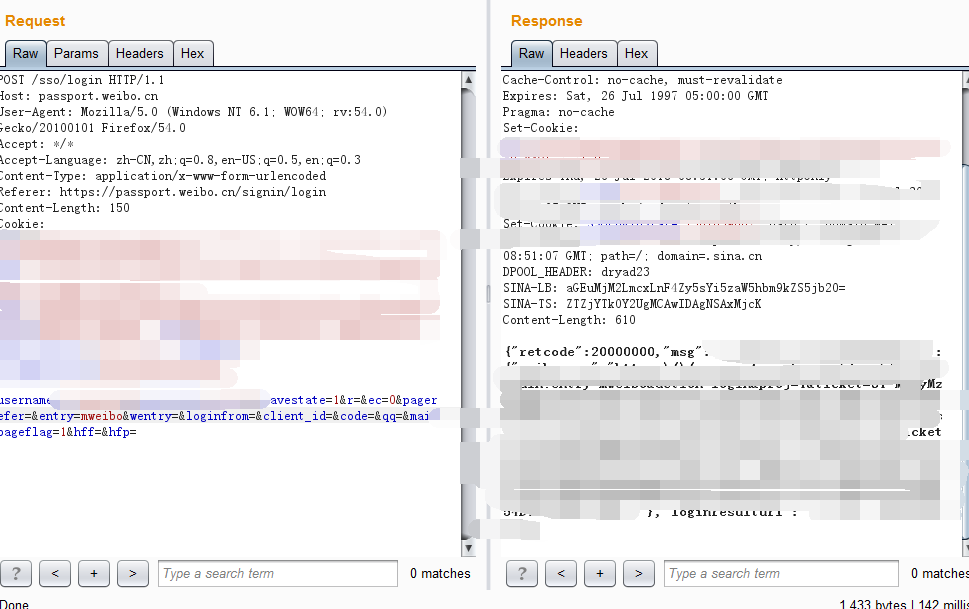
发现只要用户名和密码正确既返回200且json部分的retcode会返回20000000
少了验证码这一大坑 那模拟登陆就相当简单啦
登陆完后访问用户主页 例如:https://m.weibo.cn/u/3023940914
可以在审查元素的Network模块看到 这里用了两个xhr来加载用户信息及微博信息

分别是
https://m.weibo.cn/api/container/getIndex?type=uid&value=3023940914&containerid=1005053023940914
https://m.weibo.cn/api/container/getIndex?type=uid&value=3023940914&containerid=1076033023940914
经过测试这个接口直接加上type和value参数访问 就相当于第一个接口 不必加上containerid参数
而第二个接口的containerid参数则是通过第一个接口获取的
获取到第二个containerid参数访问第二个接口就可以获取到这个uid发布的微博了

返回的是json格式的数据 用户的微博信息都在cards列表里每条数据的mblog数组里面 包括微博正文、图片、来源与时间等
其中card_type标识的是微博类型 例如:文字微博 图片微博 视频微博 转发等 经过测试文字微博和图片微博的card_type标识都一样为9
这里初步只开发监控文字和图片微博的功能<del>其实就是懒</del>
0x02 开发
首先需要模拟登陆 后续的操作都需要基于登陆的格调来进行 也是需要在同个会话进行 可以使用requests.session() 方法来完成
代码片段:
reqHeaders = {
'User-Agent': 'Mozilla/5.0 (Windows NT 6.1; WOW64; rv:54.0) Gecko/20100101 Firefox/54.0',
'Content-Type': 'application/x-www-form-urlencoded',
'Referer': 'https://passport.weibo.cn/signin/login',
'Connection': 'close',
'Accept-Language': 'zh-CN,zh;q=0.8,en-US;q=0.5,en;q=0.3'
}
loginApi = 'https://passport.weibo.cn/sso/login'
loginPostData = {
'username':userName,
'password':passWord,
'savestate':1,
'r':'',
'ec':'0',
'pagerefer':'',
'entry':'mweibo',
'wentry':'',
'loginfrom':'',
'client_id':'',
'code':'',
'qq':'',
'mainpageflag':1,
'hff':'',
'hfp':''
}
#get user session
session = requests.session()
try:
r = session.post(loginApi,data=loginPostData,headers=reqHeaders)
if r.status_code == 200 and json.loads(r.text)['retcode'] == 20000000:
#successful
#do someting
else:
#Logon failure!
except Exception as e:
#Logon failure!
登陆完成后就可以拼接用户id访问前面说的第一个接口了
访问完后再拼接containerid参数获取微博信息的json数据
代码片段:
#get user weibo containerid
userInfo 'https://m.weibo.cn/api/container/getIndex?uid=%s&type=uid&value=%s'%(wbUserId,wbUserId)
try:
r = session.get(userInfo,headers=reqHeaders)
for i in r.json()['tabsInfo']['tabs']:
if i['tab_type'] == 'weibo':
conId = i['containerid']
except Exception as e:
#failure!
#get user weibo index
weiboInfo = 'https://m.weibo.cn/api/container/getIndex?uid=%s&type=uid&value=%s&containerid=%s'%(wbUserId,wbUserId,conId)
try:
r = session.get(weiboInfo,headers=reqHeaders)
itemIds = [] #WBQueue
for i in r.json()['cards']:
if i['card_type'] == 9:
itemIds.append(i['mblog']['id'])
except Exception as e:
#failure!
这里把所有获取到的微博的id存起来 后面继续访问是发现有新的微博id不在这个列表里就证明是新发布的微博
代码片段:
def startMonitor():
returnDict = {}
try:
r = session.get(weiboInfo,headers=reqHeaders)
for i in r.json()['cards']:
if i['card_type'] == 9:
if str(i['mblog']['id']) not in itemIds:
itemIds.append(i['mblog']['id'])
#Got a new weibo
#@ return returnDict dict
returnDict['created_at'] = i['mblog']['created_at']
returnDict['text'] = i['mblog']['text']
returnDict['source'] = i['mblog']['source']
returnDict['nickName'] = i['mblog']['user']['screen_name']
#if has photos
if i['mblog'].has_key('pics'):
returnDict['picUrls'] = []
for j in i['mblog']['pics']:
returnDict['picUrls'].append(j['url'])
return returnDict
except Exception as e:
#failure!
将这些方法封装成了一个类 完整代码如下
#!/usr/bin/env python
# -*- coding: utf-8 -*-
# Author : 奶权
# Action : 微博监控
# Desc : 微博监控主模块
import requests,json,sys
from lxml import etree
class weiboMonitor():
"""
@ Class self :
"""
def __init__(self, ):
self.session = requests.session()
self.reqHeaders = {
'User-Agent': 'Mozilla/5.0 (Windows NT 6.1; WOW64; rv:54.0) Gecko/20100101 Firefox/54.0',
'Content-Type': 'application/x-www-form-urlencoded',
'Referer': 'https://passport.weibo.cn/signin/login',
'Connection': 'close',
'Accept-Language': 'zh-CN,zh;q=0.8,en-US;q=0.5,en;q=0.3'
}
"""
@ Class self :
@ String userName : The username of weibo.cn
@ String passWord : The password of weibo.cn
"""
def login(self, userName, passWord):
loginApi = 'https://passport.weibo.cn/sso/login'
loginPostData = {
'username':userName,
'password':passWord,
'savestate':1,
'r':'',
'ec':'0',
'pagerefer':'',
'entry':'mweibo',
'wentry':'',
'loginfrom':'',
'client_id':'',
'code':'',
'qq':'',
'mainpageflag':1,
'hff':'',
'hfp':''
}
#get user session
try:
r = self.session.post(loginApi,data=loginPostData,headers=self.reqHeaders)
if r.status_code == 200 and json.loads(r.text)['retcode'] == 20000000:
self.echoMsg('Info','Login successful! UserId:'+json.loads(r.text)['data']['uid'])
else:
self.echoMsg('Error','Logon failure!')
sys.exit()
except Exception as e:
self.echoMsg('Error',e)
sys.exit()
"""
@ Class self :
@ String wbUserId : The user you want to monitored
"""
def getWBQueue(self, wbUserId):
#get user weibo containerid
userInfo = 'https://m.weibo.cn/api/container/getIndex?uid=%s&type=uid&value=%s'%(wbUserId,wbUserId)
try:
r = self.session.get(userInfo,headers=self.reqHeaders)
for i in r.json()['tabsInfo']['tabs']:
if i['tab_type'] == 'weibo':
conId = i['containerid']
except Exception as e:
self.echoMsg('Error',e)
sys.exit()
#get user weibo index
self.weiboInfo = 'https://m.weibo.cn/api/container/getIndex?uid=%s&type=uid&value=%s&containerid=%s'%(wbUserId,wbUserId,conId)
try:
r = self.session.get(self.weiboInfo,headers=self.reqHeaders)
self.itemIds = [] #WBQueue
for i in r.json()['cards']:
if i['card_type'] == 9:
self.itemIds.append(i['mblog']['id'])
self.echoMsg('Info','Got weibos')
self.echoMsg('Info','Has %d id(s)'%len(self.itemIds))
except Exception as e:
self.echoMsg('Error',e)
sys.exit()
"""
@ Class self :
"""
def startMonitor(self, ):
returnDict = {}
try:
r = self.session.get(self.weiboInfo,headers=self.reqHeaders)
for i in r.json()['cards']:
if i['card_type'] == 9:
if str(i['mblog']['id']) not in self.itemIds:
self.itemIds.append(i['mblog']['id'])
self.echoMsg('Info','Got a new weibo')
#@ return returnDict dict
returnDict['created_at'] = i['mblog']['created_at']
returnDict['text'] = i['mblog']['text']
returnDict['source'] = i['mblog']['source']
returnDict['nickName'] = i['mblog']['user']['screen_name']
#if has photos
if i['mblog'].has_key('pics'):
returnDict['picUrls'] = []
for j in i['mblog']['pics']:
returnDict['picUrls'].append(j['url'])
return returnDict
self.echoMsg('Info','Has %d id(s)'%len(self.itemIds))
except Exception as e:
self.echoMsg('Error',e)
sys.exit()
"""
@ String level : Info/Error
@ String msg : The message you want to show
"""
def echoMsg(self, level, msg):
if level == 'Info':
print '[Info] %s'%msg
elif level == 'Error':
print '[Error] %s'%msg
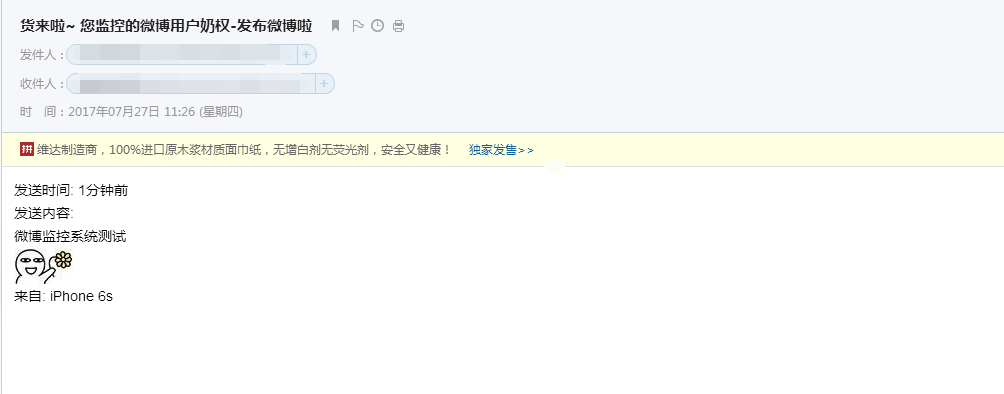
写了个一发现有新微博就发邮件提醒的功能 完整代码见Github地址 https://github.com/naiquann/WBMonitor
#### 0x03 测试
运行代码
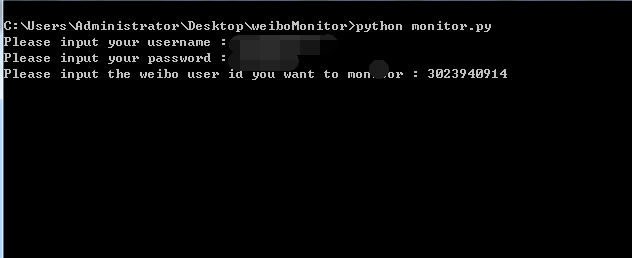
填写完相关的登陆信息及要监控的用户的id后

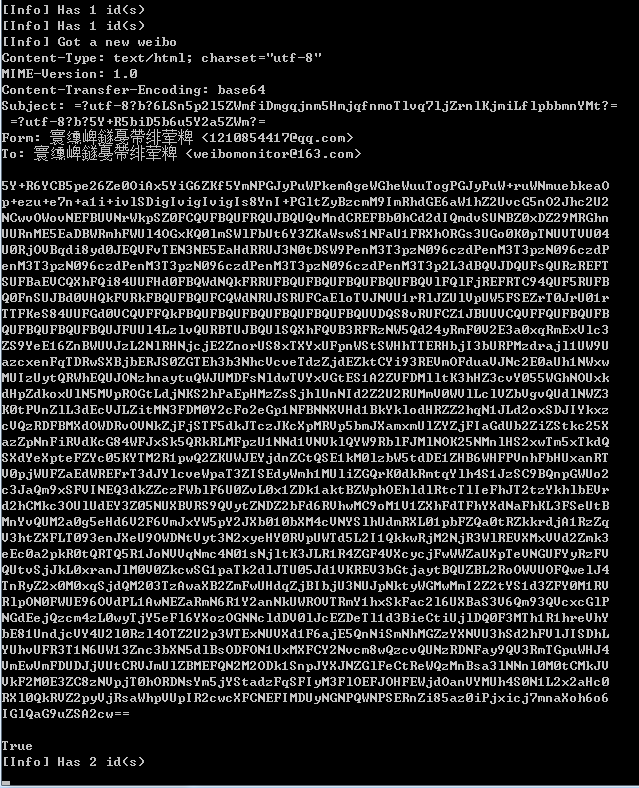
这里写了一个心跳包 每三秒访问一次看看有没有新微博发布
测试的时候这样比较方便 要是拿来用的话可以酌情增加间隔时间
当有微博发布的时候
Python系列之——利用Python实现微博监控的更多相关文章
- Python+selenium测试环境成功搭建,简单控制浏览器(firefox)接下来,继续学习其他浏览器上的测试环境搭建;学习Python语言,利用Python语言来写测试用例。加油!!!
Python+selenium测试环境成功搭建,简单控制浏览器(firefox)接下来,继续学习其他浏览器上的测试环境搭建:学习Python语言,利用Python语言来写测试用例.加油!!!
- 【阿K学Python系列】一Python基础语法(二)
前言 通过上一章的学习[阿k学Python]一Python入门(一),我们已经初步了解到Python是一种解释型.面向对象.动态数据类型的高级程序设计语言,当然也是一门脚本语言,像前端需要学习的Jav ...
- Python 学习记录----利用Python绘制奥运五环
import turtle #导入turtle模块 turtle.color("blue") #定义颜色 turtle.penup() #penup和pendown()设置画笔抬起 ...
- 【python】《利用python进行数据分析》笔记
[第三章]ipython C-a 到行首 C-e 到行尾 %timeit 测量语句时间,%time是一次,%timeit是多次. %pdb是自动调试的开关. %debug中,可以用b 12在第12行设 ...
- python之初入Python
python优缺点: Python的优点很多,简单的可以总结为以下几点. 简单和明确,做一件事只有一种方法. 学习曲线低,跟其他很多语言相比,Python更容易上手. 开放源代码,拥有强大的社区和生态 ...
- $《利用Python进行数据分析》学习笔记系列——IPython
本文主要介绍IPython这样一个交互工具的基本用法. 1. 简介 IPython是<利用Python进行数据分析>一书中主要用到的Python开发环境,简单来说是对原生python交互环 ...
- 利用Python爬虫刷店铺微博等访问量最简单有效教程
一.安装必要插件 测试环境:Windows 10 + Python 3.7.0 (1)安装Selenium pip install selenium (2)安装Requests pip install ...
- Python黑帽编程 3.2 ARP监控
Python黑帽编程 3.2 ARP监控 在第3.1节<ARP欺骗>中,我们学习了ARP的基本原理,使用Python实现了我们自己的ARP欺骗工具.在上一节的基础上,我们来实现一个ARP监 ...
- 利用python yielding创建协程将异步编程同步化
转自:http://www.jackyshen.com/2015/05/21/async-operations-in-form-of-sync-programming-with-python-yiel ...
随机推荐
- centos6中搭建tomcat
一.安装jdk [root@tomcat ~]# yum -y list java* Loaded plugins: fastestmirror, security Loading mirror sp ...
- kbmmw 的HTTPSmartService中的跨域访问
有同学在使用kbmmw 与extjs 结合的时候,涉及到了跨域访问,这个在 kbmmw 里面已经完全解决. extjs 在访问跨域的时候,首先会使用OPIONS 调用,服务端要根据浏览器请求的 he ...
- Linux centos 连接网络
1.在安装过程中不要选择网络适配器,其他正常执行 2.编辑 [root@zb ~]# vi /etc/sysconfig/network-scripts/ifcfg-eth0 一般安装完软件,打开et ...
- 以太坊虚拟机(EVM)
转载链接:https://ethfans.org/posts/solidity-chapter1-introduciton-to-smart-contracts 概括总览: 以太坊虚拟机(EVM)是以 ...
- keras model.compile(loss='目标函数 ', optimizer='adam', metrics=['accuracy'])
深度学习笔记 目标函数的总结与整理 目标函数,或称损失函数,是网络中的性能函数,也是编译一个模型必须的两个参数之一.由于损失函数种类众多,下面以keras官网手册的为例. 在官方keras.io里 ...
- 强大的DataGrid组件[1]
说明:DataGrid组件是Silverlight数据组件中最为常用并且是功能最为强大的数据组件.因此,对开发者而言,深入了解其特性是十分有必要的.本文先介绍该组件的基本特性,接着通过几个简单实例来说 ...
- (转)MyEclipse10下创建web项目并发布到Tomcat
转自:http://blog.sina.com.cn/s/blog_699d3f1b01012spf.html MyEclipse10下创建web项目并发布到Tomcat 1.软件安装(不作详细描 ...
- spring整合quartz时间任务调度框架
spring整合quartz框架 1.创建maven工程 2.导入jar包(pom.xml) <dependencies> <dependency> <groupId&g ...
- java理论学时第七节。课后作业。
对AboutException.java的理解.在try中如果发出某类系统识别的错误,会以throw的形式抛出,在catch中可以将其截获,不显示在前端,可以选择执行别的代码. ArrayIndexO ...
- java基础-day27
第04天 java基础加强 今日内容介绍 u Xml的综合案例 u 注解 u 类的加载 u 动态代理 第1章 注解 1.1 注解概述 l 什么是注解:Annotation注解,是一种代码级别的 ...