Oracle Database 12c Release 2安装过程实录
前言----------公司数据库用的是oracle,由于oracle数据库没有做监控,所有搭个环境用于测试zabbix通过orabbix插件监控oracle数据库,下面先搭建oracle数据库。
简单介绍
[root@oracle ~]$ cat /etc/redhat-release

CentOS release 6.9 (Final)

[oracle@oracle ~]$ uname -a

Linux oracle 2.6.32-696.el6.x86_64 #1 SMP Tue Mar 21 19:29:05 UTC 2017 x86_64 x86_64 x86_64 GNU/Linux

#关闭iptables

/etc/init.d/iptables stop

1	编辑/etc/hosts加入主机名和ip

vim /etc/hosts

192.168.24.133 oracle

2 安装常用软件及oracle依赖

	yum -y install autoconf automake binutils-devel bison cpp dos2unix ftp gcc gcc-c++ lrzsz python-devel  #安装常用软件

	yum -y --setopt=protected_multilib=false install compat-db compat-gcc-34 compat-gcc-34-c++ compat-libstdc++-33 glibc-* glibc-*.i686 libXpm-*.i686 libXp.so.6 libXt.so.6 libXtst.so.6 libgcc_s.so.1 ksh libXp libaio-devel numactl numactl-devel unixODBC unixODBC-devel   #安装oracle依赖,一定要加--setopt=protected_multilib=false这个参数,老系统可能存在库冲突,加上这个参数忽略。

3	创建oracle相关用户和目录

groupadd oinstall

groupadd dba

useradd -g oinstall -G dba oracle

passwd oracle

usermod -g oinstall -G dba oracle

mkdir -p /usr/local/oracle

chown -R oracle:oinstall /usr/local/oracle

chmod -R 755 /usr/local/oracle

4	修改内核参数

cat >> /etc/sysctl.conf << EOF

kernel.shmmni = 4096

kernel.sem = 250 32000 100 128

fs.file-max = 65536

net.ipv4.ip_local_port_range = 1024 65500

net.core.rmem_default = 4194304

net.core.wmem_default = 262144

net.core.rmem_max = 4194304

net.core.wmem_max = 262144

EOF

修改完成之后命令行执行sysctl –p

5	为oracle用户设置shell限制

5.1 编辑/etc/security/limits.conf添加黄色内容,以下命令可直接在命令行执行

cat >> /etc/security/limits.conf << EOF

oracle  soft    nproc   2047

oracle  hard    nproc   16384

oracle  soft    nofile  1024

oracle  hard    nofile  65536

EOF

5.2 编辑vim /etc/pam.d/login添加黄色内容,以下命令可直接在命令行执行

cat >> /etc/pam.d/login << EOF

session     required        pam_limits.so

EOF

5.3	编辑/etc/profile添加如下内容

if [ $USER = "oracle" ]; then

        if [ $SHELL = "/bin/ksh" ]; then

                ulimit -p 16384

                ulimit -n 65536

        else

                ulimit -u 16384 -n 65536

        fi

fi

# 添加完成以后执行source /etc/profile 或者 . /etc/profile

5.4	编辑/etc/csh.login添加如下内容

if ( $USER == "oracle") then

        limit maxproc 16384

        limit descriptors 65536

endif

5.5	编辑/home/oracle/.bash_profile,在最后添加如下内容

export ORACLE_BASE=/usr/local/oracle

export ORACLE_HOME=/usr/local/oracle/product/12201 #安装包版本号

export ORACLE_SID=bill

export PATH=$PATH:$HOME/bin:$ORACLE_HOME/bin

# 添加完成以后执行或soucre /home/oracle/.bash_profile者 . /home/oracle/.bash_profile

#这里面的oracle_sid这个值,是安装数据库实例时候用到的SID
下载Oracle数据库:
地址:http://www.oracle.com/technetwork/database/enterprise-edition/downloads/oracle12c-linux-12201-3608234.html
1、勾选Accept License Agreement

2、点击File下载
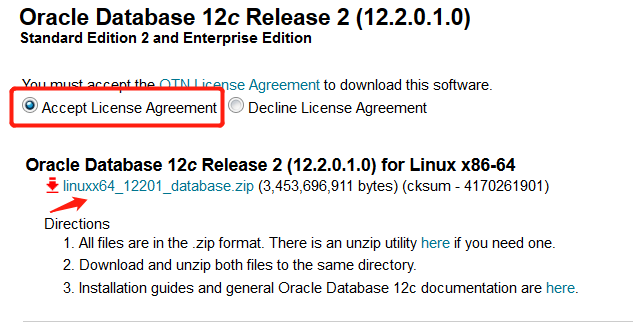
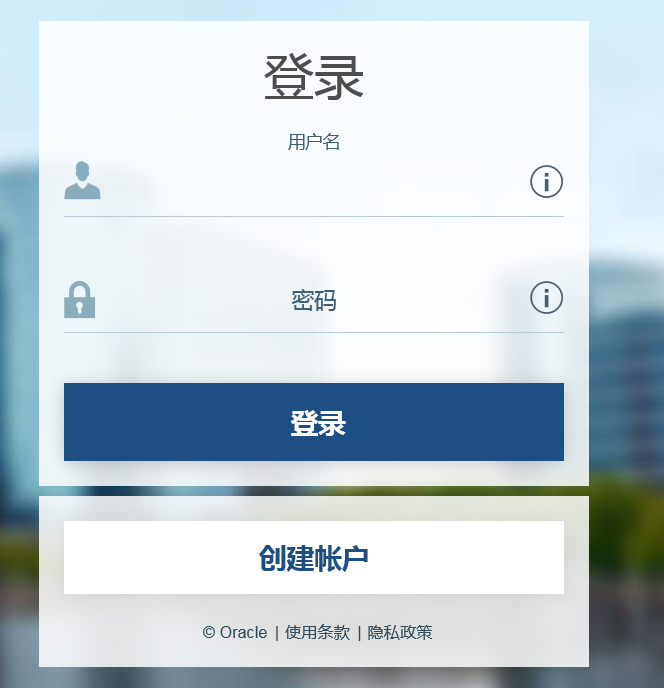
3、弹出用户登录界面需要登录才能下载,没有账号就注册一个
4.下载完成后的安装包如下

5、通过FTP上传到系统里我的路径是/application/tools下

6、系统上查看已经存在
[root@oracle ~]# cd /application/tools/

[root@oracle tools]# ll

total 3381964

drwxr-xr-x. 9 root   root         4096 Mar 23 13:11 apache-tomcat-8.0.50

-rw-r--r--. 1 root   root      9417189 Feb  7 12:52 apache-tomcat-8.0.50.tar.gz

drwxr-xr-x. 7 oracle oracle       4096 Jan 26  2017 database

-rw-r--r--. 1 root   root   3453696911 Apr 11 00:15 linuxx64_12201_database.zip

[root@oracle tools]# pwd

/application/tools
7、安装依赖包
[root@oracle tools]# yum install gcc gcc-c++ ksh libaio-devel libstdc++-devel compat-libstdc++-33 compat-libcap1 -y
8、添加oracle用户和oracle 组
[root@oracle tools]# useradd oracle

[root@oracle tools]# groupadd oracle

[root@oracle tools]# passwd oracle
9、由于我们是图形界面安装oracle数据库,我装的是minimal版系统,需再安装图形界面系统,已安装的网友可以忽略这步。
安装方法:http://www.cnblogs.com/Dev0ps/p/8795809.html
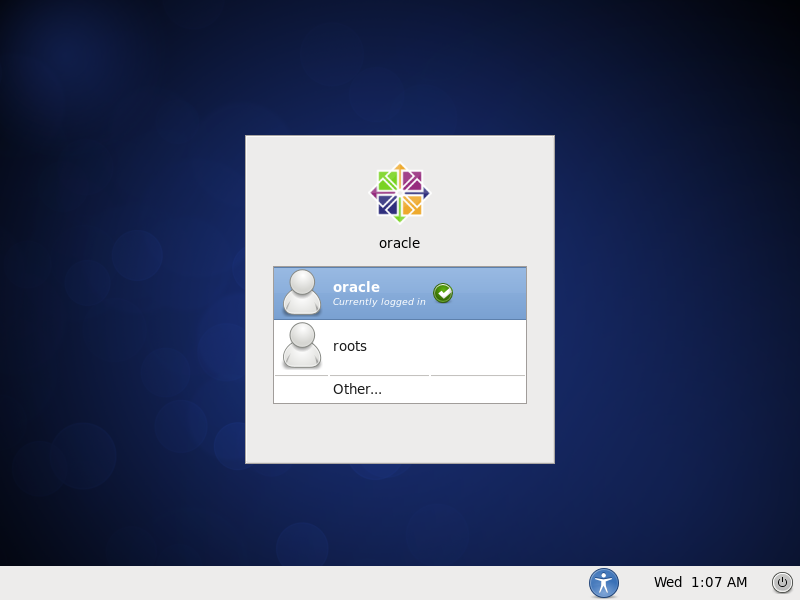
10、切换到oracle用户下
11、进入oracle安装包路径下,解压出一个名为database的目录
[root@oracle tools]# su oracle

[oracle@oracle tools]$ unzip linuxx64_12201_database.zip

[oracle@oracle tools]$ ls

apache-tomcat-8.0.50  apache-tomcat-8.0.50.tar.gz  database  linuxx64_12201_database.zip
12、运行runInstaller脚本
[oracle@oracle tools]$ cd database/

[oracle@oracle database]$ ./runInstaller
13、出现oracle安装界面
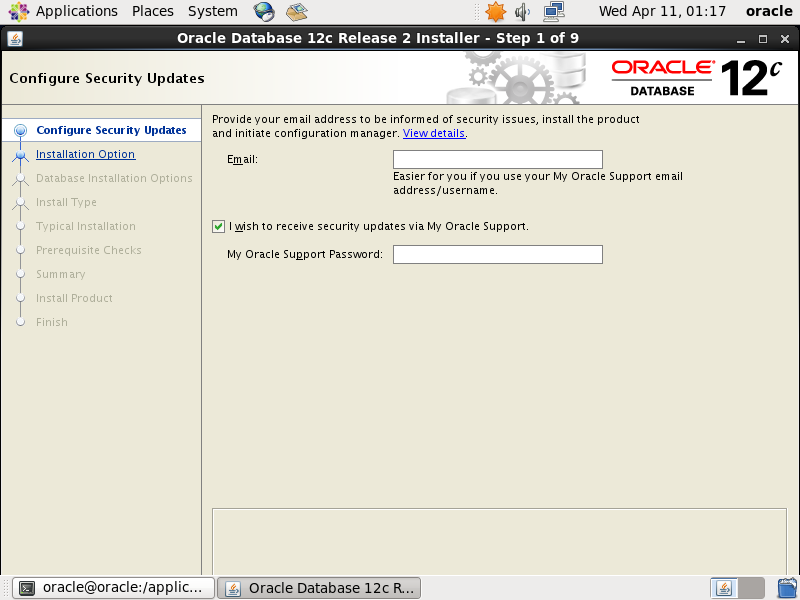
14、配置输入邮箱地址取消oracle支持,点击下一步

15、选择创建和配置新数据库,点击下一步

16、选择服务器类型,点击下一步

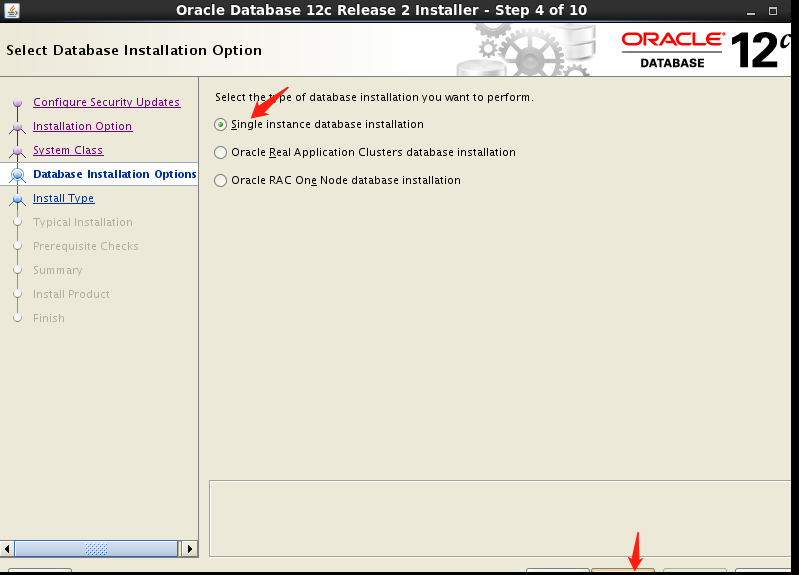
17、选择单实例安装,点击下一步
18、选择高级安装,自定义安装

19、选择企业版安装,点击下一步

20、指定安装目录,默认安装就好注意空间要足够.注意要有足够的空间安装,否则报错。

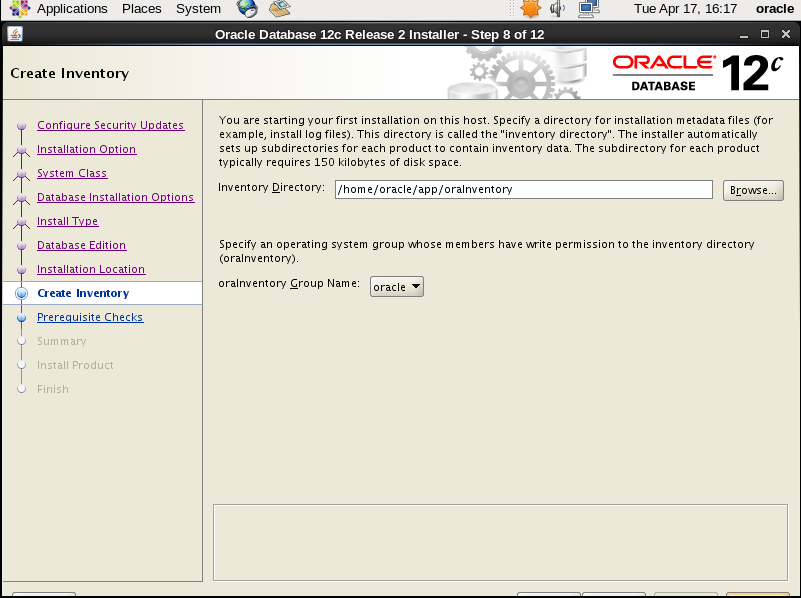
21、指点产品项目清单,默认就好
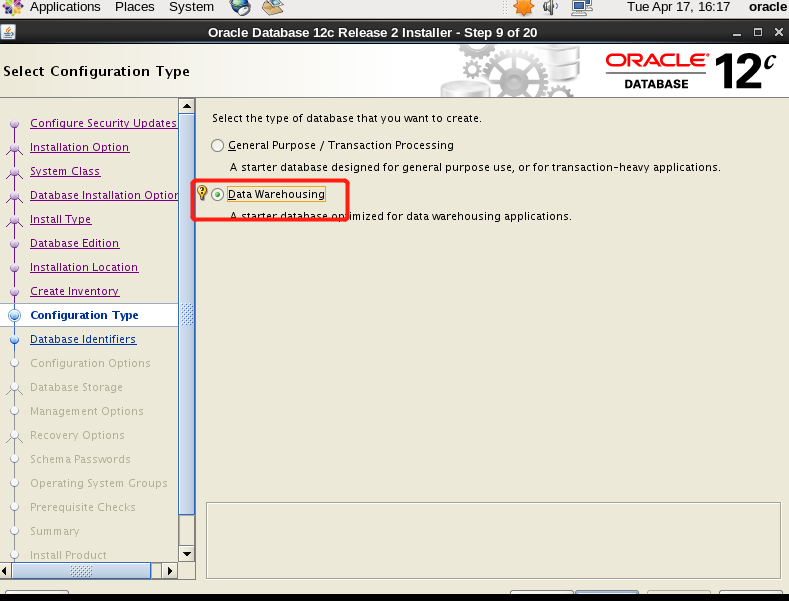
22、创建数据类型,选择数据仓库。
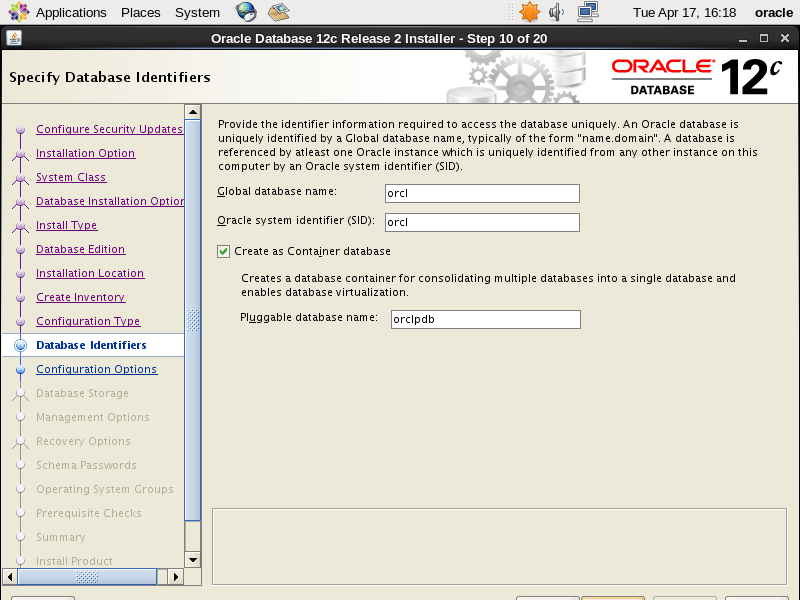
23、设置数据库名称,默认即可。
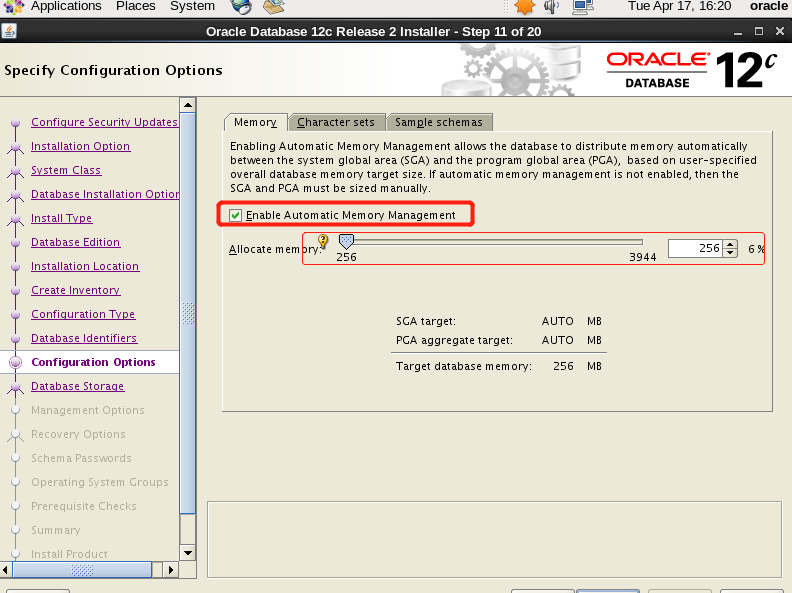
24、设置内存大小,根据实际情况调整。
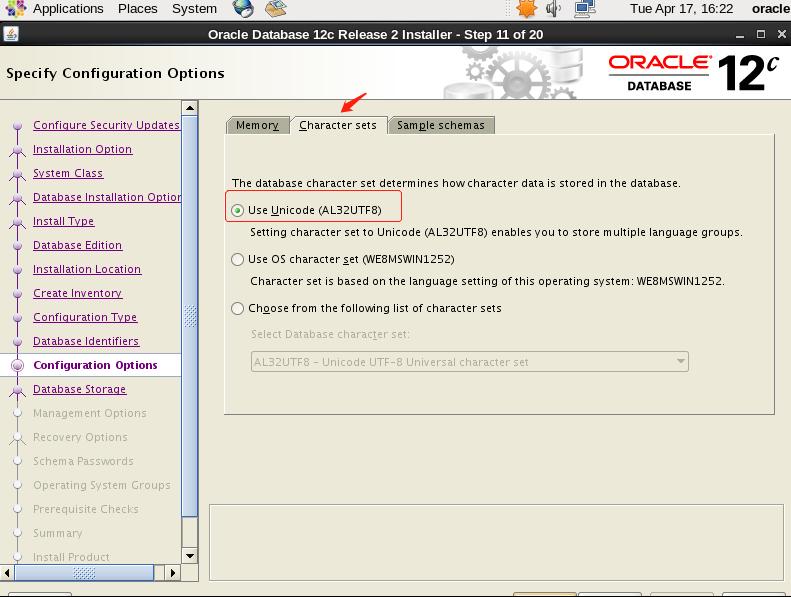
25、字符集选择utf-8
26、安装实例,生产环境建议不用安装了。

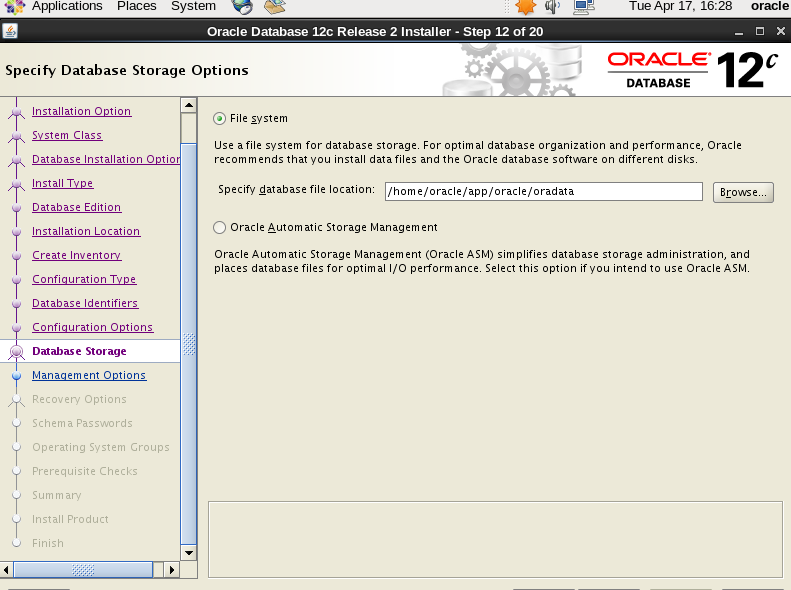
27、选择数据存储方式
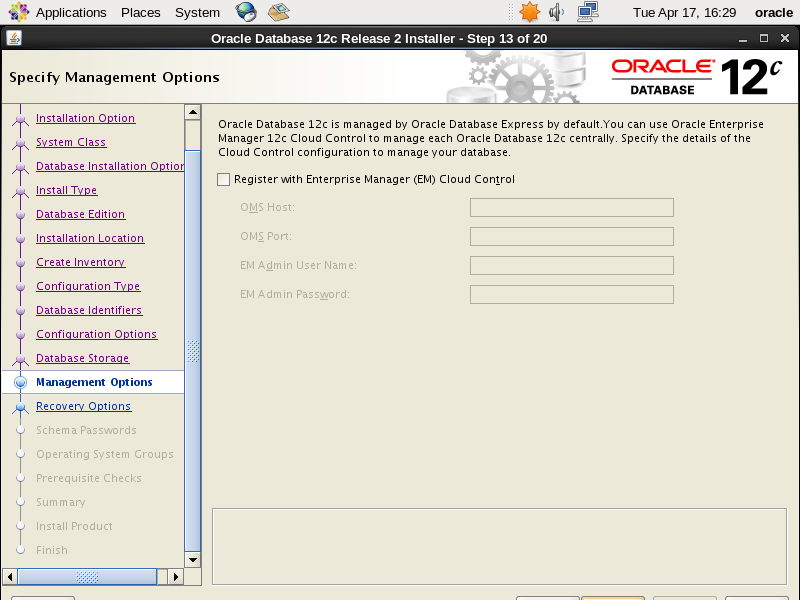
28、云管理,这里跳过
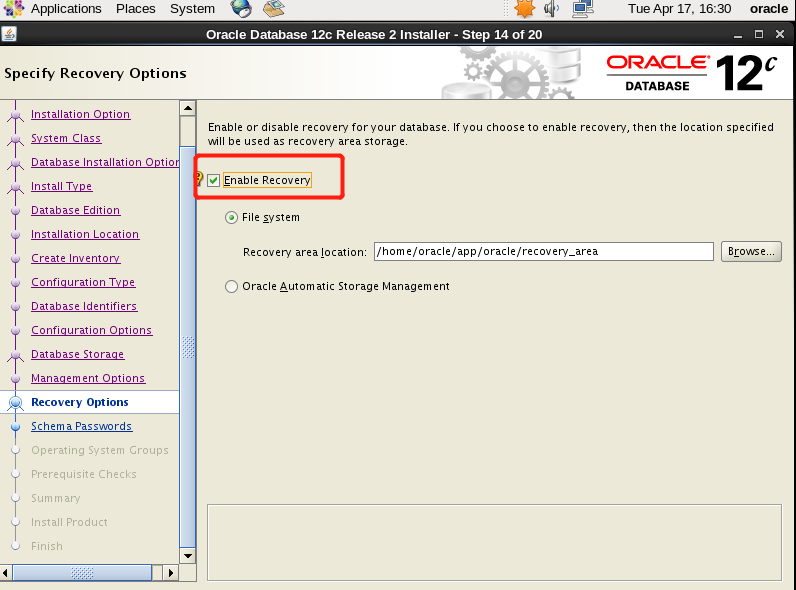
29、开启数据恢复
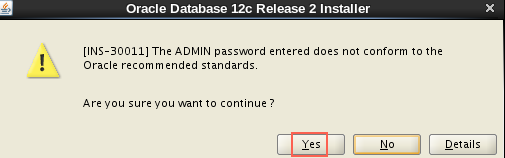
30、设置密码,为方便我设置相同密码“oracle”,生产环境建议不要设置相同。

31、选择数据库操作类型(默认即可)

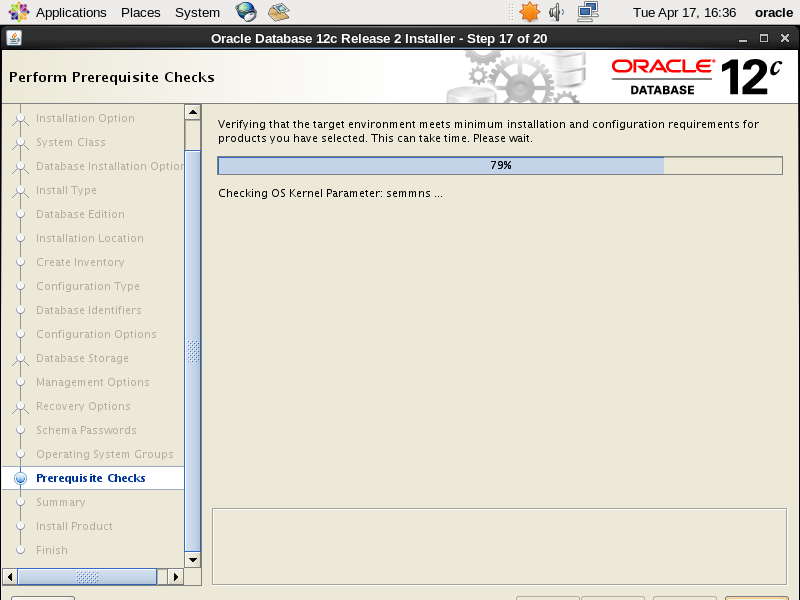
32、开始安装
33、检查错误并用“root”用户执行,该脚本文件。
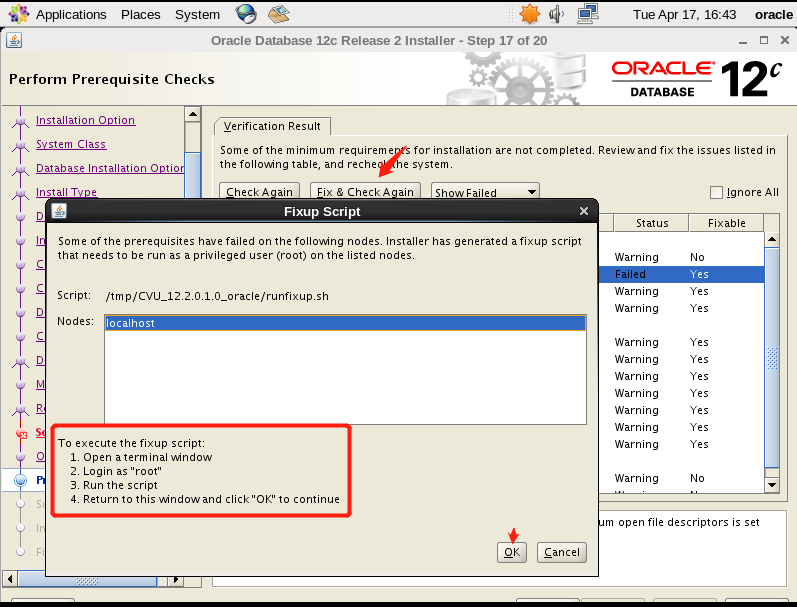
切换到root下执行以下脚本,提示successfully说明成功。
[root@localhost ~]# bash /tmp/CVU_12.2.0.1.0_oracle/runfixup.sh
34、修复后点击下一步继续
35、开始安装

36、再以“root”执行以下2个脚本。

root@localhost ~]# sh /home/oracle/app/oraInventory/orainstRoot.sh

Changing permissions of /home/oracle/app/oraInventory.

Adding read,write permissions for group.

Removing read,write,execute permissions for world.

Changing groupname of /home/oracle/app/oraInventory to oracle.

The execution of the script is complete.

[root@localhost ~]# sh /home/oracle/app/oracle/product/12.2.0/dbhome_1/root.sh

Performing root user operation.

The following environment variables are set as:

    ORACLE_OWNER= oracle

    ORACLE_HOME=  /home/oracle/app/oracle/product/12.2.0/dbhome_1

Enter the full pathname of the local bin directory: [/usr/local/bin]:  回车

   Copying dbhome to /usr/local/bin ...

   Copying oraenv to /usr/local/bin ...

   Copying coraenv to /usr/local/bin ...

Creating /etc/oratab file...

Entries will be added to the /etc/oratab file as needed by

Database Configuration Assistant when a database is created

Finished running generic part of root script.

Now product-specific root actions will be performed.

Do you want to setup Oracle Trace File Analyzer (TFA) now ? yes|[no] :

yes

Installing Oracle Trace File Analyzer (TFA).

Log File: /home/oracle/app/oracle/product/12.2.0/dbhome_1/install/root_localhost.localdomain_2018-04-17_17-02-45-547313350.log
37、结束安装
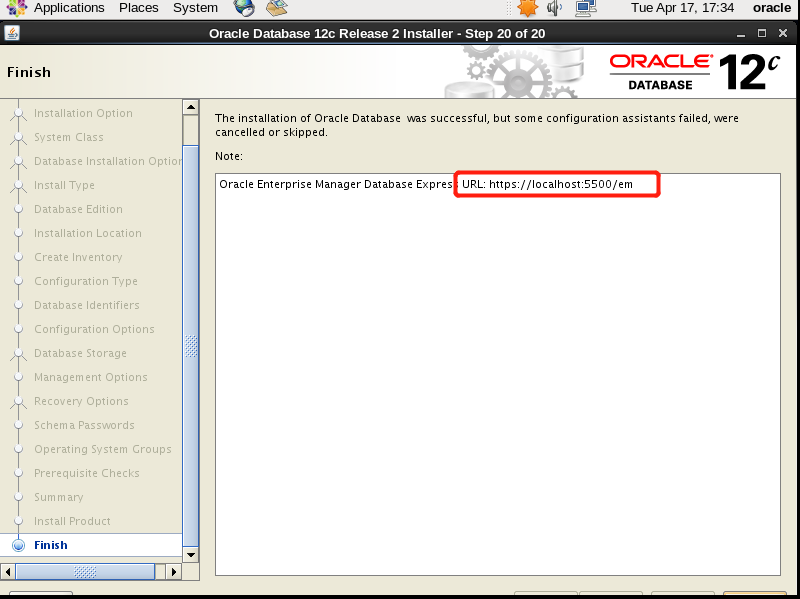
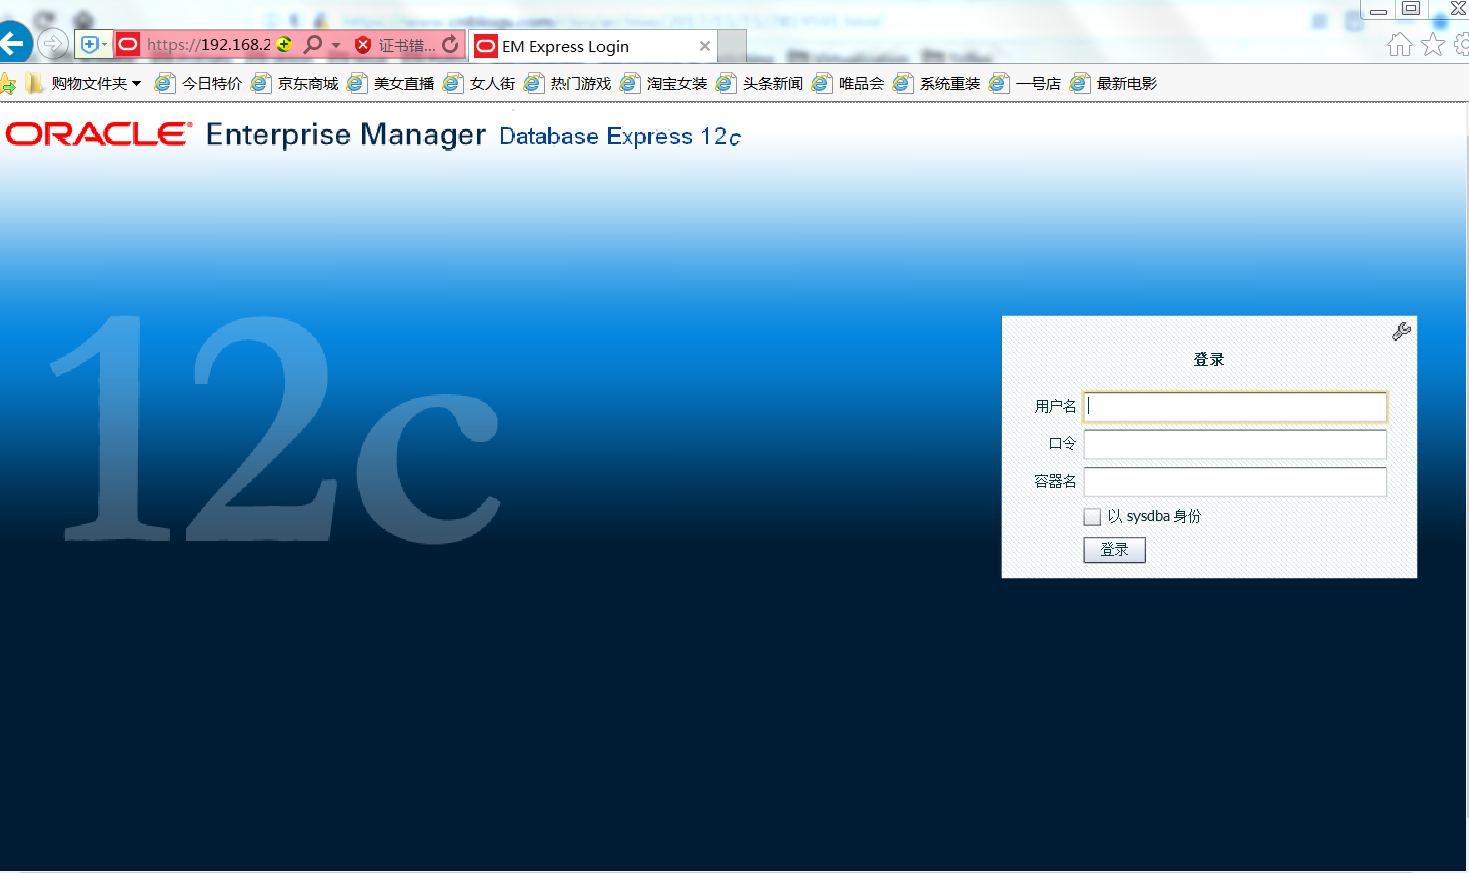
38、浏览器登录,地址根据提示输入。账号: system 我的密码:Oracle123
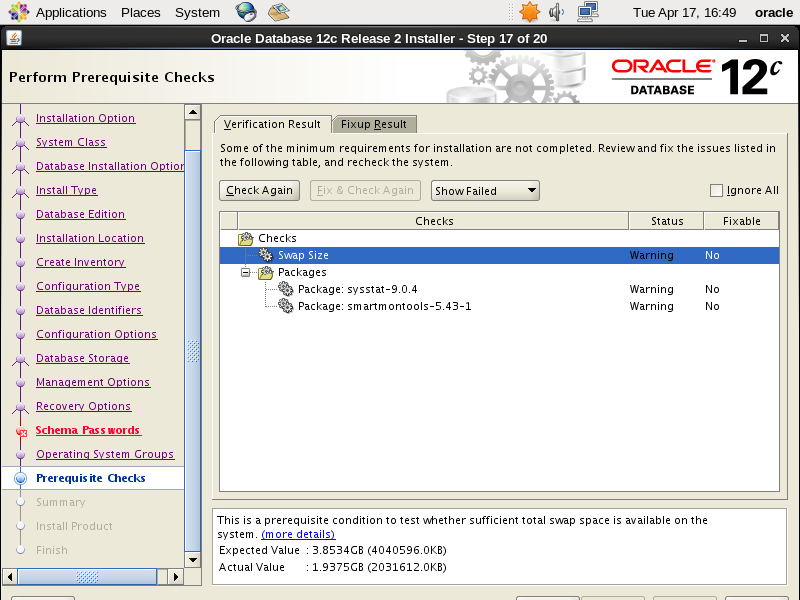
总结:安装期间出现一次报错
[INS-20802] Oracle Database Configuration Assistant 失败,我重新安装第二次就可以了。
Oracle Database 12c Release 2安装过程实录的更多相关文章
- Oracle Database 12c Release 2安装详解
第1章 Oracle Database 12c Release 2安装详解 1.1 下载方法 oracle官网https://www.oracle.com 1)打开官方网站,找到下载连接 2)选择更多 ...
- Windows下安装Oracle Database 12c Release 1(12.1.0.2.0) - Enterprise Edition
Windows下安装Oracle Database 12c Release 1(12.1.0.2.0) 最近因需要在Oracle 数据库上建立ODI的资料档案库,需要安装Oracle Database ...
- Oracle Database 12c Release 1下载安装(自身经历)
1.访问Oracle官网:https://www.oracle.com/index.html,下载Oracle Database 12c Release 1 (注意:File1和File2都要下载!! ...
- 转: Windows下安装Oracle Database 12c Release 1(12.1.0.2.0) - Enterprise Edition
http://www.cnblogs.com/xqzt/p/4395053.html Windows下安装Oracle Database 12c Release 1(12.1.0.2.0) - Ent ...
- Upgrade Oracle Database 12c Release 2(12.2) RAC on RHEL7.3 with RU
Upgrade Oracle Database 12c Release 2(12.2) RAC on RHEL7.3 -- [ RU: 26610291 (GRID INFRASTRUCTURE RE ...
- Oracle列自增实现(2)-Identity Columns in Oracle Database 12c Release 1 (12.1)
Oracle列自增-Identity Columns in Oracle Database 12c Release 1 (12.1) 在ORACLE 12C以前的版本中,如果要实现列自增长,需要通过序 ...
- 12 Things Developers Will Love About Oracle Database 12c Release 2
by Chris Saxon-Oracle It's Here: Oracle Database 12c Release 2 (12.2) Is available on Oracle Cloud. ...
- Oracle Database 12c Release 1 Installation On Oracle Linux 6.4 x86_64
Create groups and users [root@vmdb12c ~]# groupadd oinstall [root@vmdb12c ~]# groupadd dba [root@vmd ...
- Installing Oracle Database 12c Release 2(12.2) RAC on RHEL7.3 in Silent Mode
概要 在RHEL7静默方式安装oracle database 12.2 RAC. 一.环境配置 1. 配置hosts文件 cp /etc/hosts /etc/hosts_$(date +%Y%d%m ...
随机推荐
- 十字线阵---CBF,传统波束形成
%传统波束形成,CBF (Ps:这个程序是别人的,不是我写的,但是具体是在哪里找到的已经忘了) clear all; close all; clc; %---------初始化常量---------- ...
- JAVA中字符串操作几种方式对比
@参考文章 方法及原理: 方法1:a=a+b实际上另开辟一个空间c=a+b;然后将c的引用赋给a 方法2:a += b实际上是建立一个StringBuffer,然后调用append(),最后再将Str ...
- jquery中bind和on的区别
1.首先,来看看bind和on的语法. bind的用法: $('a').bind('click',[data],function(){}) 其事件的绑定者是固定的,就是a,第一个参数是事件,第二个参数 ...
- 698. Partition to K Equal Sum Subsets 数组分成和相同的k组
[抄题]: Given an array of integers nums and a positive integer k, find whether it's possible to divide ...
- [leetcode]30. Substring with Concatenation of All Words由所有单词连成的子串
You are given a string, s, and a list of words, words, that are all of the same length. Find all sta ...
- BigDecimal用法总结
BigDecimal用法总结 BigDecimal常用于金额的计算,下面总结下这次项目中BigDecimal的用法. 1.加减乘除 2.设置精度 3.取反 加减乘除分别调用函数 [java] view ...
- 48- java Arrays.sort和collections.sort()再次总结
今天又碰到一个新BUG,记下来. 一直报空指针异常,我就很奇怪了,怎么就空指针了呢,我输出时,也能输出东西呀. 原来Arrays.sort() 和 Collections.sort() 都是对整个数组 ...
- 在WIN10上安装ESXI-Comstomer (转自技术社区)
I recently required the use of ESXi Customizer to integrate some NIC drivers into my ESXi 5.5 ISO. H ...
- 二 分析easyswoole源码(启动服务)
前文连接,阅读的时候最好参照EasySwoole2.1.2的源码 $inst->run();//启动服务 这里实际调用的是Core的start方法ServerManager::getInstan ...
- PyCharm 安装package matplotlib为例
File --> settings --> Project Interpreter --> 搜索 matplotlib 如果觉得官网下载的速度慢,可以添加阿里云的 repositor ...