k8s之资源限制以及探针检查
k8s之资源限制以及探针检查
一、资源限制
1. 资源限制的使用
当定义Pod时可以选择性地为每个容器设定所需要的资源数量。最常见的可设定资源是CPU和内存大小,以及其他类型的资源。
2. reuqest资源(请求)和limit资源(约束)
当为Pod中的容器指定了request资源时,调度器就使用该信息来决定将Pod调度到哪个节点上。当还为容器指定了limit资源时,kubelet就会确保运行的容器不会使用超出所设的limit资源量。kubelet还会为容器预留所设的request资源量,供该容器使用。
如果Pod所在的节点具有足够的可用资源,容器可以使用超过所设置的request资源量。不过,容器不可以使用超出所设置的limit资源量。
如果给容器设置了内存的limit值,但未设置内存的request值,Kubernetes会自动为其设置与内存limit相匹配的request值。类似的,如果给容器设置了CPU的limit值但未设置CPU的request值,则Kubernetes自动为其设置CPU的request值,并使之与CPU的limit值匹配。
3. 官网示例
https://kubernetes.io/zh/docs/concepts/configuration/manage-resources-containers/
4. Pod和容器的资源请求和限制
| 定义创建容器时预分配的CPU资源 | |
| spec.containers[].resources.requests.cpu | |
| 定义创建容器时预分配的内存资源 | |
| spec.containers[].resources.requests.memory | |
| 定义创建容器时预分配的巨页资源 | |
| spec.containers[].resources.requests.hugepages-<size> | |
| 定义cpu的资源上限 | |
| spec.containers[].resources.limits.cpu | |
| 定义内存的资源上限 | |
| spec.containers[].resources.limits.memory | |
| 定义巨页的资源上限 | |
| spec.containers[].resources.limits.hugepages-<size> |
5. 资源类型
CPU 和内存都是资源类型。每种资源类型具有其基本单位。 CPU 表达的是计算处理能力,其单位是 Kubernetes CPUs。 内存的单位是字节。 如果你使用的是 Kubernetes v1.14 或更高版本,则可以指定巨页(Huge Page)资源。 巨页是 Linux 特有的功能,节点内核在其中分配的内存块比默认页大小大得多。
例如,在默认页面大小为 4KiB 的系统上,你可以指定约束 hugepages-2Mi: 80Mi。 如果容器尝试分配 40 个 2MiB 大小的巨页(总共 80 MiB ),则分配请求会失败。
说明:
你不能过量使用 hugepages- * 资源。 这与 memory 和 cpu 资源不同。
6. CPU资源单位
CPU资源的request和limit以cpu为单位。kubernetes中的一个cpu相当于1个vCPU(1个超线程)。
Kubernetes也支持带小数CPU的请求。spec.containers[].resources.requests.cpu为0.5的容器能够获得一个cpu的一半CPU资源(类似于cgroup对CPU资源的时间分片)。表达式0.1等价于表达式100m(毫核),表示每1000毫秒内容器可以使用的CPU时间总量为0.1*1000毫秒。
7. 内存资源单位
内存的request和limit以字节为单位。可以用证书表示,
也可以用以10为底数的指数的单位(E、P、T、G、M、K)来表示,
或者以2为底数的指数的单位(Ei、Pi、Ti、Gi、Mi、Ki)来表示。
如1KB=103=1000,1MB=106=1000000=1000KB,1GB=10^9=1000000000=1000MB
1KiB=210=1024,1MiB=220=1048576=1024KiB
PS:在买硬盘的时候,操作系统报的数量要比产品标出或商家号称的小一些,主要原因是标出的是以MB、GB为单位的,1GB就是1,000,000,000Byte,而操作系统是以2进制为处理单位的,因此检查硬盘容量时是以MiB、GiB为单位,1GiB=2^30=1,073,741,824Byte。相比较而言,1GiB要比1GB多出73,741,824Byte,所以检测实际结果要比标出的少一些,单位越大,两者的差值也就越大。
8. 官方文档示例
| apiVersion: v1 | |
| kind: Pod | |
| metadata: | |
| name: frontend | |
| spec: | |
| containers: | |
| - name: app | |
| image: images.my-company.example/app:v4 | |
| env: | |
| - name: MYSQL_ROOT_PASSWORD | |
| value: "password" | |
| resources: | |
| requests: | |
| memory: "64Mi" | |
| cpu: "250m" | |
| limits: | |
| memory: "128Mi" | |
| cpu: "500m" | |
| - name: log-aggregator | |
| image: images.my-company.example/log-aggregator:v6 | |
| resources: | |
| requests: | |
| memory: "64Mi" | |
| cpu: "250m" | |
| limits: | |
| memory: "128Mi" | |
| cpu: "500m" |
此例子中 Pod 有两个 Container。每个 Container 的请求为 0.25 cpu 和 64MiB(226 字节)内存, 每个容器的资源约束为 0.5 cpu 和 128MiB 内存。 你可以认为该 Pod 的资源请求为 0.5 cpu 和 128 MiB 内存,资源限制为 1 cpu 和 256MiB 内存。
9. 资源限制实操
9.1 编写yaml资源配置清单
| [root@master ~]# mkdir /opt/test | |
| [root@master ~]# cd !$ | |
| cd /opt/test | |
| [root@master test]# vim test1.yaml | |
| apiVersion: v1 | |
| kind: Pod | |
| metadata: | |
| name: test1 | |
| spec: | |
| containers: | |
| - name: web | |
| image: nginx | |
| env: | |
| - name: WEB_ROOT_PASSWORD | |
| value: "password" | |
| resources: | |
| requests: | |
| memory: "64Mi" | |
| cpu: "250m" | |
| limits: | |
| memory: "128Mi" | |
| cpu: "500m" | |
| - name: db | |
| image: mysql | |
| env: | |
| - name: MYSQL_ROOT_PASSWORD | |
| value: "password" | |
| resources: | |
| requests: | |
| memory: "64Mi" | |
| cpu: "250m" | |
| limits: | |
| memory: "128Mi" | |
| cpu: "500m" |
9.2 释放内存(node节点,以node01为例)
由于mysql对于内存的使用要求比较高,因此需要先检查内存的可用空间是否能够满足mysql的正常运行,若剩余内存不够,可对其进行释放操作。
9.2.1 查看内存
free -mH
| [root@node01 ~]# free -mh | |
| total used free shared buff/cache available | |
| Mem: 1.9G 1.0G 86M 26M 870M 663M | |
| Swap: 0B 0B 0B |
内存总量为1.9G,实际使用1G,因此可有内存应该为0.9G左右。
但是由于有870M的内存被用于缓存,导致了free仅为86M。
86M剩余可用内存显然是不够用的,因此需要释放缓存。
9.2.2 手动释放缓存
echo [1\2\3] > /proc/sys/vm/drop_caches
| [root@node01 ~]# cat /proc/sys/vm/drop_caches | |
| 0 | |
| [root@node01 ~]# echo 3 > /proc/sys/vm/drop_caches | |
| [root@node01 ~]# free -mh | |
| total used free shared buff/cache available | |
| Mem: 1.9G 968M 770M 26M 245M 754M | |
| Swap: 0B 0B 0B |
0:0是系统默认值,默认情况下表示不释放内存,由操作系统自动管理
1:释放页缓存
2:释放dentries和inodes
3:释放所有缓存
注意:
如果因为是应用有像内存泄露、溢出的问题,从swap的使用情况是可以比较快速可以判断的,但free上面反而比较难查看。相反,如果在这个时候,我们告诉用户,修改系统的一个值,“可以”释放内存,free就大了。用户会怎么想?不会觉得操作系统“有问题”吗?所以说,既然核心是可以快速清空buffer或cache,也不难做到(这从上面的操作中可以明显看到),但核心并没有这样做(默认值是0),我们就不应该随便去改变它。
一般情况下,应用在系统上稳定运行了,free值也会保持在一个稳定值的,虽然看上去可能比较小。当发生内存不足、应用获取不到可用内存、OOM错误等问题时,还是更应该去分析应用方面的原因,如用户量太大导致内存不足、发生应用内存溢出等情况,否则,清空buffer,强制腾出free的大小,可能只是把问题给暂时屏蔽了。
9.3 创建资源
kubectl apply -f tets1.yaml
| [root@master test]# kubectl apply -f test1.yaml | |
| pod/test1 created |
9.4 跟踪查看pod状态
kubectl get pod -o wide -w
| [root@master test]# kubectl get pod -o wide -w | |
| NAME READY STATUS RESTARTS AGE IP NODE NOMINATED NODE READINESS GATES | |
| test1 0/2 ContainerCreating 0 4s <none> node01 <none> <none> | |
| test1 2/2 Running 0 18s 10.244.1.55 node01 <none> <none> | |
| test1 1/2 OOMKilled 0 21s 10.244.1.55 node01 <none> <none> | |
| test1 2/2 Running 1 37s 10.244.1.55 node01 <none> <none> | |
| test1 1/2 OOMKilled 1 40s 10.244.1.55 node01 <none> <none> | |
| ...... |
OOM(OverOfMemory)表示服务的运行超过了我们所设定的约束值。
Ready:2/2,status:Running说明该pod已成功创建并运行,但运行过程中发生OOM问题被kubelet杀死并重新拉起新的pod。
9.5 查看容器日志
kubectl logs test1 -c web
| [root@master test]# kubectl logs test1 -c web | |
| /docker-entrypoint.sh: /docker-entrypoint.d/ is not empty, will attempt to perform configuration | |
| /docker-entrypoint.sh: Looking for shell scripts in /docker-entrypoint.d/ | |
| /docker-entrypoint.sh: Launching /docker-entrypoint.d/10-listen-on-ipv6-by-default.sh | |
| 10-listen-on-ipv6-by-default.sh: info: Getting the checksum of /etc/nginx/conf.d/default.conf | |
| 10-listen-on-ipv6-by-default.sh: info: Enabled listen on IPv6 in /etc/nginx/conf.d/default.conf | |
| /docker-entrypoint.sh: Launching /docker-entrypoint.d/20-envsubst-on-templates.sh | |
| /docker-entrypoint.sh: Launching /docker-entrypoint.d/30-tune-worker-processes.sh | |
| /docker-entrypoint.sh: Configuration complete; ready for start up | |
| 2021/11/06 08:31:23 [notice] 1#1: using the "epoll" event method | |
| 2021/11/06 08:31:23 [notice] 1#1: nginx/1.21.3 | |
| 2021/11/06 08:31:23 [notice] 1#1: built by gcc 8.3.0 (Debian 8.3.0-6) | |
| 2021/11/06 08:31:23 [notice] 1#1: OS: Linux 3.10.0-693.el7.x86_64 | |
| 2021/11/06 08:31:23 [notice] 1#1: getrlimit(RLIMIT_NOFILE): 1048576:1048576 | |
| 2021/11/06 08:31:23 [notice] 1#1: start worker processes | |
| 2021/11/06 08:31:23 [notice] 1#1: start worker process 31 | |
| 2021/11/06 08:31:23 [notice] 1#1: start worker process 32 |
nginx启动正常,接下来查看mysql日志
kubectl logs test1 -c mysql
| [root@master test]# kubectl logs test1 -c db | |
| 2021-11-06 08:38:44+00:00 [Note] [Entrypoint]: Entrypoint script for MySQL Server 8.0.27-1debian10 started. | |
| 2021-11-06 08:38:44+00:00 [Note] [Entrypoint]: Switching to dedicated user 'mysql' | |
| 2021-11-06 08:38:44+00:00 [Note] [Entrypoint]: Entrypoint script for MySQL Server 8.0.27-1debian10 started. | |
| 2021-11-06 08:38:44+00:00 [Note] [Entrypoint]: Initializing database files | |
| 2021-11-06T08:38:44.274783Z 0 [System] [MY-013169] [Server] /usr/sbin/mysqld (mysqld 8.0.27) initializing of server in progress as process 41 | |
| 2021-11-06T08:38:44.279965Z 1 [System] [MY-013576] [InnoDB] InnoDB initialization has started. | |
| 2021-11-06T08:38:44.711420Z 1 [System] [MY-013577] [InnoDB] InnoDB initialization has ended. | |
| 2021-11-06T08:38:45.777355Z 0 [Warning] [MY-013746] [Server] A deprecated TLS version TLSv1 is enabled for channel mysql_main | |
| 2021-11-06T08:38:45.777389Z 0 [Warning] [MY-013746] [Server] A deprecated TLS version TLSv1.1 is enabled for channel mysql_main | |
| 2021-11-06T08:38:45.898121Z 6 [Warning] [MY-010453] [Server] root@localhost is created with an empty password ! Please consider switching off the --initialize-insecure option. | |
| /usr/local/bin/docker-entrypoint.sh: line 191: 41 Killed "$@" --initialize-insecure --default-time-zone=SYSTEM |
锁定问题容器为mysql
9.6 删除pod
kubectl delete -f test1
| [root@master test]# kubectl delete -f test1.yaml | |
| pod "test1" deleted |
9.7 修改yaml配置资源清单,提高mysql资源限制
| [root@master test]# vim test1.yaml | |
| apiVersion: v1 | |
| kind: Pod | |
| metadata: | |
| name: test1 | |
| spec: | |
| containers: | |
| - name: web | |
| image: nginx | |
| env: | |
| - name: WEB_ROOT_PASSWORD | |
| value: "password" | |
| resources: | |
| requests: | |
| memory: "64Mi" | |
| cpu: "250m" | |
| limits: | |
| memory: "128Mi" | |
| cpu: "500m" | |
| - name: db | |
| image: mysql | |
| env: | |
| - name: MYSQL_ROOT_PASSWORD | |
| value: "password" | |
| resources: | |
| requests: | |
| memory: "512Mi" | |
| cpu: "0.5" | |
| limits: | |
| memory: "1024Mi" | |
| cpu: "1" |
9.8 再次创建资源
kubectl apply -f test1.yaml
| [root@master test]# kubectl apply -f test1.yaml | |
| pod/test1 created |
9.9 跟踪查看pod状态
kubectl get pod -o wide -w
| [root@master test]# kubectl get pod -o wide -w | |
| NAME READY STATUS RESTARTS AGE IP NODE NOMINATED NODE READINESS GATES | |
| test1 0/2 ContainerCreating 0 12s <none> node01 <none> <none> | |
| test1 2/2 Running 0 18s 10.244.1.56 node01 <none> <none> |
9.10 查看pod详细信息
kubectl describe pod test1
| [root@master test]# kubectl describe pod test1 | |
| ...... | |
| Containers: | |
| web: | |
| Container ID: docker://caf5bef54f878ebba32728b5e43743e36bbdf1457973f3ca130c98de5e1803d3 | |
| Image: nginx | |
| ...... | |
| #nginx资源限制 | |
| Limits: | |
| cpu: 500m | |
| memory: 128Mi | |
| Requests: | |
| cpu: 250m | |
| memory: 64Mi | |
| #nginx环境变量 | |
| Environment: | |
| WEB_ROOT_PASSWORD: password | |
| Mounts: | |
| /var/run/secrets/kubernetes.io/serviceaccount from default-token-7lsdx (ro) | |
| db: | |
| Container ID: docker://2574f2bd02d9d7fc5bb0d2b74582b0bece3d8bd37d1d7ff3148ae8109df49367 | |
| Image: mysql | |
| ...... | |
| #mysql资源限制 | |
| Limits: | |
| cpu: 1 | |
| memory: 1Gi | |
| Requests: | |
| cpu: 500m | |
| memory: 512Mi | |
| #mysql环境变量 | |
| Environment: | |
| MYSQL_ROOT_PASSWORD: password | |
| Mounts: | |
| /var/run/secrets/kubernetes.io/serviceaccount from default-token-7lsdx (ro) | |
| ...... | |
| #pod创建过程/事件记录 | |
| Events: | |
| Type Reason Age From Message | |
| ---- ------ ---- ---- ------- | |
| Normal Scheduled 105s default-scheduler Successfully assigned default/test1 to node01 | |
| Normal Pulling 104s kubelet, node01 Pulling image "nginx" | |
| Normal Pulled 103s kubelet, node01 Successfully pulled image "nginx" | |
| Normal Created 103s kubelet, node01 Created container web | |
| Normal Started 103s kubelet, node01 Started container web | |
| Normal Pulling 103s kubelet, node01 Pulling image "mysql" | |
| Normal Pulled 88s kubelet, node01 Successfully pulled image "mysql" | |
| Normal Created 88s kubelet, node01 Created container db | |
| Normal Started 88s kubelet, node01 Started container db |
9.11 查看node资源使用
| [root@master test]# kubectl describe node node01 | |
| ...... | |
| Namespace Name CPU Requests CPU Limits Memory Requests Memory Limits AGE | |
| --------- ---- ------------ ---------- --------------- ------------- --- | |
| default test1 750m (37%) 1500m (75%) 576Mi (30%) 1152Mi (61%) 10m | |
| kube-system coredns-bccdc95cf-qrlbp 100m (5%) 0 (0%) 70Mi (3%) 170Mi (9%) 4d21h | |
| kube-system kube-flannel-ds-amd64-6927f 100m (5%) 100m (5%) 50Mi (2%) 50Mi (2%) 4d21h | |
| kube-system kube-proxy-hjqfc 0 (0%) 0 (0%) 0 (0%) 0 (0%) 4d21h | |
| Allocated resources: | |
| (Total limits may be over 100 percent, i.e., overcommitted.) | |
| Resource Requests Limits | |
| -------- -------- ------ | |
| cpu 950m (47%) 1600m (80%) | |
| memory 696Mi (36%) 1372Mi (72%) | |
| ephemeral-storage 0 (0%) 0 (0%) | |
| Events: <none> |
node01的配置为2C2G。
CPU Requests分析:
nginx的requests为250m,mysql的requests为500m,因此node01的CPU Requests为750m,在node01的两个核中使用占比为37%。
CPU Limits分析:
nginx到的limit为500m,mysql的limit为1,因此node01到的CPU Limits为1500m,在node01的两个核中使用占比为75%。
Memory Requests分析:
nginx的requests为64Mi,mysql的requests为512Mi,因此node01的内存Requests为576Mi,在node01的2G内存中使用占比为30%。
Memory Limits分析:
nginx的limits为128Mi,mysql的limit为1Gi,因此node01的1152Mi,在node01的2G内存中使用占比为61%。
二、健康检查
1. 健康检查的定义
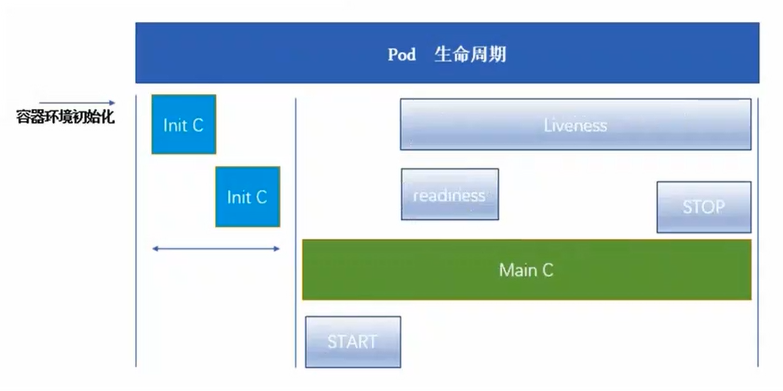
健康检查又称为探针(Probe),是由kubelet对容器执行的定期诊断。
2. 探针的三种规则
2.1 livenessProbe存活探针
判断容器是否正在运行。如果探测失败,则kubelet会杀死容器,并且容器将根据restartPolicy来设置Pod状态,如果容器不提供存活探针,则默认状态为Success。
2.2 readinessProbe就绪探针
判断容器是否准备好接受请求。如果探测失败,端点控制器将从与Pod匹配的所有service endpoints中剔除删除该Pod的IP地址。初始延迟之前的就绪状态默认为Failure。如果容器不提供就绪探针,则默认状态为Success。
2.3 startupProbe启动探针(1.17版本新增)
判断容器内的应用程序是否已启动,主要针对于不能确定具体启动时间的应用。如果匹配了startupProbe探测,则在startupProbe状态为Success之前,其他所有探针都处于无效状态,直到它成功后其他探针才起作用。如果startupProbe失败,kubelet将杀死容器,容器将根据restartPolicy来重启。如果容器没有配置startupProbe,则默认状态为Success。
2.4 同时定义
以上三种规则可同时定义。在readinessProbe检测成功之前,Pod的running状态是不会变成reasy状态的。
3. Probe支持的三种检测方法
3.1 exec
在容器内执行执行命令,如果容器退出时返回码为0则认为诊断成功。
3.2 tcpSocket
对指定端口上的容器的IP地址进行TCP检查(三次握手)。如果端口打开,则诊断被认为是成功的。
3.3 httpGet
对指定的端口和路径上的容器的IP地址执行httpGet请求。如果响应的状态码大于等于200且小于400(2xx和3xx),则诊断被认为是成功的。
4. 探测结果
每次探测都将获得以下三种结果之一:
● 成功:容器通过了诊断
● 失败:容器未通过诊断
● 未知:诊断失败,因此不会采取任何行动
5. 官方文档
6. exec方式
6.1 官方示例1
| apiVersion: v1 | |
| kind: Pod | |
| metadata: | |
| labels: | |
| test: liveness | |
| name: liveness-exec | |
| spec: | |
| containers: | |
| - name: liveness | |
| image: k8s.gcr.io/busybox | |
| args: | |
| - /bin/sh | |
| - -c | |
| - touch /tmp/healthy; sleep 30; rm -rf /tmp/healthy; sleep 600 | |
| livenessProbe: | |
| exec: | |
| command: | |
| - cat | |
| - /tmp/healthy | |
| initialDelaySeconds: 5 | |
| periodSeconds: 5 |
initalDeploySeconds:指定kubelet在执行第一次探测前应该等待5秒,即第一次探测是在容器启动后的第6秒才开始执行。默认是0秒,最小值是0。
periodSeconds:指定了kubelet应该每5秒执行一次存活探测。默认是10秒,最小值是1
补充:
failureThreshold:当探测失败时,Kubernetes将在放弃之前重试的次数。存活探测情况下的放弃就意味着重新启动容器,就绪探测情况下的放弃Pod会被打上未就绪的标签。默认值是3,最小值是1。
timeoutSeconds:探测的超时后等待多少秒。默认值是1秒,最小值是1。(在Kubernetes 1.20版本之前,exec探针会忽略timeoutSeconds,探针会无限期地持续运行,甚至可能超过所配置的限期,直到返回结果为止。)
在这个配置文件中,可以看到 Pod 中只有一个容器。 periodSeconds 字段指定了 kubelet 应该每 5 秒执行一次存活探测。 initialDelaySeconds 字段告诉 kubelet 在执行第一次探测前应该等待 5 秒。 kubelet 在容器内执行命令 cat /tmp/healthy 来进行探测。 如果命令执行成功并且返回值为 0,kubelet 就会认为这个容器是健康存活的。 如果这个命令返回非 0 值,kubelet 会杀死这个容器并重新启动它。
6.2 编写yaml资源配置清单
| [root@master test]# vim exec.yaml | |
| apiVersion: v1 | |
| kind: Pod | |
| metadata: | |
| name: liveness-exec | |
| namespace: default | |
| spec: | |
| containers: | |
| - name: liveness-exec-container | |
| image: busybox | |
| imagePullPolicy: IfNotPresent | |
| command: ["/bin/sh","-c","touch /tmp/live; sleep 30; rm -rf /tmp/live; sleep 3600"] | |
| livenessProbe: | |
| exec: | |
| command: ["test","-e","/tmp/live"] | |
| initialDelaySeconds: 1 | |
| periodSeconds: 3 |
在这个配置文件中,可以看到Pod只有一个容器。
容器中的command字段表示创建一个/tmp/live文件后休眠30秒,休眠结束后删除该文件,并休眠10分钟。
仅使用livenessProbe存活探针,并使用exec检查方式,对/tmp/live文件进行存活检测。
initialDelaySeconds字段表示kubelet在执行第一次探测前应该等待1秒。
periodSeconds字段表示kubelet每隔3秒执行一次存活探测。
6.3 创建资源
kubectl create -f exec.yaml
| [root@master test]# kubectl create -f exec.yaml | |
| pod/liveness-exec created |
6.4 跟踪查看pod状态
kubectl get pod -o wide -w
| [root@master ~]# kubectl get pod -o wide -w | |
| liveness-exec 0/1 Pending 0 0s <none> <none> <none> <none> | |
| liveness-exec 0/1 Pending 0 0s <none> node01 <none> <none> | |
| liveness-exec 0/1 ContainerCreating 0 0s <none> node01 <none> <none> | |
| liveness-exec 1/1 Running 0 2s 10.244.1.62 node01 <none> <none> | |
| liveness-exec 1/1 Running 1 68s 10.244.1.62 node01 <none> <none> |
发现68秒时容器重启
6.5 查看pod事件描述
kubectl describe pod liveness-exec
| [root@master test]# kubectl describe pod liveness-exec | |
| ...... | |
| Events: | |
| Type Reason Age From Message | |
| ---- ------ ---- ---- ------- | |
| Normal Scheduled 67s default-scheduler Successfully assigned default/liveness-exec to node01 | |
| Normal Started 66s kubelet, node01 Started container liveness-exec-container | |
| Warning Unhealthy 30s (x3 over 36s) kubelet, node01 Liveness probe failed: | |
| Normal Killing 30s kubelet, node01 Container liveness-exec-container failed liveness probe, will be restarted | |
| Normal Pulled 0s (x2 over 67s) kubelet, node01 Container image "busybox" already present on machine | |
| Normal Created 0s (x2 over 67s) kubelet, node01 Created container liveness-exec-container |
在容器启动37秒时,健康检查三次失败(倒推第一次检查在31秒),kubelet启动了killing程序并在67秒时拉取镜像创建新的容器,在68秒时完成第一次容器重启
7. httpGet方式
7.1 官网示例2
| apiVersion: v1 | |
| kind: Pod | |
| metadata: | |
| labels: | |
| test: liveness | |
| name: liveness-http | |
| spec: | |
| containers: | |
| - name: liveness | |
| image: k8s.gcr.io/liveness | |
| args: | |
| - /server | |
| livenessProbe: | |
| httpGet: | |
| path: /healthz | |
| port: 8080 | |
| httpHeaders: | |
| - name: Custom-Header | |
| value: Awesome | |
| initialDelaySeconds: 3 | |
| periodSeconds: 3 |
在这个配置文件中,可以看到Pod只有一个容器。initialDealySeconds字段告诉kubelet再执行第一次探测前应该等待3秒。preiodSeconds字段指定了kubelet每隔3秒执行一次存活探测。kubelet会向容器内运行的服务(服务会监听8080端口)发送一个认为容器是健康存活的。如果处理程序返回失败代码,则kubelet会杀死这个容器并且重新启动它。
任何大于或等于200并且小于400的返回代码标示成功,其他返回代码都标示失败。
7.2 编写yaml资源配置清单
| [root@master test]# vim httpget.yaml | |
| apiVersion: v1 | |
| kind: Pod | |
| metadata: | |
| name: liveness-httpget | |
| namespace: default | |
| spec: | |
| containers: | |
| - name: liveness-httpget-container | |
| image: nginx | |
| imagePullPolicy: IfNotPresent | |
| ports: | |
| - name: nginx | |
| containerPort: 80 | |
| livenessProbe: | |
| httpGet: | |
| port: nginx | |
| path: /index.html | |
| initialDelaySeconds: 1 | |
| periodSeconds: 3 | |
| timeoutSeconds: 10 |
7.3 创建资源
kubectl create -f httpget.yaml
| [root@master test]# kubectl create -f httpget.yaml | |
| pod/liveness-httpget created |
kubectl get pod
| [root@master test]# kubectl get pod | |
| NAME READY STATUS RESTARTS AGE | |
| liveness-httpget 1/1 Running 0 6s |
7.4 删除Pod的index.html文件
kubectl exec -it liveness-httpget -- rm -rf /usr/share/nginx/html/index.html
[root@master test]# kubectl exec -it liveness-httpget -- rm -rf /usr/share/nginx/html/index.html
7.5 查看pod状态
kubectl get pod -w
| [root@master test]# kubectl get pod -w | |
| NAME READY STATUS RESTARTS AGE | |
| liveness-httpget 1/1 Running 0 5m35s | |
| liveness-httpget 1/1 Running 1 5m37s |
容器发生重启
7.6 查看容器事件
kubectl describe pod liveness-httpget
| [root@master ~]# kubectl describe pod liveness-httpget | |
| ...... | |
| Events: | |
| Type Reason Age From Message | |
| ---- ------ ---- ---- ------- | |
| Normal Scheduled 5m47s default-scheduler Successfully assigned default/liveness-httpget to node01 | |
| Normal Pulled 11s (x2 over 5m46s) kubelet, node01 Container image "nginx" already present on machine | |
| Normal Created 11s (x2 over 5m46s) kubelet, node01 Created container liveness-httpget-container | |
| Normal Started 11s (x2 over 5m46s) kubelet, node01 Started container liveness-httpget-container | |
| Warning Unhealthy 11s (x3 over 17s) kubelet, node01 Liveness probe failed: HTTP probe failed with statuscode: 404 | |
| Normal Killing 11s kubelet, node01 Container liveness-httpget-container failed liveness probe, will be restarted |
重启原因是HTTP探测得到的状态返回码是404,HTTP probe failed with statuscode: 404。
重启完成后,不会再次重启,因为重新拉取的镜像中包含了index.html文件。
8. tcpSocket方式
8.1 官方示例
| apiVersion: v1 | |
| kind: Pod | |
| metadata: | |
| name: goproxy | |
| labels: | |
| app: goproxy | |
| spec: | |
| containers: | |
| - name: goproxy | |
| image: k8s.gcr.io/goproxy:0.1 | |
| ports: | |
| - containerPort: 8080 | |
| readinessProbe: | |
| tcpSocket: | |
| port: 8080 | |
| initialDelaySeconds: 5 | |
| periodSeconds: 10 | |
| livenessProbe: | |
| tcpSocket: | |
| port: 8080 | |
| initialDelaySeconds: 15 | |
| periodSeconds: 20 |
这个例子同时使用readinessProbe和livenessProbe探测。kubelet会在容器启动5秒后发送第一个readiness探测。这会尝试连接goproxy容器的8080端口。如果探测成功,kubelet将继续每隔10秒运行一次检测。除了readinessProbe探测,这个配置包括了一个livenessProbe探测。kubelet会在容器启动15秒后进行第一次livenessProbe探测。就像readinessProbe探测一样,会尝试连接goproxy容器的8080端口。如果livenessProbe探测失败,这个容器会被重新启动。
8.2 编写yaml资源配置清单
| [root@master test]# vim tcpsocket.yaml | |
| apiVersion: v1 | |
| kind: Pod | |
| metadata: | |
| name: liveness-tcpsocket | |
| spec: | |
| containers: | |
| - name: liveness-tcpsocket-container | |
| image: nginx | |
| livenessProbe: | |
| initialDelaySeconds: 5 | |
| timeoutSeconds: 1 | |
| tcpSocket: | |
| port: 8080 | |
| periodSeconds: 3 |
8.3 创建资源
kubectl apply -f tcpsocket.yaml
| [root@master test]# kubectl apply -f tcpsocket.yaml | |
| pod/liveness-tcpsocket created |
8.4 跟踪查看pod状态
kubectl get pod -w
| [root@master test]# kubectl get pod -w | |
| NAME READY STATUS RESTARTS AGE | |
| liveness-tcpsocket 0/1 ContainerCreating 0 6s | |
| liveness-tcpsocket 1/1 Running 0 17s | |
| liveness-tcpsocket 1/1 Running 1 44s | |
| liveness-tcpsocket 1/1 Running 2 71s |
pod异常重启
8.5 查看pod事件
kubectl describe pod liveness-tcpsocket
| [root@master test]# kubectl describe pod liveness-tcpsocket | |
| ...... | |
| Events: | |
| Type Reason Age From Message | |
| ---- ------ ---- ---- ------- | |
| Normal Scheduled 93s default-scheduler Successfully assigned default/liveness-tcpsocket to node01 | |
| Normal Pulled 23s (x3 over 77s) kubelet, node01 Successfully pulled image "nginx" | |
| Normal Created 23s (x3 over 77s) kubelet, node01 Created container liveness-tcpsocket-container | |
| Normal Started 23s (x3 over 77s) kubelet, node01 Started container liveness-tcpsocket-container | |
| Normal Pulling 11s (x4 over 92s) kubelet, node01 Pulling image "nginx" | |
| Warning Unhealthy 11s (x9 over 71s) kubelet, node01 Liveness probe failed: dial tcp 10.244.1.65:8080: connect: connection refused | |
| Normal Killing 11s (x3 over 65s) kubelet, node01 Container liveness-tcpsocket-container failed liveness probe, will be restarted |
重启原因是nginx使用的默认端口为80,8080端口的健康检查被拒绝访问
8.5 删除pod
kubectl delete -f tcpsocket.yaml
8.6 修改tcpSocket端口
| [root@master test]# vim tcpsocket.yaml | |
| apiVersion: v1 | |
| kind: Pod | |
| metadata: | |
| name: liveness-tcpsocket | |
| spec: | |
| containers: | |
| - name: liveness-tcpsocket-container | |
| image: nginx | |
| livenessProbe: | |
| initialDelaySeconds: 5 | |
| timeoutSeconds: 1 | |
| tcpSocket: | |
| #修改端口为80 | |
| port: 80 | |
| periodSeconds: 3 |
8.7 再次创建资源
kubectl apply -f tcpsocket.yaml
| [root@master test]# kubectl apply -f tcpsocket.yaml | |
| pod/liveness-tcpsocket created |
8.8 跟踪查看pod状态
kubectl get pod -o wide -w
| [root@master ~]# kubectl get pod -o wide -w | |
| NAME READY STATUS RESTARTS AGE IP NODE NOMINATED NODE READINESS GATES | |
| liveness-tcpsocket 1/1 Running 0 21s 10.244.1.66 node01 <none> <none> |
启动正常,并未出现重启
8.9 查看pod事件
kubectl describe pod liveness-tcpsocket
| [root@master test]# kubectl describe pod liveness-tcpsocket | |
| ...... | |
| Events: | |
| Type Reason Age From Message | |
| ---- ------ ---- ---- ------- | |
| Normal Scheduled 33s default-scheduler Successfully assigned default/liveness-tcpsocket to node01 | |
| Normal Pulling 32s kubelet, node01 Pulling image "nginx" | |
| Normal Pulled 17s kubelet, node01 Successfully pulled image "nginx" | |
| Normal Created 17s kubelet, node01 Created container liveness-tcpsocket-container | |
| Normal Started 17s kubelet, node01 Started container liveness-tcpsocket-container |
启动正常
9. readinessProbe就绪探针1
9.1 编写yaml资源配置清单
| [root@master test]# vim readiness-httpget.yaml | |
| apiVersion: v1 | |
| kind: Pod | |
| metadata: | |
| name: readiness-httpget | |
| namespace: default | |
| spec: | |
| containers: | |
| - name: readiness-httpget-container | |
| image: nginx | |
| imagePullPolicy: IfNotPresent | |
| ports: | |
| - name: http | |
| containerPort: 80 | |
| readinessProbe: | |
| httpGet: | |
| port: 80 | |
| #注意,这里设置个错误地址 | |
| path: /index1.html | |
| initialDelaySeconds: 1 | |
| periodSeconds: 3 | |
| livenessProbe: | |
| httpGet: | |
| port: http | |
| path: /index.html | |
| initialDelaySeconds: 1 | |
| periodSeconds: 3 | |
| timeoutSeconds: 10 |
9.2 创建资源
kubectl apply -f readiness-httpget.yaml
| [root@master test]# kubectl apply -f readiness-httpget.yaml | |
| pod/readiness-httpget created |
9.3 查看pod状态
kubectl get pod
| [root@master test]# kubectl get pod | |
| NAME READY STATUS RESTARTS AGE | |
| readiness-httpget 0/1 Running 0 25s |
STATUS为Running,但无法进入READY状态
9.4 查看pod事件
kubectl describe pod readiness-httpget
| [root@master test]# kubectl describe pod readiness-httpget | |
| ...... | |
| Events: | |
| Type Reason Age From Message | |
| ---- ------ ---- ---- ------- | |
| Normal Scheduled 119s default-scheduler Successfully assigned default/readiness-httpget to node01 | |
| Normal Pulled 119s kubelet, node01 Container image "nginx" already present on machine | |
| Normal Created 119s kubelet, node01 Created container readiness-httpget-container | |
| Normal Started 119s kubelet, node01 Started container readiness-httpget-container | |
| Warning Unhealthy 54s (x22 over 117s) kubelet, node01 Readiness probe failed: HTTP probe failed with statuscode: 404 |
异常原因为readinessProbe检测的状态返回值为404,kubelet阻止pod进入READY状态
9.5 查看日志
kubectl logs readiness-httpget
| [root@master test]# kubectl logs readiness-httpget | |
| ...... | |
| 2021/11/07 16:40:41 [error] 32#32: *164 open() "/usr/share/nginx/html/index1.html" failed (2: No such file or directory), client: 10.244.1.1, server: localhost, request: "GET /index1.html HTTP/1.1", host: "10.244.1.68:80" | |
| 10.244.1.1 - - [07/Nov/2021:16:40:41 +0000] "GET /index1.html HTTP/1.1" 404 153 "-" "kube-probe/1.15" "-" | |
| 10.244.1.1 - - [07/Nov/2021:16:40:43 +0000] "GET /index.html HTTP/1.1" 200 615 "-" "kube-probe/1.15" "-" |
9.6 为容器创建index1.html
kubectl exec -it readiness-httpget -- touch /usr/share/nginx/html/index1.html
[root@master test]# kubectl exec -it readiness-httpget -- touch /usr/share/nginx/html/index1.html
9.7 查看容器状态
kubectl get pod
| [root@master test]# kubectl get pod | |
| NAME READY STATUS RESTARTS AGE | |
| readiness-httpget 1/1 Running 0 15m |
10. readinessProbe就绪探针2
10.1 编写yaml资源配置清单
| [root@master test]# cat readiness-multi-nginx.yaml | |
| apiVersion: v1 | |
| kind: Pod | |
| metadata: | |
| name: nginx1 | |
| labels: | |
| app: nginx | |
| spec: | |
| containers: | |
| - name: nginx | |
| image: nginx | |
| imagePullPolicy: IfNotPresent | |
| ports: | |
| - name: http | |
| containerPort: 80 | |
| readinessProbe: | |
| httpGet: | |
| port: http | |
| path: /index.html | |
| initialDelaySeconds: 5 | |
| periodSeconds: 5 | |
| timeoutSeconds: 10 | |
| --- | |
| apiVersion: v1 | |
| kind: Pod | |
| metadata: | |
| name: nginx2 | |
| labels: | |
| app: nginx | |
| spec: | |
| containers: | |
| - name: nginx | |
| image: nginx | |
| imagePullPolicy: IfNotPresent | |
| ports: | |
| - name: http | |
| containerPort: 80 | |
| readinessProbe: | |
| httpGet: | |
| port: http | |
| path: /index.html | |
| initialDelaySeconds: 5 | |
| periodSeconds: 5 | |
| timeoutSeconds: 10 | |
| --- | |
| apiVersion: v1 | |
| kind: Pod | |
| metadata: | |
| name: nginx3 | |
| labels: | |
| app: nginx | |
| spec: | |
| containers: | |
| - name: nginx | |
| image: nginx | |
| imagePullPolicy: IfNotPresent | |
| ports: | |
| - name: http | |
| containerPort: 80 | |
| readinessProbe: | |
| httpGet: | |
| port: http | |
| path: /index.html | |
| initialDelaySeconds: 5 | |
| periodSeconds: 5 | |
| timeoutSeconds: 10 | |
| --- | |
| apiVersion: v1 | |
| kind: Service | |
| metadata: | |
| name: nginx-svc | |
| spec: | |
| #service通过selector绑定到nginx集群中 | |
| selector: | |
| app: nginx | |
| type: ClusterIP | |
| ports: | |
| - name: http | |
| port: 80 | |
| targetPort: 80 |
10.2 创建资源
kubectl apply -f readiness-multi-nginx.yaml
| [root@master test]# kubectl apply -f readiness-multi-nginx.yaml | |
| pod/nginx1 created | |
| pod/nginx2 created | |
| pod/nginx3 created | |
| service/nginx-svc created |
10.3 查看pod,service状态
kubectl get pod,svc -o wide
| [root@master test]# kubectl get pod,svc -o wide | |
| NAME READY STATUS RESTARTS AGE IP NODE NOMINATED NODE READINESS GATES | |
| pod/nginx1 1/1 Running 0 22s 10.244.1.69 node01 <none> <none> | |
| pod/nginx2 1/1 Running 0 22s 10.244.2.31 node02 <none> <none> | |
| pod/nginx3 1/1 Running 0 22s 10.244.1.70 node01 <none> <none> | |
| NAME TYPE CLUSTER-IP EXTERNAL-IP PORT(S) AGE SELECTOR | |
| service/kubernetes ClusterIP 10.1.0.1 <none> 443/TCP 3d3h <none> | |
| service/nginx-svc ClusterIP 10.1.177.18 <none> 80/TCP 22s app=nginx |
运行成功
10.4 删除nginx1中的index.html
kubectl exec -it nginx1 -- rm -rf /usr/share/nginx/html/index.html
[root@master test]# kubectl exec -it nginx1 -- rm -rf /usr/share/nginx/html/index.html
10.5 查看pod状态
kubectl get pod -o wide -w
| [root@master test]# kubectl get pod -o wide -w | |
| NAME READY STATUS RESTARTS AGE IP NODE NOMINATED NODE READINESS GATES | |
| nginx1 1/1 Running 0 3m41s 10.244.1.69 node01 <none> <none> | |
| nginx2 1/1 Running 0 3m41s 10.244.2.31 node02 <none> <none> | |
| nginx3 1/1 Running 0 3m41s 10.244.1.70 node01 <none> <none> | |
| nginx1 0/1 Running 0 3m43s 10.244.1.69 node01 <none> <none> |
nginx1的READY状态变为0/1
10.6 查看pod事件
kubectl describe pod nginx1
| [root@master test]# kubectl describe pod nginx1 | |
| ...... | |
| Events: | |
| Type Reason Age From Message | |
| ---- ------ ---- ---- ------- | |
| Normal Scheduled 4m13s default-scheduler Successfully assigned default/nginx1 to node01 | |
| Normal Pulled 4m12s kubelet, node01 Container image "nginx" already present on machine | |
| Normal Created 4m12s kubelet, node01 Created container nginx | |
| Normal Started 4m12s kubelet, node01 Started container nginx | |
| Warning Unhealthy 0s (x9 over 40s) kubelet, node01 Readiness probe failed: HTTP probe failed with statuscode: 404 |
由于httpGet检测到的状态返回码为404,所以readinessProbe失败,kubelet将其设定为noready状态。
10.7 查看service详情
kubectl describe svc nginx-svc
| [root@master test]# kubectl describe svc nginx-svc | |
| Name: nginx-svc | |
| Namespace: default | |
| Labels: <none> | |
| Annotations: kubectl.kubernetes.io/last-applied-configuration: | |
| {"apiVersion":"v1","kind":"Service","metadata":{"annotations":{},"name":"nginx-svc","namespace":"default"},"spec":{"ports":[{"name":"http"... | |
| Selector: app=nginx | |
| Type: ClusterIP | |
| IP: 10.1.177.18 | |
| Port: http 80/TCP | |
| TargetPort: 80/TCP | |
| Endpoints: 10.244.1.70:80,10.244.2.31:80 | |
| Session Affinity: None | |
| Events: <none> |
nginx1被剔除出了service的终端列表
10.8 查看终端
kubectl get endpoints
| [root@master test]# kubectl get endpoints | |
| NAME ENDPOINTS AGE | |
| kubernetes 192.168.122.10:6443 3d3h | |
| nginx-svc 10.244.1.70:80,10.244.2.31:80 9m34s |
终端中无nginx1
三、总结
1. 探针
探针分为3种
- livenessProbe(存活探针)∶判断容器是否正常运行,如果失败则杀掉容器(不是pod),再根据重启策略是否重启容器
- readinessProbe(就绪探针)∶判断容器是否能够进入ready状态,探针失败则进入noready状态,并从service的endpoints中剔除此容器
- startupProbe∶判断容器内的应用是否启动成功,在success状态前,其它探针都处于无效状态
2. 检查方式
检查方式分为3种
- exec∶使用 command 字段设置命令,在容器中执行此命令,如果命令返回状态码为0,则认为探测成功
- httpget∶通过访问指定端口和url路径执行http get访问。如果返回的http状态码为大于等于200且小于400则认为成功
- tcpsocket∶通过tcp连接pod(IP)和指定端口,如果端口无误且tcp连接成功,则认为探测成功
3. 常用的探针可选参数
常用的探针可选参数有4个
- initialDelaySeconds∶ 容器启动多少秒后开始执行探测
- periodSeconds∶探测的周期频率,每多少秒执行一次探测
- failureThreshold∶探测失败后,允许再试几次
- timeoutSeconds ∶ 探测等待超时的时间
k8s之资源限制以及探针检查的更多相关文章
- k8s控制器资源(五)
Pod pod在之前说过,pod是kubernetes集群中是最小的调度单元,pod中可以运行多个容器,而node又可以包含多个pod,关系如下图: 在对pod的用法进行说明之前,有必要先对docke ...
- K8s容器资源限制
在K8s中定义Pod中运行容器有两个维度的限制: 1. 资源需求:即运行Pod的节点必须满足运行Pod的最基本需求才能运行Pod. 如: Pod运行至少需要2G内存,1核CPU 2. 资源限额: ...
- 8.深入k8s:资源控制Qos和eviction及其源码分析
转载请声明出处哦~,本篇文章发布于luozhiyun的博客:https://www.luozhiyun.com,源码版本是1.19 又是一个周末,可以愉快的坐下来静静的品味一段源码,这一篇涉及到资源的 ...
- Kubernetes K8S之资源控制器Job和CronJob详解
Kubernetes的资源控制器Job和CronJob详解与示例 主机配置规划 服务器名称(hostname) 系统版本 配置 内网IP 外网IP(模拟) k8s-master CentOS7.7 2 ...
- k8s控制器资源
k8s控制器资源 Pod pod在之前说过,pod是kubernetes集群中是最小的调度单元,pod中可以运行多个容器,而node又可以包含多个pod,关系如下图: 在对pod的用法进行说明之前 ...
- Kubernetes K8S之资源控制器StatefulSets详解
Kubernetes的资源控制器StatefulSet详解与示例 主机配置规划 服务器名称(hostname) 系统版本 配置 内网IP 外网IP(模拟) k8s-master CentOS7.7 2 ...
- Kubernetes K8S之资源控制器Daemonset详解
Kubernetes的资源控制器Daemonset详解与示例 主机配置规划 服务器名称(hostname) 系统版本 配置 内网IP 外网IP(模拟) k8s-master CentOS7.7 2C/ ...
- k8s核心资源之Pod概念&入门使用讲解(三)
目录 1. k8s核心资源之Pod 1.1 什么是Pod? 1.2 Pod如何管理多个容器? 1.3 Pod网络 1.4 Pod存储 1.5 Pod工作方式 1.5.1 自主式Pod 1.5.2 控制 ...
- 005.kubernets之pods的资源限制和健康检查
一 POD的容器资源限制 1.1 限制内容 有两个参数 QoS Class: BestEffort,表示尽可能的满足使用,级别较低,但当资源不够时,会杀掉这个容器 resources: {}这里指定为 ...
随机推荐
- 很漂亮的一个背景控件——ribbons.js
写博客的人都喜欢优化自己的博客主页,博主也一样,找了一些背景控件,像canvas-nest.js等等,最终选择了ribbons.js,并基于源码,稍作了一丁点的修改,这里分享出来 (function ...
- Inside Java Newscast #1 深度解读
本文是 Inside Java Newscast #1 的个人体验与解读.视频地址:点击这里 ⎯⎯⎯⎯⎯⎯ Chapters ⎯⎯⎯⎯⎯⎯ 0:00 - Intro 0:57 - Java 16 – ...
- java 使用 ArrayList 排序【包括数字和字符串】
1.数字排序 /** * 数字排序 */ @Test public void t2() { List<Integer> list = new ArrayList<>(); li ...
- springboot插件打包跳过单元测试
只需在pom.xml添加如下即可 <skipTests>true</skipTests> pom文件如下 <?xml version="1.0" en ...
- 新增访客数量MR统计之MR数据输出到MySQL
关注公众号:分享电脑学习回复"百度云盘" 可以免费获取所有学习文档的代码(不定期更新)云盘目录说明:tools目录是安装包res 目录是每一个课件对应的代码和资源等doc 目录是一 ...
- Servlet简单实现开发部署过程
注:图片如果损坏,点击文章链接:https://www.toutiao.com/i6512008683445027331/ 主要是从下面三个步骤实现我们的预期: (1)构建开发环境: (2)开发Ser ...
- 2022 跳槽涨薪必不可少面试通关宝典 —— css 篇
生于忧患死于安乐!已经居家隔离 23 天了,解封以后估计就得找工作了,提前准备起来!需要的赶紧收藏起来 一.谈谈你对 BFC 的理解及作用. BFC 是 Block Formatting Contex ...
- 白嫖党的福音!!!全新的Java300集视频(2022版)来了!
它来了它来了,经过一年时间的沉淀, [尚学堂]高淇Java300集完整版正式发布啦! 应广大网友和尚学堂忠实的孜孜学子以及听众朋友的要求,尚学堂在去年十月份就把预计在2022年发布的Java300集提 ...
- 带你学习Flood Fill算法与最短路模型
一.Flood Fill(连通块问题) 0.简介 Flood Fill(洪水覆盖) 可以在线性的时间复杂内,找到某个点所在的连通块! 注:基于宽搜的思想,深搜也可以做但可能会爆栈 flood fill ...
- 2022年写的香橙派 OrangePi Zero 用python获取dht11温度和湿度
感谢网上资料和个人的不放弃,终于方便的解决了香橙派 OrangePi Zero用python获取dht11温湿度的问题. 网上关于香橙派的资料比起树莓派真是少之又少,现在香橙派zero能干的活暂时也只 ...