linux+nginx+tomcat负载均衡,实现session同步
第一部分:nginx反向代理tomcat
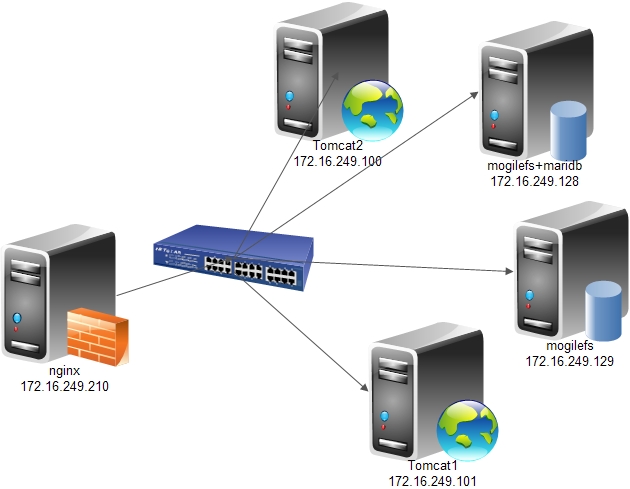
一、软件及环境
软件
| 系统 | 角色 | 用途 | 安装的软件 | ip地址 |
| Centos6.5x86_64 | nginx | 反向代理用户请求 | nginx | 172.16.249.210 |
| Centos6.5x86_64 | tomcat1 | 处理jsp请求 | jdk+tomcat | 172.16.249.101 |
| Centos6.5x86_64 | tomcat2 | 172.16.249.100 | ||
| Centos6.5x86_64 | mog(ilefs/store) | 分布式存储静态数据 | mogilefs | 172.16.249.129 |
| Centos6.5x86_64 | mog(ilefs/store)+mariadb | 172.16.249.128 |
拓扑图
二、实现过程
1、nginx安装
配置文件如下:
|
1
2
3
4
5
6
7
8
9
10
11
12
13
14
15
16
17
18
19
20
21
22
23
24
25
26
27
28
29
30
31
32
33
34
35
36
37
38
39
40
41
42
43
44
45
46
47
48
49
50
51
52
53
54
55
56
57
58
59
60
61
62
63
64
65
66
67
68
|
#user nobody;worker_processes 1;#error_log logs/error.log;#error_log logs/error.log notice;#error_log logs/error.log info;#pid logs/nginx.pid;events { worker_connections 1024;}http { include mime.types; default_type application/octet-stream; #log_format main '$remote_addr - $remote_user [$time_local] "$request" ' # '$status $body_bytes_sent "$http_referer" ' # '"$http_user_agent" "$http_x_forwarded_for"'; #access_log logs/access.log main; sendfile on; #tcp_nopush on; #keepalive_timeout 0; keepalive_timeout 65; #gzip on;upstream mogfs_cluster { server 172.16.249.128:7001; server 172.16.249.129:7001; }upstream jsp_server { server 172.16.249.100:8080; server 172.16.249.101:8080;} server { listen 80; # server_name localhost; # location / { # root html; # index index.html index.htm; # } location ~* ^(/images/.*)$ { mogilefs_tracker mogfs_cluster; mogilefs_domain images; mogilefs_noverify on; mogilefs_pass $1 { proxy_pass $mogilefs_path; proxy_hide_header Content-Type; proxy_buffering off;}} location ~* ^(/text/.*)$ { mogilefs_tracker mogfs_cluster; mogilefs_domain text; mogilefs_noverify on; mogilefs_pass $1 { proxy_pass $mogilefs_path; proxy_hide_header Content-Type; proxy_buffering off;}} location ~* (\.jsp|do)$ { proxy_pass http://jsp_server; } error_page 500 502 503 504 /50x.html; location = /50x.html { root html; } }} |
tomcat1配置文件如下(server.xml)
|
1
2
3
4
5
6
7
8
9
10
11
12
13
14
15
16
17
18
19
20
21
22
23
24
25
26
27
28
29
30
31
32
33
34
35
36
37
38
39
40
41
42
43
44
45
46
47
48
49
50
51
52
53
54
55
56
57
58
59
60
61
62
63
64
65
66
67
68
69
70
71
72
73
74
75
76
77
78
79
80
81
82
83
84
85
86
87
88
89
90
91
92
93
94
95
96
97
98
99
100
101
102
103
104
105
106
107
108
109
110
111
112
113
114
115
116
117
118
119
120
121
122
123
124
125
126
127
128
129
130
131
132
|
<?xml version='1.0' encoding='utf-8'?><!-- Licensed to the Apache Software Foundation (ASF) under one or more contributor license agreements. See the NOTICE file distributed with this work for additional information regarding copyright ownership. The ASF licenses this file to You under the Apache License, Version 2.0 (the "License"); you may not use this file except in compliance with the License. You may obtain a copy of the License at http://www.apache.org/licenses/LICENSE-2.0 Unless required by applicable law or agreed to in writing, software distributed under the License is distributed on an "AS IS" BASIS, WITHOUT WARRANTIES OR CONDITIONS OF ANY KIND, either express or implied. See the License for the specific language governing permissions and limitations under the License.--><!-- Note: A "Server" is not itself a "Container", so you may not define subcomponents such as "Valves" at this level. Documentation at /docs/config/server.html --><Server port="8005" shutdown="SHUTDOWN"> <!-- Security listener. Documentation at /docs/config/listeners.html <Listener className="org.apache.catalina.security.SecurityListener" /> --> <!--APR library loader. Documentation at /docs/apr.html --> <Listener className="org.apache.catalina.core.AprLifecycleListener" SSLEngine="on" /> <!--Initialize Jasper prior to webapps are loaded. Documentation at /docs/jasper-howto.html --> <Listener className="org.apache.catalina.core.JasperListener" /> <!-- Prevent memory leaks due to use of particular java/javax APIs--> <Listener className="org.apache.catalina.core.JreMemoryLeakPreventionListener" /> <Listener className="org.apache.catalina.mbeans.GlobalResourcesLifecycleListener" /> <Listener className="org.apache.catalina.core.ThreadLocalLeakPreventionListener" /> <!-- Global JNDI resources Documentation at /docs/jndi-resources-howto.html --> <GlobalNamingResources> <!-- Editable user database that can also be used by UserDatabaseRealm to authenticate users --> <Resource name="UserDatabase" auth="Container" type="org.apache.catalina.UserDatabase" description="User database that can be updated and saved" factory="org.apache.catalina.users.MemoryUserDatabaseFactory" pathname="conf/tomcat-users.xml" /> </GlobalNamingResources> <!-- A "Service" is a collection of one or more "Connectors" that share a single "Container" Note: A "Service" is not itself a "Container", so you may not define subcomponents such as "Valves" at this level. Documentation at /docs/config/service.html --> <Service name="Catalina"> <!--The connectors can use a shared executor, you can define one or more named thread pools--> <!-- <Executor name="tomcatThreadPool" namePrefix="catalina-exec-" maxThreads="150" minSpareThreads="4"/> --> <!-- A "Connector" represents an endpoint by which requests are received and responses are returned. Documentation at : Java HTTP Connector: /docs/config/http.html (blocking & non-blocking) Java AJP Connector: /docs/config/ajp.html APR (HTTP/AJP) Connector: /docs/apr.html Define a non-SSL HTTP/1.1 Connector on port 8080 --> <Connector port="8080" protocol="HTTP/1.1" connectionTimeout="20000" redirectPort="8443" /> <!-- A "Connector" using the shared thread pool--> <!-- <Connector executor="tomcatThreadPool" port="8080" protocol="HTTP/1.1" connectionTimeout="20000" redirectPort="8443" /> --> <!-- Define a SSL HTTP/1.1 Connector on port 8443 This connector uses the JSSE configuration, when using APR, the connector should be using the OpenSSL style configuration described in the APR documentation --> <!-- <Connector port="8443" protocol="HTTP/1.1" SSLEnabled="true" maxThreads="150" scheme="https" secure="true" clientAuth="false" sslProtocol="TLS" /> --> <!-- Define an AJP 1.3 Connector on port 8009 --> <Connector port="8009" protocol="AJP/1.3" redirectPort="8443" /> <!-- An Engine represents the entry point (within Catalina) that processes every request. The Engine implementation for Tomcat stand alone analyzes the HTTP headers included with the request, and passes them on to the appropriate Host (virtual host). Documentation at /docs/config/engine.html --> <!-- You should set jvmRoute to support load-balancing via AJP ie : <Engine name="Catalina" defaultHost="localhost" jvmRoute="jvm1"> --> <Engine name="Catalina" defaultHost="localhost"> <!--For clustering, please take a look at documentation at: /docs/cluster-howto.html (simple how to) /docs/config/cluster.html (reference documentation) --> <!-- <Cluster className="org.apache.catalina.ha.tcp.SimpleTcpCluster"/> --> <!-- Use the LockOutRealm to prevent attempts to guess user passwords via a brute-force attack --> <Realm className="org.apache.catalina.realm.LockOutRealm"> <!-- This Realm uses the UserDatabase configured in the global JNDI resources under the key "UserDatabase". Any edits that are performed against this UserDatabase are immediately available for use by the Realm. --> <Realm className="org.apache.catalina.realm.UserDatabaseRealm" resourceName="UserDatabase"/> </Realm> <Host name="www.essun.org" appBase="webapps" unpackWARs="true" autoDeploy="true"> <Context path="" docBase="essun" /> <Valve className="org.apache.catalina.valves.AccessLogValve" directory="logs" prefix="essun_access_log." suffix=".txt" pattern="%h %l %u %t "%r" %s %b" /> </Host> <Host name="localhost" appBase="webapps" unpackWARs="true" autoDeploy="true"> <!-- SingleSignOn valve, share authentication between web applications Documentation at: /docs/config/valve.html --> <!-- <Valve className="org.apache.catalina.authenticator.SingleSignOn" /> --> <!-- Access log processes all example. Documentation at: /docs/config/valve.html Note: The pattern used is equivalent to using pattern="common" --> <Valve className="org.apache.catalina.valves.AccessLogValve" directory="logs" prefix="localhost_access_log." suffix=".txt" pattern="%h %l %u %t "%r" %s %b" /> </Host> </Engine> </Service></Server> |
站点目录文件如下
|
1
2
3
4
5
6
7
8
9
10
11
12
13
14
15
16
17
18
19
20
21
22
23
24
25
26
27
28
|
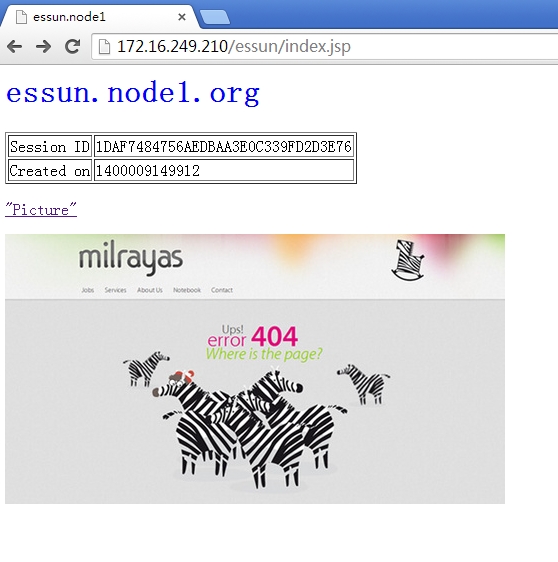
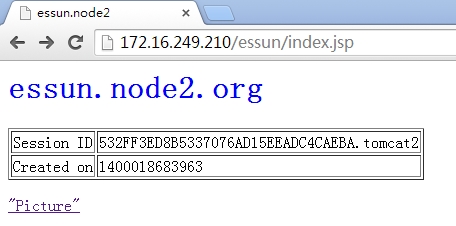
[root@essun tomcat]# cd webapps/essun/[root@essun essun]# lsindex.jsp WEB-INF[root@essun essun]# ll WEB-INF/total 8drwxr-xr-x 2 root root 4096 May 2 11:07 classesdrwxr-xr-x 2 root root 4096 May 2 11:07 lib[root@essun essun]# cat index.jsp<%@ page language="java" %><html> <head><title>essun.node2</title></head> <body> <h1><font color="red">essun.node2.org</font></h1> <table align="centre" border="1"> <tr> <td>Session ID</td> <% session.setAttribute("essun.org","essun.org"); %> <td><%= session.getId() %></td> </tr> <tr> <td>Created on</td> <td><%= session.getCreationTime() %></td> </tr> </table><p><a href="http://172.16.249.210/images/4.jpg">"Picture"</a></p><% out.println("<img src='http://172.16.249.210/images/3.jpg'>"); %></body></html> |
tomcat2 与此处的配置相同,仅 index.jsp有所不同
|
1
2
3
4
5
6
7
8
9
10
11
12
13
14
15
16
17
18
19
20
21
|
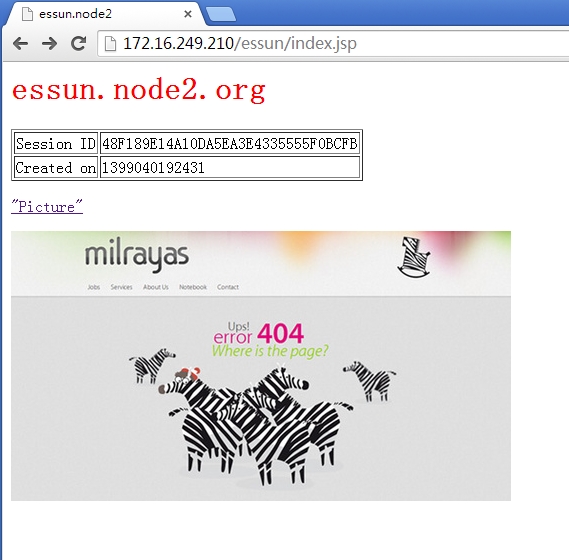
[root@essun essun]# cat index.jsp<%@ page language="java" %><html> <head><title>essun.node1</title></head> <body> <h1><font color="blue">essun.node1.org</font></h1> <table align="centre" border="1"> <tr> <td>Session ID</td> <% session.setAttribute("essun.org","essun.org"); %> <td><%= session.getId() %></td> </tr> <tr> <td>Created on</td> <td><%= session.getCreationTime() %></td> </tr> </table> <p><a href="http://172.16.249.210/images/4.jpg">"picture"</a></p><% out.println("<img src='http://172.16.249.210/images/3.jpg'>"); %></body></html> |
配置文件中只要修改对应的ip地址即可
4、测试
访问nginx
刷新后的结果
己经通过nginx中的proxy_pass为tomcat反向代理
注:
<a href="http://172.16.249.210/images/4.jpg">"picture"</a></p><% out.println("<img src='http://172.16.249.210/images/3.jpg'>"); %>这两处的url都是nginx反向代理mogilefs的url.
第二部分、实现session会话同步(DeltaManager方式)
tomcat会话管理
会话分类
标准会话管理器和持久会话管理器
标准会话管理器(StandardManager)
|
1
2
|
<Manager className="org.apache.catalina.session.StandardManager" maxInactiveInterval="7200"/> |
默认保存于$CATALINA_HOME/work/Catalina/<hostname>/<webapp-name>/下的SESSIONS.ser文件中。
maxActiveSessions:最多允许的活动会话数量,默认为-1,表示不限制;
maxInactiveInterval:非活动的会话超时时长,默认为60s;
pathname:会话文件的保存目录; 持久会话管理器(PersistentManager):将会话数据保存至持久存储中,并且能在服务器意外中止后重新启动时重新加载这些会话信息。持久会话管理器支持将会话保存至文件存储(FileStore)或JDBC存储(JDBCStore)中。
保存至文件中的示例
|
1
2
3
4
5
|
<Manager className="org.apache.catalina.session.PersistentManager" saveOnRestart="true"> <Store className="org.apache.catalina.session.FileStore" directory="/data/tomcat-sessions"/> </Manager> |
每个用户的会话会被保存至directory指定的目录中的文件中,文件名为.session,并通过后台线程每隔一段时间(checkInterval参数定义,默认为60秒)检查一次超时会话。
保存至JDBCStore中的示例
|
1
2
3
4
5
6
|
<Manager className="org.apache.catalina.session.PersistentManager" saveOnRestart="true"> <Store className="org.apache.catalina.session.JDBCStore" driverName="com.mysql.jdbc.Driver" connectionURL="jdbc:mysql://localhost:3306/mydb?user=jb;password=pw"/> </Manager> |
Manger对象用于实现HTTP会话管理的功能,Tomcat6中有4种Manger的实现:
StandardManagerTomcat7的默认会话管理器,用于非集群环境中对单个处于运行状态的Tomcat实例会话进行管理。当Tomcat关闭时,这些会话相关的数据会被写入磁盘上的一个名叫SESSION.ser的文件,并在Tomcat下次启动时读取此文件。
PersistentManager当一个会话长时间处于空闲状态时会被写入到swap会话对象,这对于内存资源比较吃紧的应用环境来说比较有用。
DeltaManager用于Tomcat集群的会话管理器,它通过将改变了的会话数据同步给集群中的其它节点实现会话复制。这种实现会将所有会话的改变同步给集群中的每一个节点,也是在集群环境中用得最多的一种实现方式。
BackupManager用于Tomcat集群的会话管理器,与DeltaManager不同的是,某节点会话的改变只会同步给集群中的另一个而非所有节点。
注 :
负载均衡,且实现会话绑定要注意给每个tomcat实例的egine容器一个jvmRoute属性!此名称要跟前端调度模块使用名称保持一致!另外,在mod_proxy实现负载均衡的会话绑定时,还要使用sticksession=JSESSIONID(字符要大写)!
1、分别打开tomcat1和tomcat2下conf中server.xml
|
1
2
3
4
5
6
7
8
|
<Server port="8005" shutdown="SHUTDOWN"><!-- Define a non-SSL HTTP/1.1 Connector on port 8080 --> <Connector port="8080" maxHttpHeaderSize="8192"maxThreads="150" minSpareThreads="25" maxSpareThreads="75"enableLookups="false" redirectPort="8443" acceptCount="100"connectionTimeout="20000" disableUploadTimeout="true" /><!-- Define an AJP 1.3 Connector on port 8009 --><Connector port="8009" enableLookups="false" redirectPort="8443"protocol="AJP/1.3" /> |
找到<Engine name="Catalina" defaultHost="localhost">
Tomcat1下的修改为
|
1
|
<Engine name="Catalina" defaultHost="localhost" jvmRoute="tomcat1"> |
Tomcat2下的修改为<Engine name="Catalina" defaultHost="localhost" jvmRoute="tomcat2">
2、修改tomcat1中的Cluster className tomcat1找到 修改为
|
1
2
3
4
5
6
7
8
9
10
11
12
13
14
15
16
17
18
19
20
21
22
23
24
25
26
27
28
29
30
31
32
33
34
35
36
37
38
39
|
<!--<Cluster className="org.apache.catalina.ha.tcp.SimpleTcpCluster"/> -->#在这以下为添加内容 <Cluster className="org.apache.catalina.ha.tcp.SimpleTcpCluster" channelSendOptions="8"> <Manager className="org.apache.catalina.ha.session.DeltaManager" expireSessionsOnShutdown="false" notifyListenersOnReplication="true"/> <Channel className="org.apache.catalina.tribes.group.GroupChannel"> <Membership className="org.apache.catalina.tribes.membership.McastService" address="228.0.0.4" port="45564" frequency="500" dropTime="3000"/> <Receiver className="org.apache.catalina.tribes.transport.nio.NioReceiver" address="172.16.249.101" port="4000" autoBind="100" selectorTimeout="5000" maxThreads="6"/> <Sender className="org.apache.catalina.tribes.transport.ReplicationTransmitter"> <Transport className="org.apache.catalina.tribes.transport.nio.PooledParallelSender"/> </Sender> <Interceptor className="org.apache.catalina.tribes.group.interceptors.TcpFailureDetector"/> <Interceptor className="org.apache.catalina.tribes.group.interceptors.MessageDispatch15Interceptor"/> </Channel> <Valve className="org.apache.catalina.ha.tcp.ReplicationValve" filter=""/> <Valve className="org.apache.catalina.ha.session.JvmRouteBinderValve"/> <Deployer className="org.apache.catalina.ha.deploy.FarmWarDeployer" tempDir="/tmp/war-temp/" deployDir="/tmp/war-deploy/" watchDir="/tmp/war-listen/" watchEnabled="false"/> <ClusterListener className="org.apache.catalina.ha.session.JvmRouteSessionIDBinderListener"/> <ClusterListener className="org.apache.catalina.ha.session.ClusterSessionListener"/> </Cluster> |
3、将conf/web.xml复制一份到发布的站点目录WEB-INF下,在</web-app>前面加入以下这句话<distributable/>
如我的站点目录为
|
1
2
3
4
5
6
|
[root@essun tomcat]# cd webapps/essun/[root@essun essun]# ll WEB-INF/total 168drwxr-xr-x 2 root root 4096 May 14 04:40 classesdrwxr-xr-x 2 root root 4096 May 14 04:40 lib-rw------- 1 root root 162921 May 14 04:40 web.xml |
4、在各节点为使用组播地址添加组播路由,格式:
|
1
|
route add -net $MCAST_ADDRESS netmask 255.255.255.255 dev eth0 |
如我自己的地址为
|
1
|
route add -net 228.0.0.4 netmask 255.255.255.255 dev eth0 |
而在tomcat2上只有两处与tomcat1不同,其它操作都一样
jvmRoute="tomcat2"
address="172.16.249.101"
address最好是当前节点的主机地址
session同步到这里设置完毕。
看一下效果
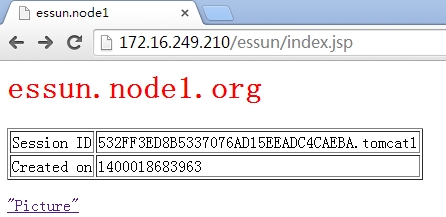
还有一张
服务器的启动顺序如下:
tomcat1 --> |tomcat2 --> |nginx
先启动tocmat1,等tomcat1启动完全的时候再启动tomcat2,等两个tocmat全启动之后,再启动nginx负载的时候可以用APACHE或NGINX,如果什么都不用,两台一接防问了话,可能会出错极session不同步的问题,网上也很多人介意不要做seeeion同步,这样会降低机器的性能,有一个方法可以,就是NGINX的ip_hash,这样至少可以保证客户端去防问同一台TOCMAT,除非那台TOCMAT挂了
linux+nginx+tomcat负载均衡,实现session同步的更多相关文章
- linux+nginx+tomcat负载均衡,实现session同步
linux+nginx+tomcat负载均衡,实现session同步 花了一个上午的时间研究nginx+tomcat的负载均衡测试,集群环境搭建比较顺利,但是session同步的问题折腾了几个小时才搞 ...
- nginx+tomcat负载均衡和session复制
本文介绍下传统的tomcat负载均衡和session复制. session复制是基于JVM内存的,当然在当今的互联网大数据时代,有更好的替代方案,如将session数据保存在Redis中. 1.安装n ...
- 通过Nginx+tomcat+redis实现反向代理 、负载均衡及session同步
一直对于负载均衡比较陌生,今天尝试着去了解了一下,并做了一个小的实验,对于这个概念有一些认识,在此做一个简单的总结 什么是负载均衡 负载均衡,英文 名称为Load Balance,指由多台服务器以对称 ...
- nginx tomcat负载均衡 使用redis session共享
环境准备 1.准备一台nginx服务器 ip192.168.1.133 端口81 安装过程: #首先安装依赖: yum -y install gcc-c++ yum -y install pcre p ...
- nginx+tomcat负载均衡
最近练习nginx+tomcat负载均衡.根据一些资料整理了大体思路,最终实现了1个nginx+2个tomcat负载均衡. 安装JDK 1>进入安装目录,给所有用户添加可执行的权限 #chmod ...
- Nginx + Tomcat 负载均衡配置详解
Nginx常用操作指南一.Nginx 与 Tomcat 安装.配置及优化1. 检查和安装依赖项 yum -y install gcc pcre pcre-devel zlib zlib-devel o ...
- Nginx+Tomcat负载均衡、动静分离群集
Nginx+Tomcat负载均衡.动静分离群集 目录 Nginx+Tomcat负载均衡.动静分离群集 一.Tomcat 1. Tomcat简介 2. Tomcat重要目录 二.Nginx负载均衡原理 ...
- Linux下Nginx+Tomcat负载均衡和动静分离配置要点
本文使用的Linux发行版:CentOS6.7 下载地址:https://wiki.centos.org/Download 一.安装Nginx 下载源:wget http://nginx.org/pa ...
- nginx+tomcat负载均衡策略
測试环境均为本地,測试软件为: nginx-1.6.0,apache-tomcat-7.0.42-1.apache-tomcat-7.0.42-2.apache-tomcat-7.0.42-3 利用n ...
随机推荐
- Log4j2进阶使用(Pattern Layout详细设置)
1.进阶说明 通过配置Layout打印格式化的日志, Log4j2支持很多的Layouts: CSV GELF HTML JSON Pattern Serialized Syslog XML YAML ...
- 巅峰对决!Spring Boot VS .NET 6
原文作者:Putu Prema 原文链接: https://medium.com/@putuprema/spring-boot-vs-asp-net-core-a-showdown-1d38b89c6 ...
- Pytest_常用执行参数详解(3)
前面讲了测试用例的执行方式,也认识了 -v -s 这些参数,那么还有没有其它参数呢?答案肯定是有的,我们可以通过 pytest -h来查看所有可用参数. 从图中可以看出,pytest的参数有很多,但 ...
- Visual Studio Code快速补全html标签(Sublime同样支持)
1.生成html文件骨架 输入"!" 或 "html:5",按tab键 注意:编写中文网页,记得把头部语言<html lang="en" ...
- Nginx 添加防爬虫
include agent_deny.conf; conf下添加 #禁止Scrapy|curl等工具的抓取 if ($http_user_agent ~* (Scrapy|Curl|HttpClien ...
- c# - 一个.cs类文件里如何建多个类
方法类可以使用 internal 修饰符,意为接口类, 主函数建议添加私有修饰符 private 控制台打印
- Word文档学习小练习链接
1. < Word2010初学> https://www.toutiao.com/i6487370439910752782/ 2. <Word2010格式化可爱的家乡> htt ...
- POJ 2387 Til the Cows Come Home (最短路径 模版题 三种解法)
原题链接:Til the Cows Come Home 题目大意:有 个点,给出从 点到 点的距离并且 和 是互相可以抵达的,问从 到 的最短距离. 题目分析:这是一道典型的最短路径模版 ...
- flutter之搭建环境
一. 环境搭建1.安装Flutter SDK 使用Flutter开发,首先我们需要安装一个Flutter的SDK. 下载Flutter的SDK 来到Flutter的官网网站,选择最新稳定的Flutte ...
- “伏魔”赏金 | WebShell检测之「模拟污点引擎」首次公测,邀你来战!
安全是一个动态的过程,攻防对抗如同在赛博世界里降妖伏魔,其要义是:取彼之长,补己之短.--伏魔引擎的诞生 伏魔引擎挑战赛 注册时间: 2022.01.10 00:00:00 - 2022.01.24 ...