
android中LitePal的使用
网上有一篇文章写的挺好的,推荐给大家:安卓项目实战之:数据库框架 LitePal 3.0 的使用详解
LitePal是对SQLite数据库操作进行了封装,采用对象映射的方式操作SQLite数据库,简化了对SQLiter的操作
我也是使用的是最新的LitePal3.0
1、首先添加依赖,引入LitePal3.0,在build.gradle中添加如下内容:
implementation group: 'org.litepal.android', name: 'java', version: '3.0.0'
2、在assets目录下创建litepal.xml文件:
<?xml version="1.0" encoding="utf-8" ?>

<litepal>

    <dbname value="db1"></dbname>

    <version value="1"></version>

    <list>

        <mapping class="com.example.chenrui.common.Student"></mapping>

    </list>

</litepal>
dbname是指的是sqlite数据库的名称
version是指的是sqlite数据库的版本号
list是指的表跟对应pojo类的映射关系,需要创建几个表,就对应创建几个pojo类,并在这个配置文件中进行注册,需要注意的是,这些pojo类,必须要继承LitePalSupport类。
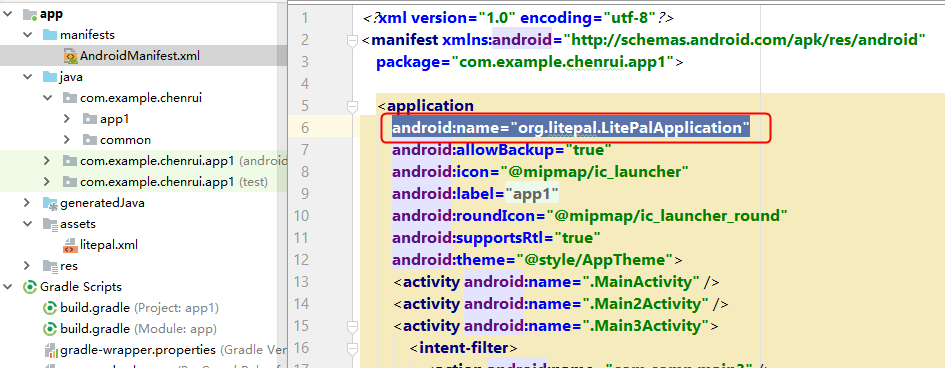
3、修改AndroidManifest.xml文件:
在application标签中添加:
android:name="org.litepal.LitePalApplication"
4、现在开始编写实例代码,本例是通过LitePal3.0对学生进行管理,实现新增、查询、删除学生的功能
添加Student.java类:
package com.example.chenrui.common;

import org.litepal.crud.LitePalSupport;

public class Student extends LitePalSupport {

    private Long id;

    private String username;

    private String phone;

    private String city;

    public Long getId() {

        return id;

    }

    public void setId(Long id) {

        this.id = id;

    }

    public String getUsername() {

        return username;

    }

    public void setUsername(String username) {

        this.username = username;

    }

    public String getPhone() {

        return phone;

    }

    public void setPhone(String phone) {

        this.phone = phone;

    }

    public String getCity() {

        return city;

    }

    public void setCity(String city) {

        this.city = city;

    }

}
列表使用的是RecyclerView组件,这里开始编写RecyclerView组件对应的内容
RecyclerView数据项student_item.xml:
<?xml version="1.0" encoding="utf-8"?>

<android.support.constraint.ConstraintLayout xmlns:android="http://schemas.android.com/apk/res/android"

    xmlns:app="http://schemas.android.com/apk/res-auto"

    xmlns:tools="http://schemas.android.com/tools"

    android:id="@+id/linearLayout1"

    android:layout_width="match_parent"

    android:layout_height="wrap_content">

    <TextView

        android:id="@+id/username"

        android:layout_width="0dp"

        android:layout_height="wrap_content"

        android:textSize="32dp"

        app:layout_constraintEnd_toEndOf="parent"

        app:layout_constraintStart_toStartOf="parent"

        app:layout_constraintTop_toTopOf="parent" />

    <TextView

        android:id="@+id/city"

        android:layout_width="0dp"

        android:layout_height="wrap_content"

        android:textSize="32dp"

        app:layout_constraintEnd_toEndOf="parent"

        app:layout_constraintStart_toStartOf="parent"

        app:layout_constraintTop_toBottomOf="@+id/username" />

    <TextView

        android:id="@+id/phone"

        android:layout_width="0dp"

        android:layout_height="wrap_content"

        android:textSize="32dp"

        app:layout_constraintEnd_toEndOf="parent"

        app:layout_constraintStart_toStartOf="parent"

        app:layout_constraintTop_toBottomOf="@+id/city" />

    <View

        android:id="@+id/divider"

        android:layout_width="match_parent"

        android:layout_height="1dp"

        android:layout_marginTop="20dp"

        android:background="?android:attr/listDivider"

        app:layout_constraintBottom_toBottomOf="parent" />

</android.support.constraint.ConstraintLayout>
注意我是添加了一个View组件,用来实现在每一项之间添加一个分割线
适配器类StudentAdapter.java:
package com.example.chenrui.app1;

import android.support.annotation.NonNull;

import android.support.v7.widget.RecyclerView;

import android.view.LayoutInflater;

import android.view.View;

import android.view.ViewGroup;

import android.widget.TextView;

import com.example.chenrui.common.Student;

import java.util.List;

public class StudentAdapter extends RecyclerView.Adapter<StudentAdapter.ViewHolder> {

    private List<Student> studentList;

    public StudentAdapter() {

    }

    public List<Student> getStudentList() {

        return studentList;

    }

    public void setStudentList(List<Student> studentList) {

        this.studentList = studentList;

    }

    @NonNull

    @Override

    public ViewHolder onCreateViewHolder(@NonNull ViewGroup viewGroup, int i) {

        View view = LayoutInflater.from(viewGroup.getContext()).inflate(R.layout.student_item,viewGroup,false);

        ViewHolder viewHolder = new ViewHolder(view);

        return viewHolder;

    }

    @Override

    public void onBindViewHolder(@NonNull final ViewHolder viewHolder, final int i) {

        Student student = studentList.get(i);

        viewHolder.username.setText("姓名:" + student.getUsername());

        viewHolder.city.setText("城市:" + student.getCity());

        viewHolder.phone.setText("手机号:" + student.getPhone());

        if(onItemClickListener!=null) {

            viewHolder.itemView.setOnLongClickListener(new View.OnLongClickListener() {

                @Override

                public boolean onLongClick(View v) {

                    onItemClickListener.onItemLongClick(viewHolder.itemView,i);

                    return false;

                }

            });

        }

    }

    @Override

    public int getItemCount() {

        return studentList.size();

    }

    static class ViewHolder extends RecyclerView.ViewHolder {

        TextView username;

        TextView city;

        TextView phone;

        public ViewHolder(@NonNull View itemView) {

            super(itemView);

            username = itemView.findViewById(R.id.username);

            city = itemView.findViewById(R.id.city);

            phone = itemView.findViewById(R.id.phone);

        }

    }

    private OnItemClickListener onItemClickListener;

    public interface OnItemClickListener{

        void onItemLongClick(View view , int pos);

    }

    public void setOnItemClickListener(OnItemClickListener onItemClickListener) {

        this.onItemClickListener = onItemClickListener;

    }

}
列表Activity的代码
activity_main.xml:
<?xml version="1.0" encoding="utf-8"?>

<android.support.constraint.ConstraintLayout xmlns:android="http://schemas.android.com/apk/res/android"

    xmlns:app="http://schemas.android.com/apk/res-auto"

    xmlns:tools="http://schemas.android.com/tools"

    android:layout_width="match_parent"

    android:layout_height="match_parent"

    tools:context=".Main33Activity">

    <android.support.v7.widget.RecyclerView

        android:id="@+id/studentView"

        android:layout_width="match_parent"

        android:layout_height="0dp"

        app:layout_constraintBottom_toTopOf="@+id/linearLayout6"

        app:layout_constraintTop_toTopOf="parent" />

    <LinearLayout

        android:id="@+id/linearLayout6"

        android:layout_width="match_parent"

        android:layout_height="50dp"

        android:orientation="horizontal"

        app:layout_constraintBottom_toBottomOf="parent">

        <Button

            android:id="@+id/button1"

            android:layout_width="wrap_content"

            android:layout_height="wrap_content"

            android:layout_weight="1"

            android:text="新增" />

    </LinearLayout>

</android.support.constraint.ConstraintLayout>
MainActivity.java:
package com.example.chenrui.app1;

import android.content.Intent;

import android.support.annotation.Nullable;

import android.support.v7.app.AppCompatActivity;

import android.os.Bundle;

import android.support.v7.widget.LinearLayoutManager;

import android.support.v7.widget.RecyclerView;

import android.view.MenuItem;

import android.view.View;

import android.widget.Button;

import android.widget.PopupMenu;

import android.widget.Toast;

import com.example.chenrui.common.Student;

import org.litepal.LitePal;

import org.litepal.crud.LitePalSupport;

import java.util.List;

public class MainActivity extends AppCompatActivity {

    RecyclerView view;

    StudentAdapter adapter;

    @Override

    protected void onActivityResult(int requestCode, int resultCode, @Nullable Intent data) {

        if(resultCode==RESULT_OK) {

            BindData(view);

        }

    }

    @Override

    protected void onCreate(Bundle savedInstanceState) {

        super.onCreate(savedInstanceState);

        setContentView(R.layout.activity_main);

        Button button = findViewById(R.id.button1);

        button.setOnClickListener(new View.OnClickListener() {

            @Override

            public void onClick(View v) {

                Intent intent = new Intent(Main33Activity.this,Main2Activity.class);

                startActivityForResult(intent,1);

            }

        });

        view = findViewById(R.id.studentView);

        LinearLayoutManager layoutManager = new LinearLayoutManager(this);

        view.setLayoutManager(layoutManager);

        adapter = new StudentAdapter();

        BindData(view);

        adapter.setOnItemClickListener(new StudentAdapter.OnItemClickListener() {

            @Override

            public void onItemLongClick(View view, final int pos) {

                PopupMenu popupMenu = new PopupMenu(Main33Activity.this,view);

                popupMenu.getMenuInflater().inflate(R.menu.menu1,popupMenu.getMenu());

                //弹出式菜单的菜单项点击事件

                popupMenu.setOnMenuItemClickListener(new PopupMenu.OnMenuItemClickListener() {

                    @Override

                    public boolean onMenuItemClick(MenuItem item) {

                        if(item.getItemId()==R.id.delete) {

                            Long id = adapter.getStudentList().get(pos).getId();

                            adapter.getStudentList().remove(pos);

                            LitePal.delete(Student.class,id);

                            adapter.notifyItemRemoved(pos);

                        }

                        return false;

                    }

                });

                popupMenu.show();

            }

        });

    }

    private void BindData(RecyclerView view) {

        //List list = LitePal.findAll(Student.class);

        List list = LitePal.order("id desc").find(Student.class);

        adapter.setStudentList(list);

        view.setAdapter(adapter);

    }

}
上面的代码,删除功能折腾了半天,删除完了不生效,后来添加上adapter.getStudentList().remove(pos);问题解决,需要把adapter绑定的数据也进行更新,问题就解决了。
PopupMenu菜单项menu1.xml:
<?xml version="1.0" encoding="utf-8"?>

<menu xmlns:android="http://schemas.android.com/apk/res/android">

    <item

        android:id="@+id/delete"

        android:title="删除" />

</menu>
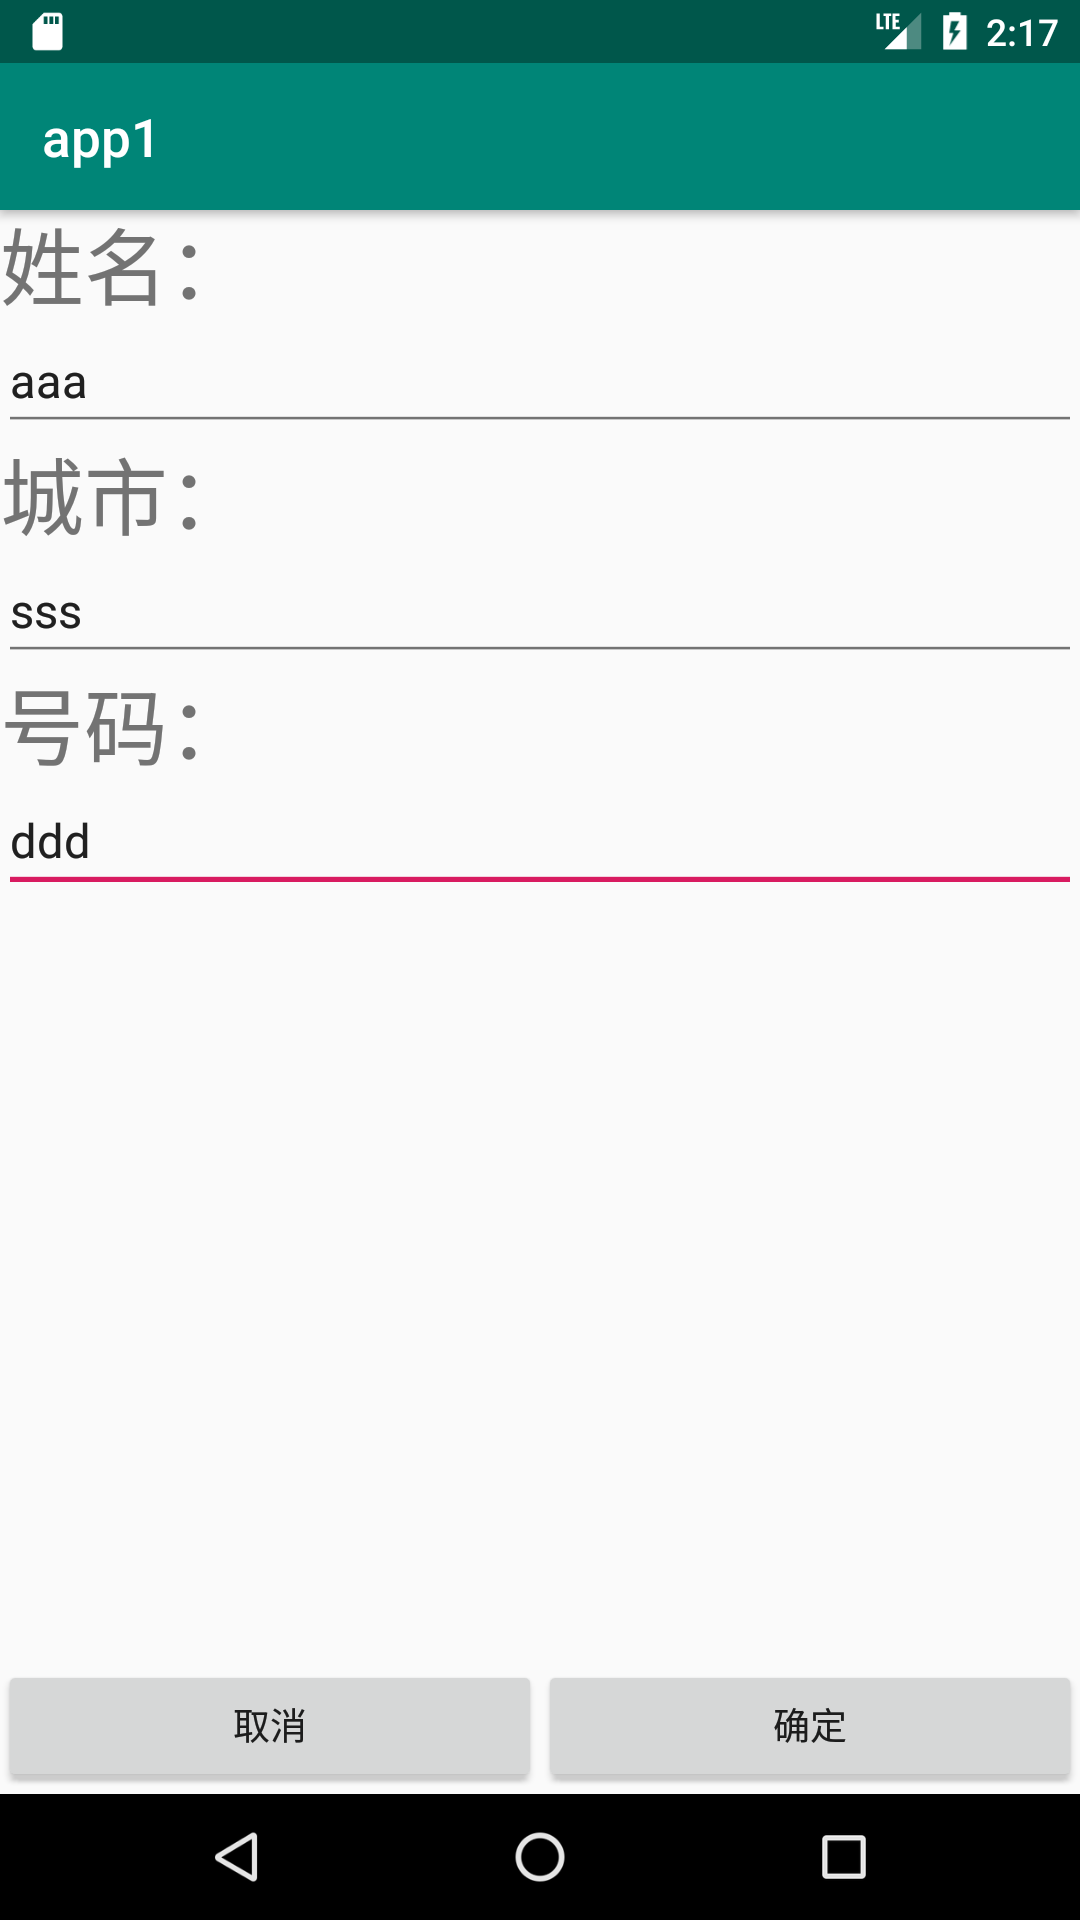
点击“添加”按钮会进入添加Activity,对应添加的Activity
activity_main2.xml:
<?xml version="1.0" encoding="utf-8"?>

<android.support.constraint.ConstraintLayout xmlns:android="http://schemas.android.com/apk/res/android"

    xmlns:app="http://schemas.android.com/apk/res-auto"

    xmlns:tools="http://schemas.android.com/tools"

    android:layout_width="match_parent"

    android:layout_height="match_parent"

    tools:context=".Main2Activity">

    <LinearLayout

        android:layout_width="match_parent"

        android:layout_height="0dp"

        android:orientation="vertical"

        app:layout_constraintBottom_toTopOf="@+id/linearLayout7"

        app:layout_constraintEnd_toEndOf="parent"

        app:layout_constraintHorizontal_bias="0.0"

        app:layout_constraintStart_toStartOf="parent"

        app:layout_constraintTop_toTopOf="parent">

        <TextView

            android:id="@+id/textView13"

            android:layout_width="match_parent"

            android:layout_height="wrap_content"

            android:text="姓名:"

            android:textSize="32dp" />

        <EditText

            android:id="@+id/editText7"

            android:layout_width="match_parent"

            android:layout_height="wrap_content"

            android:ems="10"

            android:inputType="textPersonName" />

        <TextView

            android:id="@+id/textView14"

            android:layout_width="match_parent"

            android:layout_height="wrap_content"

            android:text="城市:"

            android:textSize="32dp" />

        <EditText

            android:id="@+id/editText8"

            android:layout_width="match_parent"

            android:layout_height="wrap_content"

            android:ems="10"

            android:inputType="textPersonName" />

        <TextView

            android:id="@+id/textView15"

            android:layout_width="match_parent"

            android:layout_height="wrap_content"

            android:text="号码:"

            android:textSize="32dp" />

        <EditText

            android:id="@+id/editText9"

            android:layout_width="match_parent"

            android:layout_height="wrap_content"

            android:ems="10"

            android:inputType="textPersonName" />

    </LinearLayout>

    <LinearLayout

        android:id="@+id/linearLayout7"

        android:layout_width="match_parent"

        android:layout_height="50dp"

        android:orientation="horizontal"

        app:layout_constraintBottom_toBottomOf="parent"

        app:layout_constraintEnd_toEndOf="parent"

        app:layout_constraintStart_toStartOf="parent">

        <Button

            android:id="@+id/button2"

            android:layout_width="wrap_content"

            android:layout_height="wrap_content"

            android:layout_weight="1"

            android:text="取消" />

        <Button

            android:id="@+id/button3"

            android:layout_width="wrap_content"

            android:layout_height="wrap_content"

            android:layout_weight="1"

            android:text="确定"

            app:layout_constraintStart_toStartOf="parent" />

    </LinearLayout>

</android.support.constraint.ConstraintLayout>
Main2Activity.java:
package com.example.chenrui.app1;

import android.content.Intent;

import android.support.v7.app.AppCompatActivity;

import android.os.Bundle;

import android.view.View;

import android.widget.Button;

import android.widget.EditText;

import com.example.chenrui.common.Student;

import org.litepal.tablemanager.Connector;

public class Main2Activity extends AppCompatActivity {

    @Override

    protected void onCreate(Bundle savedInstanceState) {

        super.onCreate(savedInstanceState);

        setContentView(R.layout.activity_main2);

        Button button = findViewById(R.id.button2);

        button.setOnClickListener(new View.OnClickListener() {

            @Override

            public void onClick(View v) {

                Intent intent = new Intent();

                setResult(RESULT_CANCELED,intent);

                Main32Activity.this.finish();

            }

        });

        final EditText username = findViewById(R.id.editText7);

        final EditText city = findViewById(R.id.editText8);

        final EditText phone = findViewById(R.id.editText9);

        Button button2 = findViewById(R.id.button3);

        button2.setOnClickListener(new View.OnClickListener() {

            @Override

            public void onClick(View v) {

                Student student = new Student();

                student.setUsername(username.getText().toString());

                student.setCity(city.getText().toString());

                student.setPhone(phone.getText().toString());

                student.save();

                Intent intent = new Intent();

                setResult(RESULT_OK,intent);

                Main32Activity.this.finish();

            }

        });

    }

}
实现的效果:

android中LitePal的使用的更多相关文章
- Android中的LinearLayout布局
LinearLayout : 线性布局 在一般情况下,当有很多控件需要在一个界面列出来时,我们就可以使用线性布局(LinearLayout)了, 线性布局是按照垂直方向(vertical)或水平方向 ...
- Android中BroadcastReceiver的两种注册方式(静态和动态)详解
今天我们一起来探讨下安卓中BroadcastReceiver组件以及详细分析下它的两种注册方式. BroadcastReceiver也就是"广播接收者"的意思,顾名思义,它就是用来 ...
- Android中使用ExpandableListView实现微信通讯录界面(完善仿微信APP)
之前的博文<Android中使用ExpandableListView实现好友分组>我简单介绍了使用ExpandableListView实现简单的好友分组功能,今天我们针对之前的所做的仿微信 ...
- Android中ListView实现图文并列并且自定义分割线(完善仿微信APP)
昨天的(今天凌晨)的博文<Android中Fragment和ViewPager那点事儿>中,我们通过使用Fragment和ViewPager模仿实现了微信的布局框架.今天我们来通过使用Li ...
- Android中Fragment和ViewPager那点事儿(仿微信APP)
在之前的博文<Android中使用ViewPager实现屏幕页面切换和引导页效果实现>和<Android中Fragment的两种创建方式>以及<Android中Fragm ...
- Android中Fragment与Activity之间的交互(两种实现方式)
(未给Fragment的布局设置BackGound) 之前关于Android中Fragment的概念以及创建方式,我专门写了一篇博文<Android中Fragment的两种创建方式>,就如 ...
- 【月入41万】Mono For Android中使用百度地图SDK
借助于Mono For Android技术,.Net开发者也可以使用自己熟悉的C#语言以及.Net来开发Android应用.由于Mono For Android把Android SDK中绝大部分类库都 ...
- mono for android中使用dapper或petapoco对sqlite进行数据操作
在mono for android中使用dapper或petapoco,很简单,新建android 类库项目,直接把原来的文件复制过来,对Connection连接报错部分进行注释和修改就可以运行了.( ...
- Android开发学习之路-Android中使用RxJava
RxJava的核心内容很简单,就是进行异步操作.类似于Handler和AsyncTask的功能,但是在代码结构上不同. RxJava使用了观察者模式和建造者模式中的链式调用(类似于C#的LINQ). ...
随机推荐
- nil coalescing operator
nil coalescing operator ?? 就是 optional和 三元运算符?:的简写形式. 比如一个optional String类型的变量 var a:String? // prin ...
- AutoMapper在MVC中的运用01-配置、使用、单元测试、举例
MVC中,如果想在Domain Model和View Model之间建立映射,用AutoMapper是一个不错的选择.不仅如此,AutoMapper能在不同对象之间建立映射,比如string与int类 ...
- delphi连接mysql不用添加DSN(mysql connector odbc 5.1版)
一.下载安装mysql驱动http://mysql.com/downloads/connector/odbc/二.添加adoconnection,adoquery,使用以下连接字符串http://ww ...
- Android:活动的简单使用
2.1 活动是什么 活动(Activity)是最容易吸引到用户的地方了,它是一种可以包含用户界面的组件, 主要用于和用户进行交互.一个应用程序中可以包含零个或多个活动,但不包含任何活动的 应用程 ...
- 查看Oracle数据库名和实例名的命令
查看数据库名 SQL> select name from v$database; NAME --------- ORCL SQL> desc v$database; 名称 ...
- Lua的文件操作
先简单介绍一下被迫使用Lua的IO的情境: 游戏支持玩家自定义上传头像,在排行榜中会显示玩家列表(包括本服.跨服),原有的做法是先检测CCUserDefault中是否存在指定图片的key以及它的状态. ...
- 同一个ImageView根据xml文件来显示不同的图片--level-list
感谢:http://blog.sina.com.cn/s/blog_6111ce890100psq9.html 有时候,我们为了在一个ImageView中显示不同的图片,平时往往会使用: if (条件 ...
- 如何在windows2003(IIS6)下配置IIS,使其支持cshtml
在开发环境机器上,安装WEB PAGES 后,会在 C:\Program Files (x86)\Microsoft ASP.NET\ASP.NET Web Pages 的下产生DLL 其中 Micr ...
- ArrayBlockingQueue, LinkedBlockingQueue, ConcurrentLinkedQueue, RingBuffer
1. ArrayBlockingQueue, LinkedBlockingQueue, ConcurrentLinkedQueue ArrayBlockingQueue, LinkedBlocking ...
- Xilinx FFT IP v9.0 使用
该ip用于实现N=2**m(m=3~16)点FFT的变换, 实现的数学类型包含: A) 定点全精度 B) 定点缩减位宽 C) 块浮点 每一级蝶型运算后舍入或者取整.对于N ...