iOScollectionView广告无限滚动(Swift实现)
今天公司里的实习生跑过来问我一般App上广告的无限滚动是怎么实现的,刚好很久没写博客了,就决定写下了,尽量帮助那些处于刚学iOS的程序猿.
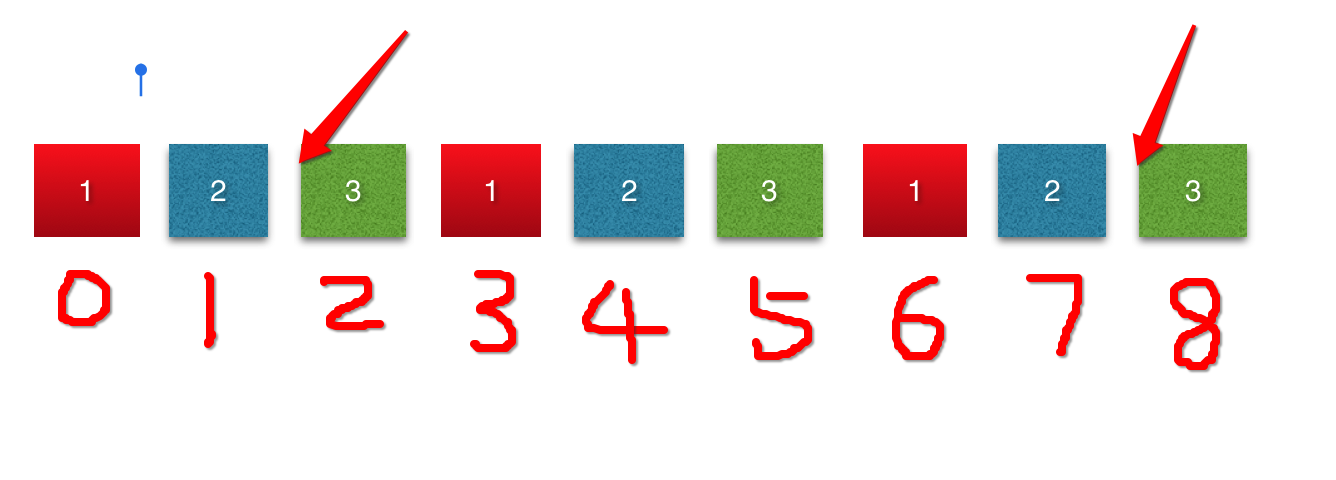
做一个小demo,大概实现效果如下图所示:

基本实现思路:
1. 在你需要放置无限滚动展示数据的地方把他的数据,在原本的基础上把你要展示的数据扩大三倍.(当然扩大两倍也是可以的,三倍的话,比较好演示)
   // MARK: - 设置数据源

    func collectionView(_ collectionView: UICollectionView, numberOfItemsInSection section: Int) -> Int {

//        print(self.arrayM.count)

        return self.arrayM.count *

    }
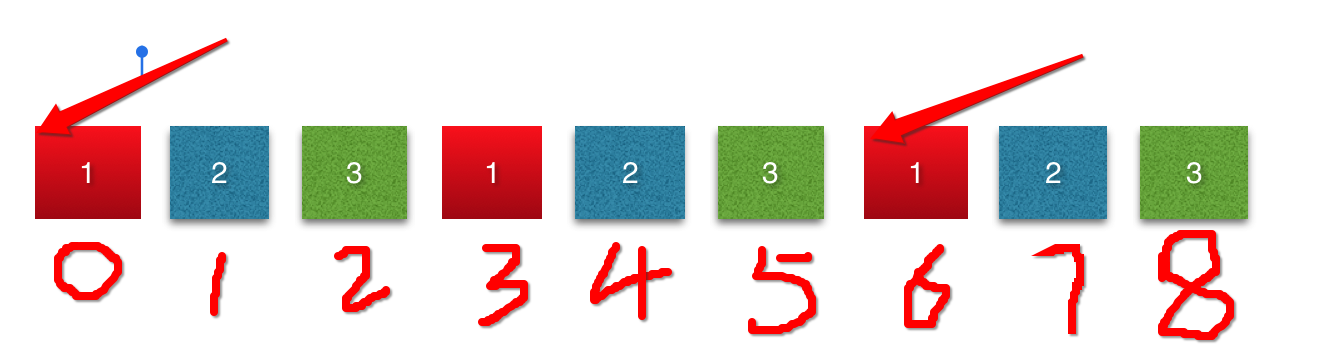
2.当在定时器的作用下,或者在拖动情况存下滚动到第八个时候,设置此时的collectionView.contentOffset.x等于滚动到第三个cell的contentOffset.x
if collectionView.contentOffset.x == CGFloat( * self.arrayM.count - ) * self.collectionView.bounds.width {

            self.collectionView.contentOffset.x = CGFloat(self.arrayM.count - ) * self.collectionView.bounds.width

        }
3.当拖动到第0个cell时,设置此时的collectionView.contentOffset.x等于第六个cell的contentOffset.x
if collectionView.contentOffset.x ==  {

            self.collectionView.contentOffset.x = CGFloat( * self.arrayM.count - ) * self.collectionView.bounds.width

        }
代码如下:
我在代码中用到5张照片,所以应该一共有15个cell
import UIKit

class ViewController: UIViewController ,UICollectionViewDataSource, UICollectionViewDelegate {

    @IBOutlet weak var collectionView: UICollectionView!

    var timer : Timer?

    var arrayM : [BOModel] = [] {

        didSet {

            self.collectionView.reloadData()

        }

    }

    static let CellID = "cell"

    override func viewDidLoad() {

        super.viewDidLoad()

        self.collectionView.dataSource = self

        self.collectionView.delegate = self

        // 加载数据

        loadData()

        self.collectionView.register(UINib.init(nibName: "BOCollectionViewCell", bundle: nil), forCellWithReuseIdentifier: ViewController.CellID)

        //设置collextionView

        setupCollectionView()

        // 开启定时器

        starTimer()

    }

    /// 从polist中加载数据

    func loadData() {

        let stemp: NSArray = NSArray(contentsOfFile: Bundle.main.path(forResource: "shops.plist", ofType: nil)!)!

        for dict in stemp {

            let model = BOModel.init(dict: dict as! [String : Any])

            self.arrayM.append(model)

        }

    }

    /// 设置cellection的布局方式

    ///

    /// - Returns: 一个布局类型

    func setupCollectionFlowlayout() -> (UICollectionViewFlowLayout) {

        let flowLayout = UICollectionViewFlowLayout()

        flowLayout.itemSize = self.collectionView.bounds.size

        flowLayout.minimumLineSpacing =

        flowLayout.minimumInteritemSpacing =

        flowLayout.scrollDirection = .horizontal

        flowLayout.sectionInset = UIEdgeInsetsMake(, , , )

        return flowLayout

    }

    /// 设置collectionVIew

    func setupCollectionView() -> () {

        self.collectionView.collectionViewLayout = self.setupCollectionFlowlayout()

        self.collectionView.showsVerticalScrollIndicator = false

        self.collectionView.showsHorizontalScrollIndicator = false

        self.collectionView.isPagingEnabled = true

    }

    // MARK: - 设置数据源

    func collectionView(_ collectionView: UICollectionView, numberOfItemsInSection section: Int) -> Int {

//        print(self.arrayM.count)

        return self.arrayM.count *

    }

    func collectionView(_ collectionView: UICollectionView, cellForItemAt indexPath: IndexPath) -> UICollectionViewCell {

        let cell = self.collectionView.dequeueReusableCell(withReuseIdentifier: ViewController.CellID, for: indexPath) as! BOCollectionViewCell

        cell.model = self.arrayM[indexPath.row % self.arrayM.count]

        return cell

    }

    // MARK: - 实现代理方法

    func scrollViewDidEndDecelerating(_ scrollView: UIScrollView) {

        //contentOffset.x == 0 时,重新设置contentOffset.x的值

        if collectionView.contentOffset.x ==  {

            self.collectionView.contentOffset.x = CGFloat( * self.arrayM.count - ) * self.collectionView.bounds.width

        }

        //当到达最后一个cell时,重新设置contentOffset.x的值

        if collectionView.contentOffset.x == CGFloat( * self.arrayM.count - ) * self.collectionView.bounds.width {

            self.collectionView.contentOffset.x = CGFloat(self.arrayM.count - ) * self.collectionView.bounds.width

        }

    }

    /// 开启定时器

    func starTimer () {

        let timer = Timer.init(timeInterval: , target: self, selector: #selector(ViewController.nextPage), userInfo: nil, repeats: true)

        // 这一句代码涉及到runloop 和 主线程的知识,则在界面上不能执行其他的UI操作

        RunLoop.main.add(timer, forMode: RunLoopMode.commonModes)

        self.timer = timer

    }

    /// 在1秒后,自动跳转到下一页

    func nextPage() {

        // 如果到达最后一个,则变成第四个

        if collectionView.contentOffset.x == CGFloat( * self.arrayM.count - ) * self.collectionView.bounds.width {

            self.collectionView.contentOffset.x = CGFloat(self.arrayM.count - ) * self.collectionView.bounds.width

        }else {

            // 每过一秒,contentOffset.x增加一个cell的宽度

            self.collectionView.contentOffset.x += self.collectionView.bounds.size.width

        }

}

    /// 当collectionView开始拖动的时候,取消定时器

    func scrollViewWillBeginDragging(_ scrollView: UIScrollView) {

        self.timer?.invalidate()

        self.timer = nil

    }

    /// 当用户停止拖动的时候,开启定时器

    func scrollViewWillEndDragging(_ scrollView: UIScrollView, withVelocity velocity: CGPoint, targetContentOffset: UnsafeMutablePointer<CGPoint>) {

        starTimer()

    }

}
plist文件如下图所示: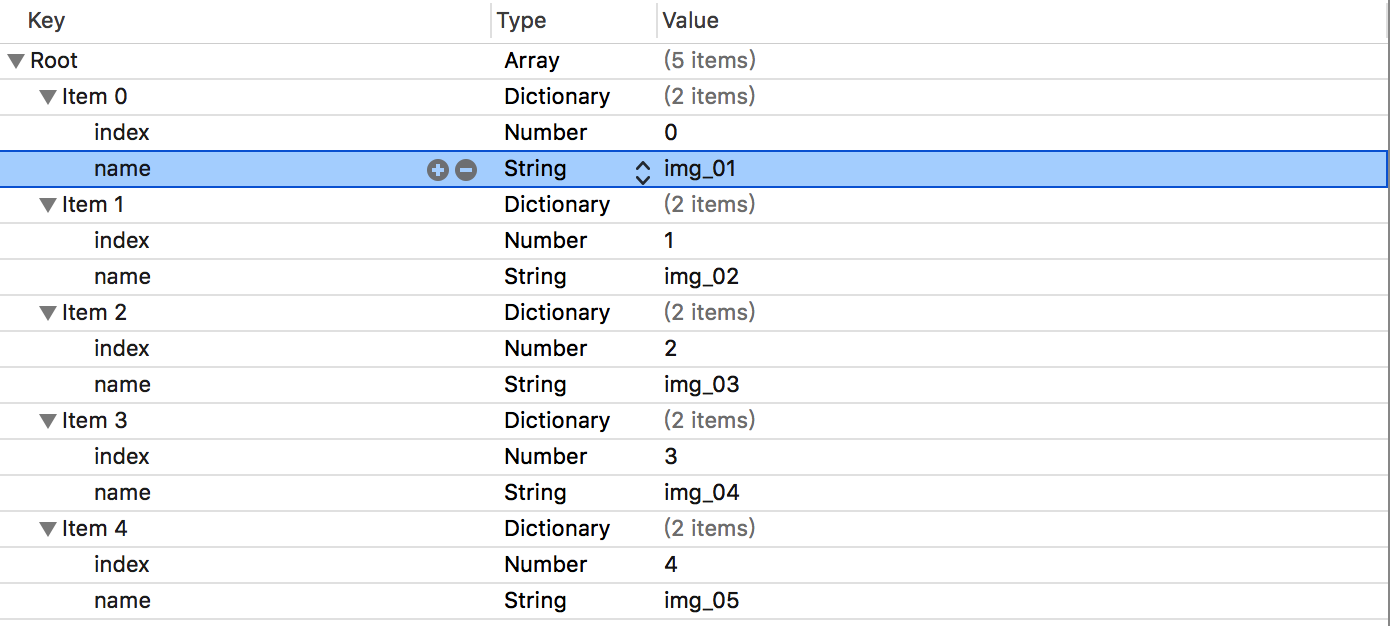
用到的字典转模型因为比较简单的转换,就自己写了个:
import UIKit

class BOCollectionViewCell: UICollectionViewCell {

    @IBOutlet weak var imageView: UIImageView!

    var model : BOModel? {

        didSet {

            guard let image = UIImage.init(named: (model?.name)!) else {

                return

            }

            self.imageView.image = image

        }

    }

    override func awakeFromNib() {

        super.awakeFromNib()

    }

}
自定义collectionViewCell类中的内容:
import UIKit

class BOCollectionViewCell: UICollectionViewCell {

    @IBOutlet weak var imageView: UIImageView!

    var model : BOModel? {

        didSet {

            guard let image = UIImage.init(named: (model?.name)!) else {

                return

            }

            self.imageView.image = image

        }

    }

    override func awakeFromNib() {

        super.awakeFromNib()

    }

}
附: 其实这种方法比较实现无限滚动,利用了一点小技巧,用电脑测试的时候可能有一点缺陷.
iOScollectionView广告无限滚动(Swift实现)的更多相关文章
- iOS开发:一个无限滚动自动播放图片的Demo(Swift语言编码)
很久以前就想写这么一个无限滚动的Demo了,最近学习了下Swift,手中没有可以用来练手的Demo,所以才将它实现了. Github地址(由于使用了UIView+AutoLayout第三方进行布局,所 ...
- iOS swift版本无限滚动轮播图
之前写过oc版本的无限滚动轮播图,现在来一个swift版本全部使用snapKit布局,数字还是pageConrrol样式可选 enum typeStyle: Int { case pageContro ...
- UIScrollView实现图片轮播器的无限滚动
简介 在现在的一些App中常常见到图片轮播器,一般用于展示广告.新闻等数据,在iOS内并没有现成的控件直接实现这种功能,但是通过UIScrollView的允许分页设置,可以实现滚动轮播的功能. 轮播原 ...
- Infinite Scroll - jQuery & WP 无限滚动插件
无限滚动(Infinite Scroll)也称为自动分页.滚动分页和无限分页.常用在图片.文章或其它列表形式的网页中,用来在滚动网页的时候自动加载下一页的内容.Infinite Scroll 这款 ...
- [Unity3D插件]2dtoolkit系列二 动画精灵的创建以及背景图的无限滚动
经过昨天2dtoolkit系列教程一的推出,感觉对新手还有有一定的启发作用,引导学习使用unity 2dToolKit插件的使用过程,今天继续系列二——动画精灵的创建,以及背景图的无限循环滚动,在群里 ...
- 基于HTML5+CSS3的图片旋转、无限滚动、文字跳动特效
本文分享几种基于HTML5+CSS3实现的一些动画特效:图片旋转.无限滚动.文字跳动;实现起来均比较容易,动手来试试! 一.图片旋转 效果图如下: 这个效果实现起来其实并不困难.代码清单如下: < ...
- LoopBar – Tap酒吧与无限滚动
相约 LoopBar – 标签栏与无限滚动为Android由Cleveroad 在Cleveroad我们最近认识到通过使用任何一个应用程序类别的导航,导航面板是很无聊和琐碎.这就是为什么我们的设计师的 ...
- Android 高级UI设计笔记09:Android如何实现无限滚动列表
ListView和GridView已经成为原生的Android应用实现中两个最流行的设计模式.目前,这些模式被大量的开发者使用,主要是因为他们是简单而直接的实现,同时他们提供了一个良好,整洁的用户体验 ...
- 无限滚动 --demo
<!DOCTYPE HTML><html><head><meta http-equiv="Content-Type" content=&q ...
随机推荐
- Unity3d入门 - 关于unity工具的熟悉
上周由于工作内容较多,花在unity上学习的时间不多,但总归还是学习了一些东西,内容如下: .1 根据相关的教程在mac上安装了unity. .2 学习了unity的主要的工具分布和对应工具的相关的功 ...
- GreenDao 数据库:使用Raw文件夹下的数据库文件以及数据库升级
一.使用Raw文件夹下的数据库文件 在使用GreenDao框架时,数据库和数据表都是根据生成的框架代码来自动创建的,从生成的DaoMaster中的OpenHelper类可以看出: public sta ...
- 使用redis构建可靠分布式锁
关于分布式锁的概念,具体实现方式,直接参阅下面两个帖子,这里就不多介绍了. 分布式锁的多种实现方式 分布式锁总结 对于分布式锁的几种实现方式的优劣,这里再列举下 1. 数据库实现方式 优点:易理解 缺 ...
- Apache Ignite之集群应用测试
集群发现机制 在Ignite中的集群号称是无中心的,而且支持命令行启动和嵌入应用启动,所以按理说很简单.而且集群有自动发现机制感觉对于懒人开发来说太好了,抱着试一试的心态测试一下吧. 在Apache ...
- 【AutoMapper官方文档】DTO与Domin Model相互转换(上)
写在前面 AutoMapper目录: [AutoMapper官方文档]DTO与Domin Model相互转换(上) [AutoMapper官方文档]DTO与Domin Model相互转换(中) [Au ...
- 如何创建Vim Dotfile?
Dotfile是电脑系统里的隐藏文件,它是专门给更高级的用户,如开发者.程序员或工程师使用的,让他们用来调整系统.如何创建Vim-Dotfile? 可以参考以下步骤: 1. 首先,你要检查一下.vim ...
- HTTP常用状态码分析
不管是面试还是工作中,经常会碰到需要通过HTTP状态码去判断问题的情况,比如对于后台RD,给到前端FE的一个接口,出现502或者504 error错误,FE就会说接口存在问题,如果没有知识储备,那就只 ...
- 分布式系列文章——从ACID到CAP/BASE
事务 事务的定义: 事务(Transaction)是由一系列对系统中数据进行访问与更新的操作所组成的一个程序执行逻辑单元(Unit),狭义上的事务特指数据库事务. 事务的作用: 当多个应用程序并发访问 ...
- 讓TQ2440也用上設備樹(1)
作者:彭東林 郵箱:pengdonglin137@163.com QQ:405728433 開發板 TQ2440 + 64MB 內存 + 256MB Nand 軟件 Linux: Linux-4.9 ...
- 我这么玩Web Api(一):帮助页面或用户手册(Microsoft and Swashbuckle Help Page)
前言 你需要为客户编写Api调用手册?你需要测试你的Api接口?你需要和前端进行接口对接?那么这篇文章应该可以帮到你.本文将介绍创建Web Api 帮助文档页面的两种方式,Microsoft Help ...