
spring整合ehcache注解实现查询缓存,并实现实时缓存更新或删除
转载: http://www.importnew.com/23358.html
写在前面:上一篇博客写了spring cache和ehcache的基本介绍,个人建议先把这些最基本的知识了解了才能对今天主题有所感触。不多说了,开干!
注:引入jar
<!-- 引入ehcache缓存 -->

<dependency>

  <groupId>net.sf.ehcache</groupId>

  <artifactId>ehcache</artifactId>

  <version>2.8.3</version>

</dependency>
第一步:首先配置ehcache.xml
 <?xml version="1.0" encoding="UTF-8"?>

 <ehcache xmlns:xsi="http://www.w3.org/2001/XMLSchema-instance"

          xsi:noNamespaceSchemaLocation="ehcache.xsd"

          updateCheck="true" monitoring="autodetect"

          dynamicConfig="true">

    <diskStore path="java.io.tmpdir"/>

    <defaultCache

             maxEntriesLocalHeap="10000"

             eternal="false"

             overflowToDisk="false"

             timeToIdleSeconds="120"

             timeToLiveSeconds="120"

             diskSpoolBufferSizeMB="30"

             maxEntriesLocalDisk="10000000"

             diskExpiryThreadIntervalSeconds="120"

             memoryStoreEvictionPolicy="LRU">

         <persistence strategy="localTempSwap"/>

     </defaultCache>

     <cache name="myCache"

            maxEntriesLocalHeap="10000"

            maxEntriesLocalDisk="1000"

            eternal="false"

            diskSpoolBufferSizeMB="30"

            timeToIdleSeconds="300"

            timeToLiveSeconds="600"

            memoryStoreEvictionPolicy="LFU"

            transactionalMode="off">

         <persistence strategy="localTempSwap"/>

     </cache>

 </ehcache>
第二步:在spring.xml的配置文件中引入schema, xmlns:aop=”http://www.springframework.org/schema/aop” 和http://www.springframework.org/schema/cache http://www.springframework.org/schema/cache/spring-cache-3.2.xsd
缓存的配置:
 <!-- 启用缓存注解功能,这个是必须的,否则注解不会生效,另外,该注解一定要声明在spring主配置文件中才会生效 -->

 <cache:annotation-driven cache-manager="ehcacheManager"/>

 <!-- cacheManager工厂类,指定ehcache.xml的位置 -->

 <bean id="ehcacheManagerFactory" class="org.springframework.cache.ehcache.EhCacheManagerFactoryBean">

      <property name="configLocation" value="classpath:ehcache.xml" />

 </bean>

 <!-- 声明cacheManager -->

 <bean id="ehcacheManager" class="org.springframework.cache.ehcache.EhCacheCacheManager">

      <property name="cacheManager" ref="ehcacheManagerFactory" />

 </bean>
OK!缓存的相关配置已经完成。下面开始编写测试程序。这里需要连接数据库,我就不写了。这里为了方便就随便找了之前写过的model,这个model就是AOP注解实现日志管理的实体,为了偷懒就直接用了,希望你们不要误解,没有特殊意义的
第三步:编写model,这里需要注意,要实现缓存的实体必须要序列化 private static final long serialVersionUID = -6579533328390250520L; 关于序列化的生成这里就不介绍了,大家可以百度看看。
 package org.shop.entity;

 import java.io.Serializable;

 import java.util.Date;

 public class SystemLog implements Serializable {

     private static final long serialVersionUID = -6579533328390250520L;

     private String id;

     private String description;

     private String method;

     private Long logType;

     private String requestIp;

     private String exceptioncode;

     private String exceptionDetail;

     private String params;

     private String createBy;

     private Date createDate;

     public String getId() {

         return id;

     }

     public void setId(String id) {

         this.id = id == null ? null : id.trim();

     }

     public String getDescription() {

         return description;

     }

     public void setDescription(String description) {

         this.description = description == null ? null : description.trim();

     }

     public String getMethod() {

         return method;

     }

     public void setMethod(String method) {

         this.method = method == null ? null : method.trim();

     }

     public Long getLogType() {

         return logType;

     }

     public void setLogType(Long logType) {

         this.logType = logType;

     }

     public String getRequestIp() {

         return requestIp;

     }

     public void setRequestIp(String requestIp) {

         this.requestIp = requestIp == null ? null : requestIp.trim();

     }

     public String getExceptioncode() {

         return exceptioncode;

     }

     public void setExceptioncode(String exceptioncode) {

         this.exceptioncode = exceptioncode == null ? null : exceptioncode.trim();

     }

     public String getExceptionDetail() {

         return exceptionDetail;

     }

     public void setExceptionDetail(String exceptionDetail) {

         this.exceptionDetail = exceptionDetail == null ? null : exceptionDetail.trim();

     }

     public String getParams() {

         return params;

     }

     public void setParams(String params) {

         this.params = params == null ? null : params.trim();

     }

     public String getCreateBy() {

         return createBy;

     }

     public void setCreateBy(String createBy) {

         this.createBy = createBy == null ? null : createBy.trim();

     }

     public Date getCreateDate() {

         return createDate;

     }

     public void setCreateDate(Date createDate) {

         this.createDate = createDate;

     }

 }
第四步:编写dao,service
 package org.shop.dao;

 import org.shop.entity.SystemLog;

 public interface SystemLogMapper {

     int deleteByPrimaryKey(String id);

     int insert(SystemLog record);

     int insertSelective(SystemLog record);

     SystemLog selectByPrimaryKey(String id);

     int updateByPrimaryKeySelective(SystemLog record);

     int updateByPrimaryKey(SystemLog record);

     int count();

 }
 public interface SystemLogService {

     int deleteSystemLog(String id);

     int insert(SystemLog record);

     int insertTest(SystemLog record);

     SystemLog findSystemLog(String id);

     int updateSystemLog(SystemLog record);

     int count();

 }
第五步:编写serviceImpl并添加缓存注解。这里缓存注解的参数不介绍了,不懂得看我上一篇博客,我这里先把需要的注解都写上了,一会一个一个介绍。
 @Service("systemLogService")

 public class SystemLogServiceImpl implements SystemLogService {

     @Resource

     private SystemLogMapper systemLogMapper;

     @Override

     public int deleteSystemLog(String id) {

               return systemLogMapper.deleteByPrimaryKey(id);

     }

     @Override

     //@CachePut(value="myCache")

     //@CacheEvict(value="myCache",allEntries=true,beforeInvocation=true)

     @CacheEvict(value="myCache",key="0",beforeInvocation=true)

     public int insert(SystemLog record) {

               return systemLogMapper.insertSelective(record);

     }

     @Override

     @Cacheable(value="myCache",key="#id")

     public SystemLog findSystemLog(String id) {

              return systemLogMapper.selectByPrimaryKey(id);

     }

     @Override

     public int updateSystemLog(SystemLog record) {

              return systemLogMapper.updateByPrimaryKeySelective(record);

     }

     @Override

     public int insertTest(SystemLog record) {

            return systemLogMapper.insert(record);

     }

     @Override

     @Cacheable(value="myCache",key="0")

     public int count() {

            int num = systemLogMapper.count();

            return num;

     }

 }
第六步:编写controller,即我们的测试。
 @Controller

 @RequestMapping("systemLogController")

 public class SystemLogController {

     @Resource

     private SystemLogService systemLogService;

     @RequestMapping("testLog")

     public ModelAndView testLog(){

         ModelMap modelMap = new ModelMap();

         SystemLog systemLog = systemLogService.findSystemLog("c30e2398-079a-406b-a2f7-a85fa15ccac7");

         modelMap.addAttribute("data", systemLog);

         return new ModelAndView("index",modelMap);

     }

     @RequestMapping("insert")

     @ResponseBody

     public boolean Insert(SystemLog record){

         systemLogService.insert(record);

         return true;

     }

     @RequestMapping("test1")

     public ModelAndView test1(){

         ModelMap modelMap = new ModelMap();

         int num =systemLogService.count();

         modelMap.addAttribute("num", num);

         return  new ModelAndView("pageEhcache",modelMap);

     }

 }
我们先测试查询的缓存,即serviceImpl中的 findSystemLog(String id) 方法,我们访问testLog.do,第一次运行如下图,注意控制台中的heap和 disk

再一次访问testLog.do,运行你会发现没有访问数据库,如图:

到此查询的缓存我们实现了,但是关于缓存的处理我们并没有做完,我们应该在深入思考下,在上面查询的缓存生命周期内,我们对刚才查询的表进行了增删改操作,这时我们再访问该查询方法,你会发现我们的数据并没有改变,还是增删改操作之前的数据(因为缓存的生命
还在),这里是不是问题呢?此时我们需要对查询的缓存进行更新或删除。
下面我们看serviceImpl中的insert方法和count()方法,count的方法是统计表中的数据总记录,insert方法是对该表进行新增一条记录,insert的缓存注解用的是@CacheEvict(value=”myCache”,key=”0″,beforeInvocation=true),这里清除的是指定缓存,也就是
count方法中@Cacheable(value=”myCache”,key=”0″)的,(serviceImpl中注释的@CacheEvict(value=”myCache”,allEntries=true,beforeInvocation=true)是清除所有的缓存,这里我就不演示了,道理是一样的)
这里我提供一个测试pageEhcache.jsp页面,
 <%@ page language="java" import="java.util.*" pageEncoding="UTF-8"%>

 <%

 String path = request.getContextPath();

 String basePath = request.getScheme()+"://"+request.getServerName()+":"+request.getServerPort()+path+"/";

 %>

 <!DOCTYPE HTML PUBLIC "-//W3C//DTD HTML 4.01 Transitional//EN">

 <html>

   <head>

     <title>测试</title>

     <script type="text/javascript" src="<%=request.getContextPath()%>/js/jquery-1.11.1.min.js"></script>

     <script type="text/javascript">

        function insert(){

            var record = $("#formID").serializeArray();

            console.info(record);

            $.ajax({

                    url : "<%=request.getContextPath()%>/systemLogController/insert.do",

                    type : 'post',

                    async:true,

                    dataType:'json',

                    data : record,

                    success:function(result){

                        alert("插入成功!");

                    }

            });

        }

     </script>

   </head>

   <body>

   <h1><%=new Date()%></h1>

   <h1>这是一个练习</h1>

      <form id="formID" action="">

         id: <input name="id" type="text"/>

         <input type="button" value="插入" onclick="insert()"/>

     </form>

     总数:

     <h4>${num}</h4>

   </body>

 </html>
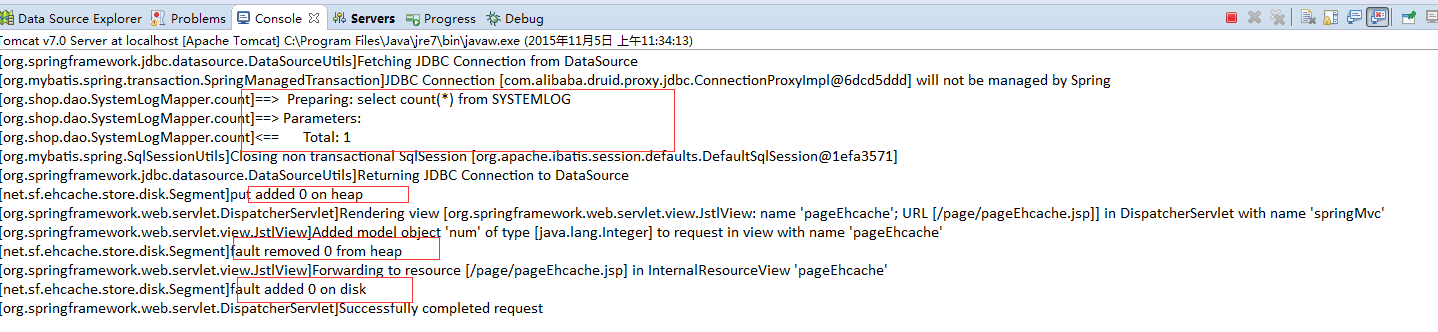
我们先访问test1.do,看下表中的记录数并注意控制台变化
页面显示如下,注意总数是67,

再一次访问test1.do,没有访问数据库,说明count()方法的缓存生效了,

接下来开始新增记录,点击插入按钮

注意控制台显示,这里执行了inserSQL语句,并remove了count()方法上的缓存,

接下来再次访问test1.do,我们看到总数变化了,增加了一条,说明我们把之前count()方法上的缓存删除了,又执行了查询总数的sql

再次访问test1.do,count()方法的缓存生效了,对吧!这个就是@CacheEvict注解的作用。

在insert()方法上还有@CachePut(value=”myCache”)注解,上面的serviceImpl中注释了,它的作用是:@CachePut标注的方法在执行前不会去检查缓存中是否存在之前执行过的结果,而是每次都会执行该方法,并将执行结果以键值对的形式存入指定的缓存中。
我这里就不做演示了,你们可以自己动手试试。
总结:我个人的理解,对查询方法增加缓存容易,但对于缓存的更新的处理就比较麻烦,我上面的serviceImpl中写了三种处理方式,
- 用@CachePut处理,这中方法需要对指定缓存key保持一致,尽管这样,还是不行,因为它返回的缓存是int(增加或删除或修改的记录数或是该记录的对象,这对我们查询所有或部分记录的缓存还是不可行的)
- 用@CacheEvict(value=”myCache”,key=”0″,beforeInvocation=true)处理,清除我们指定key的缓存,这种方式缺点是麻烦,需要我们注意每一个缓存的key
- 用@CacheEvict(value=”myCache”,allEntries=true,beforeInvocation=true)处理,清除所有缓存,这种方式最省事,但会把其他缓存也一同清除。
随着业务的复杂性的不断增加,这些处理方式,可能会增加代码的复杂性,然后我想到的是对DB层进行缓存,可以利用redis,mamchched的进行处理。当然对于一般的web应用运用ehcache已经可以解决了,但是对大数据量的运用db级别的缓存效果性能可能会更好。
spring整合ehcache注解实现查询缓存,并实现实时缓存更新或删除的更多相关文章
- spring整合ehcache 注解实现查询缓存,并实现实时缓存更新或删除
写在前面:上一篇博客写了spring cache和ehcache的基本介绍,个人建议先把这些最基本的知识了解了才能对今天主题有所感触.不多说了,开干! 注:引入jar <!-- 引入ehcach ...
- 2.spring整合ehcache 注解实现查询缓存,并实现实时缓存更新或删除
转自:http://www.importnew.com/23358.html 写在前面:上一篇博客写了spring cache和ehcache的基本介绍,个人建议先把这些最基本的知识了解了才能对今天主 ...
- Spring整合Ehcache管理缓存
前言 Ehcache 是一个成熟的缓存框架,你可以直接使用它来管理你的缓存. Spring 提供了对缓存功能的抽象:即允许绑定不同的缓存解决方案(如Ehcache),但本身不直接提供缓存功能的实现.它 ...
- Spring整合Ehcache管理缓存(转)
目录 前言 概述 安装 Ehcache的使用 HelloWorld范例 Ehcache基本操作 创建CacheManager 添加缓存 删除缓存 实现基本缓存操作 缓存配置 xml方式 API方式 S ...
- 以Spring整合EhCache为例从根本上了解Spring缓存这件事(转)
前两节"Spring缓存抽象"和"基于注解驱动的缓存"是为了更加清晰的了解Spring缓存机制,整合任何一个缓存实现或者叫缓存供应商都应该了解并清楚前两节,如果 ...
- Spring整合EHCache框架
在Spring中使用缓存可以有效地避免不断地获取相同数据,重复地访问数据库,导致程序性能恶化. 在Spring中已经定义了缓存的CacheManager和Cache接口,只需要实例化便可使用. Spr ...
- Spring整合EhCache详解
一.EhCache介绍 EhCache 是一个纯Java的进程内缓存框架,具有快速.精干等特点,是Hibernate中默认的CacheProvider.Ehcache是一种广泛使用的开 源Java分布 ...
- spring 整合hibernate注解时候,出现“Unknown entity: com.ssh.entry.Admin; nested exception is org.hibernate.MappingException: Unknown entity: com.ssh.entry.Admin”异常的问题
今天学习使用ssh框架的时候,出现一个异常,弄了好久才找到,在这记录一下,我的sb错误1.spring整合hibernate,取代*.hbm.xml配置文件 在applicationContext ...
- Hibernate Validation与Spring整合各注解的用法Demo
转自:https://www.aliyun.com/jiaocheng/1315650.html <dependency> <groupId>org.hibernate< ...
随机推荐
- [翻译] OrigamiEngine
OrigamiEngine https://github.com/ap4y/OrigamiEngine Lightweight iOS and OSX audio engine with opus, ...
- 一、Linux中的常用命令2 二、Vim编辑器的使用
一.Linux的常用命令###<1>文件目录操作 13. echo:用于输出字符串,shell编程,echo 1. 输出字符串 : echo str ,shell编程会使用(类似java中 ...
- c++程序员学习go
作为一个c++程序员学习go编程的笔记.首先声明本人文笔太差,当你阅读一点觉得实在无法阅读下去时请移步. 下载安装go,安装完毕后会增加系统环境变量path内容指定go程序所在目录,可以打开cmd输入 ...
- ECharts 定制 label 样式
起因 实现对 label 的样式定制,自定义字体颜色.大小等属性:效果如下图 实现 itemStyle: { normal: { color: '#f7ba0e', label: { ...
- pthread线程内存布局
http://www.cnblogs.com/snake-hand/p/3148191.html 我们从图上可以看出,两个线程之间的栈是独立的,其他是共享的,所以,在操作共享区域的时候才有可能出现同步 ...
- S1 商品信息管理系统
#include <iostream> #include <cstdio> #include <cstdlib> #include <iomanip> ...
- SQLServer2008导出表数据为SQL脚本
SQLServer2008的导出脚本方法: 数据库名-->右键 任务-->生存脚本 之后弹出SQLServer脚本生成向导 选择数据库 把编写数据可脚本这一项改为true,默认是false ...
- Hive学习之路 (十三)Hive分析窗口函数(一) SUM,AVG,MIN,MAX
数据准备 数据格式 cookie1,, cookie1,, cookie1,, cookie1,, cookie1,, cookie1,, cookie1,, 创建数据库及表 create datab ...
- Android攻城狮学习笔记—入门篇三
第十章 CheckBox 与其他控件类似 有自己的监听方法 实现监听 并定义被选中或取消后的操作 第十一章 RadioGroup和RadioButton RadioGroup是RadioButton的 ...
- ZOJ3211-Dream City(贪心思想+变形的01背包)
Dream City Time Limit:1000MS Memory Limit:32768KB 64bit IO Format:%lld & %llu Submit Sta ...