
django用户投票系统详解
投票系统之详解
1、创建项目(mysite)与应用(polls)
django-admin.py startproject mysite

python manage.py startapp polls
添加到setting.py
INSTALLED_APPS = (

    'django.contrib.admin',

    'django.contrib.auth',

    'django.contrib.contenttypes',

    'django.contrib.sessions',

    'django.contrib.messages',

    'django.contrib.staticfiles',

    'polls',

)
2、创建模型(即数据库)
一般web开发先设计数据库,数据库设计好了,项目就完了大半了,可见数据库的重要性。打开polls/models.py编写如下:
 coding=utf-8

from django.db import models

# Create your models here.

# 问题

class Question(models.Model):

    question_text = models.CharField(max_length=200)

    pub_date = models.DateTimeField('date published')

    def __unicode__(self):

        return self.question_text

# 选择

class Choice(models.Model):

    question = models.ForeignKey(Question)

    choice_text = models.CharField(max_length=200)

    votes = models.IntegerField(default=0)

    def __unicode__(self):

        return self.choice_text
执行数据库表生成与同步。
python manage.py makemigrations polls

python manage.py syncdb
3、admin管理
django提供了强大的后台管理,对于web应用来说,后台必不可少,例如,当前投票系统,如何添加问题与问题选项?直接操作数据库添加,显然麻烦,不方便,也不安全。所以,管理后台就可以完成这样的工作。
打开polls/admin.py文件,编写如下内容:
from django.contrib import admin

from .models import Question, Choice

# Register your models here.

class ChoiceInline(admin.TabularInline):

    model = Choice

    extra = 3

class QuestionAdmin(admin.ModelAdmin):

    fieldsets = [

        (None,               {'fields': ['question_text']}),

        ('Date information', {'fields': ['pub_date'], 'classes': ['collapse']}),

    ]

    inlines = [ChoiceInline]

    list_display = ('question_text', 'pub_date')

admin.site.register(Choice)

admin.site.register(Question, QuestionAdmin)
当前脚本的作用就是将模型(数据库表)交由admin后台管理。
运行web容器:
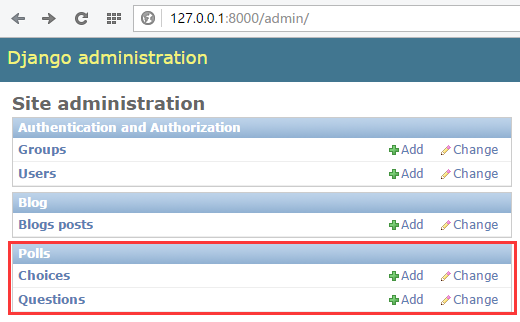
登录后台:http://127.0.0.1:8000/admin
登录密码就是在执行数据库同步时设置的用户名和密码。
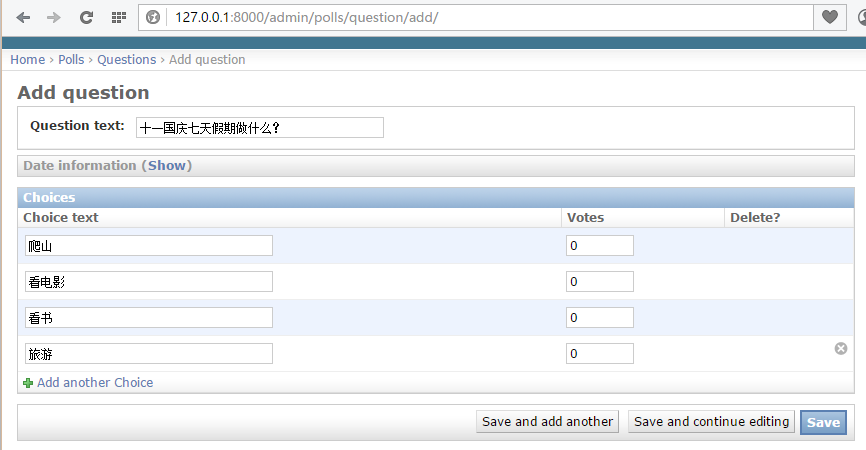
点击“add”添加问题。
4、编写视图
视图起着承前启后的作用,前是指前端页面,后是指后台数据库。将数据库表中的内容查询出来显示到页面上。
编写polls/views.py文件:
# coding=utf-8

from django.shortcuts import render, get_object_or_404

from django.http import HttpResponseRedirect, HttpResponse

from django.core.urlresolvers import reverse

from .models import Question, Choice

# Create your views here.

# 首页展示所有问题

def index(request):

    # latest_question_list2 = Question.objects.order_by('-pub_data')[:2]

    latest_question_list = Question.objects.all()

    context = {'latest_question_list': latest_question_list}

    return render(request, 'polls/index.html', context)

# 查看所有问题

def detail(request, question_id):

    question = get_object_or_404(Question, pk=question_id)

    return render(request, 'polls/detail.html', {'question': question})

# 查看投票结果

def results(request, question_id):

    question = get_object_or_404(Question, pk=question_id)

    return render(request, 'polls/results.html', {'question': question})

# 选择投票

def vote(request, question_id):

    p = get_object_or_404(Question, pk=question_id)

    try:

        selected_choice = p.choice_set.get(pk=request.POST['choice'])

    except (KeyError, Choice.DoesNotExist):

        # Redisplay the question voting form.

        return render(request, 'polls/detail.html', {

            'question': p,

            'error_message': "You didn't select a choice.",

        })

    else:

        selected_choice.votes += 1

        selected_choice.save()

        # Always return an HttpResponseRedirect after successfully dealing

        # with POST data. This prevents data from being posted twice if a

        # user hits the Back button.

        return HttpResponseRedirect(reverse('polls:results', args=(p.id,)))
5、配置url
url是一个请求配置文件,页面中的请求转交给由哪个函数处理,由该文件决定。
首先配置polls/urls.py(该文件需要创建)
from django.conf.urls import url

from . import views

urlpatterns = [

    # ex : /polls/

    url(r'^$', views.index, name='index'),

    # ex : /polls/5/

    url(r'^(?P<question_id>[0-9]+)/$', views.detail, name='detail'),

    # ex : /polls/5/results/

    url(r'^(?P<question_id>[0-9]+)/results/$', views.results, name='results'),

    # ex : /polls/5/vote

    url(r'^(?P<question_id>[0-9]+)/vote/$', views.vote, name='vote'),

]
接着,编辑mysite/urls.py文件。
from django.conf.urls import include, url

from django.contrib import admin

urlpatterns = [

    url(r'^polls/', include('polls.urls', namespace="polls")),

    url(r'^admin/', include(admin.site.urls)),

]
6、创建模板
模板就是前端页面,用来将数据显示到web页面上。
首先创建polls/templates/polls/目录,分别在该目录下创建index.html、detail.html和results.html文件。
index.html
{% if latest_question_list %}

    <ul>

    {% for question in latest_question_list %}

        <li><a href="{% url 'polls:detail' question.id %}">{{ question.question_text }}</a></li>

    {% endfor %}

    </ul>

{% else %}

    <p>No polls are available.</p>

{% endif %}
detail.html
<h1>{{ question.question_text }}</h1>

{% if error_message %}<p><strong>{{ error_message }}</strong></p>{% endif %}

<form action="{% url 'polls:vote' question.id %}" method="post">

{% csrf_token %}

{% for choice in question.choice_set.all %}

    <input type="radio" name="choice" id="choice{{ forloop.counter }}" value="{{ choice.id }}" />

    <label for="choice{{ forloop.counter }}">{{ choice.choice_text }}</label><br />

{% endfor %}

<input type="submit" value="Vote" />

</form>
results.html
<h1>{{ question.question_text }}</h1>

<ul>

{% for choice in question.choice_set.all %}

    <li>{{ choice.choice_text }} -- {{ choice.votes }} vote{{ choice.votes|pluralize }}</li>

{% endfor %}

</ul>

<a href="{% url 'polls:detail' question.id %}">Vote again?</a>
7、功能展示
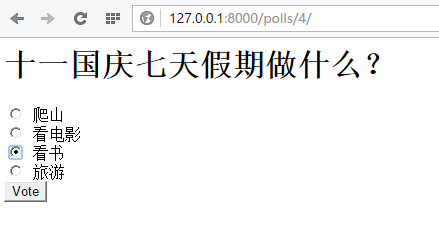
启动web容器,访问:http://127.0.0.1:8000/polls/


django用户投票系统详解的更多相关文章
- Linux 系统的用户和组详解_【all】
1.Linux 用户和用户组详解 2.Linux 文件特殊权限详解 3.Linux 文件的读写执行权限的说明 4.Linux 架构之简述企业网站 5.Linux 环境变量设置详解 6.企业生产环境用户 ...
- java中的io系统详解 - ilibaba的专栏 - 博客频道 - CSDN.NET
java中的io系统详解 - ilibaba的专栏 - 博客频道 - CSDN.NET 亲,“社区之星”已经一周岁了! 社区福利快来领取免费参加MDCC大会机会哦 Tag功能介绍—我们 ...
- Linux 用户及权限详解
Linux 用户及权限详解 用户 , 组 ,权限 安全上下文(secure context): 权限: r,w,x 文件: r : 可读,可以使用类似cat 等命令查看文件内容. w : 可写,可以编 ...
- Vmware12安装centos系统详解
vmware12安装centos7系统详解 用虚拟机12安装centos7系统详细安装过程,后附centos7下载地址. 工具/原料 虚拟机12 centos7系统镜像 方法/步骤 1 1.百度搜索c ...
- centos7.2环境nginx+mysql+php-fpm+svn配置walle自动化部署系统详解
centos7.2环境nginx+mysql+php-fpm+svn配置walle自动化部署系统详解 操作系统:centos 7.2 x86_64 安装walle系统服务端 1.以下安装,均在宿主机( ...
- syslog之一:Linux syslog日志系统详解
目录: <syslog之一:Linux syslog日志系统详解> <syslog之二:syslog协议及rsyslog服务全解析> <syslog之三:建立Window ...
- Django框架 之 querySet详解
Django框架 之 querySet详解 浏览目录 可切片 可迭代 惰性查询 缓存机制 exists()与iterator()方法 QuerySet 可切片 使用Python 的切片语法来限制查询集 ...
- 搭建zabbix监控系统详解
搭建zabbix监控系统详解 文:warren 博文大纲:一.前言 二.zabbix监控架构三.搭建Zabbix监控服务器四.搭建过程中遇到有些服务无法正常启动的解决办法 一.前言 : 要想实时的 ...
- Bootstrap栅格系统详解,响应式布局
Bootstrap栅格系统详解 栅格系统介绍 Bootstrap 提供了一套响应式.移动设备优先的流式栅格系统,随着屏幕或视口(viewport)尺寸的增加,系统会自动分为最多12列. 栅格系统用于通 ...
随机推荐
- Node.js的事件轮询Event Loop原理
Node.js的事件轮询Event Loop原理解释 事件轮询主要是针对事件队列进行轮询,事件生产者将事件排队放入队列中,队列另外一端有一个线程称为事件消费者会不断查询队列中是否有事件,如果有事件,就 ...
- 安装好oracle11gR2之后在相应路径下却没有生成tnsnames.ora和listener.ora
oracle安装帖子:https://blog.csdn.net/wjb123sw99/article/details/80780277 oracle安装过程中检查失败:需开启C盘共享,或者勾选忽略, ...
- app测试基础知识之命令
app测试点:功能测试,安全测试,用户体验测试,交叉事件测试,兼容性测试,性能测试,安装/升级/卸载 ,UI测试 命令操作: adb connect 名 adb devices adb instal ...
- caoz的梦呓:所谓打破信息不对称,其实是一种幻觉
猫宁!!! 参考链接:https://mp.weixin.qq.com/s/UzSyrhe0Vck7ItN-XU6JEg 很多创业者说,要建立怎样一个平台,要打破信息不对称,大部分时候,我都会泼冷水, ...
- vue中 Vue.set 的使用
Vue.set(vm.items, indexOfItem, newValue) 1.vm.items :源数据:2.indexOfItem : 要修改的数据的键3.newValue : 要修改的数据 ...
- 谈一谈 Normalize.css
Normalize.css是一种CSS reset的替代方案.它在默认的HTML元素样式上提供了跨浏览器的高度一致性.相比于传统的CSS reset,Normalize.css是一种现代的.为HTML ...
- 我理解的CLH
学而时习之,不亦说乎! --<论语> 原创,转载请附原文链接,谢谢. CLH 思路 保持时序的锁基本思路就是将等待获取锁的线程放入 ...
- [Python3] 040 文件 一般使用
目录 文件 1. open 函数 2. with 语句 3. 先写再读 3.1 写 3.2 读 4. "位置"的查询与移动 4.1 tell() 4.2 seek(cookie, ...
- Storm提交Topology报错:Found multiple defaults.yaml resources.
Storm提交Topology运行方式分为本地和集群运行两种,其中集群运行需要将程序打包并把jar包复制到集群,通过以下方式执行: bin/storm jar /opt/run/storm-demo- ...
- Luogu P3520 [POI2011]SMI-Garbage
题目 把要变边权的边拿出来找欧拉回路就行了.正确性显然,因为一条边经过两次相当于对欧拉回路度数的奇偶性没有影响. 然后把一个个小环输出即可,具体的我也不知道怎么输,题目没讲清楚,我按着题解的来的. # ...