
Android 网络图片查看器与网页源码查看器
在AndroidManifest.xml里面先添加访问网络的权限:
<uses-permission android:name="android.permission.INTERNET"/>
效果图如下 :
:
下面是主要代码:
 package com.hb.neting;

 import java.io.InputStream;

 import java.net.HttpURLConnection;

 import java.net.URL;

 import android.annotation.SuppressLint;

 import android.app.Activity;

 import android.graphics.Bitmap;

 import android.graphics.BitmapFactory;

 import android.os.Bundle;

 import android.text.TextUtils;

 import android.view.View;

 import android.widget.EditText;

 import android.widget.ImageView;

 import android.widget.Toast;

 public class MainActivity extends Activity {

     private ImageView iv_show;

     private EditText et_input;

     private String path;

     private int code;

     private HttpURLConnection conn;

     @Override

     protected void onCreate(Bundle savedInstanceState) {

         super.onCreate(savedInstanceState);

         setContentView(R.layout.activity_main);

         iv_show=(ImageView) findViewById(R.id.iv_show);

         et_input=(EditText) findViewById(R.id.et_inpput);

     }

     @SuppressLint("ShowToast") public void chakan(View view){

         path = et_input.getText().toString().trim();

         if (TextUtils.isEmpty(path)) {

             Toast.makeText(MainActivity.this, "不能输入空的", 0).show();

             return;

         }

         new Thread(){

             public void run() {

                 try {

                     URL url = new URL(path);

                     conn = (HttpURLConnection) url.openConnection();

                     conn.setRequestMethod("GET");

                     conn.setConnectTimeout(5000);

                     code = conn.getResponseCode();

                     if(code==200){

                         InputStream in = conn.getInputStream();

                         //解析图片

                         final Bitmap stream = BitmapFactory.decodeStream(in);

                         runOnUiThread(new  Runnable() {

                             public void run() {

                                 //更新UI

                                 iv_show.setImageBitmap(stream);

                             }

                         });

                         in.close();

                     }

                 } catch (Exception e) {

                     e.printStackTrace();

                 }

             };

         }.start();

     }

 }
这是xml的布局:
 <LinearLayout xmlns:android="http://schemas.android.com/apk/res/android"

     xmlns:tools="http://schemas.android.com/tools"

     android:layout_width="match_parent"

     android:layout_height="match_parent"

     android:orientation="vertical" >

     <EditText

         android:id="@+id/et_inpput"

         android:layout_width="match_parent"

         android:layout_height="wrap_content"

         android:hint="请输入获取图片的地址:" />

     <Button

         android:id="@+id/bt_read"

         android:onClick="chakan"

         android:layout_width="match_parent"

         android:layout_height="wrap_content"

         android:text="查看"

         />

     <ImageView

         android:id="@+id/iv_show"

         android:layout_width="match_parent"

         android:layout_height="match_parent"

         />

 </LinearLayout>
源码:http://pan.baidu.com/s/1bUgMgY
接着看一下网页源码查看器的小案例:
既然都涉及到网络的添加一个如上的网络权限是必不可少的了,具体操做如上所示,先看效果图:
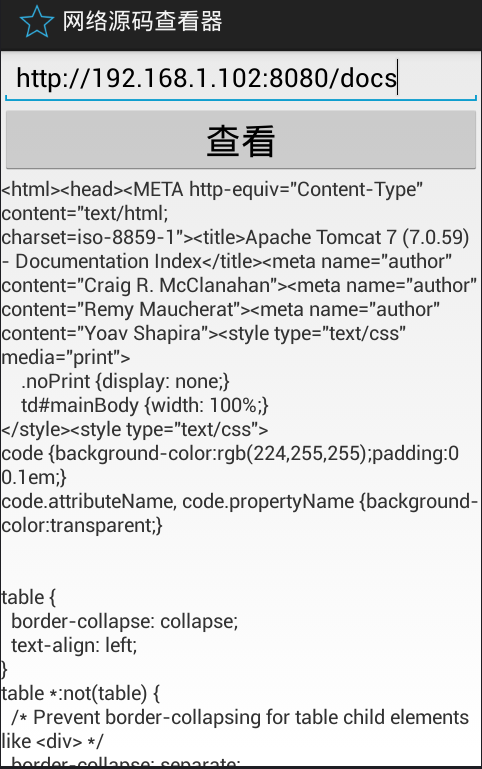
主要代码:
 package com.hb.network;

 import java.io.InputStream;

 import java.net.HttpURLConnection;

 import java.net.URL;

 import android.annotation.SuppressLint;

 import android.app.Activity;

 import android.os.Bundle;

 import android.os.Handler;

 import android.os.Message;

 import android.text.TextUtils;

 import android.view.View;

 import android.widget.EditText;

 import android.widget.TextView;

 import android.widget.Toast;

 import com.hb.utils.ReadStreamUtils;

 public class MainActivity extends Activity {

     protected static final int SUCESS = 0;

     protected static final int EORR = 1;

     private TextView tv_show;

     private EditText et_input;

     private URL url;

     private String path;

     @SuppressLint("HandlerLeak")

     private Handler handler=new Handler(){

         public void handleMessage(android.os.Message msg) {

             switch (msg.what) {

             case SUCESS:

                 String content=(String) msg.obj;

                 tv_show.setText(content);

                 break;

             case EORR:

                 Toast.makeText(MainActivity.this,"查看源码失败" , 0).show();

                 break;

             }

         };

     };

     @Override

     protected void onCreate(Bundle savedInstanceState) {

         super.onCreate(savedInstanceState);

         setContentView(R.layout.activity_main);

         tv_show=(TextView) findViewById(R.id.tv_show);

         et_input=(EditText) findViewById(R.id.et_input);

     }

     public void onclick(View view){

         path = et_input.getText().toString().trim();

         if(TextUtils.isEmpty(path)){

             return;

         }new Thread(){

             public void run() {

                 try {

                     url = new URL(path);

                     //判断从EditText获取的数据否为空

                     if(TextUtils.isEmpty(path)){

                         return;

                     }

                     HttpURLConnection conn = (HttpURLConnection) url.openConnection();

                     conn.setConnectTimeout(3000);

                     conn.setRequestMethod("GET");

                     int code = conn.getResponseCode();

                     if(code == 200){

                         InputStream is= conn.getInputStream();

                         String content = ReadStreamUtils.Read(is);

                         Message msg = new Message();

                         msg.what=SUCESS;

                         msg.obj=content;

                         handler.sendMessage(msg);

                     }

                 } catch (Exception e) {

                     e.printStackTrace();

                     Message msg = new Message();

                     msg.what=EORR;

                     handler.sendMessage(msg);

                 }

             };

         }.start();

     }

 }
 package com.hb.utils;

 import java.io.ByteArrayOutputStream;

 import java.io.IOException;

 import java.io.InputStream;

 public class ReadStreamUtils {

 /**

  * 读取流的输入

  * @param is

  * @return

  * @throws IOException

  */

     public static String Read(InputStream is) throws IOException{

         ByteArrayOutputStream bos = new ByteArrayOutputStream();

         int len;

         byte [] buffer=new byte[1024];

         while((len=is.read(buffer))!=-1){

             bos.write(buffer,0,len);

         }

         is.close();

         bos.close();

         String temp = bos.toString();

         if(temp.contains("charset=utf-8")){

             return bos.toString("utf-8");

         }else if(temp.contains("charset=iso-8859-1")){

             return bos.toString("iso-8859-1");

         }

         return null;

     }

 }
及xml布局:
 <LinearLayout xmlns:android="http://schemas.android.com/apk/res/android"

     xmlns:tools="http://schemas.android.com/tools"

     android:layout_width="match_parent"

     android:layout_height="match_parent"

     android:orientation="vertical"

     tools:context="${relativePackage}.${activityClass}" >

     <EditText

         android:id="@+id/et_input"

         android:layout_width="match_parent"

         android:layout_height="wrap_content"

         android:hint="请输入要查看源码的网址:" />

     <Button

         android:onClick="onclick"

         android:layout_width="match_parent"

         android:layout_height="wrap_content"

         android:text="查看"

         android:textSize="25sp" />

     <ScrollView

         android:layout_width="match_parent"

         android:layout_height="match_parent" >

         <TextView

             android:id="@+id/tv_show"

             android:layout_width="match_parent"

             android:layout_height="match_parent" />

     </ScrollView>

 </LinearLayout>
源码:http://pan.baidu.com/s/1bUgMgY
http://pan.baidu.com/s/1i46RQqL
Android 网络图片查看器与网页源码查看器的更多相关文章
- 黎活明8天快速掌握android视频教程--24_网络通信之网页源码查看器
1 该项目的主要功能就是从将后台的html网页在Android的界面上显示出来 后台就是建立一个java web工程在工程尚建立一个html或者jsp文件就可以了,这里主要看Android客户端的程序 ...
- Android(java)学习笔记203:网页源码查看器(Handler消息机制)
1.项目框架图: 2.首先是布局文件activity_main.xml: <LinearLayout xmlns:android="http://schemas.android.com ...
- Android(java)学习笔记146:网页源码查看器(Handler消息机制)
1.项目框架图: 2.首先是布局文件activity_main.xml: <LinearLayout xmlns:android="http://schemas.android.com ...
- android 网络_网络源码查看器
xml设计 <?xml version="1.0"?> -<LinearLayout tools:context=".MainActivity" ...
- Android: 在WebView中获取网页源码
1. 使能javascript: ? 1 webView.getSettings().setJavaScriptEnabled(true); 2. 编写本地接口 ? 1 2 3 4 5 final c ...
- 编译Android 4.4.4 r1的源码刷Nexus 5手机详细教程
本文博客地址:http://blog.csdn.net/qq1084283172/article/details/54562606 网上关于编译Android源码的教程已经很多了,但是讲怎么编译And ...
- 【原】Android热更新开源项目Tinker源码解析系列之一:Dex热更新
[原]Android热更新开源项目Tinker源码解析系列之一:Dex热更新 Tinker是微信的第一个开源项目,主要用于安卓应用bug的热修复和功能的迭代. Tinker github地址:http ...
- 如何查看google chrome 插件源码
常用浏览器google chrome 有很多优秀的插件,寂寞的时候想看看人家是怎么实现的,说是快那就动手吧 插件代码位置 本人mac笔记本,chrome 插件位置如下 $ cd /Users/vin ...
- Python爬虫学习之获取网页源码
偶然的机会,在知乎上看到一个有关爬虫的话题<利用爬虫技术能做到哪些很酷很有趣很有用的事情?>,因为强烈的好奇心和觉得会写爬虫是一件高大上的事情,所以就对爬虫产生了兴趣. 关于网络爬虫的定义 ...
随机推荐
- python性能优化、内存优化、内存泄露;与其他语音比较效率如何?
1.内存泄露:http://www.cnblogs.com/xybaby/p/7491656.html 2.内存优化:http://www.cnblogs.com/xybaby/p/7488216.h ...
- iOS_开发中遇到的那些问题_1
[自编号:60][AutoLayout中,怎样让ImageView保持固定的宽高比?比如1:1] 先将imageViewframe手动写成:宽20,高20,再勾选Aspect Ratio加入宽高比约束 ...
- luajit利用ffi结合C语言实现面向对象的封装库
luajit中.利用ffi能够嵌入C.眼下luajit的最新版是2.0.4,在这之前的版本号我还不清楚这个扩展库详细怎么样,只是在2.04中,真的非常爽. 既然是嵌入C代码.那么要说让lua支持 ...
- Cracking the Coding Interview 150题(一)
1.数组与字符串 1.1 实现一个算法,确定一个字符串的所有字符是否全都不同.假设不允许使用额外的数据结构,又该如何处理? 1.2 用C或C++实现void reverse(char* str)函数, ...
- linux c 获取当前执行进程总数
获取当前执行进程总数的命令为: ps auxw | wc -l 获取当前执行进程总数的源代码例如以下: #include <stdio.h> #include <stdlib.h&g ...
- [译]IOS中AutoLayout布局与Transform的冲突问题
http://m.blog.csdn.net/blog/a345017062/43565279 原文链接见这里: http://stackoverflow.com/questions/12943107 ...
- web前端和后端的区别
一句话,展示ui相关的就是前端,否则就是后端. 前端语言:javascript.css和html. 后端就是一些服务.
- train_action
# 导入数值计算模块 import numpy as np import tensorflow as tf # 创建计算会话 sess = tf.Session() # 生成数据,创建占位符和变量A ...
- mySQL (关系型数据库管理系统)
MySQL是一个关系型数据库管理系统,由瑞典MySQL AB 公司开发,目前属于 Oracle 旗下产品.MySQL 是最流行的关系型数据库管理系统之一,在 WEB 应用方面,MySQL是最好的 RD ...
- beego4---web项目结构
app.conf appname = blog1 httpport = runmode = dev controllersmy package controllersmy //跟外面的包名一致 imp ...