
STM32F4 DMA2D_R2M
图像处理的专门DMA
看一段示例代码
 /**

   * @brief  Displays a line.

   * @param Xpos: specifies the X position.

   * @param Ypos: specifies the Y position.

   * @param Length: line length.

   * @param Direction: line direction.

   *   This parameter can be one of the following values: Vertical or Horizontal.

   * @retval None

   */

 void LCD_DrawLine(uint16_t Xpos, uint16_t Ypos, uint16_t Length, uint8_t Direction)

 {

   DMA2D_InitTypeDef      DMA2D_InitStruct;

   uint32_t  Xaddress = ;

   uint16_t Red_Value = , Green_Value = , Blue_Value = ;

   Xaddress = CurrentFrameBuffer + *(LCD_PIXEL_WIDTH*Ypos + Xpos);

   Red_Value = (0xF800 & CurrentTextColor) >> ;

   Blue_Value = 0x001F & CurrentTextColor;

   Green_Value = (0x07E0 & CurrentTextColor) >> ;

   /* Configure DMA2D */

   DMA2D_DeInit();

   DMA2D_InitStruct.DMA2D_Mode = DMA2D_R2M;

   DMA2D_InitStruct.DMA2D_CMode = DMA2D_RGB565;

   DMA2D_InitStruct.DMA2D_OutputGreen = Green_Value;

   DMA2D_InitStruct.DMA2D_OutputBlue = Blue_Value;

   DMA2D_InitStruct.DMA2D_OutputRed = Red_Value;

   DMA2D_InitStruct.DMA2D_OutputAlpha = 0x0F;

   DMA2D_InitStruct.DMA2D_OutputMemoryAdd = Xaddress;

   if(Direction == LCD_DIR_HORIZONTAL)

   {

     DMA2D_InitStruct.DMA2D_OutputOffset = ;

     DMA2D_InitStruct.DMA2D_NumberOfLine = ;

     DMA2D_InitStruct.DMA2D_PixelPerLine = Length;

   }

   else

   {

     DMA2D_InitStruct.DMA2D_OutputOffset = LCD_PIXEL_WIDTH - ;

     DMA2D_InitStruct.DMA2D_NumberOfLine = Length;

     DMA2D_InitStruct.DMA2D_PixelPerLine = ;

   }

   DMA2D_Init(&DMA2D_InitStruct);

   /* Start Transfer */

   DMA2D_StartTransfer();

   /* Wait for CTC Flag activation */

   while(DMA2D_GetFlagStatus(DMA2D_FLAG_TC) == RESET)

   {

   }

 }
LCD_DrawLine
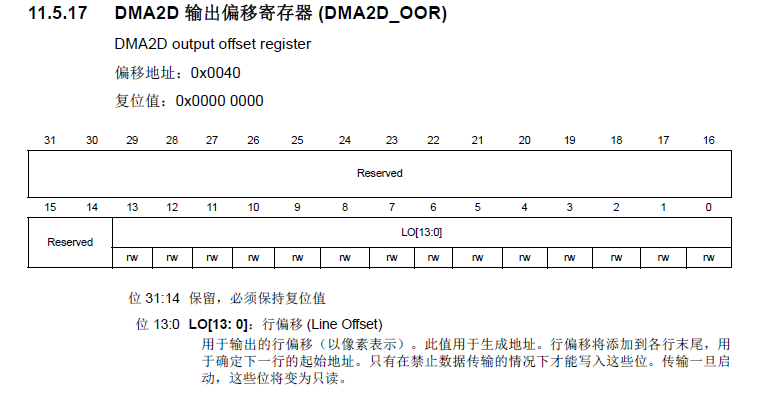
里面不好理解的是offset那块,其他统一模式设置看看手册即可,这个offset设置我们先看寄存器是哪个
/* Configure the line Offset */
DMA2D->OOR &= ~(uint32_t)DMA2D_OOR_LO;
DMA2D->OOR |= (DMA2D_InitStruct->DMA2D_OutputOffset);
寄存器定义:
再看代码那几句:
if(Direction == LCD_DIR_HORIZONTAL)
{
DMA2D_InitStruct.DMA2D_OutputOffset = 0;
DMA2D_InitStruct.DMA2D_NumberOfLine = 1;
DMA2D_InitStruct.DMA2D_PixelPerLine = Length;
}
else
{
DMA2D_InitStruct.DMA2D_OutputOffset = LCD_PIXEL_WIDTH - 1;
DMA2D_InitStruct.DMA2D_NumberOfLine = Length;
DMA2D_InitStruct.DMA2D_PixelPerLine = 1;
}
if里很明白,在指定位置没有offset画一条length长的线
else是画的竖线,所以每行只画一个点,画length条线,所以每行只画一个点,offset的值就是:LCD_PIXEL_WIDTH - 1
发现不同MODE有很多不同理解故深化一下看看初始化函数内部操作的哪些寄存器进一步理解
 /**

   * @brief  Initializes the DMA2D peripheral according to the specified parameters

   *         in the DMA2D_InitStruct.

   * @note   This function can be used only when the DMA2D is disabled.

   * @param  DMA2D_InitStruct: pointer to a DMA2D_InitTypeDef structure that contains

   *         the configuration information for the specified DMA2D peripheral.

   * @retval None

   */

 void DMA2D_Init(DMA2D_InitTypeDef* DMA2D_InitStruct)

 {

   uint32_t outgreen = ;

   uint32_t outred   = ;

   uint32_t outalpha = ;

   uint32_t pixline  = ;

   /* Check the parameters */

   assert_param(IS_DMA2D_MODE(DMA2D_InitStruct->DMA2D_Mode));

   assert_param(IS_DMA2D_CMODE(DMA2D_InitStruct->DMA2D_CMode));

   assert_param(IS_DMA2D_OGREEN(DMA2D_InitStruct->DMA2D_OutputGreen));

   assert_param(IS_DMA2D_ORED(DMA2D_InitStruct->DMA2D_OutputRed));

   assert_param(IS_DMA2D_OBLUE(DMA2D_InitStruct->DMA2D_OutputBlue));

   assert_param(IS_DMA2D_OALPHA(DMA2D_InitStruct->DMA2D_OutputAlpha));

   assert_param(IS_DMA2D_OUTPUT_OFFSET(DMA2D_InitStruct->DMA2D_OutputOffset));

   assert_param(IS_DMA2D_LINE(DMA2D_InitStruct->DMA2D_NumberOfLine));

   assert_param(IS_DMA2D_PIXEL(DMA2D_InitStruct->DMA2D_PixelPerLine));

   /* Configures the DMA2D operation mode */

   DMA2D->CR &= (uint32_t)CR_MASK;

   DMA2D->CR |= (DMA2D_InitStruct->DMA2D_Mode);

   /* Configures the color mode of the output image */

   DMA2D->OPFCCR &= ~(uint32_t)DMA2D_OPFCCR_CM;

   DMA2D->OPFCCR |= (DMA2D_InitStruct->DMA2D_CMode);

   /* Configures the output color */

   if (DMA2D_InitStruct->DMA2D_CMode == DMA2D_ARGB8888)

   {

     outgreen = DMA2D_InitStruct->DMA2D_OutputGreen << ;

     outred = DMA2D_InitStruct->DMA2D_OutputRed << ;

     outalpha = DMA2D_InitStruct->DMA2D_OutputAlpha << ;

   }

   else

     if (DMA2D_InitStruct->DMA2D_CMode == DMA2D_RGB888)

     {

       outgreen = DMA2D_InitStruct->DMA2D_OutputGreen << ;

       outred = DMA2D_InitStruct->DMA2D_OutputRed << ;

       outalpha = (uint32_t)0x00000000;

     }

   else

     if (DMA2D_InitStruct->DMA2D_CMode == DMA2D_RGB565)

     {

       outgreen = DMA2D_InitStruct->DMA2D_OutputGreen << ;

       outred = DMA2D_InitStruct->DMA2D_OutputRed << ;

       outalpha = (uint32_t)0x00000000;

     }

   else

     if (DMA2D_InitStruct->DMA2D_CMode == DMA2D_ARGB1555)

     {

       outgreen = DMA2D_InitStruct->DMA2D_OutputGreen << ;

       outred = DMA2D_InitStruct->DMA2D_OutputRed << ;

       outalpha = DMA2D_InitStruct->DMA2D_OutputAlpha << ;

     }

   else /* DMA2D_CMode = DMA2D_ARGB4444 */

   {

     outgreen = DMA2D_InitStruct->DMA2D_OutputGreen << ;

     outred = DMA2D_InitStruct->DMA2D_OutputRed << ;

     outalpha = DMA2D_InitStruct->DMA2D_OutputAlpha << ;

   }

   DMA2D->OCOLR |= ((outgreen) | (outred) | (DMA2D_InitStruct->DMA2D_OutputBlue) | (outalpha));

   /* Configures the output memory address */

   DMA2D->OMAR = (DMA2D_InitStruct->DMA2D_OutputMemoryAdd);

   /* Configure  the line Offset */

   DMA2D->OOR &= ~(uint32_t)DMA2D_OOR_LO;

   DMA2D->OOR |= (DMA2D_InitStruct->DMA2D_OutputOffset);

   /* Configure the number of line and pixel per line */

   pixline = DMA2D_InitStruct->DMA2D_PixelPerLine << ;

   DMA2D->NLR &= ~(DMA2D_NLR_NL | DMA2D_NLR_PL);

   DMA2D->NLR |= ((DMA2D_InitStruct->DMA2D_NumberOfLine) | (pixline));
DMA2D_Init
DMA2D_InitStruct.DMA2D_Mode = DMA2D_R2M; // DMA2D->CR
DMA2D_InitStruct.DMA2D_CMode = DMA2D_RGB565; // DMA2D->OPFCCR
DMA2D_InitStruct.DMA2D_OutputGreen = Green_Value; // DMA2D->OCOLR
DMA2D_InitStruct.DMA2D_OutputBlue = Blue_Value; // DMA2D->OCOLR
DMA2D_InitStruct.DMA2D_OutputRed = Red_Value; // DMA2D->OCOLR
DMA2D_InitStruct.DMA2D_OutputAlpha = 0x0F; // DMA2D->OCOLR
DMA2D_InitStruct.DMA2D_OutputMemoryAdd = Xaddress; // DMA2D->OMAR
DMA2D_InitStruct.DMA2D_OutputOffset = 0; // DMA2D->OOR
DMA2D_InitStruct.DMA2D_NumberOfLine = 1; // DMA2D->NLR
DMA2D_InitStruct.DMA2D_PixelPerLine = Length; // DMA2D->NLR
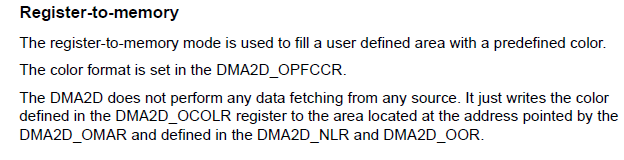
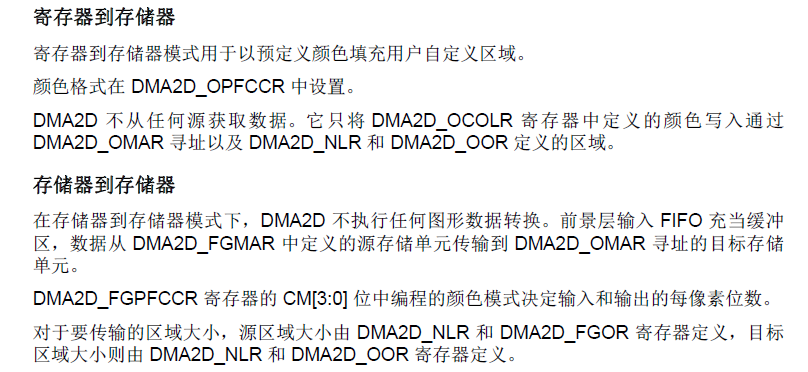
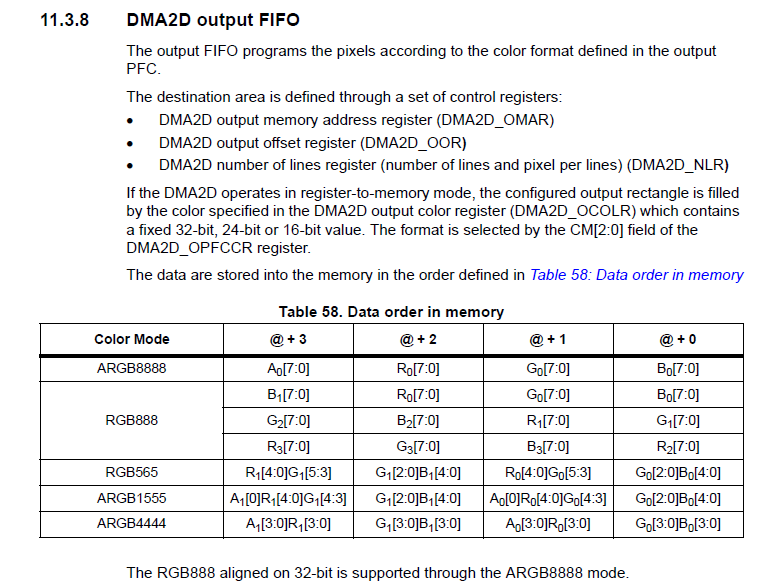
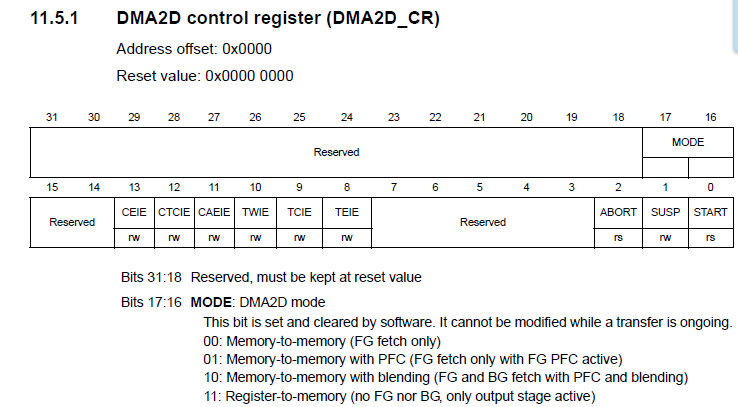
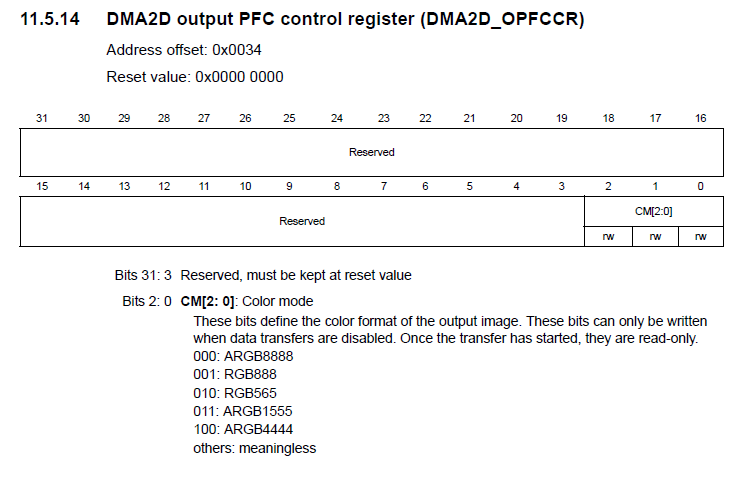
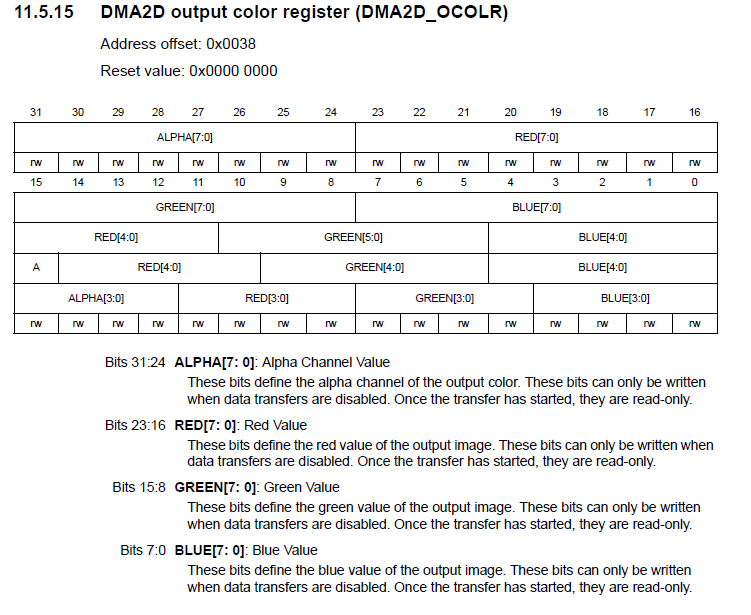
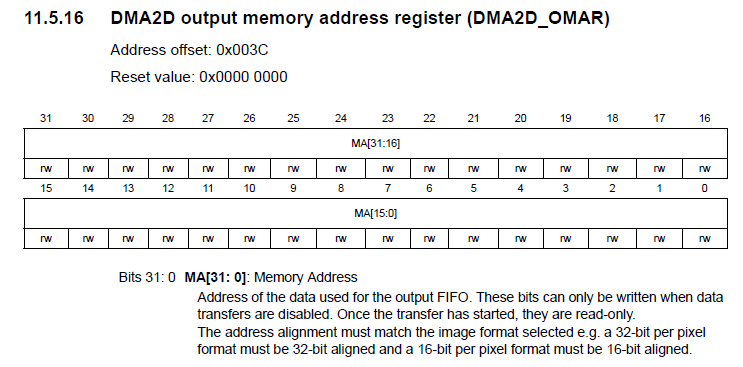
Register to Memory比较简单,设置模式与输出color format,然后就是输出的颜色值,输出的地址(此例子直接给LCD),输出的offset已经解释过
没有FG(foreground)和 BG(background) 直接输出image到Memory


STM32F4 DMA2D_R2M的更多相关文章
- 使用STM32F4的CCM内存
使用STM32F4的CCM内存http://www.stmcu.org/module/forum/forum.php?mod=viewthread&tid=604814&fromuid ...
- STM32F4读写内部FLASH【使用库函数】
STM32F4Discovery开发帮使用的STM32F407VGT6芯片,内部FLASH有1M之多.平时写的代码,烧写完之后还有大量的剩余.有效利用这剩余的FLASH能存储不少数据.因此研究了一下S ...
- STM32F1和STM32F4 区别
STM32F4相对于STM32F1的改进不只一点点,为了便于初学者了解,我们比对相关资料将改进点进行了汇总. STM32F1和STM32F4 区别 (安富莱整理)u F1采用Crotex M3内 ...
- STM32F4 SPI2初始化及收发数据【使用库函数】
我的STM32F4 Discovery上边有一个加速度传感器LIS302DL.在演示工程中,ST的工程师使用这个传感器做了个很令人羡慕的东西:解算开发板的姿态.当开发板倾斜时候,处于最上边的LED点亮 ...
- 使用固件库操作STM32F4时的必要配置(转)
源:使用固件库操作STM32F4时的必要配置 使用STM32F4的固件库时,默认的晶振为25Mhz晶振,因此需要做一定的修改.之前因为一直没有注意这个问题,我捣腾了许久,发现工作时钟总是不对,查阅了一 ...
- STM32F4系统时钟配置及描述
STM32F4系统时钟配置及描述 stm32f407时钟配置方法(感觉很好,分享一下) STM32F4_RCC系统时钟配置及描述 STM32F4时钟设置分析 stm32f4 - 时钟树分析配置
- STM32F4时钟配置分析
//学习STM32F4的过程中关于时钟上面讲的比较好 特地转发与大家分享 STM32F4时钟设置分析 原文博客链接:http://blog.csdn.net/jdh99,作者:jdh,转载请注明. 环 ...
- STM32F4的FPU单元讲解
搞STM32F407单片机的时候 看见的关于STM32F4系列的FPU 单元讲解 比较精彩的博客 于是特意转载 和大家分享 转自:http://blog.renren.com/blog/256814 ...
- STM32F4中USB与PC双向通信
STM32F4系列处理器内部集成了USB-OTG控制器,在不要外部USB IC下就可以实现USB通信,最近两天看了下如何利用STM32的USB实现通信,记录下关键步骤: 1. 从http://www. ...
随机推荐
- BZOJ 3175: [Tjoi2013]攻击装置
捉水题真是捉上瘾了TUT Description 给定一个01矩阵,其中你可以在0的位置放置攻击装置.每一个攻击装置(x,y)都可以按照“日”字攻击其周围的 8个位置(x-1,y-2),(x-2,y- ...
- poj 3678 XOR和OR和AND(简单2-sat问题)
/* 题意:给你一些边,每条边有一个值和一个运算符XOR OR AND求是否存在一些点使得所有的边根据这些运算符 可以符合条件的权值. 建边方式参考:http://blog.csdn.net/shua ...
- ES6__字符串、数组、对象的扩展
/** * 字符串的扩展 */ // 模板字符串 tab上面的反向符号 // 添加${} // let flag = true; // // let html = `<ul> // < ...
- msp430入门编程41
msp430中C语言的软件工程--状态机建模
- spring/spring boot/spring mvc中用到的注解
在spring Boot中几乎可以完全弃用xml配置文件,本文的主题是分析常用的注解. Spring最开始是为了解决EJB等大型企业框架对应用程序的侵入性,因此大量依靠配置文件来“非侵入式”得给POJ ...
- 转: ORACLE存储过程笔记2----运算符和表达式
运算符和表达式 关系运算 =等于<>,!=不等于<小于>大于<=小于等于>=大于等于 一般运算 +加-减*乘/除:=赋值号=>关系号. ...
- npm Error: Cannot find module 'proto-list'
Error: Cannot find module 'proto-list' at Function.Module._resolveFilename (module.js:338:15) at Fun ...
- firedac数据集的序列和还原
procedure TForm1.Button1Click(Sender: TObject);var stream, stream2: TMemoryStream; buf: TBytes;begin ...
- 关于Android Service真正的全然具体解释,你须要知道的一切
转载请注明出处(万分感谢! ): http://blog.csdn.net/javazejian/article/details/52709857 出自[zejian的博客] Service全部内 ...
- Citrix XenServer
Citrix XenServer xenserver-test cpu特性码:77fafbff-bfebfbff-00000021-2c100800 xe snapshot-list xen还原快照 ...