
Springboot- Spring缓存抽象学习笔记
Spring缓存作用准备:
1、准备数据(准备一个有数据的库和表/导入数据库文件,准备好表和表里面的数据)
2、创建javaBean封装数据
3、整合MyBatis操作数据库( 这里用MyBatis)
1,配置数据源信息
2、使用注解版的MyBatis;
1)、@MapperScan指定需要扫描的Mapper接口所在的包
创建一个springboot项目 -》选择依赖(Core->Cache、Web->Web、SQL->MySQL,MyBatis) -》
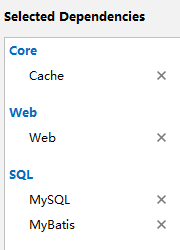
1,配置数据源信息

spring.datasource.url=jdbc:mysql://localhost:3306/spring_cache?useUnicode=true&characterEncoding=utf8&serverTimezone=GMT%2B8&useSSL=false
spring.datasource.username=root spring.datasource.password=root # 不写的时候从url识别 # spring.datasource.driver-class-name=com.mysql.jdbc.Driver
# 开启驼峰命名匹配规则,将数据库中表的字段含有下划线分割符的匹配到javaBean的驼峰风格属性
mybatis.configuration.map-underscore-to-camel-case=true
logging.level.com.orz.springbootcache.mapper= debug
2、使用注解版的MyBatis;
1)、@MapperScan指定需要扫描的Mapper接口所在的包
package com.orz.springbootcache.mapper;

import com.orz.springbootcache.bean.Department;

import org.apache.ibatis.annotations.Mapper;

import org.apache.ibatis.annotations.Select;

@Mapper

public interface DepartmentMapper {

    @Select("SELECT * FROM department WHERE id = #{id}")

    Department getDeptById(Integer id);

}
package com.orz.springbootcache.mapper;

import com.orz.springbootcache.bean.Employee;

import org.apache.ibatis.annotations.*;

@Mapper

public interface EmployeeMapper {

    @Select("SELECT * FROM employee WHERE id = #{id}")

    public Employee getEmpById(Integer id);

    @Update("UPDATE employee SET lastName=#{lastName},email=#{email},gender=#{gender},d_id=#{dId} WHERE id=#{id}")

    public void updateEmp(Employee employee);

    @Delete("DELETE FROM employee WHERE id=#{id}")

    public void deleteEmpById(Integer id);

    @Insert("INSERT INTO employee(lastName,email,gender,d_id) VALUES(#{lastName},#{email},#{gender},#{dId})")

    public void insertEmployee(Employee employee);

    @Select("SELECT * FROM employee WHERE lastName = #{lastName}")

    Employee getEmpByLastName(String lastName);

}

EmployeeService
package com.orz.springbootcache.service;

import com.orz.springbootcache.bean.Employee;

import com.orz.springbootcache.mapper.EmployeeMapper;

import org.springframework.beans.factory.annotation.Autowired;

import org.springframework.stereotype.Service;

import org.springframework.web.context.annotation.ApplicationScope;

/**

 * @Author ^_^

 * @Create 2019/3/10

 */

@Service

public class EmployeeService {

    @Autowired

    EmployeeMapper employeeMapper;

    public Employee getEmp(Integer id){

        System.out.println("查询"+id + "号员工");

        Employee emp = employeeMapper.getEmpById(id);

        return emp;

    }

}
EmployeeController
package com.orz.springbootcache.controller;

import com.orz.springbootcache.bean.Employee;

import com.orz.springbootcache.service.EmployeeService;

import org.springframework.beans.factory.annotation.Autowired;

import org.springframework.web.bind.annotation.GetMapping;

import org.springframework.web.bind.annotation.PathVariable;

import org.springframework.web.bind.annotation.RestController;

/**

 * @Author ^_^

 * @Create 2019/3/10

 */

@RestController

public class EmployeeController {

    @Autowired

    EmployeeService employeeService;

    @GetMapping("/emp/{id}")

    public Employee getEmployee(@PathVariable("id") Integer id){

        Employee emp = employeeService.getEmp(id);

        return emp;

    }

}
Spring缓存步骤:
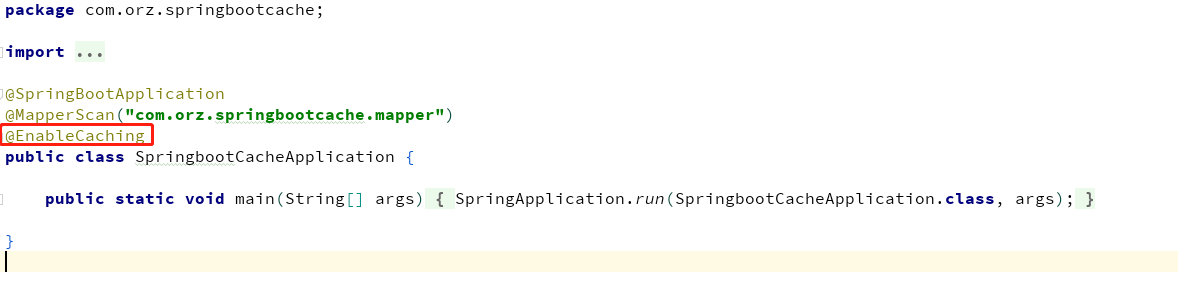
1、开启基于注解的缓存 @EnableCaching
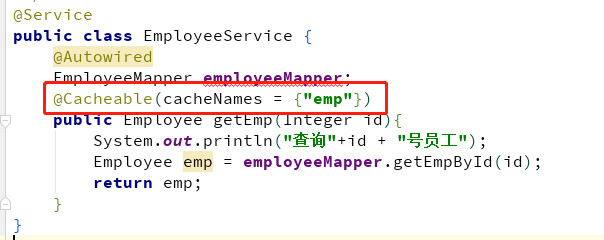
2、标注缓存注解即可
@Cachable
@CachePut
@CacheEvict
@Cachable将方法的运行结果进行缓存;以后再要相同的数据,直接从缓存中获取,不用调用方法;
CacheManager管理多个 Cache组件的,对缓存的真正CRUD操作在 Cache组件中,每一个缓存组件有自己唯一一个名字;
几个属性::
程序入口开启使用缓存@EnableCaching和持久层方法上加入可缓存注解@Cacheable
缓存工作原理和@Cachable工作流程
我们引入了缓存模块,那么缓存的自动配置就会生效
1、自动配置类;CacheAutoConfiguration
@Service

public class EmployeeService {

    @Autowired

    EmployeeMapper employeeMapper;

    @Cacheable(cacheNames = {"emp"})

    public Employee getEmp(Integer id){

        System.out.println("查询"+id + "号员工");

        Employee emp = employeeMapper.getEmpById(id);

        return emp;

    }

}
package com.orz.springbootcache.config;

import org.springframework.cache.interceptor.KeyGenerator;

import org.springframework.context.annotation.Bean;

import org.springframework.context.annotation.Configuration;

import java.lang.reflect.Method;

import java.util.Arrays;

/**

 * @Author ^_^

 * @Create 2019/3/11

 */

@Configuration

public class MyCacheConfig {

    @Bean("myKeyGenerator")

    public KeyGenerator keyGenerator(){

        return new KeyGenerator() {

            @Override

            public Object generate(Object o, Method method, Object... objects) {

                return method.getName() + "[" + Arrays.asList(objects) + "]";

            }

        };

    }

}
调用自定义KeyGenerator
@Service

public class EmployeeService {

    @Autowired

    EmployeeMapper employeeMapper;

    @Cacheable(cacheNames = {"emp"},keyGenerator = "myKeyGenerator", condition = "#id>0", unless="#a0==2")

    public Employee getEmp(Integer id){

        System.out.println("查询"+id + "号员工");

        Employee emp = employeeMapper.getEmpById(id);

        return emp;

    }

}
@CachePut
 @CachePut: 既调用方法,又更新缓存数据:同步更新缓存
 修改了数据库的某个数据,同时更新缓存
 运行时机:
   1,先调用目标方法
   2,将目标方法的结果缓存起来

 需要注意缓存的数据
 @CachePut 没有指定key时,默认用传参做key,查询result做value
 需要要指定和@Cacheable用相同的key,更新的key和查询的key达到一致

service:
package com.orz.springbootcache.service;

import com.orz.springbootcache.bean.Employee;

import com.orz.springbootcache.mapper.EmployeeMapper;

import org.springframework.beans.factory.annotation.Autowired;

import org.springframework.cache.annotation.CachePut;

import org.springframework.cache.annotation.Cacheable;

import org.springframework.stereotype.Service;

/**

 * @Author ^_^

 * @Create 2019/3/10

 */

@Service

public class EmployeeService {

    @Autowired

    EmployeeMapper employeeMapper;

    @Cacheable(cacheNames = {"emp"})

    public Employee getEmp(Integer id){

        System.out.println("查询"+id + "号员工");

        Employee emp = employeeMapper.getEmpById(id);

        return emp;

    }

    /**

     * @CachePut: 既调用方法,又更新缓存数据:同步更新缓存

     * 修改了数据库的某个数据,同时更新缓存

     * 运行时机:

     *  1,先调用目标方法

     *  2,将目标方法的结果缓存起来

     *

     *

     *  需要注意缓存的数据

     * @CachePut 没有指定key时,默认用传参做key,查询result做value

     * 需要要指定和@Cacheable用相同的key,更新的key和查询的key达到一致

     *

     */

    @CachePut(value = "emp",key = "#result.id")

    public Employee updateEmp(Employee employee){

        System.out.println("updateEmp:" + employee);

        employeeMapper.updateEmp(employee);

        return employee;

    }

}
controller
package com.orz.springbootcache.controller;

import com.orz.springbootcache.bean.Employee;

import com.orz.springbootcache.service.EmployeeService;

import org.springframework.beans.factory.annotation.Autowired;

import org.springframework.web.bind.annotation.GetMapping;

import org.springframework.web.bind.annotation.PathVariable;

import org.springframework.web.bind.annotation.RestController;

/**

 * @Author ^_^

 * @Create 2019/3/10

 */

@RestController

public class EmployeeController {

    @Autowired

    EmployeeService employeeService;

    @GetMapping("/emp/{id}")

    public Employee getEmployee(@PathVariable("id") Integer id){

        Employee emp = employeeService.getEmp(id);

        return emp;

    }

    @GetMapping("/emp")

    public Employee update(Employee employee){

        Employee emp = employeeService.updateEmp(employee);

        return emp;

    }

}
@
Springboot- Spring缓存抽象学习笔记的更多相关文章
- Spring 源码学习笔记11——Spring事务
Spring 源码学习笔记11--Spring事务 Spring事务是基于Spring Aop的扩展 AOP的知识参见<Spring 源码学习笔记10--Spring AOP> 图片参考了 ...
- Spring源码学习笔记12——总结篇,IOC,Bean的生命周期,三大扩展点
Spring源码学习笔记12--总结篇,IOC,Bean的生命周期,三大扩展点 参考了Spring 官网文档 https://docs.spring.io/spring-framework/docs/ ...
- Spring源码学习笔记9——构造器注入及其循环依赖
Spring源码学习笔记9--构造器注入及其循环依赖 一丶前言 前面我们分析了spring基于字段的和基于set方法注入的原理,但是没有分析第二常用的注入方式(构造器注入)(第一常用字段注入),并且在 ...
- java框架之SpringBoot(11)-缓存抽象及整合Redis
Spring缓存抽象 介绍 Spring 从 3.1 版本开始定义了 org.springframework.cache.Cache 和 org.springframework.cache.Cache ...
- 【原创】SpringBoot & SpringCloud 快速入门学习笔记(完整示例)
[原创]SpringBoot & SpringCloud 快速入门学习笔记(完整示例) 1月前在系统的学习SpringBoot和SpringCloud,同时整理了快速入门示例,方便能针对每个知 ...
- Spring 缓存抽象
Spring从3.1开始定义了org.springframework.cache.Cache和org.springframework.cache.CacheManager接口来统一不同的缓存技术:并支 ...
- MVC缓存OutPutCache学习笔记 (二) 缓存及时化VaryByCustom
<MVC缓存OutPutCache学习笔记 (一) 参数配置> 本篇来介绍如何使用 VaryByCustom参数来实现缓存的及时化.. 根据数据改变来及时使客户端缓存过期并更新.. 首先更 ...
- MVC缓存OutPutCache学习笔记 (一) 参数配置
OutPutCache 参数详解 Duration : 缓存时间,以秒为单位,这个除非你的Location=None,可以不添加此属性,其余时候都是必须的. Location : 缓存放置的位置; 该 ...
- spring cloud(学习笔记)高可用注册中心(Eureka)的实现(二)
绪论 前几天我用一种方式实现了spring cloud的高可用,达到两个注册中心,详情见spring cloud(学习笔记)高可用注册中心(Eureka)的实现(一),今天我意外发现,注册中心可以无限 ...
随机推荐
- 【Double】double精度问题和int、long除不尽取舍问题
看了老半天,真心没搞懂,留下几篇文章,后面继续跟进吧.... 一.如何理解double精度丢失问题? - 知乎 https://www.zhihu.com/question/42024389/answ ...
- Outlook自动回复功能无法使用
Outlook2010 http://support.microsoft.com/viewkb/viewkb.aspx?contentid=2596516 Outlook2007 ...
- curl post CURLOPT_POSTFIELDS
PHP: curl_setopt - Manual http://php.net/manual/en/function.curl-setopt.php CURLOPT_POST TRUE to do ...
- office 2013 activiate---(run as admin)
win7 office 2013 activiate---(run as admin) empty the garbage in osx rm -rf ~/.Trash
- Java基础语法 - 面向对象 - static 关键字
使用static关键字修饰的变量.常量和方法分别被称作静态变量.静态常量和静态方法,也被称作类的静态成员 静态变量 使用static修饰过的类变量称为静态变量 该变量需要使用类名.变量名进行调用,不能 ...
- pycharm调试
pycharm调试 flask app调试: 1.打开edit configurations面板 run===>edit configurations(图一或图二处都可以) 2.配置项目信息 点 ...
- Python 去掉文本中空行
pandas 操作csv文件时,一直报错,排查后发现csv文本中存在很多“空行”: So 需要把空行全部去掉: def clearBlankLine(): file1 = open('text1.tx ...
- MySQL数据库(1)- 数据库概述、MySQL的安装与配置、初始SQL语句、MySQL创建用户和授权
一.数据库概述 1.什么是数据(Data) 描述事物的符号记录称为数据,描述事物的符号既可以是数字,也可以是文字.图片,图像.声音.语言等,数据由多种表现形式,它们都可以经过数字化后存入计算机. 在计 ...
- tornado下模板引擎的使用
模板引擎 Tornado中的模板语言和django中类似,模板引擎将模板文件载入内存,然后将数据嵌入其中,最终获取到一个完整的字符串,再将字符串返回给请求者. Tornado =的模板支持“控制语句” ...
- 超过两行显示省略号 -webkit-line-clamp、-webkit-box-orient vue打包后不起作用
为了实现两行显示缩略显示,但是本地是可以显示,打包后不起作用 word-break: break-all; text-overflow: ellipsis; display: -webkit-box; ...