
cas+tomcat+shiro实现单点登录-4-Apache Shiro 集成Cas作为cas client端实现
目录
4.Apache Shiro 集成Cas作为cas client端实现
Apache Shiro 集成Cas作为cas client端实现
第一步、添加maven依赖
     <!-- shiro依赖包 -->

        <!-- <dependency> <groupId>org.apache.shiro</groupId> <artifactId>shiro-quartz</artifactId> <version>${shiro.version}</version> </dependency> -->

        <dependency>

            <groupId>org.apache.shiro</groupId>

            <artifactId>shiro-ehcache</artifactId>

            <version>${shiro.version}</version>

        </dependency>

        <dependency>

            <groupId>org.apache.shiro</groupId>

            <artifactId>shiro-spring</artifactId>

            <version>${shiro.version}</version>

        </dependency>

        <!-- shiro-cas集成依赖包 -->

        <dependency>

            <groupId>org.apache.shiro</groupId>

            <artifactId>shiro-cas</artifactId>

            <version>${shiro.version}</version>

        </dependency>
第二步、添加spring-shiro.xml配置文件
<beans xmlns="http://www.springframework.org/schema/beans" xmlns:xsi="http://www.w3.org/2001/XMLSchema-instance" xmlns:aop="http://www.springframework.org/schema/aop"

    xmlns:tx="http://www.springframework.org/schema/tx" xmlns:context="http://www.springframework.org/schema/context" xmlns:util="http://www.springframework.org/schema/util"

    xsi:schemaLocation="

     http://www.springframework.org/schema/beans

     http://www.springframework.org/schema/beans/spring-beans-3.0.xsd

     http://www.springframework.org/schema/context

     http://www.springframework.org/schema/context/spring-context-3.0.xsd

     http://www.springframework.org/schema/util

     http://www.springframework.org/schema/util/spring-util-3.0.xsd"

    default-lazy-init="true">

    <bean id="shiroFilter" class="org.apache.shiro.spring.web.ShiroFilterFactoryBean">

        <property name="securityManager" ref="securityManager" />

        <!-- 设定角色的登录链接,这里为cas登录页面的链接可配置回调地址 -->

        <property name="loginUrl" value="http://192.168.20.248:8080/cas/login?service=http://127.0.0.1:8080/nhmz/shiro-cas" />

        <property name="successUrl" value="/index.htm"></property>

        <property name="filters">

            <util:map>

                <entry key="casFilter" value-ref="casFilter" />

                <entry key="logout" value-ref="logout" />

            </util:map>

        </property>

        <property name="filterChainDefinitions">

            <value>

                /shiro-cas=casFilter

                /logout.htm=logout

                /login.htm=authc

                /xzqh/**=authc

                /tjfx/**=authc

                /gxfw/**=authc

                /xtsz/**=authc

                /region/**=authc

                /shareApi/**=authc

                /**=anon

            </value>

        </property>

    </bean>

    <!-- shiro-cas登录过滤器 -->

    <bean id="casFilter" class="org.apache.shiro.cas.CasFilter">

        <!-- 配置验证错误时的失败页面 ,这里配置为登录页面 -->

        <property name="failureUrl" value="http://192.168.20.248:8080/cas/login?service=http://127.0.0.1:8080/nhmz/shiro-cas" />

    </bean>

    <!-- 退出登录过滤器 -->

    <bean id="logout" class="org.apache.shiro.web.filter.authc.LogoutFilter">

        <property name="redirectUrl" value="http://192.168.20.248:8080/cas/logout?service=http://127.0.0.1:8080/nhmz/index.htm" />

    </bean>


   <!-- 自定义casRealm -->

    <bean id="casRealm" class="com.ld.nhmz.shiro.MzCasRealm">

        <!-- <property name="defaultRoles" value="ROLE_USER" /> -->

        <!-- 配置cas服务器地址 -->

        <property name="casServerUrlPrefix" value="http://192.168.20.248:8080/cas" />

        <!-- 客户端的回调地址设置,必须和上面的shiro-cas过滤器casFilter拦截的地址一致 -->

        <property name="casService" value="http://127.0.0.1:8080/nhmz/shiro-cas" />

    </bean>

    <!--缓存机制 -->

    <bean id="cacheManager" class="org.apache.shiro.cache.ehcache.EhCacheManager">

        <property name="cacheManagerConfigFile" value="classpath:ehcache-shiro.xml" />

    </bean>

    <bean id="securityManager" class="org.apache.shiro.web.mgt.DefaultWebSecurityManager">

        <property name="realm" ref="casRealm" />

        <property name="subjectFactory" ref="casSubjectFactory" />

        <property name="cacheManager" ref="cacheManager" />

    </bean>

    <!-- 如果要实现cas的remember me的功能,需要用到下面这个bean,并设置到securityManager的subjectFactory中 -->

    <bean id="casSubjectFactory" class="org.apache.shiro.cas.CasSubjectFactory" />

    <bean id="lifecycleBeanPostProcessor" class="org.apache.shiro.spring.LifecycleBeanPostProcessor" />

    <bean class="org.springframework.beans.factory.config.MethodInvokingFactoryBean">

        <property name="staticMethod" value="org.apache.shiro.SecurityUtils.setSecurityManager" />

        <property name="arguments" ref="securityManager" />

    </bean>

</beans>
这里由于前端的每一个操作shiro都会做登录和权限认证,所以上面配置添加了缓存机制
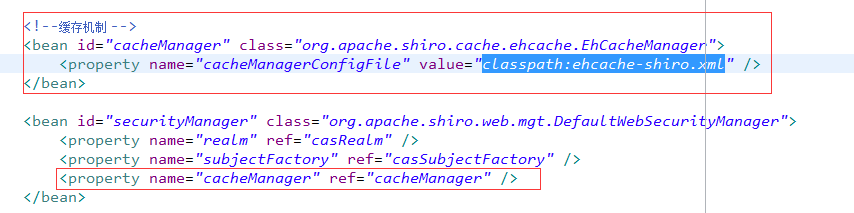
所以在classpath目录下还要添加缓存而配置文件ehcache-shiro.xml,配置如下:
<?xml version="1.1" encoding="UTF-8"?>

<ehcache name="shirocache">

    <diskStore path="java.io.tmpdir"/>

     <defaultCache

        maxElementsInMemory="2000"

        eternal="false"

        timeToIdleSeconds="120"

        timeToLiveSeconds="120"

        overflowToDisk="true"

        />

<!--     <cache name="diskCache"

           maxEntriesLocalHeap="2000"

           eternal="false"

           timeToIdleSeconds="300"

           timeToLiveSeconds="0"

           overflowToDisk="false"

           statistics="true">

    </cache> -->

    <cache name="passwordRetryCache"

           maxElementsInMemory="2000"

           eternal="false"

           timeToIdleSeconds="300"

           timeToLiveSeconds="0"

           overflowToDisk="false"

           >

    </cache>

    <cache name="authorizationCache"

           maxElementsInMemory="2000"

           eternal="false"

           timeToIdleSeconds="1800"

           timeToLiveSeconds="0"

           overflowToDisk="false"

           >

    </cache>

    <cache name="authenticationCache"

           maxElementsInMemory="2000"

           eternal="false"

           timeToIdleSeconds="1800"

           timeToLiveSeconds="0"

           overflowToDisk="false"

           >

    </cache>

    <cache name="shiro-activeSessionCache"

           maxElementsInMemory="2000"

           eternal="false"

           timeToIdleSeconds="1800"

           timeToLiveSeconds="0"

           overflowToDisk="false"

           >

    </cache>

</ehcache>
第三步、添加<bean id="casRealm" class="com.ld.nhmz.shiro.MzCasRealm">配置的自定义实现类
package com.ld.nhmz.shiro;

import java.util.List;

import org.apache.shiro.authc.AuthenticationException;

import org.apache.shiro.authc.AuthenticationInfo;

import org.apache.shiro.authc.AuthenticationToken;

import org.apache.shiro.authz.AuthorizationInfo;

import org.apache.shiro.authz.SimpleAuthorizationInfo;

import org.apache.shiro.cas.CasRealm;

import org.apache.shiro.subject.PrincipalCollection;

import org.springframework.beans.factory.annotation.Autowired;

import org.springframework.transaction.annotation.Transactional;

import com.ld.nhmz.ebo.SusRoleEntity;

import com.ld.nhmz.ebo.SusUserEntity;

import com.ld.nhmz.service.SusRolePermissionService;

import com.ld.nhmz.service.SusRoleService;

import com.ld.nhmz.service.SusUserService;

//@Service

@SuppressWarnings("deprecation")

@Transactional(value = "nhmzTM")

public class MzCasRealm extends CasRealm {

    @Autowired

    private SusUserService userService;

    @Autowired

    private SusRolePermissionService rolePermissionService;

    @Autowired

    private SusRoleService roleService;

    /**

     * 授权访问控制,用于对用户进行的操作进行人证授权,证明该用户是否允许进行当前操作,如访问某个链接,某个资源文件等

     */

    @Override

    protected AuthorizationInfo doGetAuthorizationInfo(PrincipalCollection principals) {

        String username = (String) principals.getPrimaryPrincipal();

        SusUserEntity user = userService.findByUsername(username);

        if (user != null) {

            SimpleAuthorizationInfo authorizationInfo = new SimpleAuthorizationInfo();

            // 设置用户的角色

            String roleId = userService.getRoleIdFromUserId(user.getId());

            SusRoleEntity roleEntity = roleService.getRole(roleId);

            if (null != roleEntity)

                authorizationInfo.addRole(roleEntity.getRolecode());

            // 设置用户对应的角色的权限集合

            List<String> permissons;

            try {

                permissons = rolePermissionService.getPermissionIds2(roleId);

                for (String permission : permissons) {

                    authorizationInfo.addStringPermission(permission);

                }

            } catch (Exception e) {

                e.printStackTrace();

            }

            return authorizationInfo;

        }

        return null;

    }

    /**

     * 验证用户身份

     */

    @Override

    protected AuthenticationInfo doGetAuthenticationInfo(AuthenticationToken token) throws AuthenticationException {

        return super.doGetAuthenticationInfo(token);

    }

    @Override

    public void clearCachedAuthorizationInfo(PrincipalCollection principals) {

        super.clearCachedAuthorizationInfo(principals);

    }

    @Override

    public void clearCachedAuthenticationInfo(PrincipalCollection principals) {

        super.clearCachedAuthenticationInfo(principals);

    }

    @Override

    public void clearCache(PrincipalCollection principals) {

        super.clearCache(principals);

    }

    public void clearAllCachedAuthorizationInfo() {

        getAuthorizationCache().clear();

    }

    public void clearAllCachedAuthenticationInfo() {

        getAuthenticationCache().clear();

    }

    public void clearAllCachedKickoutInfo() {

    }

    public void clearAllCache() {

        clearAllCachedAuthenticationInfo();

        clearAllCachedAuthorizationInfo();

        clearAllCachedKickoutInfo();

    }

}
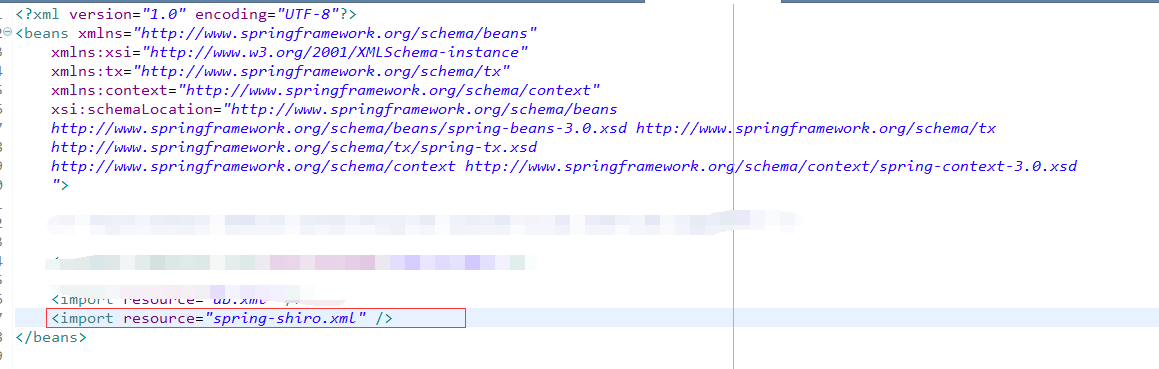
第四步、将spring-shiro.xml配置文件导入到spring的配置文件中,注意配置文件间的相对路径
第五步、web.xml中添加shiro过滤器
<!-- shiro filter的名字是shiroFilter,那么在spring的配置文件中要有一个名字为shiroFilter的bean -->

    <filter>

        <filter-name>shiroFilter</filter-name>

        <filter-class>org.springframework.web.filter.DelegatingFilterProxy</filter-class>

        <init-param>

            <param-name>targetFilterLifecycle</param-name>

            <param-value>true</param-value>

        </init-param>

    </filter>

    <filter-mapping>

        <filter-name>shiroFilter</filter-name>

        <url-pattern>/*</url-pattern>

    </filter-mapping>
以上步骤完成,shiro集成cas的步骤就完成了,实现了单点登录和单点注销登录。
cas+tomcat+shiro实现单点登录-4-Apache Shiro 集成Cas作为cas client端实现的更多相关文章
- cas+tomcat+shiro实现单点登录-3-CAS服务器深入配置(连接MYSQL)
目录 1.tomcat添加https安全协议 2.下载cas server端部署到tomcat上 3.CAS服务器深入配置(连接MYSQL) 4.Apache Shiro 集成Cas作为cas cli ...
- cas+tomcat+shiro实现单点登录-2-部署cas server到tomcat
目录 1.tomcat添加https安全协议 2.下载cas server端部署到tomcat上 3.CAS服务器深入配置(连接MYSQL) 4.Apache Shiro 集成Cas作为cas cli ...
- cas+tomcat+shiro实现单点登录-1-tomcat添加https协议
目录 1.tomcat添加https安全协议 2.下载cas server端部署到tomcat上 3.CAS服务器深入配置(连接MYSQL) 4.Apache Shiro 集成Cas作为cas cli ...
- CAS 在 Tomcat 中实现单点登录
单点登录(Single Sign On , 简称 SSO )是目前比较流行的服务于企业业务整合的解决方案之一, SSO 使得在多个应用系统 中,用户只需要登录一次就可以访问所有相互信任的应用系统.CA ...
- 【IBM】使用 CAS 在 Tomcat 中实现单点登录
来源: IBM Developer http://www.ibm.com/developerworks/cn/opensource/os-cn-cas/ 张 涛 (zzhangt@cn.ibm.com ...
- 使用 CAS 在 Tomcat 中实现单点登录
单点登录(Single Sign On , 简称 SSO )是目前比较流行的服务于企业业务整合的解决方案之一, SSO 使得在多个应用系统中,用户只需要登录一次就可以访问所有相互信任的应用系统.CAS ...
- 使用 CAS 在 Tomcat 中实现单点登录 http://www.ibm.com/developerworks/cn/opensource/os-cn-cas/
developerWorks 中国 技术主题 Open source 文档库 使用 CAS 在 Tomcat 中实现单点登录 单点登录(Single Sign On , 简称 SSO )是目前比较流行 ...
- 【CAS单点登录视频教程】 第02集 -- 安装CAS
目录 ----------------------------------------- [CAS单点登录视频教程] 第06集[完] -- Cas认证 学习 票据认证FormsAuthenticati ...
- 【CAS单点登录视频教程】 第01集-- 认识CAS
CAS 是什么? 目录 ----------------------------------------- [CAS单点登录视频教程] 第06集[完] -- Cas认证 学习 票据认证FormsAut ...
随机推荐
- phpcms二次开发步骤
文件目录结构 根目录 | – api 接口文件目录 | – caches 缓存文件目录 | – configs 系统配置文件目录 | – caches_* 系统缓存目录 | – phpcms phpc ...
- PHP 过滤二维数组和三维数组
<?php $arr = [ [1,3,5,7,9], [2,4,6,8,0] ]; $arr2 = [ 'list' => [ [1,3,5,7], [2,4,6,8], [3,2,9, ...
- HTML资源(推荐)
W3C在线验证工具:http://validator.w3.org/ (X)HTML嵌套规则:http://www.cnblogs.com/PeunZhang/archive/2012/03/11/2 ...
- DbUtility-关于DataTable转成List的效率问题
DbUtility中的方法ExecuteDataTableAsync()得到的是一个DataTable,而我们常见的情况下,我们需要的不是DataTable,而是List或IList,所以现在需要考虑 ...
- Android 实现ActionBar定制
我们在使用Android手机时,经常发现应用中的ActionBar和我们平时使用的ActionBar相差非常大.简单的说就是,其他应用的 ActionBar为什么那么绚丽,自己应用的ActionBar ...
- BZOJ3394: [Usaco2009 Jan]Best Spot 最佳牧场
3394: [Usaco2009 Jan]Best Spot 最佳牧场 Time Limit: 1 Sec Memory Limit: 128 MBSubmit: 11 Solved: 9[Sub ...
- cf581D Three Logos
Three companies decided to order a billboard with pictures of their logos. A billboard is a big squa ...
- sicily 4433 DAG?
题意:输入一个有向图,判断该图是否是有向无环图(Directed Acyclic Graph). 解法:还是深搜 #include<iostream> #include<memory ...
- cocos2d-x游戏开发(十七)NDK+ant编译暗黑世界
个人原创,欢迎转载http://blog.csdn.net/dawn_moon/article/details/12308967 9秒论坛的客户端暗黑世界,ios已经跑过了,今天搞了一下安卓的,记录一 ...
- 将vs2012建的项目转换为vs2010项目
vs2012建的项目vs2010打不开,但vs2010的项目vs2012能打开,所以我觉得vs2012没有对解决方案进行重大的调整,尝试修改了一下.sln文件,使用vs2010就能打开了,方法如下: ...