Android系统定制之SystemUI修改:下拉通知栏尺寸【转】
本文转载自:https://blog.csdn.net/huil0925/article/details/67632358
最近项目需要修改下拉通知栏面板的宽度,完成后,写个Blog做个总结,也提供给需要的开发人员参考。
本文介绍了DDMS中 Dump View Hierarchy for UI Automator 工具的使用方法,通过该工具找到一些应用的布局,快速定位我们需要修改的源码位置。
1 先看下效果图
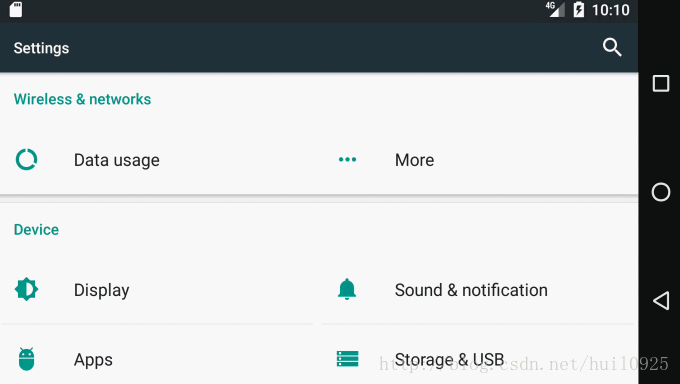
修改前,横屏状态的下拉通知栏,距离屏幕左右两边还有段距离。(模拟器中的截图,Android原生的状态)
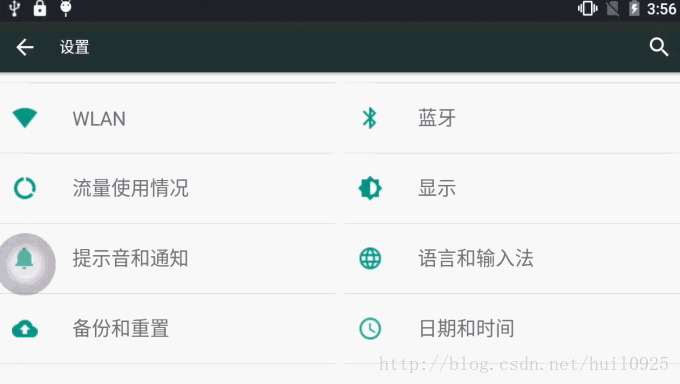
修改后,横屏状态的下拉通知栏,宽度铺满屏幕。(真实设备截图, 修改后刷机效果)
2 找到这部分的相关布局。
SystemUI下拉通知栏的布局为super_status_bar.xml

代码如下
<!-- This is the combined status bar / notification panel window. -->

<com.android.systemui.statusbar.phone.StatusBarWindowView

    xmlns:android="http://schemas.android.com/apk/res/android"

    android:layout_width="match_parent"

    android:layout_height="match_parent"

    android:fitsSystemWindows="true">

    <com.android.systemui.statusbar.BackDropView

            android:id="@+id/backdrop"

            android:layout_width="match_parent"

            android:layout_height="match_parent"

            android:visibility="gone"

            >

        <ImageView android:id="@+id/backdrop_back"

                   android:layout_width="match_parent"

                   android:scaleType="centerCrop"

                   android:layout_height="match_parent" />

        <ImageView android:id="@+id/backdrop_front"

                   android:layout_width="match_parent"

                   android:layout_height="match_parent"

                   android:scaleType="centerCrop"

                   android:visibility="invisible" />

    </com.android.systemui.statusbar.BackDropView>

    <com.android.systemui.statusbar.ScrimView android:id="@+id/scrim_behind"

        android:layout_width="match_parent"

        android:layout_height="match_parent"

        android:importantForAccessibility="no" />

    <include layout="@layout/status_bar"

        android:layout_width="match_parent"

        android:layout_height="@dimen/status_bar_height" />

    <FrameLayout android:id="@+id/brightness_mirror"

                 android:layout_width="@dimen/notification_panel_width"

                 android:layout_height="wrap_content"

                 android:layout_gravity="@integer/notification_panel_layout_gravity"

                 android:paddingLeft="@dimen/notification_side_padding"

                 android:paddingRight="@dimen/notification_side_padding"

                 android:visibility="gone">

        <FrameLayout

                android:layout_width="match_parent"

                android:layout_height="match_parent"

                android:elevation="2dp"

                android:background="@drawable/brightness_mirror_background">

            <include layout="@layout/quick_settings_brightness_dialog"

                     android:layout_width="match_parent"

                     android:layout_height="wrap_content" />

        </FrameLayout>

    </FrameLayout>

    <com.android.systemui.statusbar.phone.PanelHolder

        android:id="@+id/panel_holder"

        android:layout_width="match_parent"

        android:layout_height="match_parent"

        android:background="@color/transparent" >

        <include layout="@layout/status_bar_expanded"

            android:layout_width="match_parent"

            android:layout_height="match_parent"

            android:visibility="gone" />

    </com.android.systemui.statusbar.phone.PanelHolder>

    <com.android.systemui.statusbar.ScrimView android:id="@+id/scrim_in_front"

        android:layout_width="match_parent"

        android:layout_height="match_parent"

        android:importantForAccessibility="no" />

</com.android.systemui.statusbar.phone.StatusBarWindowView>- 1
- 2
- 3
- 4
- 5
- 6
- 7
- 8
- 9
- 10
- 11
- 12
- 13
- 14
- 15
- 16
- 17
- 18
- 19
- 20
- 21
- 22
- 23
- 24
- 25
- 26
- 27
- 28
- 29
- 30
- 31
- 32
- 33
- 34
- 35
- 36
- 37
- 38
- 39
- 40
- 41
- 42
- 43
- 44
- 45
- 46
- 47
- 48
- 49
- 50
- 51
- 52
- 53
- 54
- 55
- 56
- 57
- 58
- 59
- 60
- 61
- 62
- 63
- 64
- 65
- 66
- 67
- 68
几个关键的字眼:
| “@layout/status_bar” ————–> 状态栏
| “@+id/brightness_mirror” ——–> 下拉通知栏中调节亮度时,只剩下亮度调节弹出框,位置与下拉通知栏亮度调节位置一样的。
| “@+id/panel_holder”—————>下拉通知栏载体
| “@layout/status_bar_expanded”->下拉通知栏布局
super_status_bar.xml包含了状态栏,下拉通知栏等布局
3 找到下拉通知栏相关布局
通过 DDMS 的 Dump View Hierarchy for UI Automator 工具,我们可以抓取一些布局的ID。

-3.1 header
通知栏上半部分是 com.android.systemui:id/header,那我们在SystemUI的res中,搜索这个“header” 。
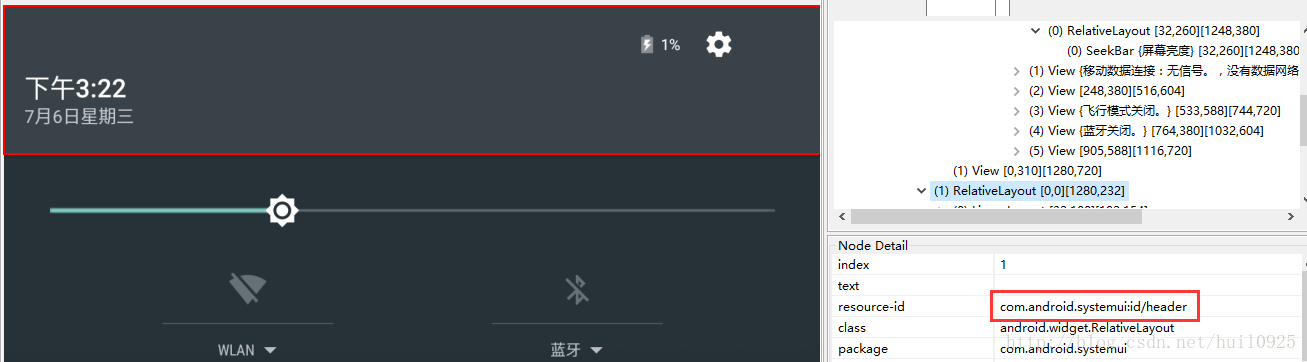
搜索到layout中带有header的,有status_bar_expanded_header.xml,只有这个布局有这个ID
<com.android.systemui.statusbar.phone.StatusBarHeaderView

    xmlns:android="http://schemas.android.com/apk/res/android"

    xmlns:systemui="http://schemas.android.com/apk/res-auto"

    android:id="@+id/header"

    android:layout_width="@dimen/notification_panel_width"

    android:layout_height="@dimen/status_bar_header_height"

    android:layout_gravity="@integer/notification_panel_layout_gravity"

    android:paddingStart="@dimen/notification_side_padding"

    android:paddingEnd="@dimen/notification_side_padding"

    android:baselineAligned="false"

    android:elevation="4dp"

    android:background="@drawable/notification_header_bg"

    android:clickable="true"

    android:focusable="true"
- 1
- 2
- 3
- 4
- 5
- 6
- 7
- 8
- 9
- 10
- 11
- 12
- 13
- 14
- 15
如果需要修改header的尺寸,可将
android:layout_width="@dimen/notification_panel_width"- 1
修改为
android:layout_width="match_parent"- 1
重新编译,这个header的宽度就和屏幕一样了。
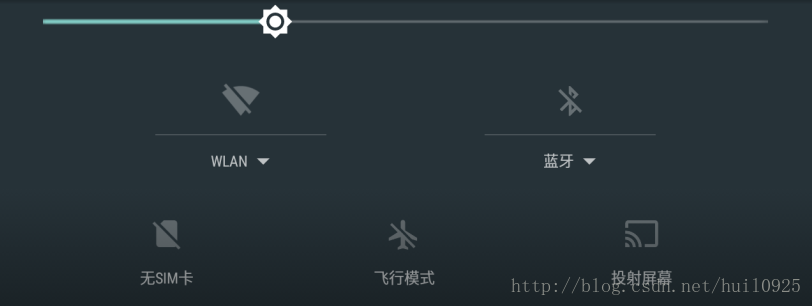
-3.2 scroll_view
可上下滑动的快捷开关布局。
上图所示的布局代码如下
<com.android.systemui.statusbar.phone.ObservableScrollView

     android:id="@+id/scroll_view"

     android:layout_width="@dimen/notification_panel_width"

     android:layout_height="match_parent"

     android:layout_gravity="@integer/notification_panel_layout_gravity"

     android:scrollbars="none"

     android:overScrollMode="never"

android:fillViewport="true">- 1
- 2
- 3
- 4
- 5
- 6
- 7
- 8
将宽度属性改成:
android:layout_width="match_parent"- 1
-3.3 notification_stack_scroller
通知列表布局
上图所示的布局代码如下
<com.android.systemui.statusbar.stack.NotificationStackScrollLayout

android:id="@+id/notification_stack_scroller"

android:layout_width="@dimen/notification_panel_width"

android:layout_height="match_parent"

android:layout_gravity="@integer/notification_panel_layout_gravity"

android:layout_marginBottom="@dimen/close_handle_underlap"

android:importantForAccessibility="no" />- 1
- 2
- 3
- 4
- 5
- 6
- 7
宽度属性改成:
android:layout_width="match_parent"- 1
4 重新编译,打包ROM
make源码,重新刷机查看效果,可以看到文章开头的gif图所示的效果
Android系统定制之SystemUI修改:下拉通知栏尺寸【转】的更多相关文章
- Android系统定制和源码开发以及源码编译(附视频)
Android系统定制配套视频: 为了把Android系统源码定制和编译的课程讲完,从准备到录制完所有的视频,一共花去了近半年的时间,前前后后各种下载源码,编译源码,系统不兼容,版本适配,虚拟机配置困 ...
- [置顶] android系统如何在静音模式下关闭camera拍照声音(2)
之前写过一篇“android系统如何在静音模式下关闭camera拍照声音”的博客,今天来写他的续篇,继续探讨这个问题. 公司新需求,要求在camera应用中添加一个开关,可以进行拍照声音的关闭和开启. ...
- SupportV7包中 SwipeRefreshLayout 修改下拉控件的距离
//修改下拉距离 ViewTreeObserver vto = mCategoryResults.mSwipeRefreshLayout.getViewTreeObserver(); vto.addO ...
- bootstrap-select and selectpicker 修改下拉框的宽度或者下方留白
bootstrap-select and selectpicker 修改下拉框的宽度或者下方留白 $("#sel_userName").selectpicker({ "w ...
- QuickBase64 - Android 下拉通知栏快捷base64加解密工具
Android Quick Setting Tile Base64 Encode/Decode Tool Android 下拉通知栏快捷 base64 加解密,自动将剪切板的内容进行 base64 E ...
- Android 系统默认参数的修改
转自: http://www.th7.cn/Program/Android/201505/447097.shtml 写在前面的话 一般在新项目开始之初,我们需要针对客户需求进行各种系统默认属性的配置, ...
- Android系统定制——Download Android System 及加载system镜像文件
定制android系统(配置及相关系统的镜像文件),具体可参考:Driver_All_in_One_V1.0——MT6735_6753.pdf文档,特别需要理解的是Download部分. 与之对应的软 ...
- Android系统联系人全特效实现(下),字母表快速滚动
在上一篇文章中,我和大家一起实现了类似于Android系统联系人的分组导航和挤压动画功能,不过既然文章名叫做<Android系统联系人全特效实现>,那么没有快速滚动功能显然是称不上&quo ...
- PullToRefreshScrollView 修改下拉刷新图标
我的修改比较简单暴力.网上查了一番,貌似大家都没有改,无奈,查了一下源码.发现如下资源目录: 在看看我们的布局文件,此三个图片就是下拉刷新的三种图标 好吧,flip就是我目前的下拉刷新图片,对应的也就 ...
随机推荐
- C#开发--FTP操作方法管理
1.整理简化了下C#的ftp操作,方便使用 1.支持创建多级目录 2.批量删除 3.整个目录上传 4.整个目录删除 5.整个目录下载 2.调用方法展示, var ftp ...
- spark 的一些常用函数 filter,map,flatMap,lookup ,reduce,groupByKey
定义不带参数也不带返回值的函数(def :定义函数的关键字 printz:方法名称) scala> def printz = print("scala hello") ...
- UVA-11625-Nice Prefixes (DP+矩阵快速幂)
题目(vjudge) 题面 题意: 你有K个字母,你需要用K个字母组成L长度的字符串,定义对于该字符串的任意前缀P 必须满足 ,输出方案数%1000000007的值. 思路: 首先可以想到一种简 ...
- protobuf编译安装
为什么选择protobuf,而不选择thift和avro,原因大概几点吧,网上对比的文章很多,我主要关注以下几点 1.protobuf序列化性能最好,序列化后字节数最少. 2.protobuf是单纯的 ...
- PowerBuilder--Aes128加解密
通过C#开发Com控件,注册到系统,然后由pb通过OLEObject进行调用 原文:https://www.cnblogs.com/eric_ibm/archive/2012/07/06/dll.ht ...
- Linux守护进程简单介绍和实例具体解释
Linux守护进程简单介绍和实例具体解释 简单介绍 守护进程(Daemon)是执行在后台的一种特殊进程.它独立于控制终端而且周期性地执行某种任务或等待处理某些发生的事件.守护进程是一种非常实用的进程. ...
- Redis加锁与解锁
Redis加锁 customerM = BaseMemCached.setMLock(customerId); /** * 个人账户表加锁 **/ public static CustomerM se ...
- 安装android Studio和运行react native项目(基础篇)
ANDROID_HOME环境变量 确保ANDROID_HOME环境变量正确地指向了你安装的Android SDK的路径. 打开控制面板 -> 系统和安全 -> 系统 -> 高级系统设 ...
- JUNIT单元测试时统计代码的覆盖率工具eclemma安装
EclEmma是Eclipse里的一个插件,安装简单,覆盖率显示直观.安装EclEmma.打开Eclipse,点击Help → Software Updates → Find and Install, ...
- 【BZOJ3563/3569】DZY Loves Chinese II 线性基神题
[BZOJ3563/3569]DZY Loves Chinese II Description 神校XJ之学霸兮,Dzy皇考曰JC. 摄提贞于孟陬兮,惟庚寅Dzy以降. 纷Dzy既有此内美兮,又重之以 ...