基于 Cloudflare Workers 和 cloudflare-docker-proxy 搭建镜像加速服务
本文主要介绍了如何基于 Cloudflare Workers 和 cloudflare-docker-proxy 搭建 dockerhub、gcr、quay 等镜像加速服务。
最近,受限于各种情况,部分主流镜像站都关了,为了能够正常使用,建议自己搭建一个加速器。
写文之前,也已经部署好了一个,可以直接使用,具体使用方法跳转 https://docker.lixd.xyz 或者 使用说明 查看。
准备工作
- 1)首先要注册一个 Cloudflare 账号
- 2)Cloudflare 账号下需要添加一个域名,推荐到万网注册一个域名,再转移到 Cloudflare。
- 推荐 top、xyz 后缀应该都是首年 7 块
部署流程
修改配置
首先 fork https://github.com/ciiiii/cloudflare-docker-proxy 仓库到自己账号下。
然后修改 src/index.js,修改内容如下:
const routes = {

  "docker.mydomain.com": "https://registry-1.docker.io",

  "quay.mydomain.com": "https://quay.io",

  "gcr.mydomain.com": "https://gcr.io",

  "k8s-gcr.mydomain.com": "https://k8s.gcr.io",

  "k8s.mydomain.com": "https://registry.k8s.io",

  "ghcr.mydomain.com": "https://ghcr.io",

  "cloudsmith.mydomain.com": "https://docker.cloudsmith.io",

};
其中 mydomain.com 就是你的域名,比如我这里用的是 lixd.xyz
再修改 wrangler.toml,同样是替换域名
[env.production]

name = "cloudflare-docker-proxy"

routes = [

  { pattern = "docker.mydomain.com", custom_domain = true },

  { pattern = "quay.mydomain.com", custom_domain = true },

  { pattern = "gcr.mydomain.com", custom_domain = true },

  { pattern = "k8s-gcr.mydomain.com", custom_domain = true },

  { pattern = "k8s.mydomain.com", custom_domain = true },

  { pattern = "ghcr.mydomain.com", custom_domain = true },

  { pattern = "cloudsmith.mydomain.com", custom_domain = true },

]

[env.production.vars]

MODE = "production"

TARGET_UPSTREAM = ""

[env.staging]

name = "cloudflare-docker-proxy-staging"

route = { pattern = "docker-staging.mydomain.com", custom_domain = true }
同样的 mydomain.com 就是你的域名
最后修改 README.md 中的 图标对应的 Github 仓库地址为你 fork 后的仓库地址,比如 https://deploy.workers.cloudflare.com/?url=https://github.com/lixd/cloudflare-docker-proxy。
这三个修改都完成后,提交代码。
帮助文档
为了便于使用,可以在访问根目录时返回一个帮助页面。
help.html
新建一个help.html 文件,内容如下:
<!DOCTYPE html>
<html lang="zh-CN">
<head>
<meta charset="utf-8">
<meta name="viewport" content="width=device-width, initial-scale=1">
<title>镜像使用说明</title>
<style>
body {
font-family: 'Roboto', sans-serif;
margin: 0;
padding: 0;
background-color: #f4f4f4;
}
.header {
background: linear-gradient(135deg, #667eea, #764ba2);
color: #fff;
padding: 20px 0;
text-align: center;
box-shadow: 0 2px 4px rgba(0, 0, 0, 0.1);
position: relative;
}
.github-link {
position: absolute;
top: 10px;
right: 20px;
color: #fff;
text-decoration: none;
}
.github-icon {
width: 24px;
height: 24px;
vertical-align: middle;
}
.container {
max-width: 800px;
margin: 40px auto;
padding: 20px;
background-color: #fff;
box-shadow: 0 4px 8px rgba(0, 0, 0, 0.1);
border-radius: 10px;
}
.content {
margin-bottom: 20px;
}
.footer {
text-align: center;
padding: 20px 0;
background-color: #333;
color: #fff;
}
pre {
background-color: #272822;
color: #f8f8f2;
padding: 15px;
border-radius: 5px;
overflow-x: auto;
}
code {
font-family: 'Source Code Pro', monospace;
}
a {
color: #4CAF50;
text-decoration: none;
}
a:hover {
text-decoration: underline;
}
@media (max-width: 600px) {
.container {
margin: 20px;
padding: 15px;
}
.header {
padding: 15px 0;
}
}
</style>
<link href="https://fonts.googleapis.com/css2?family=Roboto:wght@400;700&family=Source+Code+Pro:wght@400;700&display=swap" rel="stylesheet">
</head>
<body>
<div class="header">
<h1>镜像使用说明</h1>
<a href="https://github.com/lixd/cloudflare-docker-proxy" target="_blank" class="github-link">
<img src="https://github.githubassets.com/images/modules/logos_page/GitHub-Mark.png" alt="GitHub" class="github-icon">
</a>
</div>
<div class="container">
<div class="content">
<p>为了加速 Docker 镜像拉取,你可以使用以下命令设置 registry mirror:</p>
<pre><code id="registry-config">sudo tee /etc/docker/daemon.json <<EOF
{
"registry-mirrors": ["https://{{host}}"]
}
EOF
# 配置完后需要重启 Docker 服务
sudo systemctl restart docker
</code></pre>
<p>使用该代理从不同的镜像仓库拉取镜像,请参考以下命令:</p>
<pre><code id="commands">
# docker pull nginx:latest
docker pull docker.{{host}}/library/nginx:latest # 拉取 Docker 官方镜像
# docker pull quay.io/coreos/etcd:latest
docker pull quay.{{host}}/coreos/etcd:latest # 拉取 Quay 镜像
# docker pull gcr.io/google-containers/busybox:latest
docker pull gcr.{{host}}/google-containers/busybox:latest # 拉取 GCR 镜像
# docker pull k8s.gcr.io/pause:latest
docker pull k8s-gcr.{{host}}/pause:latest # 拉取 k8s.gcr.io 镜像
# docker pull registry.k8s.io/pause:latest
docker pull k8s.{{host}}/pause:latest # 拉取 registry.k8s.io 镜像
# docker pull ghcr.io/github/super-linter:latest
docker pull ghcr.{{host}}/github/super-linter:latest # 拉取 GitHub 容器镜像
# docker pull docker.cloudsmith.io/public/repo/image:latest
docker pull cloudsmith.{{host}}/public/repo/image:latest # 拉取 Cloudsmith 镜像
</code></pre>
<p>为了避免 Worker 用量耗尽,你可以手动 pull 镜像然后 re-tag 之后 push 至本地镜像仓库。</p>
</div>
</div>
<div class="footer">
<p>Powered by Cloudflare Workers</p>
<p><a href="https://lixueduan.com" target="_blank">访问博客 探索云原生</a></p>
</div>
<script>
document.addEventListener('DOMContentLoaded', function() {
const host = window.location.hostname;
const mainDomain = host.split('.').slice(-2).join('.');
const registryConfigElement = document.getElementById('registry-config');
const commandsElement = document.getElementById('commands');
registryConfigElement.innerHTML = registryConfigElement.innerHTML.replace(/{{host}}/g, host);
commandsElement.innerHTML = commandsElement.innerHTML.replace(/{{host}}/g, mainDomain);
});
</script>
</body>
</html>
增加路由
scr/index.js 中增加一条路由,访问根目录时就返回这个帮助页面
import DOCS from './help.html'

// return docs

if (url.pathname === "/") {

  return new Response(DOCS, {

    status: 200,

    headers: {

      "content-type": "text/html"

    }

  });

}
完整内容见:https://github.com/lixd/cloudflare-docker-proxy
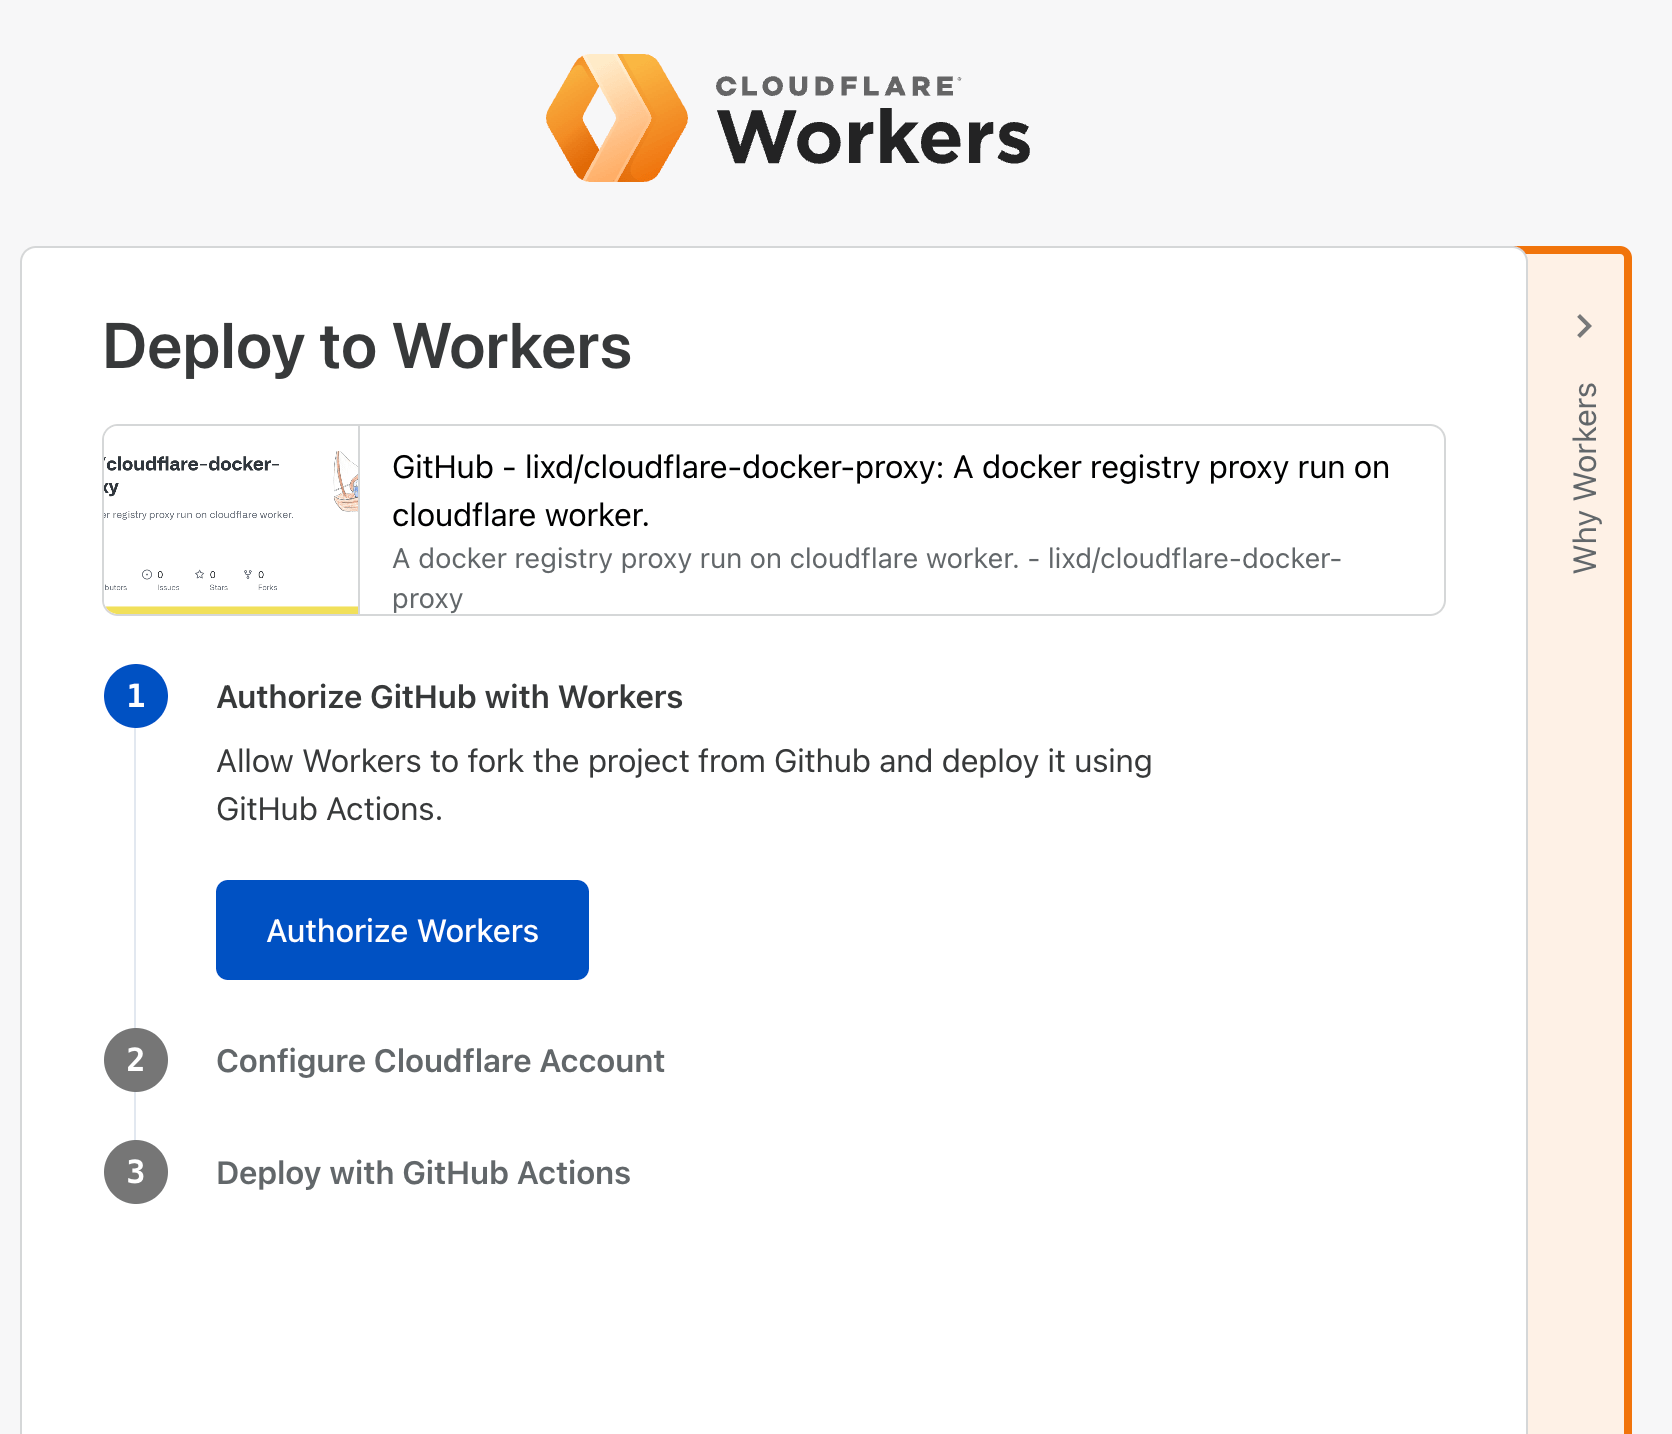
点击部署
然后在 Github 界面点击这个 图标进行部署,会自动跳转到 cloudflare,按步骤操作即可,最终会在 Github 仓库中创建一个 Github Action 来将该仓库部署到 Cloudflare Workers。
就像这样:
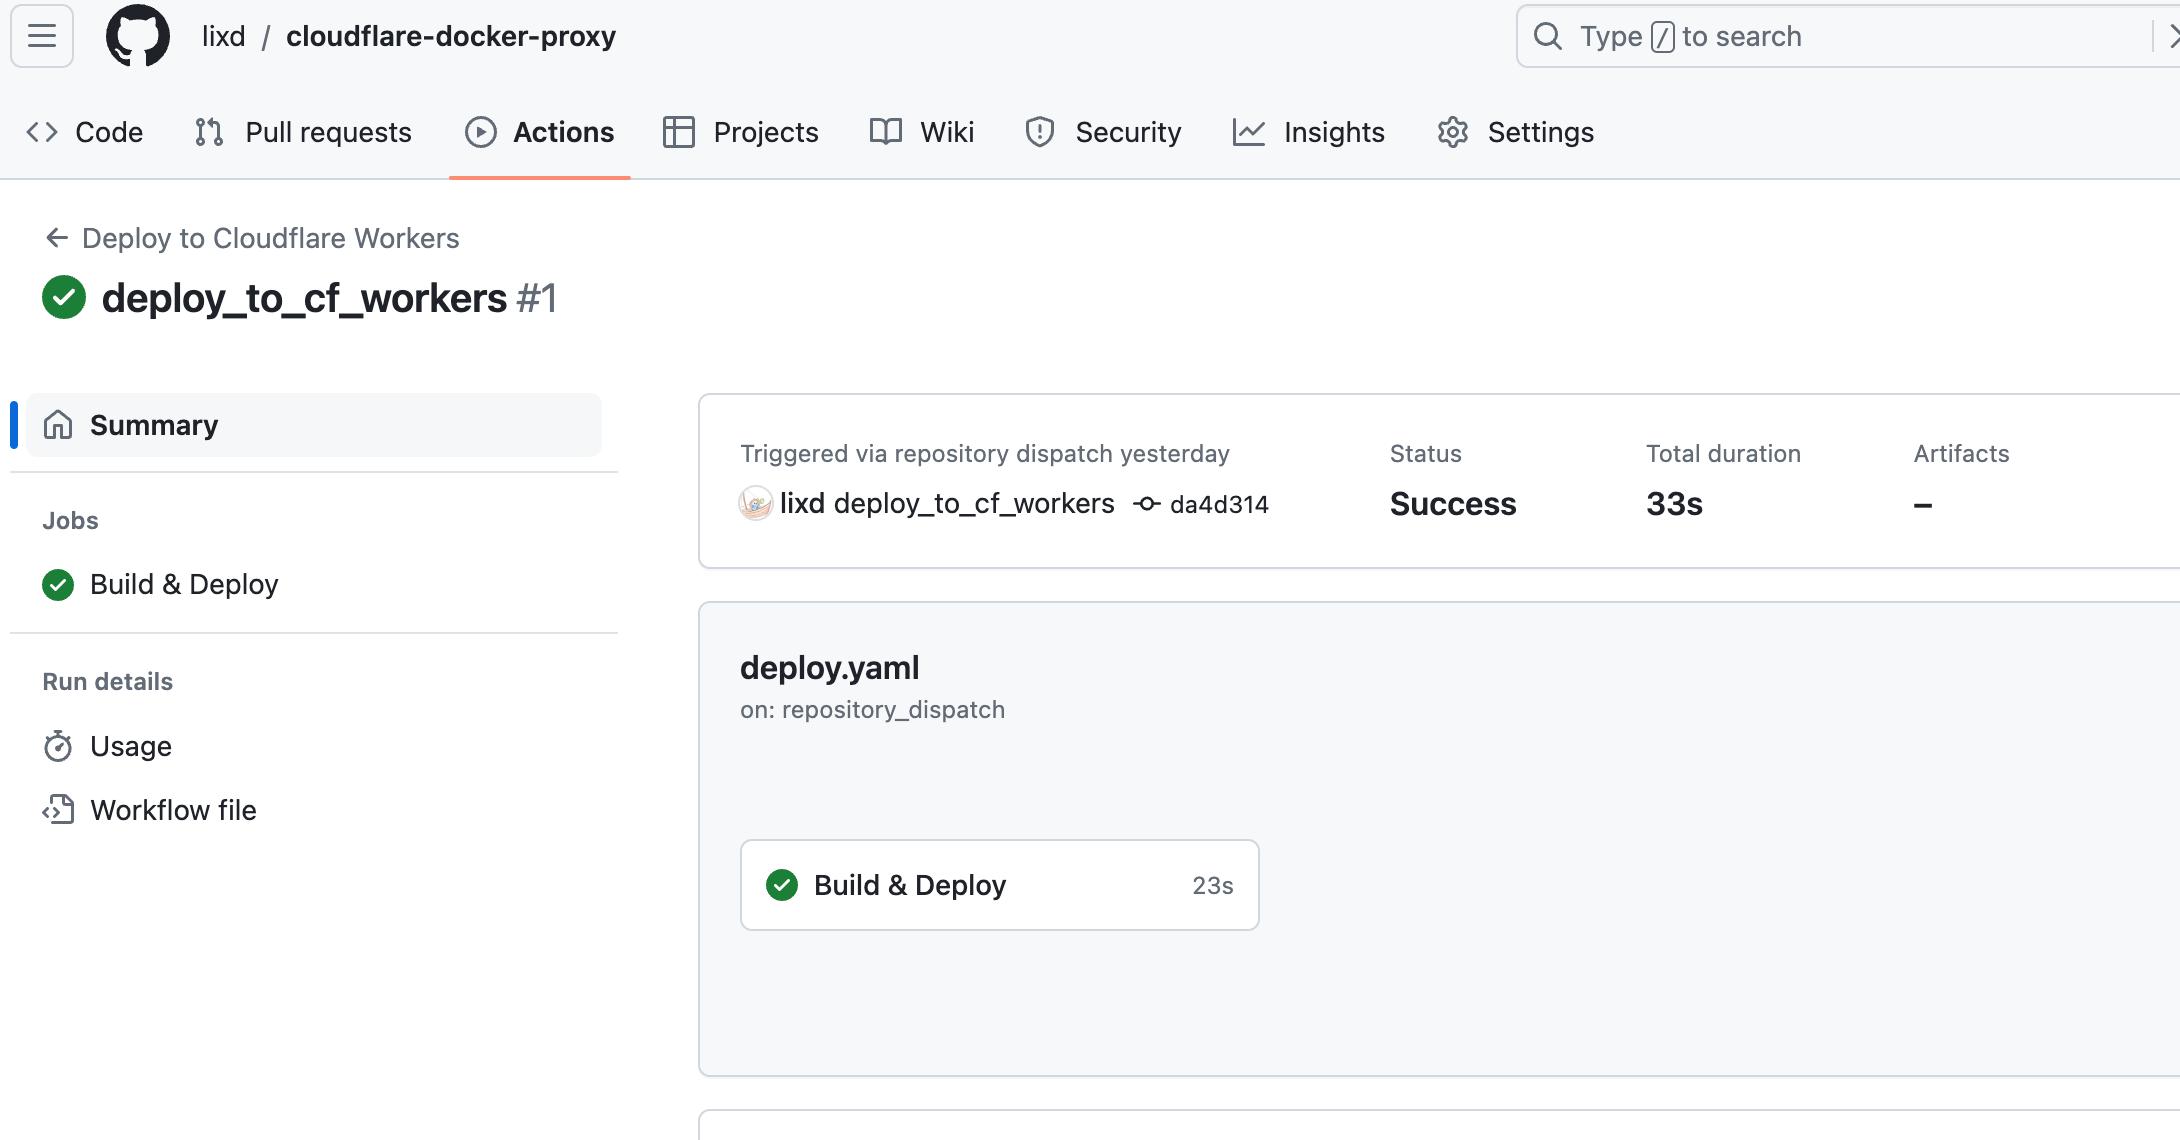
等待部署完成
可以到 Github 查看 Action 执行进度
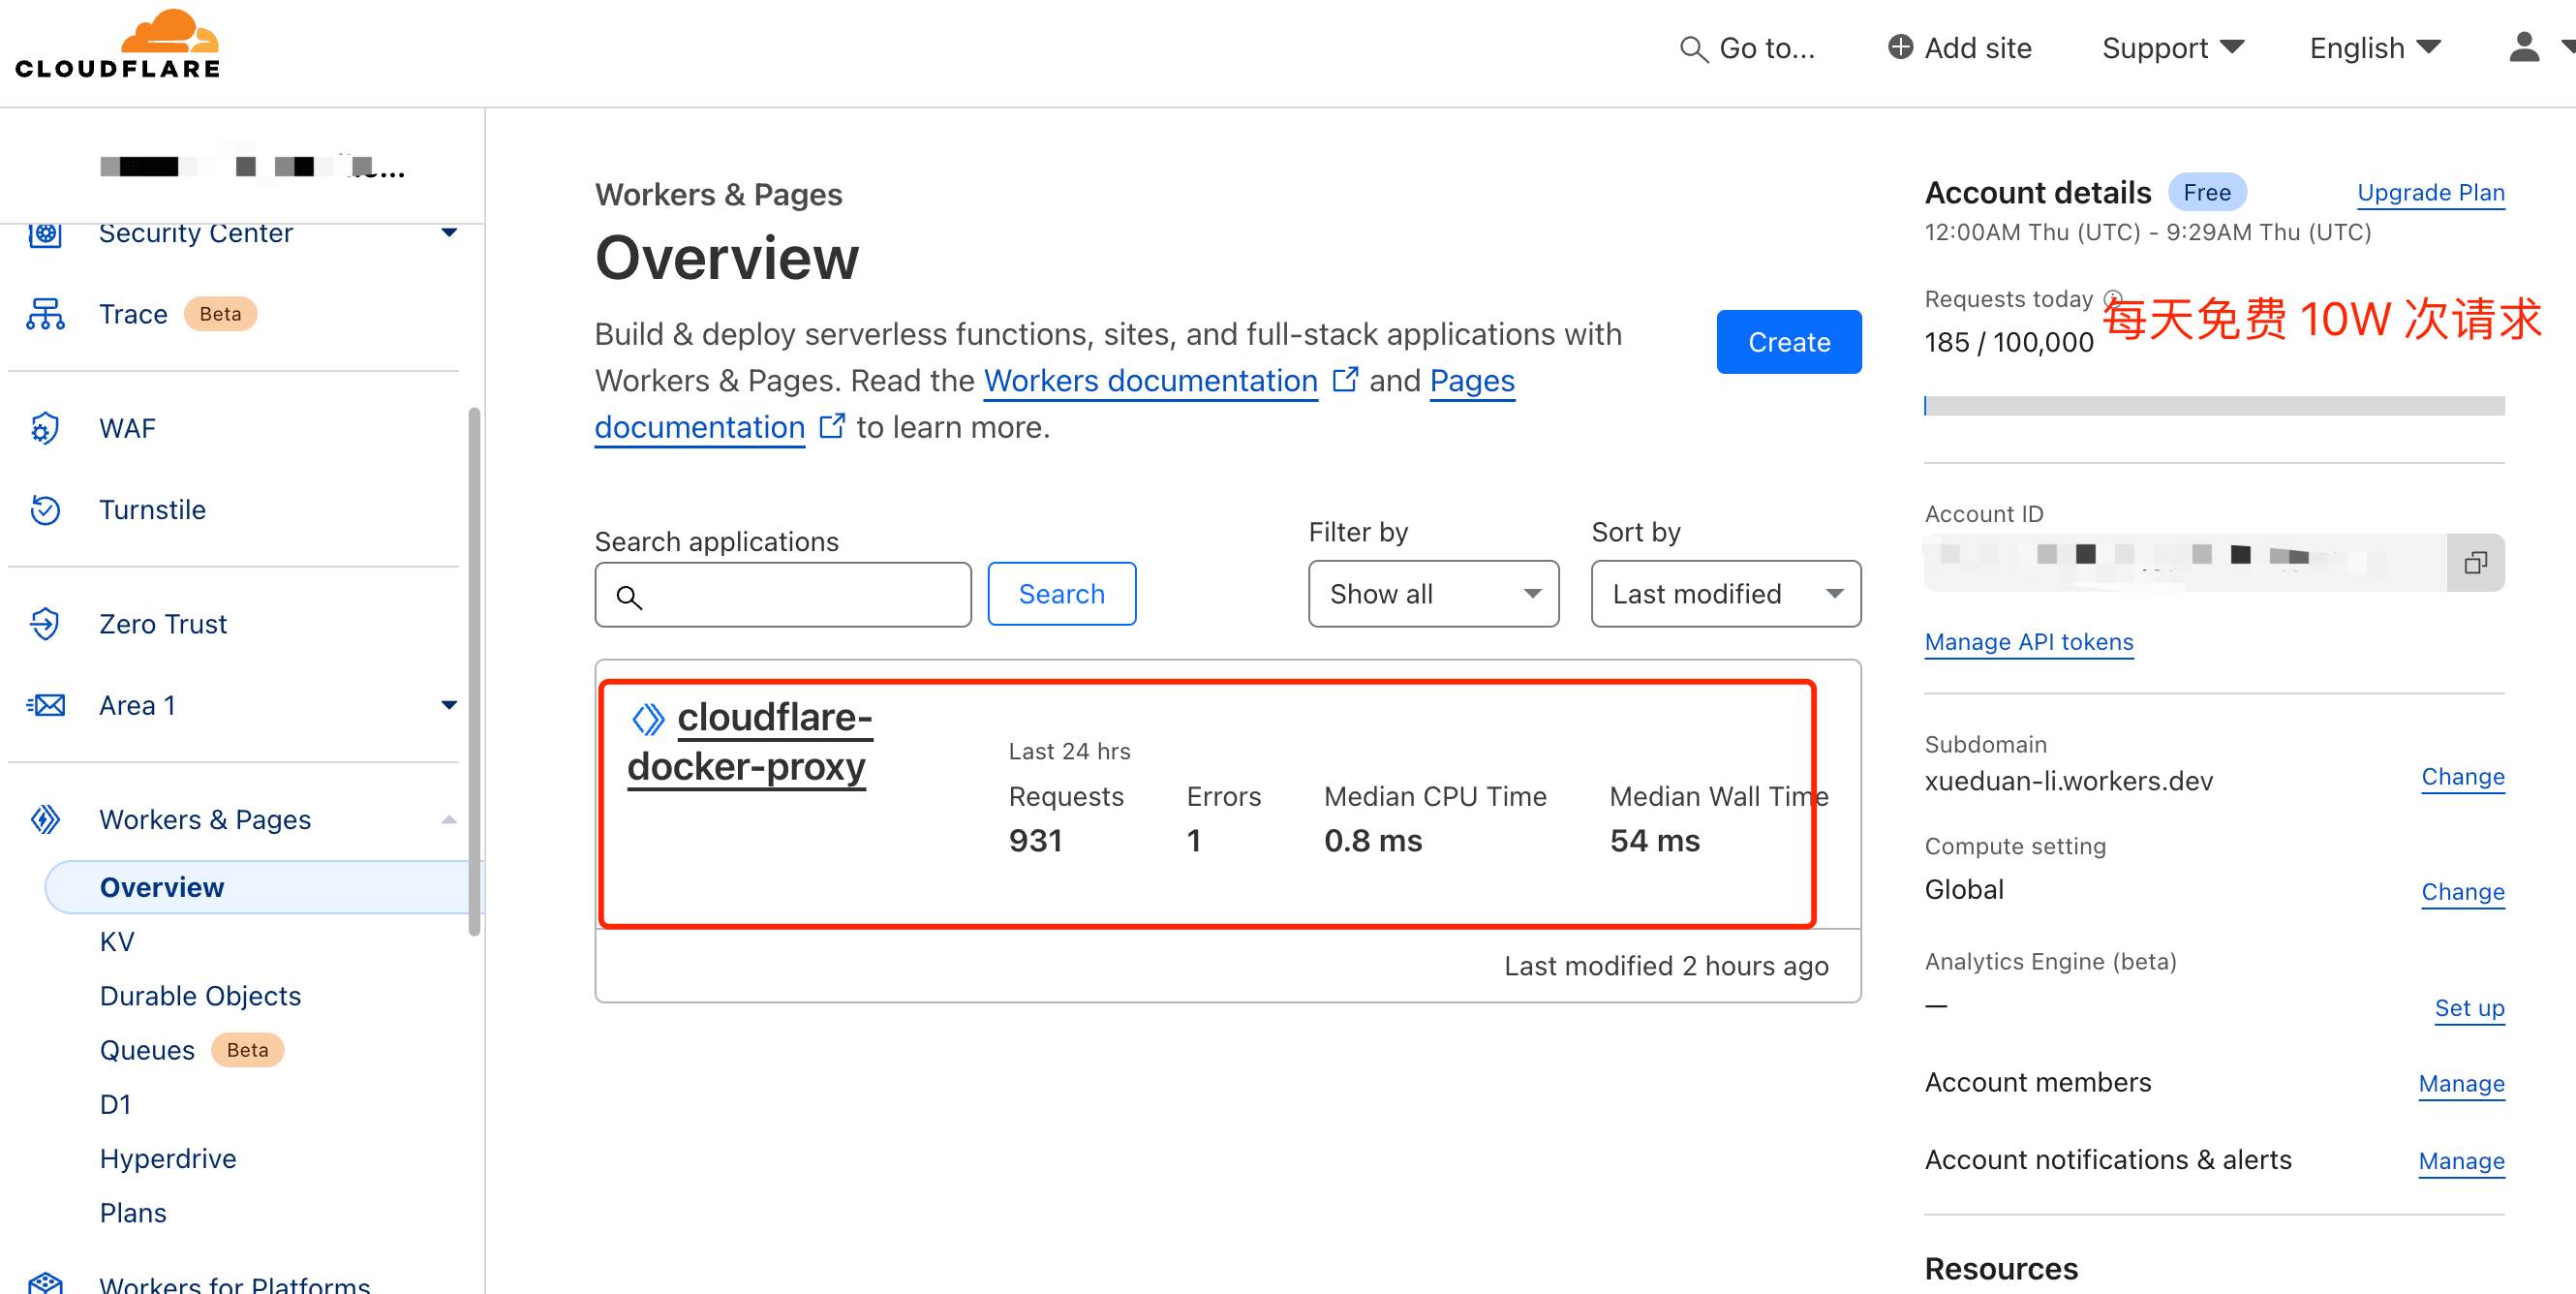
执行完成后,切换到 Cloudflare Dashboard ,不出意外的话就可以看到刚创建的 Worker 了。
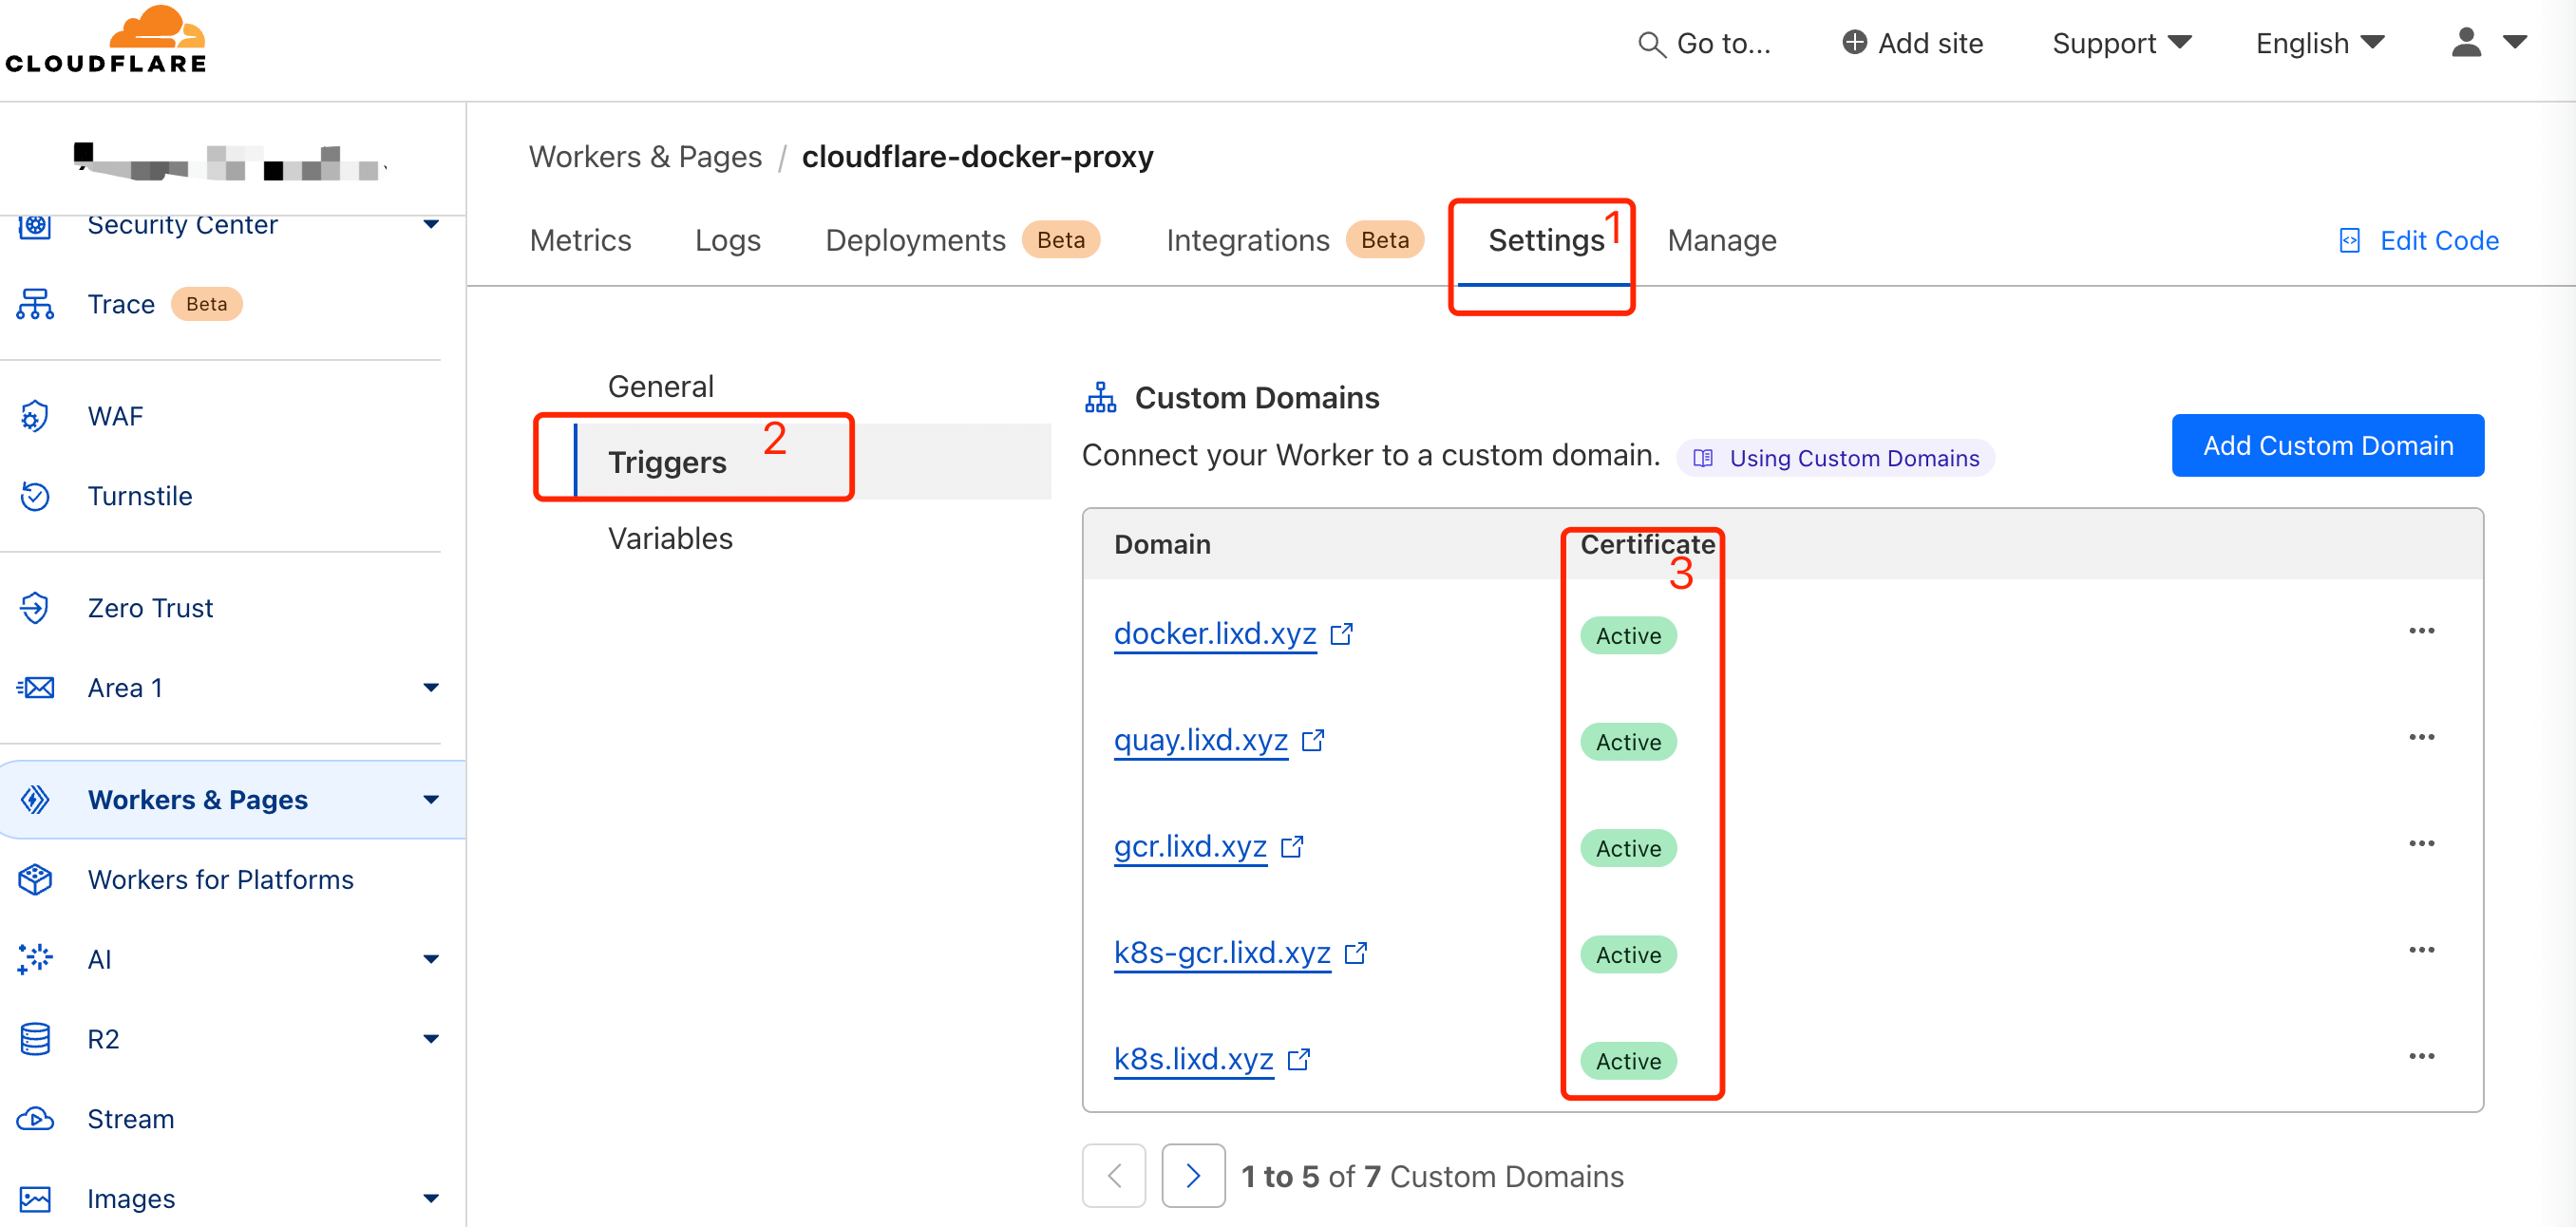
切换到 Setting,等待 SSL 证书签发完成即可
使用说明
部署完成后,访问 https://docker.mydomain.com 就可以看到使用说明了。
为了加速 Docker 镜像拉取,你可以使用以下命令设置 registry mirror:
sudo tee /etc/docker/daemon.json <<EOF

{

    "registry-mirrors": ["https://docker.lixd.xyz"]

}

EOF

# 配置完后需要重启 Docker 服务

sudo systemctl restart docker
使用该代理从不同的镜像仓库拉取镜像,请参考以下命令:
# docker pull nginx:latest

docker pull docker.lixd.xyz/library/nginx:latest  # 拉取 Docker 官方镜像

# docker pull quay.io/coreos/etcd:latest

docker pull quay.lixd.xyz/coreos/etcd:latest  # 拉取 Quay 镜像

# docker pull gcr.io/google-containers/busybox:latest

docker pull gcr.lixd.xyz/google-containers/busybox:latest  # 拉取 GCR 镜像

# docker pull k8s.gcr.io/pause:latest

docker pull k8s-gcr.lixd.xyz/pause:latest  # 拉取 k8s.gcr.io 镜像

# docker pull registry.k8s.io/pause:latest

docker pull k8s.lixd.xyz/pause:latest  # 拉取 registry.k8s.io 镜像

# docker pull ghcr.io/github/super-linter:latest

docker pull ghcr.lixd.xyz/github/super-linter:latest  # 拉取 GitHub 容器镜像

# docker pull docker.cloudsmith.io/public/repo/image:latest

docker pull cloudsmith.lixd.xyz/public/repo/image:latest  # 拉取 Cloudsmith 镜像
为了避免 Worker 用量耗尽,你可以手动 pull 镜像然后 re-tag 之后 push 至本地镜像仓库。
FAQ
Build & Deploy The process '/usr/local/bin/yarn' failed with exit code 1 +1
  ✘ [ERROR] A request to the Cloudflare API (/accounts/***/workers/scripts/cloudflare-docker-proxy/domains/records) failed.

    workers.api.error.origin_conflict_existing_dns_record [code: 100117]
如果提前添加了 DNS 解析则出现这个错误,部署之后会自动添加解析记录,因此部署前不要手动添加记录。
如果出现该问题,可以把 DNS 解析记录删除后再试。
如果你对云原生技术充满好奇,想要深入了解更多相关的文章和资讯,欢迎关注微信公众号。
搜索公众号【探索云原生】即可订阅

参考
白嫖Cloudflare Workers 搭建 Docker Hub镜像加速服务|
又发掘一个CF的新用法,利用Worker构建Docker Registry Mirror
基于 Cloudflare Workers 和 cloudflare-docker-proxy 搭建镜像加速服务的更多相关文章
- Linux 使用 docker 下搭建xunsearch 搜索引擎服务
Linux 使用 docker 下搭建 xunsearch 搜索引擎服务 安装 docker 环境(菜鸟教程有说明) 安装docker说明 下载并运行 xunsearch 的服务端:docker安装x ...
- Docker 中国官方镜像加速
参考:https://www.docker-cn.com/registry-mirror 通过 Docker 官方镜像加速,中国区用户能够快速访问最流行的 Docker 镜像.该镜像托管于中国大陆,本 ...
- Docker拉取镜像加速
关于Docker拉取镜像加速 打开桌面 docker 小图标 选中框框 根据下图 添加国内的加速源即可 Docker加速源 #网易 http://hub-mirror.c.163.com #Docke ...
- Docker+Gogs搭建个人Git服务
欢迎 经常使用Github的我,Github它功能强大,操作简单,不用FQ,所以大家会使用Github进行代码托管,但是,Github的私仓收费的,而且对于普通个人用户来说,价格也不便宜.很多人搭建自 ...
- docker 基础之镜像加速
国内访问 Docker Hub 有时会遇到困难,此时可以配置镜像加速器 对于使用 systemd 的系统,用 systemctl enable docker 启用服务后,编辑 /etc/systemd ...
- ubuntu 安装 docker 并配置镜像加速(使用 apt-get 进行安装)
ubuntu 安装docker CentOS docker安装 https://blog.csdn.net/weixin_44953227/article/details/108597310 你需要这 ...
- CentOS Docker安装、镜像加速
CentOS Docker安装 方法一:使用官方安装脚本自动安装 # 安装命令: curl -fsSL https://get.docker.com | bash -s docker --mirror ...
- docker(五) 使用Docker Registry搭建镜像私服
1.创建私服 docker run -d --name registry -v /opt/data/registry:/var/lib/registry -p 5000:5000 registry - ...
- Kubernetes搭建过程中使用k8s.gcr.io、quay.io、docker.io的镜像加速
前言 因为众所周知的原因,在使用Kubernetes和docker的时候会出现一些镜像无法拉取或者速度较慢的情况,错误信息类似以下: [ERROR ImagePull]: failed to pull ...
- docker使用自定义镜像zabbix服务
一.关闭firewall,永久关闭,使用iptables防火墙 systemctl stop firewalld.service #停止firewall systemctl disable firew ...
随机推荐
- WPF 获取本机所有字体拿到每个字符的宽度和高度
本文主要采用 GlyphTypeface 类尝试获取每个字符的宽度和高度的值,尽管这个方法和最终 WPF 布局使用的文本的宽度和高度是不相同的,但是依然可以作为参考 获取系统字体文件夹的文件 系统字体 ...
- 使用 Docker 自建一款怀旧游戏之 - 超级马里奥
1)超级马里奥 简介 < 超级马里奥 >(Super Mario)是任天堂公司创造的一款经典游戏系列,是世界上最知名.最成功的游戏之一.这个系列由日本设计师宫本茂于 1985 年创造,最初 ...
- vue-cli快速搭建项目的几个文件(一)
===========app.vue文件============= <template> <div id="app"> <router ...
- 03. Ruby入门理解
Ruby入门学习: 视频教程 https://www.bilibili.com/video/BV1QW411F7rh?t=401&p=1 笔记 https://github.com/haima ...
- 报错:Client does not support authentication protocol requested by server; consider upgrading MySQL cli
IDEA启动项目登录时显示用户或密码错误 或者 连接mysql数据库时报错 原因: mysql8 之前的版本中加密规则是mysql_native_password,而在mysql8之后,加密规则是ca ...
- JavaScript算法---基础排序类
<html> <script> //正序排序,把大的放到最后,arr[j]>arr[j+1] let fz=(arr)=>{ for(let len=arr.len ...
- MQTT的使用一
MQTT:物联网消息传递标准 简介 MQTT是用于物联网(IoT)的OASIS标准消息传递协议.它被设计为一种非常轻量级的发布/订阅消息传送,非常适合以较小的代码占用量和最小的网络带宽连接远程设备.如 ...
- GESP 202312 游记
day 0 把一本通上的指针扫了一遍,睡觉! day 1 9:00入场,在第二个考场. 冲进昌平二中,码了Hello,World!. 9:30发网址,开题 监考老师居然说阅读程序题可以打代码!···· ...
- Win10-常用cmd命令与快捷键
以下全部是本人私认为平时经常用到的指令,持续更行中- 常用快捷键 win + R : 输入cmd回车,打开命令提示符界面 win + E : 打开文件资源管理器(俗称:文件夹) win + S : 搜 ...
- Hibernate双向关联导致Java对象转换为JSON字符串时死循环问题的分析与解决方案
引言: 本文描述了在SSH框架中,多个持久层对象相互引用,从而引发分页查询中,查询所得的持久化对象转换为JSON字符串报错的原因及解决方案 使用EasyUI框架的小伙伴们都知道,在使用datagrid ...