Spring WebFlux 简介
本文基于 Spring Boot 2.6.0
基于之前提到的 Reactor 的出现,使得编写响应式程序成为可能。为此,Spring 的开发团队决定添加有关 Reactor 模型的网络层。这样做的话将会对 Spring MVC 作出许多重大的修改,因此 Spring 的研发团队决定开发一个单独的响应式处理框架,随之,Spring WeFlux 就这么诞生了。
Spring WebFlux 与 Spring MVC 的关系如下:
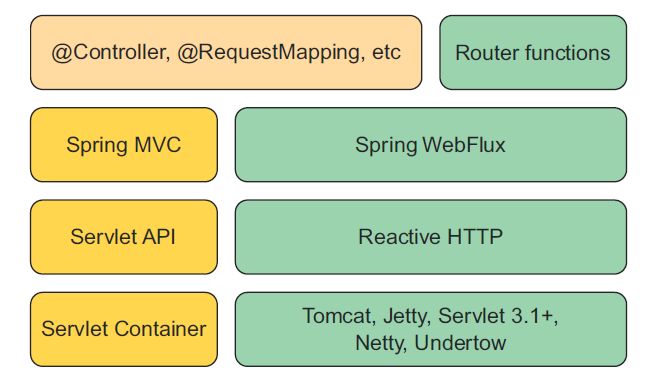
Spring WebFlux 的大部分内容都借鉴了 Spring MVC,许多在 Spring MVC 上使用的注解在 Spring WebFlux 上依旧是可用的,但是 Spring WebFlux 会为此作出特定于 Reactor 的实现
基本使用
注解
依旧可以使用在 Spring MVC 中存在的那些注解
import org.springframework.stereotype.Controller;

import org.springframework.ui.Model;

import org.springframework.web.bind.annotation.GetMapping;

import org.springframework.web.bind.annotation.RequestMapping;

import org.springframework.web.bind.annotation.ResponseBody;

import reactor.core.publisher.Mono;

@Controller

@RequestMapping(path = "/hello")

public class HelloController {

    @GetMapping(path = "") // MVC 相关

    public String hello(Model model) {

        model.addAttribute("name", "xhliu2");

        return "hello";

    }

    @GetMapping(path = "/test") // Rest。。。。

    public @ResponseBody

    Mono<String> test() {

        return Mono.just("xhliu2"); // 每个请求都将创建一个 Mono 流,在对请求作出响应时将会将这些流组合到一起(flatMap),因此整个请求整体来讲将会是非阻塞的

    }

}
RouteFunction
通过 RouteFunction 来定义请求处理:
import org.springframework.context.annotation.Bean;

import org.springframework.context.annotation.Configuration;

import org.springframework.web.reactive.function.server.RequestPredicates;

import org.springframework.web.reactive.function.server.RouterFunction;

import org.springframework.web.reactive.function.server.RouterFunctions;

import org.springframework.web.reactive.function.server.ServerResponse;

import reactor.core.publisher.Mono;

@Configuration

public class RouterController {

    /*

    	通过 RouterFunction 来定义处理逻辑。。。。

    */

    @Bean

    public RouterFunction<ServerResponse> route1() {

        return RouterFunctions.route(

            RequestPredicates.GET("/route1"), // 定义请求方法和路径

            // 使用函数式的方式来处理请求,这是为了结合 Reactor 的最佳处理方式(非阻塞)

            request -> ServerResponse.ok().body(Mono.just("This is a Mono Sample"), String.class)

        );

    }

}
如果需要定义多个请求路径,可以额外定义一个 RouterFunction 的 Bean,也可以在一个 RouterFunction Bean 中定义额外的处理路径和处理逻辑
@Bean

public RouterFunction<ServerResponse> route2() {

    return RouterFunctions.route( // 第一个处理逻辑。。。。

        RequestPredicates.GET("/route2"),

        request -> ServerResponse.ok().body(Mono.just("This is route2"), String.class)

    ).andRoute( // 定义的第二个处理。。。

        RequestPredicates.GET("/route3"),

        request -> ServerResponse.ok().body(Mono.just("This is route3"), String.class)

    );

}
也可以通过预先定义的 Bean 的相关的方法,使用函数式编程的方式来处理对应的逻辑:
首先定义一个 Bean,用于定义一些逻辑处理:
import org.slf4j.Logger;

import org.slf4j.LoggerFactory;

import org.springframework.stereotype.Component;

import org.springframework.web.reactive.function.server.ServerRequest;

import org.springframework.web.reactive.function.server.ServerResponse;

import reactor.core.publisher.Mono;

@Component(value = "handleA")

public class HandlerA {

    private final static Logger log = LoggerFactory.getLogger(HandlerA.class);

    public Mono<ServerResponse> echo(ServerRequest request) {

        log.info("Ready to echo......");

        return ServerResponse.ok().body(Mono.just(request.queryParams().toString()), String.class);

    }

}
再定义对应的路径的处理逻辑:
@Bean

public RouterFunction<ServerResponse> route3(@Autowired HandlerA handlerA) {

    return RouterFunctions.route(

        RequestPredicates.GET("/route4"),

        handlerA::echo

    );

}
源码解析
WebFlux 的初始化
根据
classpath来判断当前的 web 应用所属的类型// org.springframework.boot.SpringApplication。。。
public SpringApplication(ResourceLoader resourceLoader, Class<?>... primarySources) {
this.webApplicationType = WebApplicationType.deduceFromClasspath();
// 省略一部分不太相关的代码。。。。
}
deduceFromClasspath()方法对应的源代码:// 该方法位于 org.springframework.boot.WebApplicationType 中 private static final String WEBMVC_INDICATOR_CLASS = "org.springframework.web.servlet.DispatcherServlet"; private static final String WEBFLUX_INDICATOR_CLASS = "org.springframework.web.reactive.DispatcherHandler"; private static final String JERSEY_INDICATOR_CLASS = "org.glassfish.jersey.servlet.ServletContainer"; static WebApplicationType deduceFromClasspath() {
/*
如果当前加载的 Class 中,WEBFLUX_INDICATOR_CLASS 已经被加载并且 WEBMVC_INDICATOR_CLASS 和 JERSEY_INDICATOR_CLASS 都没有被加载的情况下,才会认为当前的 Web 应用的类型是 Reactive 的
*/
if (ClassUtils.isPresent(WEBFLUX_INDICATOR_CLASS, null) && !ClassUtils.isPresent(WEBMVC_INDICATOR_CLASS, null)
&& !ClassUtils.isPresent(JERSEY_INDICATOR_CLASS, null)) {
return WebApplicationType.REACTIVE;
}
for (String className : SERVLET_INDICATOR_CLASSES) {
if (!ClassUtils.isPresent(className, null)) {
return WebApplicationType.NONE;
}
}
return WebApplicationType.SERVLET;
}
创建
Reactive应用上下文创建应用上下文对应的源代码:
// 该源代码位于 org.springframework.boot.ApplicationContextFactory 中。。。

// 注意这里的 Lamada 表达式。。。

ApplicationContextFactory DEFAULT = (webApplicationType) -> {

    try {

        switch (webApplicationType) {

            case SERVLET:

                return new AnnotationConfigServletWebServerApplicationContext();

            case REACTIVE: // 根据上一步推断出的 Web 应用类型为 Reactive,因此会走这

                return new AnnotationConfigReactiveWebServerApplicationContext();

            default:

                return new AnnotationConfigApplicationContext();

        }

    }

    catch (Exception ex) {

        throw new IllegalStateException("Unable create a default ApplicationContext instance, "

                                        + "you may need a custom ApplicationContextFactory", ex);

    }

};
实例化
AnnotationConfigReactiveWebServerApplicationContext对应的源代码:// 一些基本的 Spring IOC 的内容。。。。具体细节可以查看有关 Spring IOC 部分的内容
public AnnotationConfigReactiveWebServerApplicationContext() {
this.reader = new AnnotatedBeanDefinitionReader(this);
this.scanner = new ClassPathBeanDefinitionScanner(this);
}
之后就是一般的 Spring IOC 容器的创建和
Bean的初始化了,与Reactor相关的比较重要的部分为onRefresh()方法调用的阶段,这个方法使用到了模板方法模式,在org.springframework.boot.web.reactive.context.ReactiveWebServerApplicationContext类中得到了具体的实现onRefresh()在WebFlux中的实现的源代码如下:@Override
protected void onRefresh() {
// AbstractApplicationContext 中定义的 “模板方法”,就目前 Spring 5.3.13 的版本来讲,是一个空的方法
super.onRefresh(); createWebServer(); // 由 WebFlux 具体定义 // 省略有一部分异常捕获代码
}
createWebServer()方法对应的源代码如下:// 该方法定义依旧位于 org.springframework.boot.web.reactive.context.ReactiveWebServerApplicationContext 中 private void createWebServer() {
WebServerManager serverManager = this.serverManager; // 默认为 null
if (serverManager == null) {
// 获取 BeanFactory。。。。。
StartupStep createWebServer = this.getApplicationStartup().start("spring.boot.webserver.create");
String webServerFactoryBeanName = getWebServerFactoryBeanName();
/*
默认情况下,WebFlux 会选择 Netty 作为服务器,这是因为 Netty 的处理模型十分适合 Reactor 编程,因此能够很好地契合 WebFlux
在这里的 webServerFactory 为 org.springframework.boot.web.embedded.netty.NettyReactiveWebServerFactory
*/
ReactiveWebServerFactory webServerFactory = getWebServerFactory(webServerFactoryBeanName);
createWebServer.tag("factory", webServerFactory.getClass().toString());
// 获取 BeanFactory 结束。。。。 boolean lazyInit = getBeanFactory().getBeanDefinition(webServerFactoryBeanName).isLazyInit(); // 默认为 false /*
比较关键的部分,这里会创建一个 WebServerManager
*/
this.serverManager = new WebServerManager(this, webServerFactory, this::getHttpHandler, lazyInit); // 剩下的部分就是完成一些其它 Bean 的注册了。。。
getBeanFactory().registerSingleton("webServerGracefulShutdown",
new WebServerGracefulShutdownLifecycle(this.serverManager.getWebServer()));
getBeanFactory().registerSingleton("webServerStartStop",
new WebServerStartStopLifecycle(this.serverManager));
createWebServer.end();
}
// 最后再初始化相关的属性资源,在当前的类中,这也是一个模板方法
initPropertySources();
}
剩下的就是一般的 IOC 初始化流程,在此不做赘述
WebServerFactory 的实例化
具体对应上文描述的 createWebServer() 方法中
ReactiveWebServerFactory webServerFactory=getWebServerFactory(webServerFactoryBeanName);
的部分,其中 getWebServerFactory 对应的源代码如下:
protected ReactiveWebServerFactory getWebServerFactory(String factoryBeanName) {

    /*

    	当前环境下的 factoryBeanName 为 "nettyReactiveWebServerFactory",按照 Spring Bean 默认的命名方式,将会加载 NettyReactiveWebServerFactory 作为 ReactiveWebServerFactory 的实现

    */

    return getBeanFactory().getBean(factoryBeanName, ReactiveWebServerFactory.class);

}
WebServerManager 的实例化对应的源代码如下:
WebServerManager(

    ReactiveWebServerApplicationContext applicationContext,

    ReactiveWebServerFactory factory,

    Supplier<HttpHandler> handlerSupplier, boolean lazyInit

) {

    this.applicationContext = applicationContext;

    Assert.notNull(factory, "Factory must not be null");

    /*

    	比较重要的部分就是有关 HttpHandler 的处理,在这里定义了 HttpHandler Bean 的初始化方式

    	结合上文中默认传入的参数,在当前的上下文环境中不是以 lazy-init 的方式进行加载的

    */

    this.handler = new DelayedInitializationHttpHandler(handlerSupplier, lazyInit);

    this.webServer = factory.getWebServer(this.handler);

}
具体 NettyReactiveWebServerFactory 中对 getWebServer(handler) 方法的实现如下:
// 该方法定义于 org.springframework.boot.web.embedded.netty.NettyReactiveWebServerFactory

@Override

public WebServer getWebServer(HttpHandler httpHandler) {

    HttpServer httpServer = createHttpServer();

    /*

    	这里是重点部分!HttpHandler 的作用相当于 Spring MVC 中的 DispatcherServlet,用于处理请求的分发,以及寻找 Handler 对请求进行处理。。。。

    	这里使用到了 "适配器模式", handlerAdapter 将 HttpHandler 适配到 Netty 的 Channel,使得原本不相干的两个对象能够协同工作

    */

    ReactorHttpHandlerAdapter handlerAdapter = new ReactorHttpHandlerAdapter(httpHandler);

    // 创建 Netty 服务端。。。。。。。。

    NettyWebServer webServer = createNettyWebServer(

        httpServer, handlerAdapter, this.lifecycleTimeout, getShutdown()

    );

    webServer.setRouteProviders(this.routeProviders);

    return webServer;

}
HttpHandler 的实例化
在 Reactive 中,对于 handlerSupplier 的定义如下:
// 该方法定义于 org.springframework.boot.web.reactive.context.ReactiveWebServerApplicationContext 中

protected HttpHandler getHttpHandler() {

    // Use bean names so that we don't consider the hierarchy

    String[] beanNames = getBeanFactory().getBeanNamesForType(HttpHandler.class);

    // 省略一部分参数检测代码。。。。

    // 一般的 BeanFactory 获取 Bean 的步骤

    return getBeanFactory().getBean(beanNames[0], HttpHandler.class);

}
由于 Spring Boot 自动配置的存在,在创建应用时会把能够自动配置的类自动配置到 IOC 中,具体包括 spring.factories 文件中定义的 Bean、以及使用 @Configuration 注解修饰的配置类。
在 WebFlux 中 HttpHandler 的配置类的定义如下:
// 此静态类位于 org.springframework.boot.autoconfigure.web.reactive.HttpHandlerAutoConfiguration 类中,这个类在 spring.factories 文件中定义为是可以自动配置的

@Configuration(proxyBeanMethods = false)

public static class AnnotationConfig {

    private final ApplicationContext applicationContext;

    public AnnotationConfig(ApplicationContext applicationContext) {

        this.applicationContext = applicationContext;

    }

    @Bean

    public HttpHandler httpHandler(ObjectProvider<WebFluxProperties> propsProvider) {

        /*

        	这里使用到了构建者模式的方式来创建对象。。。。。

        */

        HttpHandler httpHandler = WebHttpHandlerBuilder.applicationContext(this.applicationContext).build();

        // 省略一部分不太重要的代码。。。。。

        return httpHandler;

    }

}
applicationContext(applicationContext) 对应的源代码如下:
public static WebHttpHandlerBuilder applicationContext(ApplicationContext context) {

    /*

    	获取 WebHandler Bean,由于 Spring Boot 的自动配置的存在,在将 org.springframework.boot.autoconfigure.web.reactive.HttpHandlerAutoConfiguration 配置类加载到 IOC 容器中时,将会自动引入 DispatcherHandler 的 WebHandler Bean

    	HttpHandlerAutoConfiguration 在 spring.factories 中定义为是可以自动配置的

    */

    WebHttpHandlerBuilder builder = new WebHttpHandlerBuilder(

        context.getBean(WEB_HANDLER_BEAN_NAME, WebHandler.class), context);

    // 添加 WebFliter。。。。

    List<WebFilter> webFilters = context

        .getBeanProvider(WebFilter.class)

        .orderedStream()

        .collect(Collectors.toList());

    builder.filters(filters -> filters.addAll(webFilters));

    // 异常处理 Handler。。。

    List<WebExceptionHandler> exceptionHandlers = context

        .getBeanProvider(WebExceptionHandler.class)

        .orderedStream()

        .collect(Collectors.toList());

    builder.exceptionHandlers(handlers -> handlers.addAll(exceptionHandlers));

    // 省略一部分不太重要的代码。。。。

    return builder;

}
bulid() 方法的定义如下:
// 该方法定义于 org.springframework.web.server.adapter.WebHttpHandlerBuilder 中

public HttpHandler build() {

    /*

    	这里是 WebFlux 用于处理请求的关键的地方,通过 “装饰者” 模式,将 FilterWebHandler 通过 ExceptionHandlingWebHandler 进行 “装饰”,使得在处理请求时先执行 ExceptionHandlingWebHandler 的 handle 的处理逻辑,从而增强了底层 FilterWebHandler 的功能

    	在设计时值得考虑使用这样的方式来优化自己的设计,从而尽可能地复用已有的对象和类

   	*/

    WebHandler decorated = new FilteringWebHandler(this.webHandler, this.filters);

    decorated = new ExceptionHandlingWebHandler(decorated,  this.exceptionHandlers);

    // 因此最终生成的 HttpHandler 的具体实例化类为 HttpWebHandlerAdapter

    HttpWebHandlerAdapter adapted = new HttpWebHandlerAdapter(decorated);

    // 省略一部分设置属性相关的代码。。。

    return (this.httpHandlerDecorator != null ? this.httpHandlerDecorator.apply(adapted) : adapted);

}
组件的定义
这里又涉及到 Spring Boot 的自动配置,spring.factories 文件中定义了对于 WebFlux 的自动配置类 WebFluxAutoConfiguration:
// 该类定义于org.springframework.boot.autoconfigure.web.reactive.WebFluxAutoConfiguration

@Configuration(proxyBeanMethods = false)

@ConditionalOnWebApplication(type = ConditionalOnWebApplication.Type.REACTIVE)

@ConditionalOnClass(WebFluxConfigurer.class) // 有关 WebFlux 的相关配置。。。。

// 这里引入的类是和 WebFlux 相关的主要类

@ConditionalOnMissingBean({ WebFluxConfigurationSupport.class })

@AutoConfigureAfter({ ReactiveWebServerFactoryAutoConfiguration.class, CodecsAutoConfiguration.class,

                     ReactiveMultipartAutoConfiguration.class, ValidationAutoConfiguration.class,

                     WebSessionIdResolverAutoConfiguration.class })

@AutoConfigureOrder(Ordered.HIGHEST_PRECEDENCE + 10)

public class WebFluxAutoConfiguration {

    // 省略类中的内容

}
主要需要关注的是 WebFluxConfigurationSupport 的引入,在这个类中定义了有关请求分发和处理的逻辑的类。
WebFluxConfigurationSupport 中定义的 Bean 如下:
// 此类定义于 org.springframework.web.reactive.config.WebFluxConfigurationSupport

public class WebFluxConfigurationSupport implements ApplicationContextAware {

    /*

    	这个 Bean 类似于 Spring MVC 中的 DiaptcherServlet,用于处理请求的分发以及查找对应的 handler 去处理对应的请求(“外观模式” 的使用)

    */

    @Bean

    public DispatcherHandler webHandler() {

        return new DispatcherHandler();

    }

    /*

    	由于篇幅问题,在此省略了一些其它必需的 Bean 的定义

    */

}
简单起见,在此仅仅只是描述一下 WebFluxConfigurationSupport 中定义的必需的 Bean:
DispatcherHandler用于处理请求的分发、为当前请求寻找对应的处理 Handler,类似于 Spring MVC 中的 DispatcherServlet
RouterFunctionMapping和RequestMappingHandlerMapping定义了请求和处理方法之间的对应关系,Spring WebFlux 支持使用传统的 Spring MVC 的注解方式来定义 Handler,也支持使用
RouterFunction通过函数式的方式来定义对应的请求的 HandlerRequestMappingHandlerAdapter和HandlerFunctionAdapter同样地,两者是都是为了处理实际的请求而做的适配,和 Spring MVC 中对 Handler 的适配是一样的。由于 Spring WebFlux 支持使用
@RequestMapping的方式来定义请求,因此也必须对这种类型的方式定义对应的适配器。WebSocketHandlerAdapter对于
WebSocket的支持。。。。ResponseEntityResultHandler、ResponseBodyResultHandler、ViewResolutionResultHandler以及ServerResponseResultHandlerResponseEntityResultHandler、ResponseBodyResultHandler和ServerResponseResultHandler都是针对 Rest 的响应结果(Http);ViewResolutionResultHandler则是相当于返回的是一个View(MVC 中的View)即 “视图”
整合 Handler
有了这些组件之后,值得关心的地方就是 .*Adapter 和对应的 Handler 之间的连接,即 Adapter 是如何调用 Handler的
首先,经过一系列的 debug 操作,得到 WebFlux 对于一个一般的 Http 请求的处理链如下:

有关 WebHandler 的类层次结构如下:

对请求的具体分析:
服务的启动
以
NettyWebServer为例,查看服务启动的源代码// 该方法定义于 org.springframework.boot.web.embedded.netty.NettyWebServer
DisposableServer startHttpServer() {
HttpServer server = this.httpServer; // HttpServerBind 为当上下文的具体实现
if (this.routeProviders.isEmpty()) {
// 在这里定义了对于请求的处理逻辑。。。。
server = server.handle(this.handler);
}
else {
server = server.route(this::applyRouteProviders);
}
if (this.lifecycleTimeout != null) {
return server.bindNow(this.lifecycleTimeout);
}
return server.bindNow();
}
handle(handler)对应的源代码如下:// 该方法定义于 reactor.netty.http.server.HttpServer /*
该方法的主要目的是捕获来自客户端的请求,附加一个 IO 处理程序以对连接的客户端作出响应
*/
public final HttpServer handle(
BiFunction<? super HttpServerRequest, ? super HttpServerResponse, ? extends Publisher<Void>> handler) {
Objects.requireNonNull(handler, "handler");
// 重点在于具体的 handler,它定义了处理请求的逻辑
return childObserve(new HttpServerHandle(handler));
}
继续查看
HttpServerHandle的源代码,具体如下:static final class HttpServerHandle implements ConnectionObserver { final BiFunction<? super HttpServerRequest, ? super HttpServerResponse, ? extends Publisher<Void>> handler; HttpServerHandle(BiFunction<? super HttpServerRequest, ? super HttpServerResponse, ? extends Publisher<Void>> handler) {
this.handler = handler;
} /*
重点部分在这里,这里设置一个观察者来监听请求,当请求状态发生改变时,则作出对应的响应
*/
@Override
@SuppressWarnings("FutureReturnValueIgnored")
public void onStateChange(Connection connection, State newState) {
if (newState == HttpServerState.REQUEST_RECEIVED) {
try {
if (log.isDebugEnabled()) {
log.debug(format(connection.channel(), "Handler is being applied: {}"), handler);
}
HttpServerOperations ops = (HttpServerOperations) connection;
/*
重点部分就在这里了,在当前的上下问环境中当前的 handler 为 ReactorHttpHandlerAdapter
具体细节可以查看 org.springframework.boot.web.reactive.context.ReactiveWebServerApplicationContext 在 refresh() 阶段创建 WebManager 的源代码,在那里定义了当前 webServer 的具体实现过程
*/
Mono<Void> mono = Mono.fromDirect(handler.apply(ops, ops));
if (ops.mapHandle != null) {
mono = ops.mapHandle.apply(mono, connection);
}
mono.subscribe(ops.disposeSubscriber());
}
catch (Throwable t) {
log.error(format(connection.channel(), ""), t);
//"FutureReturnValueIgnored" this is deliberate
connection.channel()
.close();
}
}
}
}
ReactorHttpHandlerAdapter具体处理请求的源代码如下:
// 此方法定义于 org.springframework.http.server.reactive.ReactorHttpHandlerAdapter

@Override

public Mono<Void> apply(HttpServerRequest reactorRequest, HttpServerResponse reactorResponse) {

    // 用于创建对应的 ByteBuf,具体可以查看有关 Netty 的 ByteBuf

    NettyDataBufferFactory bufferFactory = new NettyDataBufferFactory(reactorResponse.alloc());

    /*

        	为 request 和 response 创建对应的 ByteBuf。。。。。

        	但是就目前步骤来讲并不会真正创建 ByteBuf,而是只是设置创建 ByteBuf 的工厂对象

        */

        ReactorServerHttpRequest request = new ReactorServerHttpRequest(reactorRequest, bufferFactory);

        ServerHttpResponse response = new ReactorServerHttpResponse(reactorResponse, bufferFactory);

        // Rest 风格的请求,“Head”,不常用。。。

        if (request.getMethod() == HttpMethod.HEAD) {

            response = new HttpHeadResponseDecorator(response);

        }

    	/*

    		这里是重点部分!在这里定义了实际的处理逻辑 (handle 方法)

    	*/

        return this.httpHandler.handle(request, response)

            .doOnError(ex -> logger.trace(request.getLogPrefix() + "Failed to complete: " + ex.getMessage()))

            .doOnSuccess(aVoid -> logger.trace(request.getLogPrefix() + "Handling completed"));

    // 省略部分异常检测代码。。。。

}
HttpWebHandlerAdapter经过上文的相关分析,在当前的运行条件下唯一存在于 Spring IOC 的
HttpHandler的实际 Bean 为HttpWebHandlerAdapter,即具体执行的handle()方法为HttpWebHandlerAdapter的具体实现对应的源代码如下:
// 该方法定义于 org.springframework.web.server.adapter.HttpWebHandlerAdapter

@Override

public Mono<Void> handle(ServerHttpRequest request, ServerHttpResponse response) {

    if (this.forwardedHeaderTransformer != null) {

        request = this.forwardedHeaderTransformer.apply(request);

        // 省略一部分异常检测代码。。。。

    }

    ServerWebExchange exchange = createExchange(request, response);

    // 省略一部分日志打印的代码。。。。

    /*

    	通过对 HttpHandler 实例化的分析,现在调用的是最外层的 ExceptionHandlingWebHandler 的 handle() 方法

    */

    return getDelegate().handle(exchange)

        .doOnSuccess(aVoid -> logResponse(exchange))

        .onErrorResume(ex -> handleUnresolvedError(exchange, ex))

        .then(Mono.defer(response::setComplete));

}
ExceptionHandlingWebHandler其中具体的源代码如下:
// 该方法定义于 org.springframework.web.server.handler.ExceptionHandlingWebHandler。。。

@Override

public Mono<Void> handle(ServerWebExchange exchange) {

    Mono<Void> completion;

    try {

        // 首先会执行父类的 handle 方法

        completion = super.handle(exchange);

    } catch (Throwable ex) {

        // 处理过程中存在异常则返回一个 error 到上层

        completion = Mono.error(ex);

    }

    /*

    	遍历当前上下文中存在的 WebExceptionHandler,如果处理结果存在对应的 Handler 预定义的异常,那么将会处理对应的异常。。。

    */

    for (WebExceptionHandler handler : this.exceptionHandlers) {

        completion = completion.onErrorResume(ex -> handler.handle(exchange, ex));

    }

    return completion;

}
根据上文中的
WebHandler的类结构图,ExceptionHandlingWebHandler继承自WebHandlerDecorator,其中中的handle()方法的定义如下:// 该具体实现定义于 org.springframework.web.server.handler.WebHandlerDecorator
@Override
public Mono<Void> handle(ServerWebExchange exchange) {
/*
结合之前使用 “构建者模式” 来构造 HttpHandler 的过程,在构建时通过 “装饰器模式” 来增强 FilterWebHandler 功能的逻辑,对于当前的执行上下文 ExceptionHandlingWebHandler, 其中的 delegate 为 FilterWebHandler
*/
return this.delegate.handle(exchange);
}
也就是说,WebFlux 在接收到一个请求时,首先将请求发送到
ExceptionHandlingWebHandler进行进一步的处理,而在ExceptionHandlingWebHandler在调用handle()方法进行处理时,首先会再讲请求发送到下一层的handle()方法,最后通过处理结果再执行当前上下文对应的逻辑在
ExceptionHandlingWebHandler中,当处理结果出现异常时将会进行捕获,并返回一个带有 error 的MonoFilteringWebHandler具体的源代码如下:
// 该方法定义于 org.springframework.web.server.handler.FilteringWebHandler 中

/*

	在使用 “构建者模式” 构建 HttpHandler Bean 时,会创建一个 FilteringWebHandler 的实例

	传入的参数为 DispatcherHandler, filters

*/

public FilteringWebHandler(WebHandler handler, List<WebFilter> filters) {

    super(handler); // 设置当前的 delegate,将请求发送到下一层

    this.chain = new DefaultWebFilterChain(handler, filters);

}

@Override

public Mono<Void> handle(ServerWebExchange exchange) {

    // 在这里定义了对应的过滤处理

    return this.chain.filter(exchange);

}
结合构造
FilteringWebHandler对象时的构造函数,chain的具体实例对象为DefaultWebFilterChain,具体的filter(exchange)方法的定义如下:// org.springframework.web.server.handler.DefaultWebFilterChain @Override
public Mono<Void> filter(ServerWebExchange exchange) {
return Mono.defer(() ->
this.currentFilter != null && this.chain != null ?
// 如果没有定义 Filter,那么就会将 request 发送到下一层的 WebHandler,在当前环境下下一层的 WebHandler 为 DispatcherHandler
invokeFilter(this.currentFilter, this.chain, exchange) :
this.handler.handle(exchange)
);
}
DispatcherHandler对应的源代码如下:
// org.springframework.web.reactive.DispatcherHandler

@Override

public Mono<Void> handle(ServerWebExchange exchange) {

    // 省略一部分不太重要的代码。。。

    return Flux.fromIterable(this.handlerMappings)

        /*

        	遍历对应的处理的 Mapping,将它们组合为一个 Flux,这么做的目的是为了使得 @RequestMapping 注解能够和 RouterFunction 能够协同工作

        	经过这一轮处理之后将会得到所有的 request 对应的 handler

        */

        .concatMap(mapping -> mapping.getHandler(exchange))

        .next() // 为每个处理创建一个单独的 Mono,以达到完全异步的效果

        .switchIfEmpty(createNotFoundError())

        // 调用对应的 handler 方法处理请求

        .flatMap(handler -> invokeHandler(exchange, handler))

        // 将处理后的结果进行一定的封装之后再组合成一个 Flux

        .flatMap(result -> handleResult(exchange, result));

}
invokeHandler(exchange, handler)对应的源代码如下:// org.springframework.web.reactive.DispatcherHandler
private Mono<HandlerResult>
invokeHandler(
ServerWebExchange exchange,
Object handler
) {
// 省略一部分 CORS 检测。。。 if (this.handlerAdapters != null) {
// 通过合适的 HandlerAdapter 适配所有的 handler,使得 handler 能够正常地处理请求
for (HandlerAdapter handlerAdapter : this.handlerAdapters) {
if (handlerAdapter.supports(handler)) {
// “适配器模式” 的使用 :)
return handlerAdapter.handle(exchange, handler);
}
}
}
return Mono.error(new IllegalStateException("No HandlerAdapter: " + handler));
}
具体的
HandlerAdapter的类结构图如下:
HandlerFunctionAdapter最后一步的
handle(exchange)方法,对应的源代码如下:// 在这里以 HandlerFunctionAdapter 的 handle() 方法为例 @Override
public Mono<HandlerResult> handle(ServerWebExchange exchange, Object handler) {
HandlerFunction<?> handlerFunction = (HandlerFunction<?>) handler;
ServerRequest request = exchange.getRequiredAttribute(RouterFunctions.REQUEST_ATTRIBUTE); // 调用对应的 handle(request) 函数进行对应的处理
return handlerFunction.handle(request)
.map(response -> new HandlerResult(handlerFunction, response, HANDLER_FUNCTION_RETURN_TYPE));
}
最后对相应结果进行封装:
// org.springframework.web.reactive.DispatcherHandler ....

private Mono<Void> handleResult(ServerWebExchange exchange, HandlerResult result) {

    // 就当前上下文来讲,对应的 HandlerResultHandler 为 ServerResponseResultHandler

    return getResultHandler(result).handleResult(exchange, result)

        .checkpoint("Handler " + result.getHandler() + " [DispatcherHandler]")

        .onErrorResume(ex ->

                       result.applyExceptionHandler(ex).flatMap(exResult -> {

                           String text = "Exception handler " + exResult.getHandler() +

                               ", error=\"" + ex.getMessage() + "\" [DispatcherHandler]";

                           return getResultHandler(exResult).handleResult(exchange, exResult).checkpoint(text);

                       }));

}
ServerResponseResultHandler处理结果对应的源代码如下:/* org.springframework.web.reactive.function.server.support.ServerResponseResultHandler
*/ @Override
public Mono<Void> handleResult(ServerWebExchange exchange, HandlerResult result) {
ServerResponse response = (ServerResponse) result.getReturnValue();
Assert.state(response != null, "No ServerResponse"); // 将响应结果写入到 response 中。。。
return response.writeTo(exchange, new ServerResponse.Context() {
@Override
public List<HttpMessageWriter<?>> messageWriters() {
return messageWriters;
}
@Override
public List<ViewResolver> viewResolvers() {
return viewResolvers;
}
});
}
Spring WebFlux 简介的更多相关文章
- Spring WebFlux 基础教程:WebSocket 使用
WebSocket 协议简介 WebSocket 协议提供了一种标准化的方式,在客户端和服务端建立在一个TCP 连接之上的全双工,双向通信的协议. WebSocket 交互开始于 HTTP 请求,使用 ...
- 深入剖析 Spring WebFlux
一.WebFlux 简介 WebFlux 是 Spring Framework5.0 中引入的一种新的反应式Web框架.通过Reactor项目实现Reactive Streams规范,完全异步和非阻塞 ...
- Spring 系列: Spring 框架简介 -7个部分
Spring 系列: Spring 框架简介 Spring AOP 和 IOC 容器入门 在这由三部分组成的介绍 Spring 框架的系列文章的第一期中,将开始学习如何用 Spring 技术构建轻量级 ...
- Spring MVC简介
Spring MVC简介 Spring MVC框架是有一个MVC框架,通过实现Model-View-Controller模式来很好地将数据.业务与展现进行分离.从这样一个角度来说,Spring MVC ...
- Spring 系列: Spring 框架简介(转载)
Spring 系列: Spring 框架简介 http://www.ibm.com/developerworks/cn/java/wa-spring1/ Spring AOP 和 IOC 容器入门 在 ...
- Spring Boot简介
Spring Boot简介 Spring Boot是为了简化Spring开发而生,从Spring 3.x开始,Spring社区的发展方向就是弱化xml配置文件而加大注解的戏份.最近召开的SpringO ...
- Spring Framework 简介
Spring Framework 依赖注入.事务管理.Web应用程序.数据访问.消息传递.测试和更多的核心支持. Tips: Spring 官网:https://spring.io/ spring f ...
- Spring Webflux: Kotlin DSL [片断]
原文链接:https://dzone.com/articles/spring-webflux-kotlin-dsl-snippets 作者:Biju Kunjummen 译者:Jackie Tang ...
- Spring WebFlux开门迎客,却来了一位特殊客人
话说Spring WebFlux已经出现有一段时间了,但是知道他的人并不是很多.这让他很是闷闷不乐. 还有更惨的是,那些敢于吃螃蟹的人在尝试了他之后,有的竟把代码重新改回到Spring MVC的同步模 ...
- 爸爸又给Spring MVC生了个弟弟叫Spring WebFlux
情景引入 很早之前,Java就火起来了,是因为它善于开发和处理网络方面的应用. Java有一个爱好,就是喜欢制定规范标准,但自己又不善于去实现. 反倒是一些服务提供商使用它的规范标准来制造应用服务器而 ...
随机推荐
- 基于go语言gin框架的web项目骨架
该骨架每个组件之间可单独使用,组件之间松耦合,高内聚,组件的实现基于其他三方依赖包的封装. 目前该骨架实现了大多数的组件,比如事件,中间件,日志,配置,参数验证,命令行,定时任务等功能,目前可以满足大 ...
- 什么是vfs以及它的作用
VFS(Virtual File System,虚拟文件系统)是计算机操作系统中的一个概念,它提供了一个统一的抽象层,使得操作系统可以支持不同的文件系统类型和存储设备,而不需要直接与每个文件系统进行交 ...
- 详解RecyclerView的预布局
概述 RecyclerView 的预布局用于 Item 动画中,也叫做预测动画.其用于当 Item 项进行变化时执行的一次布局过程(如添加或删除 Item 项),使 ItemAnimator 体验更加 ...
- 手写商用Java虚拟机HotSpot,疯狂磨砺技术中
在当前Java行业激烈竞争的形式下,唯有掌握技术,心中才不能慌.在多年前,我就开始苦练底层技术,但是眼看百遍也不如手过一遍,所以我打算把虚拟机的精华实现部分用手敲出来,这个过程注定不会轻松,但是心态不 ...
- 创建vue项目并搭建JSONSERVER
1.该前提是你已经搭建好vue-cli脚手架,开始创建一个新项目,输入 vue init webpack demo(demo是自定义项目名). 2.cd demo 进入项目安装依赖 3.在已经创建的项 ...
- KubeEdge v1.15.0发布!新增5大特性
本文分享自华为云社区<KubeEdge v1.15.0发布!新增Windows 边缘节点支持,基于物模型的设备管理,DMI 数据面支持等功能>,作者:云容器大未来 . 北京时间2023年1 ...
- spring-boot集成hikari多数据源
maven依赖 <dependency> <groupId>com.zaxxer</groupId> <artifactId>HikariCP</ ...
- Velocity之Hello World(tomcat下配置Velocity)
本文主要参考:http://hi.baidu.com/dalianjingying/item/1fb3a98ad64dcac299255f72 http://wangbaoaiboy.blog.163 ...
- [转]深入HBase架构解析
HBase架构讲解非常清晰的一篇文章,转自 http://www.blogjava.net/DLevin/archive/2015/08/22/426877.htmlhttp://www.blogja ...
- Ubuntu 编辑文件、安装、删除软件等常用命令(持续更新)
一.编辑文件 1. sudo vi 文件名,进入文件页面,如图: 2. 按 i 键或者 o 键,进入编辑,左下角出现---------INSERT---------信息 3. 输入完毕后,按ESC退出 ...