
UE4 绘制Gizmo
Unity的Gizmos可以很方便的在编辑器下进行调试,Unreal中也有一些办法可以达到效果。
本文主要参考:https://zhuanlan.zhihu.com/p/363625037,进行了一些简化。并在Unreal 4.27中实现。
具体流程如下:
- 需要绘制Gizmo的Actor挂载继承UPrimitiveComponent的组件;该组件重写了CreateSceneProxy方法,这个方法里可以拿到PDI绘制
- 然后进行这个组件的编写(继承UPrimitiveComponent实际上也继承了USceneComponent),手动挂载到Actor上就可以绘制Gizmo了
- 再在Actor的构造函数中编写自动挂载该组件的逻辑,方便使用
先来编写绘制Gizmo的组件,这里命名为UMyPrimitiveComponent:
MyPrimitiveComponent.h (MYPROJECT_API注意替换)
//MyPrimitiveComponent.h

#pragma once

#include "CoreMinimal.h"

#include "Components/PrimitiveComponent.h"

#include "PrimitiveSceneProxy.h"

#include "MyPrimitiveComponent.generated.h"

UCLASS(ClassGroup = (Custom), meta = (BlueprintSpawnableComponent))

class MYPROJECT_API UMyPrimitiveComponent : public UPrimitiveComponent

{

    GENERATED_BODY()

public:

    //绘制逻辑主要在这里

    virtual FPrimitiveSceneProxy* CreateSceneProxy() override;

    //如果要在非选中情况下始终绘制的话,需要有Bounds信息,所以要重写该函数

    virtual FBoxSphereBounds CalcBounds(const FTransform& LocalToWorld) const;

};
MyPrimitiveComponent.cpp
//MyPrimitiveComponent.cpp

#include "MyPrimitiveComponent.h"

FPrimitiveSceneProxy* UMyPrimitiveComponent::CreateSceneProxy()

{

    class FMySceneProxy : public FPrimitiveSceneProxy

    {

    public:

        SIZE_T GetTypeHash() const override

        {

            static size_t UniquePointer;

            return reinterpret_cast<size_t>(&UniquePointer);

        }

        FMySceneProxy(const UPrimitiveComponent* InComponent) : FPrimitiveSceneProxy(InComponent)

        {

            CacheInComponent = InComponent;

            bWillEverBeLit = false;

        }

        virtual void GetDynamicMeshElements(const TArray<const FSceneView*>& Views, const FSceneViewFamily& ViewFamily, uint32 VisibilityMap, FMeshElementCollector& Collector) const override

        {

            QUICK_SCOPE_CYCLE_COUNTER(STAT_Draw3DAgentSceneProxy_GetDynamicMeshElements);

            for (int32 ViewIndex = 0; ViewIndex < Views.Num(); ViewIndex++)

            {

                if (VisibilityMap & (1 << ViewIndex))

                {

                    const FSceneView* View = Views[ViewIndex];

                    FPrimitiveDrawInterface* PDI = Collector.GetPDI(ViewIndex);

                    //拿到Actor的矩阵绘制,而不是Component自己的

                    const FMatrix& LocalToWorld = CacheInComponent->GetTypedOuter<AActor>()->GetTransform().ToMatrixWithScale();

                    //绘制函数可以去看下PrimitiveDrawingUtils.cpp

                    DrawOrientedWireBox(PDI

                        , LocalToWorld.TransformPosition(FVector::ZeroVector)

                        , LocalToWorld.GetScaledAxis(EAxis::X)

                        , LocalToWorld.GetScaledAxis(EAxis::Y)

                        , LocalToWorld.GetScaledAxis(EAxis::Z)

                        , FVector(100.0, 100.0, 100.0)

                        , FLinearColor(1.0, 0.0, 0.0, 1.0)

                        , SDPG_World

                        , 1.0);

                }

            }

        }

        virtual FPrimitiveViewRelevance GetViewRelevance(const FSceneView* View) const override

        {

            /*const bool bVisibleForSelection = IsSelected();

            const bool bShowForCollision = View->Family->EngineShowFlags.Collision && IsCollisionEnabled();

            FPrimitiveViewRelevance Result;

            Result.bDrawRelevance = (IsShown(View) && bVisibleForSelection) || bShowForCollision;

            Result.bDynamicRelevance = true;

            Result.bShadowRelevance = IsShadowCast(View);

            Result.bEditorPrimitiveRelevance = true;

            Result.bEditorNoDepthTestPrimitiveRelevance = true; */

            //上面这段表示选中绘制Gizmo

            FPrimitiveViewRelevance Result;

            Result.bDrawRelevance = true;

            Result.bDynamicRelevance = true;

            Result.bShadowRelevance =false;

            Result.bEditorPrimitiveRelevance = true;

            Result.bEditorNoDepthTestPrimitiveRelevance = true;

            //这段表示始终绘制

            return Result;

        }

        virtual uint32 GetMemoryFootprint(void) const override { return(sizeof(*this) + GetAllocatedSize()); }

        uint32 GetAllocatedSize(void) const { return(FPrimitiveSceneProxy::GetAllocatedSize()); }

    private:

        const UPrimitiveComponent* CacheInComponent;

    };

    return new FMySceneProxy(this);

}

FBoxSphereBounds UMyPrimitiveComponent::CalcBounds(const FTransform& LocalToWorld) const

{

    return FBoxSphereBounds(FBox(FVector(-50, -50, -50), FVector(50, 50, 50))).TransformBy(LocalToWorld);

    //因为缩放是1,这里填的就是实际尺寸,也可以遍历所有组件取最大Bounds.

}
然后手动再挂载一下组件,就有效果了:
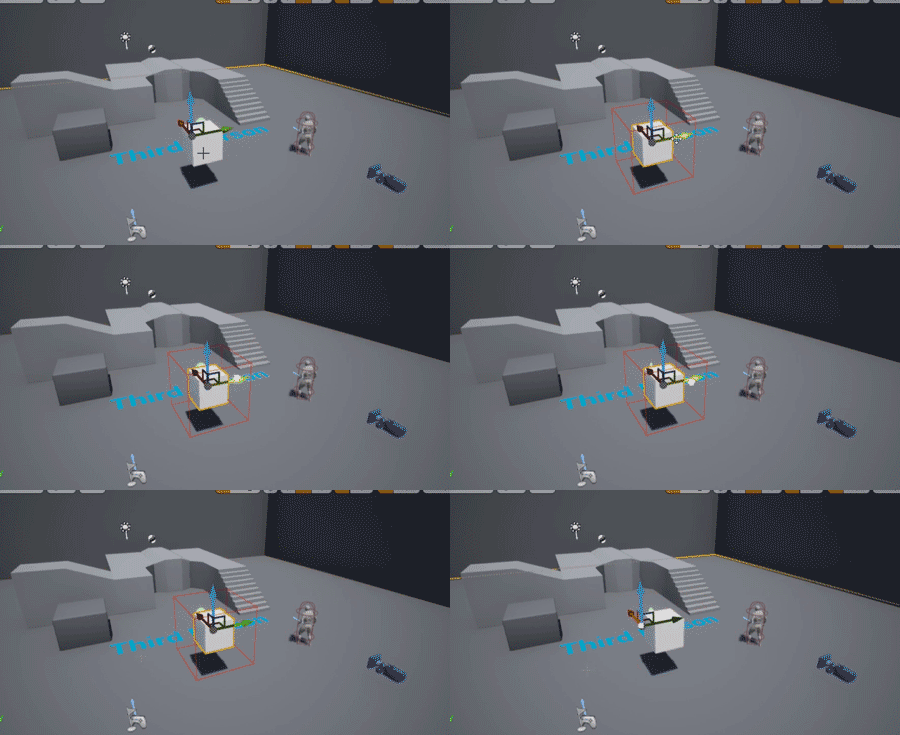
如果需要像Unity那样;直接就有Gizmo,可以在Actor构造函数中编写逻辑自动挂载组件:
AMyTestActor::AMyTestActor()

{

    UBBoxActorGizmoComponent* Gizmo = CreateDefaultSubobject<UBBoxActorGizmoComponent>(TEXT("Gizmo"));

    if (Gizmo)

    {

        Gizmo->SetupAttachment(GetRootComponent());

    }

}
UE4 绘制Gizmo的更多相关文章
- Unity3D脚本中文系列教程(十七)
http://dong2008hong.blog.163.com/blog/static/469688272014032332976/ ◆ Static function PrefixLabel(to ...
- 从Unity中的Attribute到AOP(八)
本文将讲一下在UnityEditor命名空间下的一些特性. CallBackOrder,这个Attribute是所有带callback index的Attribute的基类,由于官方也没有给出详细的说 ...
- Unreal学习笔记2-绘制简单三角形
目录 1. 概述 2. 详论 2.1. 代码实现 2.2. 解析:Component 2.3. 解析:材质 2.4. 解析:包围盒 2.5. 解析:Section 3. 其他 4. 参考 1. 概述 ...
- UE4 Tutorial - Custom Mesh Component 用于绘制自定义网格的插件CustomMeshComponent
UE4 中用于绘制自定义网格的插件CustomMeshComponent. 转载: UE4 Tutorial - Custom Mesh Component Over the last few w ...
- unity gizmo绘制圆形帮助调试
using UnityEngine; using System.Collections; using System; public class LearnGrazio : MonoBehaviour ...
- UE4射线的碰撞与绘制
http://blog.csdn.net/qq992817263/article/details/51800657 //起点 终点 FHitResult RayGetHitResult(FVector ...
- [UE4][Canvas]用C++代码绘制血条(HealthBar)
转自:http://aigo.iteye.com/blog/2275110 参考自Epic官方项目StrategyGame 血条效果: StrategyHUD.h StrategyHUD.cpp
- 【UE4 C++】绘制函数 Debug drawing functions
基于UKismetSystemLibrary /** Draw a debug line */ UFUNCTION(BlueprintCallable, Category="Renderin ...
- UE4命令行使用,解释
命令行在外部 从命令行运行编辑项目 1 导航到您的[LauncherInstall][VersionNumber]\Engine\Binaries\Win64 目录中. 2 右键单击上 UE4Edit ...
- UE4 在C++ 动态生成几何、BSP体、Brush ---- Mesh_Generation
截至UE4 4.10 runtime 无法生成BSP类 ,只能通过自定义的Mesh的Vertex 进行绘制 ( Google 考证,能改UE4源码的请忽略 ) 可用到的 UE4 集成的Render ...
随机推荐
- #深搜,期望#CF105B Dark Assembly
洛谷题目传送门 CODEFORCES传送门 分析 题目强调贿赂要在投票开始前完成说明分糖和成功率可以分开计算 那么分糖考虑直接暴搜,由于题目并没有说糖必须全部分完, 所以每一次分完一颗糖后均要求当前状 ...
- OpenHarmony技术日探讨教育发展,聚焦开源人才培养
4 月 25 日,OpenAtom OpenHarmony (以下简称"OpenHarmony")技术日在深圳成功举办.作为 OpenHarmony 开源项目的年度盛会,大会以&q ...
- django项目部署到centos
服务器是使用的阿里云的centos 7.6 项目使用的是 Python3.9.5 + Django 3.2.4 目标:将django项目部署到centos上,centos + Python + dja ...
- cmd中怎么清屏--cls
平时我们在 Linux 系统中清除屏幕 用的命令是: clear 现在在Windows上用的清屏命令是 : cls
- DevEco Device Tool 3.0 Beta2新版本发布,新增实用功能一览
DevEco Device Tool是面向智能设备开发者提供的一站式集成开发环境,支持HarmonyOS Connect/OpenHarmony的组件按需定制,支持代码编辑.编译.烧录和调试.性能监测 ...
- Linux-主机之间创建免密
一.四台主机进行免密 192.168.10.6 192.168.10.11 192.168.10.12 192.168.10.13 二.192.168.10.6主机生成密钥对,并将公钥传输到其它所有主 ...
- GAN的实现和一些问题
GAN的学习是一个二人博弈问题,最终目标是达到纳什平衡.对抗指的是生成网络和判别网络的互相对抗.生成网络尽可能生成逼真样本,判别网络则尽可能去判别该样本是真实样本,还是生成的假样本.示意图如下: 生成 ...
- nginx重新整理——————http请求的11个阶段中的content阶段[十八]
前言 简单介绍一下content 阶段. 正文 下面介绍一下root和alias. 这个前面其实就提交过了,这里再说明一下. 功能都是一样的:将url映射为文件路径,以返回静态文件内容. 差别:roo ...
- cv2在图像上画不同比例的锚框
''' cv2在图像上画不同比例的锚框 ''' import cv2 import math # 画宽高比1:1的锚框 def display_11_anchor(img,anchor_11_left ...
- Pytorch-卷积神经网络CNN之ResNet的Pytorch代码实现
先说一个小知识,助于理解代码中各个层之间维度是怎么变换的. 卷积函数:一般只用来改变输入数据的维度,例如3维到16维. Conv2d() Conv2d(in_channels:int,out_chan ...