linux下nginx安装和配置
一、软件安装
1、环境说明
操作系统:CentOS 7.4 64位
nginx版本:1.16.1
安装日期:2019/10/01
安装用户:root
2、安装运行库
yum -y install gcc gcc-c++ automake autoconf libtool make
3、安装openssl(不用安装,解压即可)
$ cd /usr/local/src

$ wget https://www.openssl.org/source/openssl-1.0.1t.tar.gz

$ tar -zxvf openssl-1.0.1t.tar.gz
4、安装pcre
$ cd /usr/local/src

$ wget https://ftp.pcre.org/pub/pcre/pcre-8.38.tar.gz

$ tar -zxvf pcre-8.38.tar.gz

$ cd pcre-8.38

$ ./configure

$ make

$ make install
5、安装zlib
$ cd /usr/local/src

$ wget http://zlib.net/zlib-1.2.11.tar.gz

$ tar -zxvf zlib-1.2.11.tar.gz

$ cd zlib-1.2.11

$ ./configure

$ make

$ make install
6、安装nginx
$ cd /usr/local/src

$ wget http://nginx.org/download/nginx-1.16.1.tar.gz

$ tar -zxvf nginx-1.16.1.tar.gz

$ cd nginx-1.16.1

$ ./configure --with-http_ssl_module \

--with-pcre=/usr/local/src/pcre-8.38 \

--with-zlib=/usr/local/src/zlib-1.2.11 \

--with-openssl=/usr/local/src/openssl-1.0.1t

$ make

$ make install
二、软件使用命令
nginx默认安装路径为 /usr/local/nginx
启动:./sbin/nginx
关闭:/usr/local/nginx/sbin/nginx -s stop
重启:/usr/local/nginx/sbin/nginx -s reopen
重新加载配置文件:/usr/local/nginx/sbin/nginx -s reload
查看nginx的进程:
ps -ef | grep nginx
三、软件配置方法
#user  nobody;

worker_processes  1;

#error_log  logs/error.log;

#error_log  logs/error.log  notice;

#error_log  logs/error.log  info;

#pid        logs/nginx.pid;

events {

    worker_connections  1024;

}

http {

    include       mime.types;

    default_type  application/octet-stream;

    proxy_cache_path D:/nginx-1.16.1/cache levels=1:1:1 keys_zone=pcache:10m max_size=2g;

    #log_format  main  '$remote_addr - $remote_user [$time_local] "$request" '

    #                  '$status $body_bytes_sent "$http_referer" '

    #                  '"$http_user_agent" "$http_x_forwarded_for"';

    #access_log  logs/access.log  main;

    sendfile        on;

    #tcp_nopush     on;

    #keepalive_timeout  0;

    keepalive_timeout  65;

    #gzip  on;

    server {

        listen       55556;

        server_name  127.0.0.1;

    proxy_cache pcache; #调用缓存

    proxy_cache_key $request_uri; #把什么当键

    proxy_cache_methods GET HEAD; #缓存哪些项

    proxy_cache_valid 200 302 10m; #指定200 302响应码的内容缓存10分钟

    proxy_cache_valid 404      1m; #指定404响应码的内容缓存1分钟

    proxy_cache_use_stale http_502; #允许502响应码的内容使用过期缓存

    proxy_set_header X-Real-IP $remote_addr;  #将实际的客户端IP发送至后端服务器

    add_header X-Via $server_addr; #将代理服务器的IP发至后端服务器

        #charset koi8-r;

        #access_log  logs/host.access.log  main;

        location / {

        proxy_pass  http://127.0.0.1:55555/;

            root   html;

            index  index.html index.htm;

        }

    location /nationInterface/ {

        proxy_pass  http://124.163.214.106:18064/nationInterface/;

            root   html;

            index  index.html index.htm;

        proxy_set_header X-Real-IP $remote_addr;  #将实际的客户端IP发送至后端服务器

        add_header X-Via $server_addr; #将代理服务器的IP发至后端服务器

        }

    location /CMAQ {

        autoindex on;

            root   D:/dataCenter;

        add_header Cache-Control no-cache;

        add_header Pragma no-cache;

        add_header Expires 0;

        }

        #error_page  404              /404.html;

        # redirect server error pages to the static page /50x.html

        #

        error_page   500 502 503 504  /50x.html;

        location = /50x.html {

            root   html;

        }

        # proxy the PHP scripts to Apache listening on 127.0.0.1:80

        #

        #location ~ \.php$ {

        #    proxy_pass   http://127.0.0.1;

        #}

        # pass the PHP scripts to FastCGI server listening on 127.0.0.1:9000

        #

        #location ~ \.php$ {

        #    root           html;

        #    fastcgi_pass   127.0.0.1:9000;

        #    fastcgi_index  index.php;

        #    fastcgi_param  SCRIPT_FILENAME  /scripts$fastcgi_script_name;

        #    include        fastcgi_params;

        #}

        # deny access to .htaccess files, if Apache's document root

        # concurs with nginx's one

        #

        #location ~ /\.ht {

        #    deny  all;

        #}

    }

    # another virtual host using mix of IP-, name-, and port-based configuration

    #

    #server {

    #    listen       8000;

    #    listen       somename:8080;

    #    server_name  somename  alias  another.alias;

    #    location / {

    #        root   html;

    #        index  index.html index.htm;

    #    }

    #}

    # HTTPS server

    #

    #server {

    #    listen       443 ssl;

    #    server_name  localhost;

    #    ssl_certificate      cert.pem;

    #    ssl_certificate_key  cert.key;

    #    ssl_session_cache    shared:SSL:1m;

    #    ssl_session_timeout  5m;

    #    ssl_ciphers  HIGH:!aNULL:!MD5;

    #    ssl_prefer_server_ciphers  on;

    #    location / {

    #        root   html;

    #        index  index.html index.htm;

    #    }

    #}

}
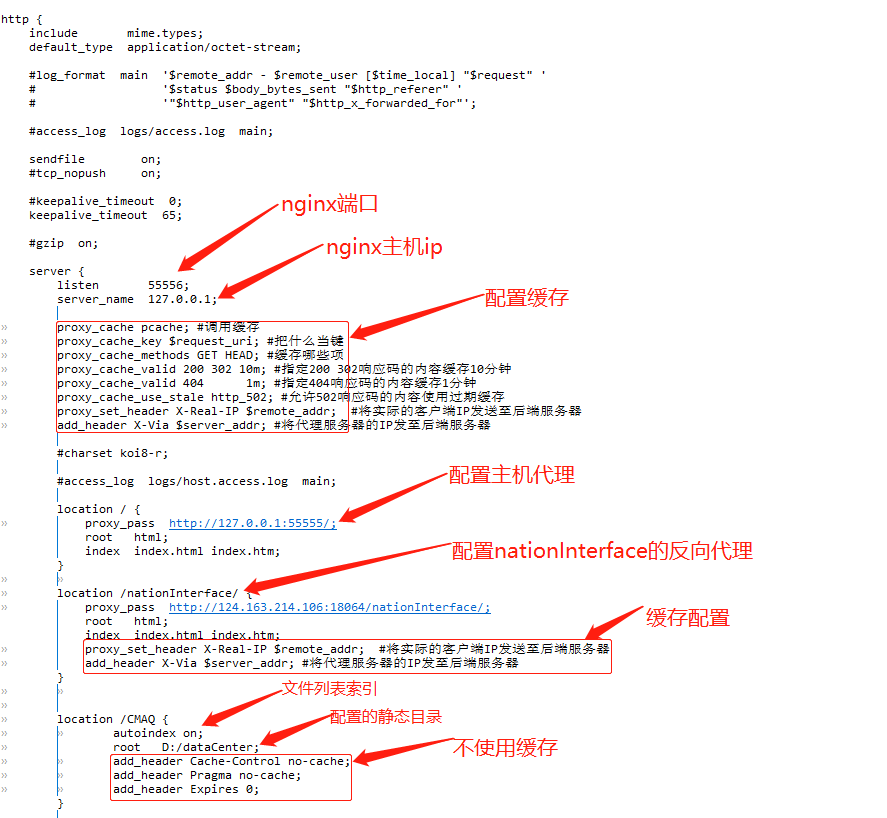
注意事项:配置静态目录的时候,采用的是目录拼接的方式,比如上图的静态目录是:D:/dataCenter/CMAQ/。
如果linux下遇到权限问题,比如 13: Permission denied。从以下几个方面排查:
1、root安装的,那么启动也要用root用户
2、nginx.conf配置文件第一行,#user nobody要改成user root
3、是否缺少index.html
4、修改目录权限:chmod -R 777 /data
5、要将SELinux设置为关闭。
开机自动启动-制作nginx服务(再/etc/rc.local中添加执行脚本的方法不行):
第一步:进入到/lib/systemd/system/目录
[root@iz2z init.d]# cd /lib/systemd/system
第二步:创建nginx.service文件,并编辑
# vim nginx.service
内容如下:
[Unit]

Description=nginx service

After=network.target

[Service]

Type=forking

ExecStart=/usr/local/nginx/sbin/nginx

ExecReload=/usr/local/nginx/sbin/nginx -s reload

ExecStop=/usr/local/nginx/sbin/nginx -s quit

PrivateTmp=true

[Install]

WantedBy=multi-user.target
第三步:加入开机自启动
# systemctl enable nginx
其他常用命令:
# systemctl start nginx.service          启动nginx服务

# systemctl stop nginx.service           停止服务

# systemctl restart nginx.service        重新启动服务

# systemctl list-units --type=service     查看所有已启动的服务

# systemctl status nginx.service          查看服务当前状态

# systemctl enable nginx.service          设置开机自启动

# systemctl disable nginx.service         停止开机自启动
nginx,配置文件目录浏览
location /gfs {
autoindex on;
root //public/share;
autoindex_exact_size off;
autoindex_localtime on;
charset utf-8;
}
linux下nginx安装和配置的更多相关文章
- linux下nginx安装、配置实战
1什么是Nginx Nginx("enginex")是一个高性能的HTTP和反向代理服务器,也是一个IMAP/POP3/SMTP代理服务器,在高连接并发的情况下Nginx是Apac ...
- Linux下 Nginx安装与配置(Centos7)
1:下载解压 #下载 wget http://nginx.org/download/nginx-1.14.0.tar.gz #解压 tar -xzf nginx-1.14.0.tar.gz cd ng ...
- Linux下nginx安装与配置
部分Linux发布版的默认安装已经集成了nginx,查看方法ls /usr/local,若已有nginx文件夹说明已集成. nginx依赖库pcre与zlib,且pcre依赖于gcc与gcc-c++, ...
- VMware Linux 下 Nginx 安装配置 - nginx.conf 配置 [负载两个 Tomcat] (三)
首先启动Nginx 1. 相关浏览 两个 Tomcat 配置: VMware Linux 下 Nginx 安装配置 - Tomcat 配置 (二) Nginx 安装配置启动: VMware Linu ...
- VMware Linux 下 Nginx 安装配置 - Tomcat 配置 (二)
准备工作 相关浏览: VMware Linux 下 Nginx 安装配置 (一) 1. 选在 /usr/local/ 下创建 softs 文件夹,通过 ftp 命令 把 apache-tomcat-7 ...
- Linux中Nginx安装与配置详解
转载自:http://www.linuxidc.com/Linux/2016-08/134110.htm Linux中Nginx安装与配置详解(CentOS-6.5:nginx-1.5.0). 1 N ...
- Linux下MySQL安装和配置
--Linux下MySQL安装和配置 ---------------------------2014/05/18 Linux下MySQL的配置和安装 本文的安装采用 rpm 包安装 1.首先在官网下载 ...
- redis 在Linux下的安装与配置
redis在Linux下的安装与配置 by:授客 QQ:1033553122 测试环境 redis-3.0.7.tar.gz 下载地址: http://redis.io/download http: ...
- centos7系统下nginx安装并配置开机自启动操作
准备工作 我的centos7系统是最小化安装的, 缺很多库, 首先安装必须的运行库 ? 1 2 3 4 5 6 7 8 9 10 11 yum install wget gcc gcc-c++ pcr ...
- Linux下MySQL安装及配置
Linux下MySQL安装及配置 安装MySQL Ubuntu系统中,直接使用apt install的方式去安装MySQL的服务端和客户端,MySQL的客户端必须安装,否则无法通过命令连接并操作MyS ...
随机推荐
- IPv4地址的结构体与网络字节序
IPv4地址的结构体 /* Fixed-size types, underlying types depend on word size and compiler. */ typedef signed ...
- 17 JavaScript 中的call和apply
17 JavaScript 中的call和apply 对于咱们逆向工程师而言. 并不需要深入的理解call和apply的本质作用. 只需要知道这玩意执行起来的逻辑顺序是什么即可 在运行时. 正常的js ...
- #dp,高精度#洛谷 4295 [SCOI2003]严格N元树
题目 求有多少棵严格 \(n\) 叉树深度为 \(k\) 分析 考虑往下放子孙挺难维护的,考虑在上面换新的根. 设 \(dp[i]\) 表示深度不超过 \(i\) 的方案数,那么 \(dp[i]=dp ...
- #启发式合并,LIS,平衡树#洛谷 4577 [FJOI2018]领导集团问题
题目 在一棵树上选择最多的点,使得存在祖先关系的点满足\(w_x\leq w_y\),其中\(x\)是\(y\)的祖先 分析 祖先链上要满足\(LIS\),考虑将子节点的LIS序列合并至节点\(x\) ...
- CentOS 9 安装 Nginx 模块 `subs_filter`
sub_filter 和 subs_filter 区别 sub_filter( 0.7.24):替换响应体(Response Body)中的文本,只能设置一组替换. subs_filter:替换响应体 ...
- OpenHarmony使用ArkUI Inspector分析布局
本文转载自<#2023 盲盒+码 # OpenHarmony使用ArkUI Inspector分析布局>,作者:zhushangyuan_ OpenHarmony使用ArkUI Ins ...
- 成长计划知识赋能 | 第九期:渐进式深入理解OpenHarmony系统
成长计划知识赋能直播第九期如约而至,面向OpenHarmony初中级开发者,解析OpenHarmony系统架构和驱动框架,助力开发者快速上手OpenHarmony系统开发. 详情见海报内容,资深软 ...
- QImage将图片白色背景修改为透明色
// 改透明色 QImage setImageColor(QImage img) { QImage img_color = img.convertToFormat(QImage::Format_RGB ...
- python读取ini配置文件-configparser使用方法
我们在操作 ini 配置文件的时候 可以使用 Python 的 configparser 库 具体使用方法如下: from configparser import ConfigParser # 初始化 ...
- Python scipy.ndimage.find_objects用法及代码示例
用法 scipy.ndimage.find_objects(input, max_label=0) 在标记数组中查找对象. 参数: input: 整数数组 包含由不同标签定义的对象的数组.值为 0 的 ...