spring boot实现验证码登录
内容比较简单,需要完整项目的朋友留下邮箱,给你们发。
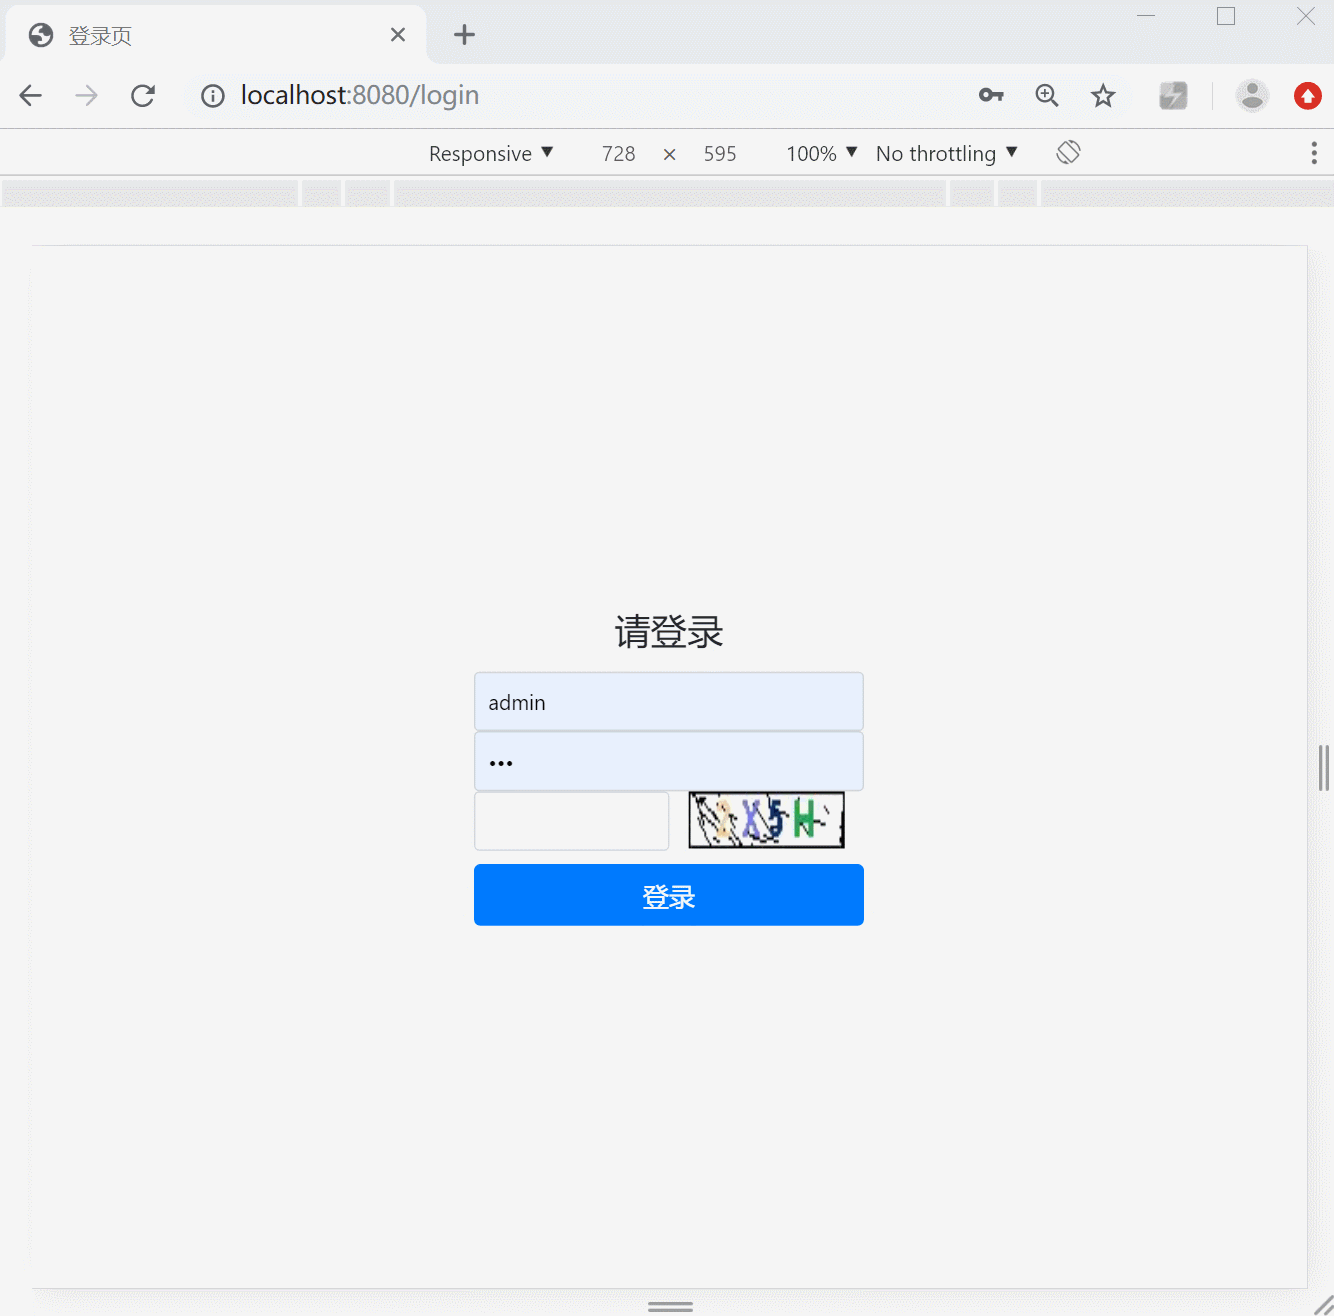
直接看效果:
下面是实现步骤
1.验证码生成工具类(引用自网络)
package com.laoxu.test.helloweb.util;

import javax.imageio.ImageIO;

import java.awt.*;

import java.awt.image.BufferedImage;

import java.awt.image.RenderedImage;

import java.io.FileOutputStream;

import java.io.OutputStream;

import java.util.HashMap;

import java.util.Map;

import java.util.Random;

/**

 * @Description: 原始验证码生成工具

 * @Author laoxu

 * @Date 2019/11/2 23:01

 **/

public class VerifyCodeUtil {

    private  int width = 90;// 定义图片的width

    private  int height = 20;// 定义图片的height

    private static int codeCount = 4;// 定义图片上显示验证码的个数

    private static int xx = 15;

    private  int fontHeight = 18;

    private static  int codeY = 16;

    private static char[] codeSequence = { 'A', 'B', 'C', 'D', 'E', 'F', 'G', 'H', 'I', 'J', 'K', 'L', 'M', 'N', 'O', 'P', 'Q', 'R',

            'S', 'T', 'U', 'V', 'W', 'X', 'Y', 'Z', '0', '1', '2', '3', '4', '5', '6', '7', '8', '9' };

    /**

     * 生成一个map集合

     * code为生成的验证码

     * codePic为生成的验证码BufferedImage对象

     * @return

     */

    public static Map<String,Object> generateCodeAndPic(int width, int height, int fontHeight) {

        // 定义图像buffer

        BufferedImage buffImg = new BufferedImage(width, height, BufferedImage.TYPE_INT_RGB);

        // Graphics2D gd = buffImg.createGraphics();

        // Graphics2D gd = (Graphics2D) buffImg.getGraphics();

        Graphics gd = buffImg.getGraphics();

        // 创建一个随机数生成器类

        Random random = new Random();

        // 将图像填充为白色

        gd.setColor(Color.WHITE);

        gd.fillRect(0, 0, width, height);

        // 创建字体,字体的大小应该根据图片的高度来定。

        Font font = new Font("Fixedsys", Font.BOLD, fontHeight);

        // 设置字体。

        gd.setFont(font);

        // 画边框。

        gd.setColor(Color.BLACK);

        gd.drawRect(0, 0, width - 1, height - 1);

        // 随机产生40条干扰线,使图象中的认证码不易被其它程序探测到。

        gd.setColor(Color.BLACK);

        for (int i = 0; i < 30; i++) {

            int x = random.nextInt(width);

            int y = random.nextInt(height);

            int xl = random.nextInt(12);

            int yl = random.nextInt(12);

            gd.drawLine(x, y, x + xl, y + yl);

        }

        // randomCode用于保存随机产生的验证码,以便用户登录后进行验证。

        StringBuffer randomCode = new StringBuffer();

        int red = 0, green = 0, blue = 0;

        // 随机产生codeCount数字的验证码。

        for (int i = 0; i < codeCount; i++) {

            // 得到随机产生的验证码数字。

            String code = String.valueOf(codeSequence[random.nextInt(36)]);

            // 产生随机的颜色分量来构造颜色值,这样输出的每位数字的颜色值都将不同。

            red = random.nextInt(255);

            green = random.nextInt(255);

            blue = random.nextInt(255);

            // 用随机产生的颜色将验证码绘制到图像中。

            gd.setColor(new Color(red, green, blue));

            gd.drawString(code, (i + 1) * xx, codeY);

            // 将产生的四个随机数组合在一起。

            randomCode.append(code);

        }

        Map<String,Object> map  =new HashMap<String,Object>();

        //存放验证码

        map.put("code", randomCode);

        //存放生成的验证码BufferedImage对象

        map.put("codePic", buffImg);

        return map;

    }

    public static void main(String[] args) throws Exception {

        //创建文件输出流对象

        OutputStream out = new FileOutputStream("D://tmp/"+System.currentTimeMillis()+".jpg");

        Map<String,Object> map = VerifyCodeUtil.generateCodeAndPic(90,20,18);

        ImageIO.write((RenderedImage) map.get("codePic"), "jpeg", out);

        System.out.println("验证码的值为:"+map.get("code"));

    }

}
2.写登录页
<!DOCTYPE html>

<html lang="en">

<head>

    <meta charset="UTF-8">

    <title>登录页</title>

    <link rel="stylesheet" href="css/bootstrap.min.css">

    <link rel="stylesheet" href="css/login.css">

</head>

<body class="text-center">

<form class="form-signin">

    <h1 class="h3 mb-3 font-weight-normal">请登录</h1>

    <label for="username" class="sr-only">用户名:</label>

    <input type="text" id="username" class="form-control" placeholder="" required="required" autofocus="">

    <label for="password" class="sr-only">密码:</label>

    <input type="password" id="password" class="form-control" placeholder="" required="required">

    <div class="verify-div">

        <label for="verify-code" class="sr-only">验证码:</label>

        <input type="text" id="verify-code" style="width: 50%;" class="form-control" placeholder="" required="required">

        <a href="#" onclick="changeVerifyCode()"><img id="imgObj" alt="验证码" src="/getVerifyCode"></a>

    </div>

    <button class="btn btn-lg btn-primary btn-block" type="submit" id="submit">登录</button>

</form>

</body>

<script type="text/javascript" src="js/jquery-1.11.3.min.js"></script>

<script type="text/javascript">

    $(function() {

        $("#submit").click(function (event) {

            // 阻止表单默认提交

            event.preventDefault();

            var username = $("#username").val(), password = $("#password").val(),verifyCode=$("#verify-code").val();

            if(username==""){

                alert("用户名不能为空!");

                return;

            }

            if(password==""){

                alert("密码不能为空!");

                return;

            }

            if(verifyCode==""){

                alert("验证码不能为空!");

                return;

            }

            // 提交验证

            $.ajax({

                type: "POST",

                url: "/checkLogin",

                data: {

                    "username": username,

                    "password": password,

                    "verifyCode": verifyCode

                },

                success: function (result) {

                    if(result=='success'){

                        window.location.href="http://localhost:8080/success.html";

                    }else{

                        alert(result);

                    }

                }

            });

        });

    });

    function changeVerifyCode() {

        var imgSrc = $("#imgObj");

        var src = imgSrc.attr("src");

        imgSrc.attr("src", chgUrl(src));

    }

    // 时间戳

    // 为了使每次生成图片不一致,即不让浏览器读缓存,所以需要加上时间戳

    function chgUrl(url) {

        var timestamp = (new Date()).valueOf();

        url = url.substring(0, 20);

        if ((url.indexOf("&") >= 0)) {

            url = url + "×tamp=" + timestamp;

        } else {

            url = url + "?timestamp=" + timestamp;

        }

        return url;

    }

</script>

</html>
3.写controller
package com.laoxu.test.helloweb;

import com.laoxu.test.helloweb.util.VerifyCodeUtil;

import org.springframework.stereotype.Controller;

import org.springframework.web.bind.annotation.*;

import javax.imageio.ImageIO;

import javax.servlet.ServletOutputStream;

import javax.servlet.http.HttpServletRequest;

import javax.servlet.http.HttpServletResponse;

import javax.servlet.http.HttpSession;

import java.awt.image.RenderedImage;

import java.io.IOException;

import java.util.Map;

/**

 * @Description:

 * @Author laoxu

 * @Date 2019/11/2 13:35

 **/

@Controller

public class LoginController {

    @RequestMapping("/login")

    public String index(){

        return "forward:/login.html";

    }

    @RequestMapping("/getVerifyCode")

    public void getVerifyCode(HttpServletRequest request, HttpServletResponse response){

        // 调用工具类生成的验证码和验证码图片

        Map<String, Object> codeMap = VerifyCodeUtil.generateCodeAndPic(90,20,18);

        // 将四位数字的验证码保存到Session中。

        HttpSession session = request.getSession();

        session.setAttribute("verifyCode", codeMap.get("code").toString().toUpperCase());

        // 禁止图像缓存。

        response.setHeader("Pragma", "no-cache");

        response.setHeader("Cache-Control", "no-cache");

        response.setDateHeader("Expires", -1);

        response.setContentType("image/jpeg");

        // 将图像输出到Servlet输出流中。

        ServletOutputStream sos;

        try {

            sos = response.getOutputStream();

            ImageIO.write((RenderedImage) codeMap.get("codePic"), "jpeg", sos);

            sos.close();

        } catch (IOException e) {

            e.printStackTrace();

        }

    }

    @ResponseBody

    @RequestMapping("/checkLogin")

    public String checkLogin(@RequestParam String username,

                             @RequestParam String password,

                             @RequestParam String verifyCode,

                             HttpServletRequest request){

        String sessionVerifyCode = (String) request.getSession().getAttribute("verifyCode");

        if(!"admin".equals(username)){

            return "用户名错误!";

        }

        if(!"123".equals(password)){

            return "密码错误!";

        }

        if(!sessionVerifyCode.equals(verifyCode.toUpperCase())){

            return "验证码错误!";

        }

        return "success";

    }

}
需要完整项目的朋友留下邮箱。
spring boot实现验证码登录的更多相关文章
- spring Boot 简单的登录功能,利用了jdbcTemplate.class完成sql语句的执行,无需service层、dao层和.xml文件
1.搭建SpringBoot项目首先我们先在IDEA上创建一个SpringBoot的Web项目(1)file ——> new ——> project——> Spring Initia ...
- Spring Boot中验证码实现kaptcha
要生成验证码网上的方案比较多,基本是基于两大类:1为自定义生成,操作用Image类,2为kaptcha生成,有模糊算法. 当然也可以直接交由前端进行处理 1.基于kaptcha 首先不要怀疑的是报名是 ...
- 15 Spring Boot Shiro 验证码
1. <dependency> <groupId>com.github.axet</groupId> <artifactId>kaptcha</a ...
- 14 Spring Boot Shiro限制登录尝试次数
- Spring Boot+Mybatis:实现数据库登录注册与两种properties配置参数读取
〇.参考资料 1.hutool介绍 https://blog.csdn.net/abst122/article/details/124091375 2.Spring Boot+Mybatis实现登录注 ...
- 精通Spring Boot
原 精通Spring Boot—— 第二十一篇:Spring Social OAuth 登录简介 1.什么是OAuth OAuth官网介绍是这样的: An open protocol to allow ...
- 详解Spring Security的formLogin登录认证模式
一.formLogin的应用场景 在本专栏之前的文章中,已经给大家介绍过Spring Security的HttpBasic模式,该模式比较简单,只是进行了通过携带Http的Header进行简单的登录验 ...
- spring boot:spring security给用户登录增加自动登录及图形验证码功能(spring boot 2.3.1)
一,图形验证码的用途? 1,什么是图形验证码? 验证码(CAPTCHA)是"Completely Automated Public Turing test to tell Computers ...
- spring Boot登录验证之验证码 邮箱
一 验证码 登录login.jsp <%@ page contentType="text/html;charset=UTF-8" language="java&qu ...
- Spring Boot + Spring Cloud 实现权限管理系统 后端篇(十七):登录验证码实现(Captcha)
登录验证码 登录验证是一般系统都会有的功能,验证的方式也多种多样,比如输入式验证码,拖动式验证条,拖动式验证拼图等等. 我们这里先实现常规的输入验证码的方式,右边显示验证码图片,点击可刷新,左边输入验 ...
随机推荐
- [转帖]SQL Server 2008~2022版本序列号/密钥/激活码 汇总
https://www.cnblogs.com/cqpanda/p/16148822.html SQL Server 2022# Enterprise: J4V48-P8MM4-9N3J9-HD97X ...
- [转帖]《Linux性能优化实战》笔记(20)—— 使用 tcpdump 和 Wireshark 分析网络流量
tcpdump 和 Wireshark 是最常用的网络抓包和分析工具,更是分析网络性能必不可少的利器. tcpdump 仅支持命令行格式使用,常用在服务器中抓取和分析网络包.Wireshark 除了可 ...
- [转帖]调优"四剑客"的实战演练,福尔摩斯•K带你轻松优化性能
前言 天下武功,唯快不破.在侦探的世界中,破案效率永远是衡量一名侦探能力的不二法门.作为推理界冉冉升起的新星,大侦探福尔摩斯·K凭借着冷静的头脑.严谨的思维,为我们展现了一场场华丽而热血的推理盛宴. ...
- 【转帖】Linux多链路聚合技术
https://www.jianshu.com/p/dd8587ecf54f 一般而言,在单体结构的操作系统中,一块物理磁盘会接在总线设备上,并经由总线分配 PCI-Bus 号,这个时候一个 bus ...
- [转帖]陈巍谈芯:NLP里比BERT更优秀的XLNet长什么样?
https://zhuanlan.zhihu.com/p/447836322 目录 收起 一.XLNet的优势 1)独得AR与AE两大绝学 2)集成了Tansformer-XL 二.XLNet的结 ...
- [转帖]Intel、海光、鲲鹏920、飞腾2500 CPU性能对比
https://plantegg.github.io/2021/06/18/%E5%87%A0%E6%AC%BECPU%E6%80%A7%E8%83%BD%E5%AF%B9%E6%AF%94/ Int ...
- Redislabs的简单使用与benchmark测试结果
Redislabs的简单使用与benchmark测试结果 自己的理解 仅是理解. 没有看过源码 哨兵可以实现高可用, 但是对高吞吐是没有太大帮助的. 虽然可以实现主写从读, 但是在高并发的场景下延迟肯 ...
- 【JS 逆向百例】Fiddler 插件 Hook 实战,某创帮登录逆向
关注微信公众号:K哥爬虫,QQ交流群:808574309,持续分享爬虫进阶.JS/安卓逆向等技术干货! 声明 本文章中所有内容仅供学习交流,抓包内容.敏感网址.数据接口均已做脱敏处理,严禁用于商业用途 ...
- 使用C#做为游戏开发的服务器语言方案
Scut开源服务器 开源C#/Python/Lua 手游服务器 主页:http://www.scutgame.com/index.html 开源:https://github.com/ScutGame ...
- 强化学习技巧三:Python多进程
1.Python多进程模块 Python中的多进程是通过multiprocessing包来实现的,和多线程的threading.Thread差不多,它可以利用multiprocessing.Proce ...